Heinrici engine

Advert

Heinrici engine

Home Forums Stationary engines Heinrici engine

Viewing 13 posts - 26 through 38 (of 38 total)
  • Author
    Posts
  • #525879
    WILLIAM FREEMAN 1
    Participant
      @williamfreeman1
      Posted by JasonB on 09/02/2021 10:10:14:

      Although mine is of a different layout on both this and my earlier Robinson there is no "seal" to the displacer rod just a good "fit" as anything else will add drag which won't help these low powered engines. Mine was quickly running with a very small flame from my burner for the initial test and ran for a long time once the heat was removed.

      In both cases when assembled neither engine will turn over as both develop a considerable amount of "bounce" as the air is being compressed rather than expanding/contracting so it does sound like you are loosing air somewhere.

      This is all metal to metal, no seals and the ones that will eventually go in are only to retain water in the jacket

      Edited By JasonB on 09/02/2021 10:15:20

      Hi Jason,

      I watched your video of your scratch build with awe. Especially how long it runs with no flame at all. The drawings for the westbury contains 3 o ring grooves. One of which is on the displacer rod. this is what I'm assuming is causing me the problems. Out of interest does your engine have a drain plug to let the air / pressure out?

      When i draw a vacuum with my mouth on mine it draws a good vacuum but after a few seconds it has disappeared, telling me i have a leak somewhere. It had its first run on Sunday night, and I can see it being a nightly task at the moment for me to strip it down and try a new configuration until it works as well as yours.

      Regards

      Will

      Advert
      #526069
      JasonB
      Moderator
        @jasonb

        No plug on mine though I have seen them on some pictures of full size.

        #526072
        WILLIAM FREEMAN 1
        Participant
          @williamfreeman1

          I had a bit of a play last night with seemingly better results. In the join between the water jacket and liner, I had made a brass bush to fit the displacer rod and hopefully alleviate my pressure loss issues. there was still some slight leakage but the engine ran much better. I'm still convinced that the engine is 'breathing' and losing power. I assembled it freshly with the bush in place and the engine was difficult to turnover due to the vacuum and pressure the power cylinder was creating. Is that normal?

          I'll have another session of playing tonight, but I think there is light at the end of the tunnel.

          Will

          #526074
          JasonB
          Moderator
            @jasonb

            Yes you should feel the compression "bounce" yes

            #526156
            WILLIAM FREEMAN 1
            Participant
              @williamfreeman1

              Finally some good news on the engine front. after making a bush it seals far better and now runs far better too. The engine has a slight knock from the piston gudgeon pin. But other than that she's in fine fettle now. Feeling a lot more confident in terms of hot air engines, having never made one before. There does seem to be a lack of widely available knowledge for hot air engines. Information on this forum has been very helpful.

              After a bit of playing she is now running well. moving onto sorting the gudgeon pin knock and making the furnace next.

              #527444
              WILLIAM FREEMAN 1
              Participant
                @williamfreeman1

                Another quick video update, I'm now happy with how the engine is running and I've stripped it down for a final clean and reassembly before the full strip down for painting. I've also made a small water tank which can be fitted for extended running. I've also uploaded another video to youtube of the engine on the kitchen worktop, showing its free running. which hopefully should appear below.

                I've decided after having a great deal of fun with this engine that I'm going to build another one.

                #527460
                JasonB
                Moderator
                  @jasonb

                  Looks to be running well now.

                  #531158
                  WILLIAM FREEMAN 1
                  Participant
                    @williamfreeman1

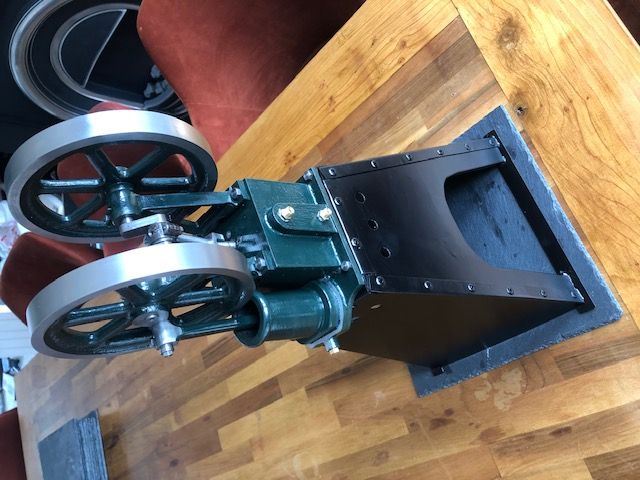
                    I've now completed the engine and the album of the engine is complete containing a good pictoral log of the build. I've attached a picture of the engine below, which the forum has rotated for an unknown reason. I've also attached a video of it running indoors, it runs very nicely now and is much quieter since I remade the gudgeon pin on the power piston. Hopefully this can be seen in the video below. I'm intending on building a meths burner for use under the engine as the bunsen burner isn't really suitable. The heat from the burner seems to go far too high in the furnace, losing the ability to have a 'hot' end and a 'cold' end. The bunsen burner seemed to create a 'hot' end and a 'warm' end. A small meths flame underneath would make the engine much more efficient I'm sure.


                    img_5292.jpg

                    Edited By JasonB on 02/03/2021 11:23:37

                    #531176
                    JasonB
                    Moderator
                      @jasonb

                      That looks to be running very nicely now, I've also rotated your picture.

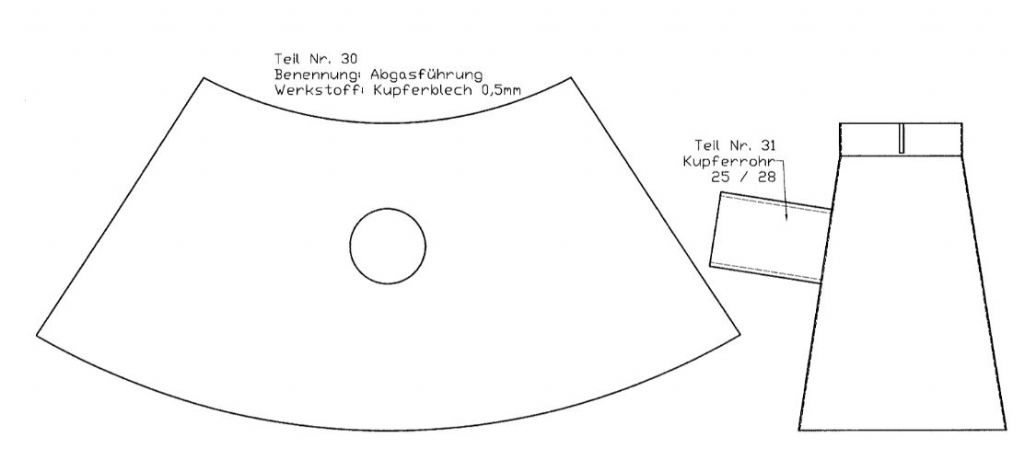
                      The drawings for the one I have just completed show a conical "skirt" that slides up the hot end with a pipe out to the chimney which is meant to stop a lot of the heat going upwards and heating the cold bits, may be something to try.

                      skirt.jpg

                      #531179
                      WILLIAM FREEMAN 1
                      Participant
                        @williamfreeman1

                        I like the idea of a heat shielding skirt, definitely something to try on my next one.

                        I did very much like the style of the heinrici motor you have recently made, are there any commercial castings or drawings available to build one of that style? I am mainly talking about the arrangement of the piston and displacer all running in the same line, rather than separate like on the westbury.

                        I don't really have the ability in my workshop to machine one from solid. I have seen an old german website that appeared to have supplied them at one time, but seems it does no longer.

                        P.S thank you for rotating the image!

                        #531200
                        JasonB
                        Moderator
                          @jasonb

                          The German drawings are still available but not the castings as that is what I based mine on, see link in first post of my build thread.

                          You could use suitably sized flywheels from another model, the frames could be simplified and the linkages are not too hard to do on a manual machine.

                          #531210
                          WILLIAM FREEMAN 1
                          Participant
                            @williamfreeman1

                            I will definitely be considering getting a set of those drawings, I find it a much more attractive engine than the westbury. The way yours is turned out is immaculate, that goes a long way to making me want one!

                            Just studying your build more closely, I notice you used brass and stainless for the displacer and hot cap. The westbury drawings suggest using copper for both. I'm currently finding it difficult to purchase copper in the required sizes, and I'm now wondering whether making them from different materials would be a viable alternative.

                            #531223
                            JasonB
                            Moderator
                              @jasonb

                              Copper is not ideal as it conducts the heat too easily and as you say the older sizes are becoming harder to find.

                              The hot cap on mine was specified as 45mm OD x 1.5 wall which was easy to come by in the form of exhaust pipe on e-bay and actually measured 45.2mm x 1.5 wall. Stainless or brass is specified for the displacer at 41mm OD which I could not find in either but M-Machine did have 1 5/8 brass which is 41.3 so close to the oversize hot cap though stainless would have been 1st choice. I got the thinnest wall I could in the brass but did skim the inside to make the displacer a bit lighter

                            Viewing 13 posts - 26 through 38 (of 38 total)
                            • Please log in to reply to this topic. Registering is free and easy using the links on the menu at the top of this page.

                            Advert

                            Latest Replies

                            Home Forums Stationary engines Topics

                            Viewing 25 topics - 1 through 25 (of 25 total)
                            Viewing 25 topics - 1 through 25 (of 25 total)

                            View full reply list.

                            Advert

                            Newsletter Sign-up