Has anybody built Beng’s Danni Steam engine.

Advert

Has anybody built Beng’s Danni Steam engine.

Home Forums Stationary engines Has anybody built Beng’s Danni Steam engine.

Viewing 25 posts - 176 through 200 (of 304 total)
  • Author
    Posts
  • #310511
    Lawrie Bradly
    Participant
      @lawriebradly72996

      img_2547.jpg

      Advert
      #310512
      Brian John
      Participant
        @brianjohn93961

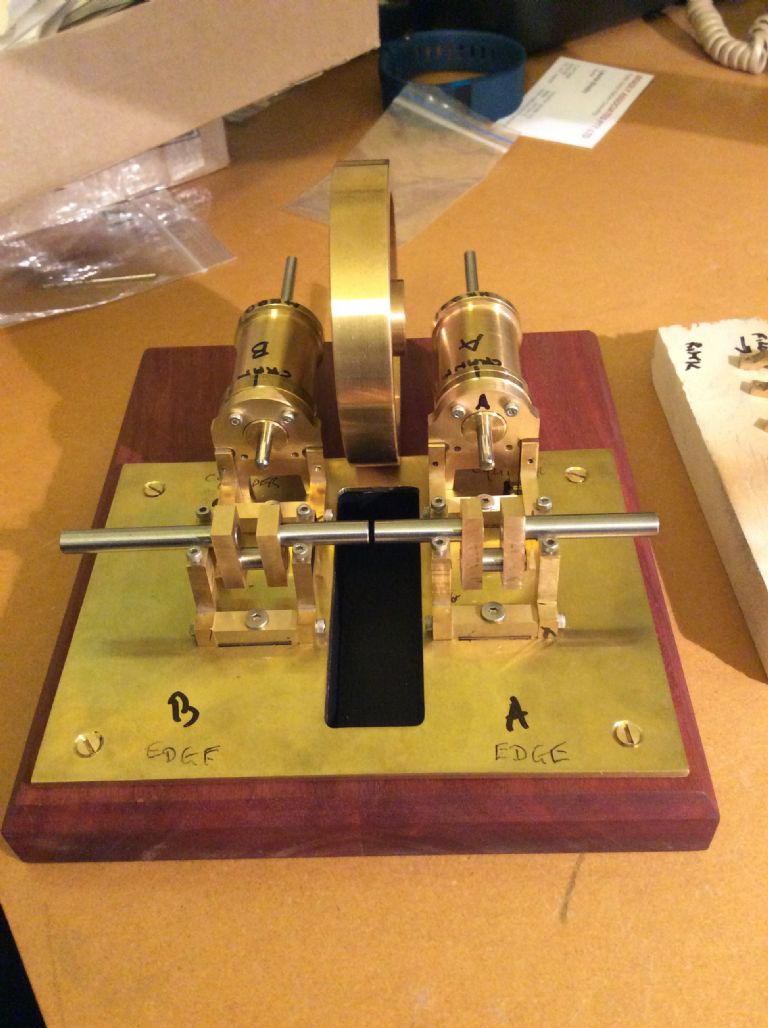
        That is very nice work ; I really like the idea of a twin cylinder engine. How did you make your crankshafts ?

        #310614
        Lawrie Bradly
        Participant
          @lawriebradly72996

          Hi Brian, The crankshafts aren't finished yet. I plan to screw them together with M2 x 5mm stainless steel grub screws. i drilled the holes 5.8mm and reamed them 6mm, holding them in alignment as I did it with short bits of silver street. It remains to be seen if I can retain the alignment in the process of drilling and tapping the holes for the grub screws (that I intend continuing a short distance into the silver steel rods) I'll let you know how I go. I may have to revert to solder, as specified in the Bends plans, but that looks like a fraught process to me.

          #310624
          Brian John
          Participant
            @brianjohn93961

            The crankshafts are one of my few unfinished parts. I had trouble with these : I carefully drilled the holes in the crank arms but the shafts are not parallel. I had intended to do the same as you with the grub screws and I had already drilled and tapped the crank arms for that. I may yet try the solder method. I bought some more crank arms and these I will Loctite together before drilling them in the vice at the same time. Hopefully that will keep the shafts in alignment.

            NOTE : I did not have this problem with the crankshaft of the flame eater engine.

            Edited By Brian John on 06/08/2017 01:25:00

            #310626
            Hopper
            Participant
              @hopper
              Posted by Brian John on 06/08/2017 01:23:43:

              …. I had intended to do the same as you with the grub screws and I had already drilled and tapped the crank arms for that….

              Hi Brian. Not sure if I am reading this right but you might be best to drill and tap the grub screw holes after drilling the main holes for the crank pins first. The reason being that the grub screw holes could cause your drill to wander and kick over at an angle when the drill tip meets the existing grub screw hole.

              Definitely soldering or loctiting the two crank webs together will help keep things aligned better than just clamping both in the vice. Super glue can be used too. Destroy the bond with propane torch afterwards.


              Edited By Hopper on 06/08/2017 05:15:27

              #310638
              Brian John
              Participant
                @brianjohn93961

                Hopper : I think I did drill and tap after drilling the main holes (it was a while ago) but still ended up with things all askew. I was surprised because I had done exactly the same thing with the flame eater engine and I had no problems. Maybe that was beginners luck !

                Yes, I will definitely use Loctite next time.

                The cylinders are now milled and drilled and ready for soldering to the steam chests. I still cannot find that silver solder paste I ordered from the US. That would have been ideal for the job. I might move onto the crankshafts now and see how I go with my soft soldering skills before coming back to the cylinder/steam chest assembly.

                #310648
                Lawrie Bradly
                Participant
                  @lawriebradly72996

                  I'm beginning to doubt whether I'm going to get these bloody crankshafts to line up! I'm just going to have forge ahead and see how it goes. I'm not all that confident.

                  #310650
                  roy entwistle
                  Participant
                    @royentwistle24699

                    Brian John I would soft solder the cylinders and probably silver solder the crank

                    Lawrie I would have made the crankshaft in one piece, rather than two joined together

                    Roy

                    #310657
                    Brian John
                    Participant
                      @brianjohn93961

                      Roy : The solder paste would have been easier to use than the soft solder. I know I bought the stuff on ebay from the US…I just can't find it after the house move !

                      The instructions are very strict about not silver soldering the cranks due to the risk of distortion. What do you think ? It would certainly make things easier for me if I could silver solder it.

                      …but first of all I have to drill those holes in the crank arms and get things lined up properley.

                      Edited By Brian John on 06/08/2017 11:57:45

                      #310662
                      Lawrie Bradly
                      Participant
                        @lawriebradly72996

                        Roy, A single crankshaft would mean incorporating it with the flywheel. I thought about it, but then decided, in the interest of being able for maintenance etc., to pull it all apart, I didn't want to do it. Regards, Lawrie.

                        #310664
                        Hopper
                        Participant
                          @hopper

                          You might get better alignment of the crankshaft if you drill the holes slightly undersize and then ream to the final diameter with a machine reamer. Gives a more accurately sized hole that is straighter and rounder than a drilled hole. Drilled holes can be all over the place as far as shape, size and location goes.

                          #310676
                          Brian John
                          Participant
                            @brianjohn93961

                            My mistake : the instructions say to soft solder the crank but all the warnings against silver soldering were in the flame eater instructions…..I am not sure why. The two crankshaft assemblies are the same although the Danni crankshaft is a bit smaller.

                            Hopper : my initial attempts were done with a reamer. I had two goes at it with the two crankshafts and both were crook. I will be reaming them again after I Loctite the crank arms together.

                            #310804
                            Hopper
                            Participant
                              @hopper

                              It might be that your budget drill press is not drilling perfectly square, or is flexing under drilling load etc. Might be more accurate to set up the crank webs on the faceplate of the lathe and drill and ream them there? (Although your Optimum's tailstock alignment was not real reliable from what I remember. Seemed to be some variation when you clamped it down etc.)

                              #310942
                              Brian John
                              Participant
                                @brianjohn93961

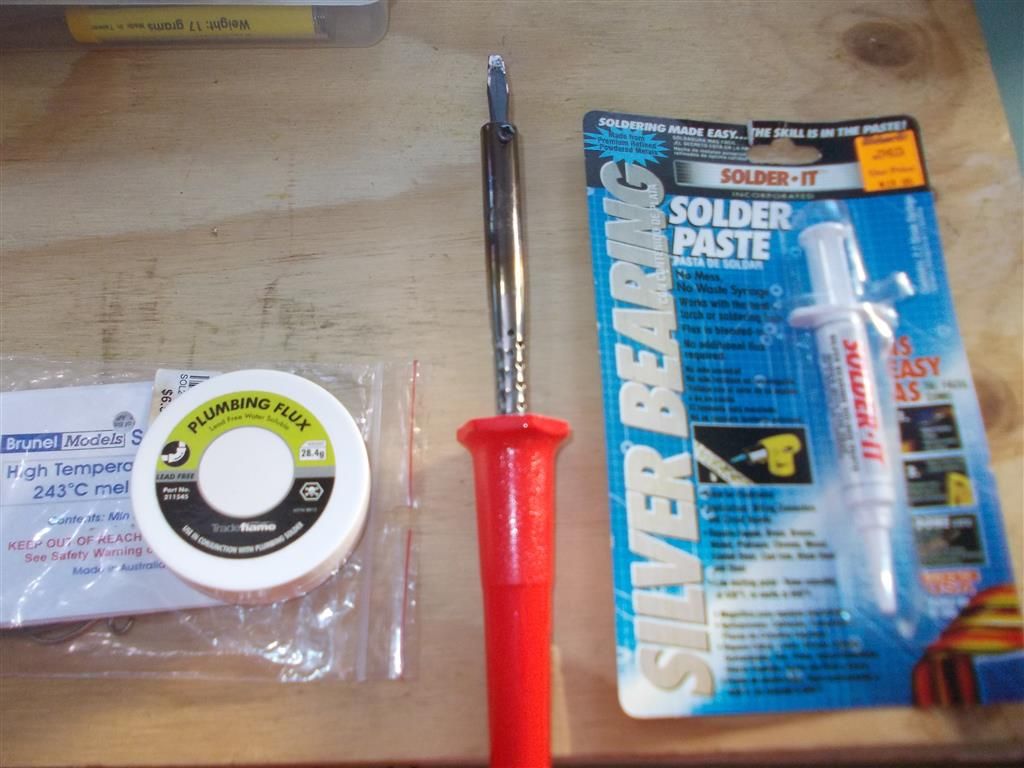
                                I found somewhere in Cairns that sells the silver solder paste : Whitworths Marine. You can see the syringe in the photo below. Also in photo 1 is the 243 degree soft solder, the plumbers flux paste and the soldering iron I had intended to use to tin the cylinder and the steam chest. I spent the afternoon making sure everything fits together correctly first. I also cut two stainless steel rods 2.3mm X 10mm long which will sit in the steam holes which must not be blocked. You can see them sitting in the holes in the cylinder supported from below with a piece of aluminium. This is probably not necessary but I am getting a bit paranoid about stuffing this up : a lot of work has gone into these two parts !

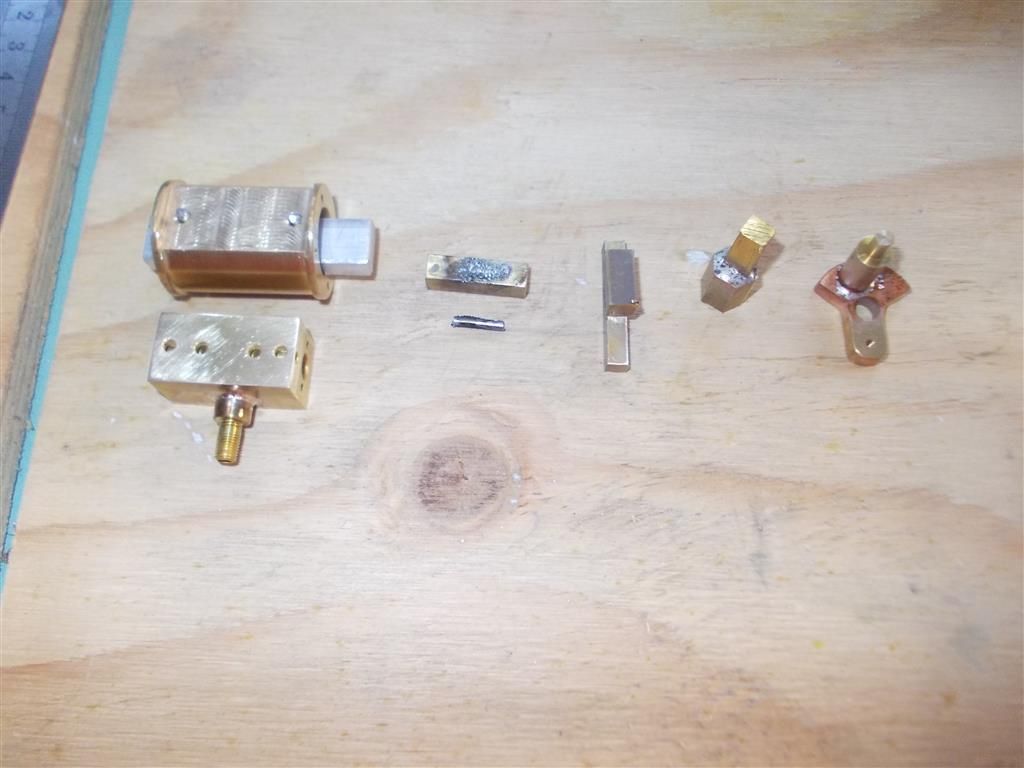
                                I tried tinning some scrap brass after first applying flux to both sides. I cannot get a nice film of solder like they do in the videos ; I just end up with a mess although the parts did stick together after heating them up with a small blow torch (items 1 and 2 from the right).

                                I then tried the solder paste and the blow torch which worked better (item 3 from the right). I also tested the solder paste on the stainless steel rod to make sure it would not stick to the brass and it does not. It looks like I may have to use the solder paste.

                                You almost need three hands for this !

                                soft soldering 1.jpg

                                soft soldering 2.jpg


                                Edited By Brian John on 08/08/2017 08:34:18

                                Edited By Brian John on 08/08/2017 08:35:34

                                Edited By Brian John on 08/08/2017 08:36:38

                                Edited By Brian John on 08/08/2017 08:37:59

                                #310943
                                JasonB
                                Moderator
                                  @jasonb

                                  I doubt you are getting things hot enough with that little soldering iron to get the solder to flow well enough to wipe the joint smooth, have another practice with your torch. Dont think you will get the heat into the cylinder with that you need a much larger iron or a torch.

                                  They is not "silver solder" you have there, as it only has a very small percentage of silver to help it flow and wet the surface, more a high melting point soft solder. Will be OK for the cylinder but don't use it on boilers.

                                  #310944
                                  Brian John
                                  Participant
                                    @brianjohn93961

                                    Okay, I will try the torch to heat things up more tomorrow. I had intended to use the large torch with the medium burner once I had things tinned sufficiently.

                                    Yes, I know it is not real silver solder. It is only for soldering these parts and perhaps the crankshafts. This is what they suggested I use on the crankshafts for the flame eater engine. I did try to bash the test parts for the solder paste apart with a hammer but they are really stuck together so I know it works !

                                    I also have some 180 degree soft solder I could use. Which is more suitable for this application : 243 or 180 degree ?

                                    Edited By Brian John on 08/08/2017 08:55:36

                                    #310945
                                    JasonB
                                    Moderator
                                      @jasonb

                                      Of the two I would go with 243deg on the cylinder

                                      #310953
                                      roy entwistle
                                      Participant
                                        @royentwistle24699

                                        Brian Looking at your photos, it appears that you are trying to build up a fillet of solder. A sweated joint should show very little solder round the joint. Ideally you need a proper soldering iron. the type that is heated up on a gas ring.The electric iron you show is more suited to electronic work, PCBs etc

                                        Roy

                                        #310981
                                        Brian John
                                        Participant
                                          @brianjohn93961

                                          Yes, I can see that now. I will call around tomorrow and ask who has such a thing. Do plumbers still use those sort of tools ? What size iron should I be after ? Is red hot sufficient ?

                                          Edited By Brian John on 08/08/2017 12:44:44

                                          #310995
                                          roy entwistle
                                          Participant
                                            @royentwistle24699

                                            Brian you heat on a gas ring till the flame turns green. You do not want it red hot or even too hot

                                            Roy

                                            #311036
                                            Lawrie Bradly
                                            Participant
                                              @lawriebradly72996

                                              Hi Brian, I bought a second-hand, big copper 'vintage' soldering iron on eBay a while ago. I had look just now again on eBay and there are a few for sale. If you search for EVRO SOLDERING IRON you should turn up one like the one I got. I think it's about $35 plus $8.50 postage. I didn't have a proper look and there may be better ones.

                                              #311097
                                              Brian John
                                              Participant
                                                @brianjohn93961

                                                Thanks. I have called around this morning and nobody has them on the shelf. Plumbers do not use them anymore. Blackwoods can get in a 16 ounce iron from Sydney but it costs $75. Now that I know what to look for I will check out ebay.

                                                There are some on ebay : any suggestions as to what size I need ? I am looking at an EVRO #10 which has a 25mm square tipped head. It is copper tipped.

                                                http://www.ebay.com.au/itm/Vintage-Copper-EVRO-SOLDERING-IRON-25mm-Square-TIP-Old-Antique-Hand-Tool-46-/201661801881?hash=item2ef3fae599:g:dZwAAOSw-kdXzTRb

                                                NOTE : I just remembered that I have a small portable gas stove. I could also keep the iron hot in that rather than use my silver soldering burner.


                                                Edited By Brian John on 09/08/2017 01:24:32

                                                Edited By Brian John on 09/08/2017 01:47:16

                                                #311217
                                                Ian S C
                                                Participant
                                                  @iansc

                                                  Brian, is there a secondhand tool shop up your way, that's the place to find an old plumbers soldering iron. I have three or four, each of them weighing about 1 kg. In use it is a good idea on bigger jobs to use at least two irons, one heating while the other is in use, then there is no hanging around, and having to reheat the work. For jobs like yours I have a 175 W electric iron.

                                                  To tin the parts you need to flood it with solder, then while its molten, wipe it with a cotton cloth leaving a thin solder layer on each surface.

                                                  Ian S C

                                                  #311283
                                                  Brian John
                                                  Participant
                                                    @brianjohn93961

                                                    Thanks Ian. I knew I had to tin the iron but I was not sure of the procedure. I know I have seen them at Rustys markets ; there is always a guy there selling old tools. They are open tomorrow and I will have a look but when you want something, they never have it !

                                                    For a small job like this, I would think one iron would suffice.

                                                    #311338
                                                    Brian John
                                                    Participant
                                                      @brianjohn93961

                                                      I have had another look at the Bengs website and it seems they have used solder paste for both the crankshaft and cylinder/steam chest assembly ? That looks like a lot of solder paste on the cylinder and steam chest !

                                                      **LINK**

                                                      NOTE : I had another go at reaming the crank arms today and I had better luck this time. The two shafts are now parallel. I am holding the crankshaft in place with M2 grub screws until I decide what to use : solder paste, soft solder, silver solder or Loctite. I have enough spare crank arms so I may even make up four crankshafts and try each method to see which one works the best.

                                                    Viewing 25 posts - 176 through 200 (of 304 total)
                                                    • Please log in to reply to this topic. Registering is free and easy using the links on the menu at the top of this page.

                                                    Advert

                                                    Latest Replies

                                                    Home Forums Stationary engines Topics

                                                    Viewing 25 topics - 1 through 25 (of 25 total)
                                                    Viewing 25 topics - 1 through 25 (of 25 total)

                                                    View full reply list.

                                                    Advert