Grinding your own hss lathe tools. Tips & tricks?

Advert

Grinding your own hss lathe tools. Tips & tricks?

Home Forums Beginners questions Grinding your own hss lathe tools. Tips & tricks?

Viewing 25 posts - 26 through 50 (of 53 total)
  • Author
    Posts
  • #632479
    bernard towers
    Participant
      @bernardtowers37738

      The one thing I can recommend is that you have a suitable jig to hold the hss bit so when you return to your grinder (whatever sort) that the bit is at the same angles, meaning that touching up the edges does not mean large amounts have to removed. Especially important if you have hit on a set of angles that work for you.

      Advert
      #632491
      Andy Stopford
      Participant
        @andystopford50521

        You can disprove the overheating myth and make holding small bits of HSS for grinding easier by brazing the HSS onto a mild steel shank, suitably sized to fit your toolpost. You can also file a seating on the shank for your toolbit to sit in for brazing, thus taking care of at least one of the rake angles.

        #632492
        Andy Stopford
        Participant
          @andystopford50521

          re. your photo, Iain, I would hazard a guess that the tool was allowed to rub on the stainless, which work hardened and wiped the tip off the tool. Try regrinding with no top rake and be reasonably aggressive in feeding it into the work – don't let it rub.

          #632605
          Iain Downs
          Participant
            @iaindowns78295

            Thanks, Andy.

            I will be regrinding and will try various approaches on some test parts – rather than the tinal item. As far as agressive – the top is 0.3mm and I need to cut down to 0.3mm. I probably won't manage that agressively!

            Do you think I should be running as fast as possible (for this, we have a 1.8mm dia target), or run slower and more controlled?

            Iain

            #632635
            Andy Stopford
            Participant
              @andystopford50521

              I'd try as fast as possible since the diameter is small (so you need a high speed to get a decent surface speed), and it'll be easier to maintain a consistent feed per rev, keeping it cutting but not causing it to dig in and break. You may get through a few test parts/regrindings!

              #632653
              Dave S
              Participant
                @daves59043

                Iain,

                you might do better brazing a small carbide tip to a piece of steel. I have an old circular saw blade I use for this sort of thing. It’s bstard tough steel to cut mind…

                The tips can be sharpened using one of the now ubiquitous diamond plates.

                Dave

                #632697
                Iain Downs
                Participant
                  @iaindowns78295

                  Thanks Andy and Steve.

                  I will probably have another go with an HSS tip and if that crashes and burns (probably literally), I will try and repurpose one of the carbide tipped tools I bought at the start of my journey and never really used (it was years before I found they are provided blunt!).

                  Iain

                  #632705
                  Hopper
                  Participant
                    @hopper

                    I remember sometime the past five years or so there was a two-part article about HSS in MEW written by a metallurgist. His advice was to never dunk your HSS in water when sharpening it but instead put the toolbit down and let it cool off slowly in the air. He was quite adamant about that.

                    On the shop floor of course, there is not time to stand around for five or ten minutes waiting for the tool bit to cool down every time it gets a bit warm to hold. So the workaround is to keep dunking the HSS toolbit in water frequently, BEFORE it starts to turn colour on the edges, in this way stopping the HSS from getting hot in the first place and doing away with the need to let it stand and cool off in the air for extended periods.

                    I don't remember if the MEW metallurgist's concern was micro-cracking or heat treatment issues, but the don't-let-it-get- too-hot-and-dunk-it-in-water regime is in line with what I was taught as an apprentice both on the shop floor by crusty old craftsmen who could machine new hinges for the gates of Hell if need be, and at tech college out of a book written by experts in classes taught by crusty old craftsmen who had gone on to get engineering degrees. Both agreed on dunking the HSS in water frequently before it turned colour on the edges so it never got overly hot.

                    Edited By Hopper on 09/02/2023 10:43:21

                    Edited By Hopper on 09/02/2023 10:47:21

                    #632794
                    samuel heywood
                    Participant
                      @samuelheywood23031

                      Appreciate all the input. eg:

                      Use something to hold the toolbit~ certainly got got hot fingers a few times!

                      Also, not to dunk the tool bit, but let it air cool. Have been dunking in water thus far.

                      Still would like someone to chip in with roughly how long it should take to grind an average 3/8" toolbit?

                      Because it does seem to take ages.

                      #632797
                      Grindstone Cowboy
                      Participant
                        @grindstonecowboy

                        For me, a little under ten minutes, depending how much care you are taking to get specific angles, maybe fifteen if you include honing with an oilstone or diamond plate. And I'd consider myself slow.

                        Rob

                        #632801
                        samuel heywood
                        Participant
                          @samuelheywood23031
                          Posted by Grindstone Cowboy on 09/02/2023 21:43:51:

                          For me, a little under ten minutes, depending how much care you are taking to get specific angles, maybe fifteen if you include honing with an oilstone or diamond plate. And I'd consider myself slow.

                          Rob

                          Thanks~ Definitely must be doing something wrong then! blush

                          Wheels are rebalanced & dressed, so no idea as to what though.

                          #632805
                          Hopper
                          Participant
                            @hopper
                            Posted by samuel heywood on 09/02/2023 21:31:00:

                            Appreciate all the input. eg:

                            Use something to hold the toolbit~ certainly got got hot fingers a few times!

                            Also, not to dunk the tool bit, but let it air cool. Have been dunking in water thus far.

                            Still would like someone to chip in with roughly how long it should take to grind an average 3/8" toolbit?

                            Because it does seem to take ages.

                            You seem to have missed the point. Dunk the tool bit in water to cool it off. Just don't let the tool bit get hot enough to turn blue before you dunk it. So frequent dunkings and keep the tool bit cool. That is the quickest way to do it, the way it is done on professional shop floors.

                            If you want confirmation of this common and well proven method, see LH Sparey's book The Amateur's Lathe, page 75.

                            How long should it take to grind a 3/8" tool bit? For a standard turning tool shape such as a knife tool, five minutes or so. Maybe 10 at the most. The end of the blank comes already angled, so you only need to about 15 degrees angle to the top and leading side surfaces, plus about 10 degrees clearance on the end surface. It should not take too long at all.

                            This is assuming a six inch bench grinder with 1" wide wheels, well dressed and a good tin of water for frequent dunking. Rough it out on the coarse wheel first then finish on the fine wheel. Then spend a few extra minutes rubbing it on a bench oil stone to get a nice smooth cutting edge and to put a small radius on the tip.

                            #632806
                            Hopper
                            Participant
                              @hopper

                              If it is still taking you forever to grind a tool bit, it may be substandard cheap grinding wheels. They are about on budget grinders. Or you may have lucked out and got a piece of extremely high quality HSS with extra additives. I have some old pieces of Swedish HSS that take forever to grind, like trying to grind hardened glass or something. But once done they hold an edge beautifully. Try different bits of HSS and if that does not help, try some new good quality grinding wheels. But it is much much quicker to use 1/4" HSS and sit it on a piece of 1/8' packing in the tool holder. That is what I have gone over to doing on my Myford when I use HSS, purely because of the quicker sharpening.

                              #632807
                              Hopper
                              Participant
                                @hopper
                                Posted by Andy Stopford on 07/02/2023 19:38:36:

                                You can disprove the overheating myth and make holding small bits of HSS for grinding easier by brazing the HSS onto a mild steel shank, suitably sized to fit your toolpost. You can also file a seating on the shank for your toolbit to sit in for brazing, thus taking care of at least one of the rake angles.

                                It;s not the overheating that is the problem, it is the dunking it in cold water while it is overheated that causes microcracks and a brittle cutting edge that does not last well. Braze away and let it cool naturally and all will be well.

                                #632808
                                Ramon Wilson
                                Participant
                                  @ramonwilson3

                                  Just read this through – a few thoughts to go with the others.

                                  I've passed this on before I think – I've found the best thing for holding tool bits to grind is a hole that will accept the diagonal dimension across the tool bit drilled in the end of a short length of round bar. A simple grub screw in the side will hold the bit secure for grinding, the round bar giving a good hand grip and allowing infinite angular positioning on all faces.

                                  I've confessed before that when it comes to tool grinding I'm very tardy once the tool has had it's major shaping but after a life time of not doing anything but cooling the bit in water I do not share the fear of damaging the tool that some have implied. Just simply never had an issue with it and I've seen a few glow hot a few times for sure.

                                  An HSS tool will colour, as any steel, if too hot but, unlike carbon steel tools, this will not affect the cutting edge performance.

                                  Try this to see – grind a piece of HSS until you do get it blue then cool. Very lightly regrind the faces to remove any trace of blueing. The tool will still cut perfectly well. Do the same with one of carbon steel and you will soon see the difference as the edge deforms under cutting pressure. As has already been stated HSS will still cut at near red heat though obviously not for long.

                                  For what we do in the home workshop and what we used to do at work you'd have to work really hard to spoil HSS hardness – it's hardening temperature is way in excess of carbon steel – it comes out of the oven quite yellow at the correct temperature.

                                  I rough grind tools on an 8" grinder but finish grind them on a small 5" one.

                                  There is no need to grind text book angles – just near enough will do – remember it's only the part that's at the depth of cut that does the work so that can be tweaked to get optimum performance – the rest of the tool behind is just there to hold it in position!

                                  Best – Tug

                                  #632829
                                  Mick B1
                                  Participant
                                    @mickb1

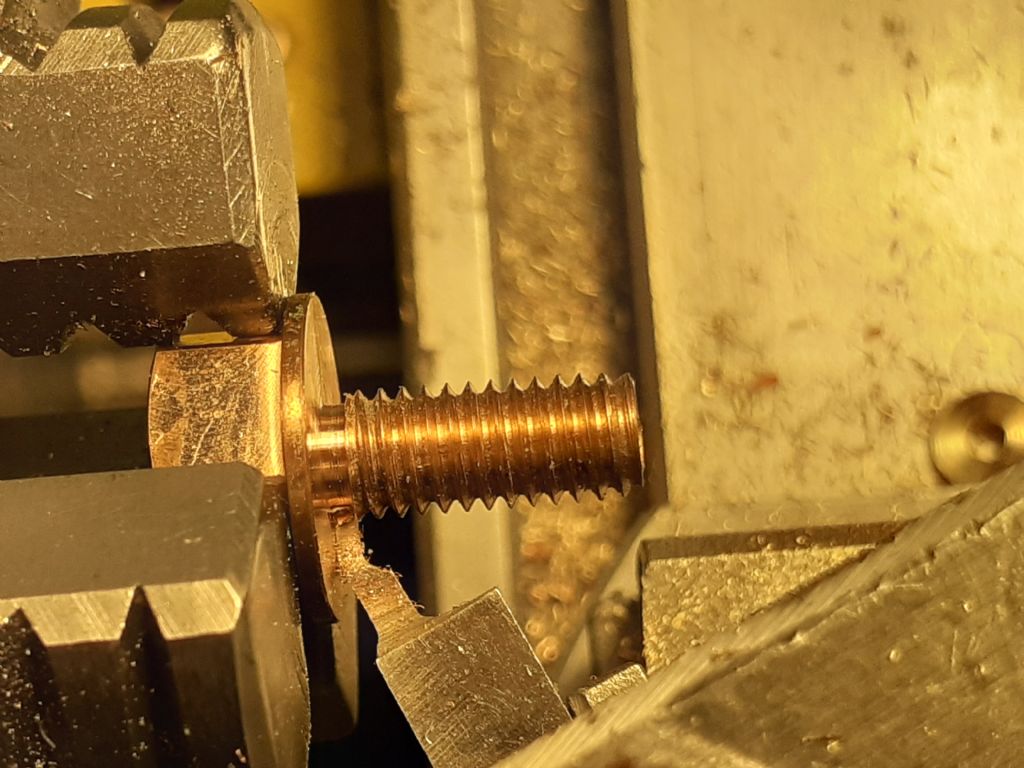
                                    There'll be loads of other way of doing this in the picture, but the value of learning the bench grinder/HSS tool blank game is that you only have to visualise the tool you want – and you can have it ! laugh

                                    threaducuttool.jpg

                                    'Course I missed a trick there – should've made it a bit wider and ground the 60° back chamfer on the M6 flank…

                                    #632843
                                    Andy_G
                                    Participant
                                      @andy_g
                                      Posted by Iain Downs on 08/02/2023 15:39:35:

                                      Do you think I should be running as fast as possible (for this, we have a 1.8mm dia target), or run slower and more controlled?

                                      Given that you're machining 304 stainless, I would start slow (with plenty of the best cutting oil that you own). With such a fine tool, the natural tendency is to be tentative with the feed and, on stainless, the result is likely to be that the tool rubs, hardens the surface and then, when you apply a little bit more pressure, digs in and breaks.

                                      FWIW, my advice would be:

                                      – Run slowly (a few hundred RPM, or less);

                                      – Plenty of oil;

                                      – Feed steadily 'through' the surface of the part (I.e. don't wind the tool until it touches the surface and then start feeding);

                                      – When you see the curl of swarf appear keep feeding steadily until you're at your target depth. DON'T STOP.

                                      On the tool: Make sure that the tip is the widest part – it looks from that photo that the tool may have tapered towards the tip (although the actual tip has gone) – you don't want the tool to wedge itself into the slot it has cut, or it will jam and break.

                                      Difficult to tell from the photos, but it looks like there is quite a large relief angle on the front of the tool – if so, reduce this to the minimum possible (5° maybe?) to better support the cutting edge.

                                      I am a heathen, and rough out any HSS tools I need with an angle grinder – much quicker than a wheel – and sharpen them on a belt sander. That said, 3/8" is a big chunk of HSS to start with if you want a 0.3mm wide blade. Broken centre drills, etc. will need less grinding, but you will need to make holder for them.

                                      Exhibit A (set up for internal grooving):

                                      (3mm grooving tool facing the camera; 1mm from a previous job on the other end.)

                                      My 2p, anyway.

                                      #632863
                                      Hopper
                                      Participant
                                        @hopper

                                        For a 0.3mm wide groove, you might consider using a piece of HSS hacksaw blade ground into a parting tool shape. There was a thread on here somewhere recently that showed a few examples, I think. Pieces out of a very thin HSS circular saw blade or slitting saw could be used too.

                                        Lathe toolbits in hobby grade HSS are not really very good at being ground down that thin. They tend to crumble away as you have found.

                                        #632869
                                        Vic
                                        Participant
                                          @vic

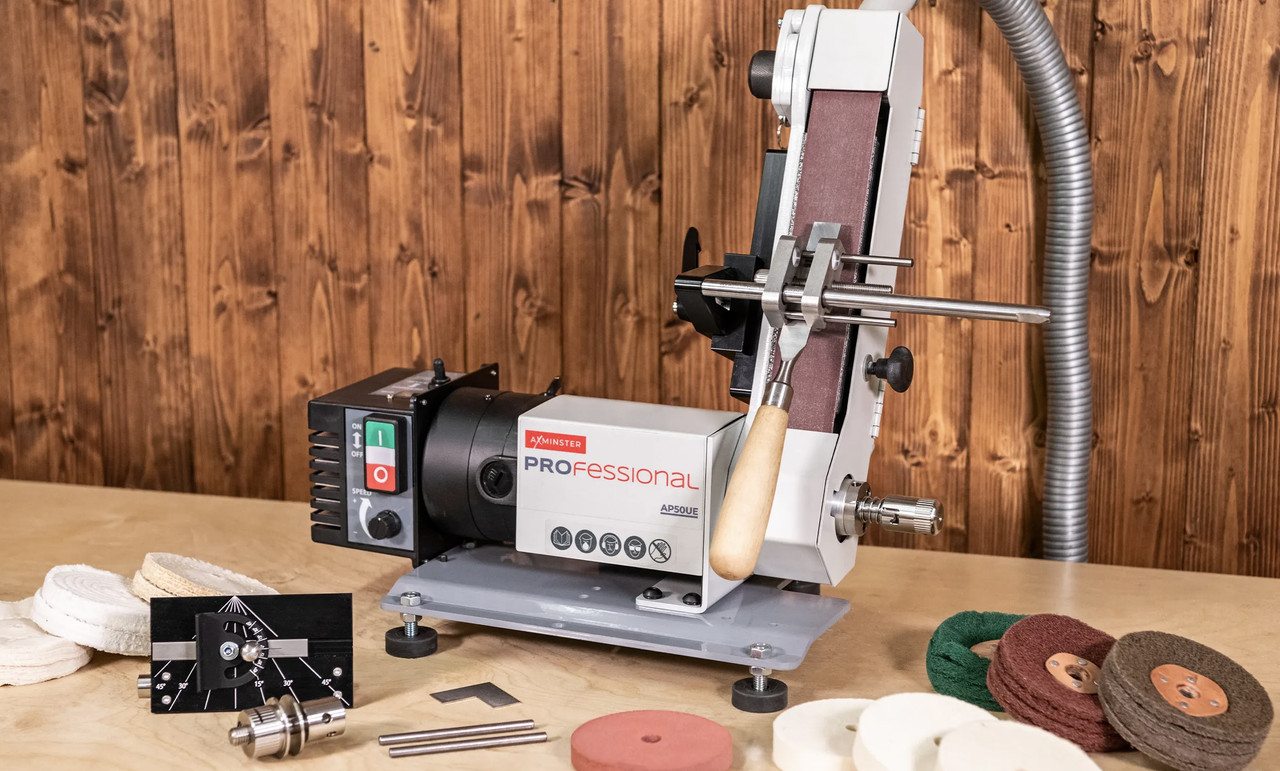
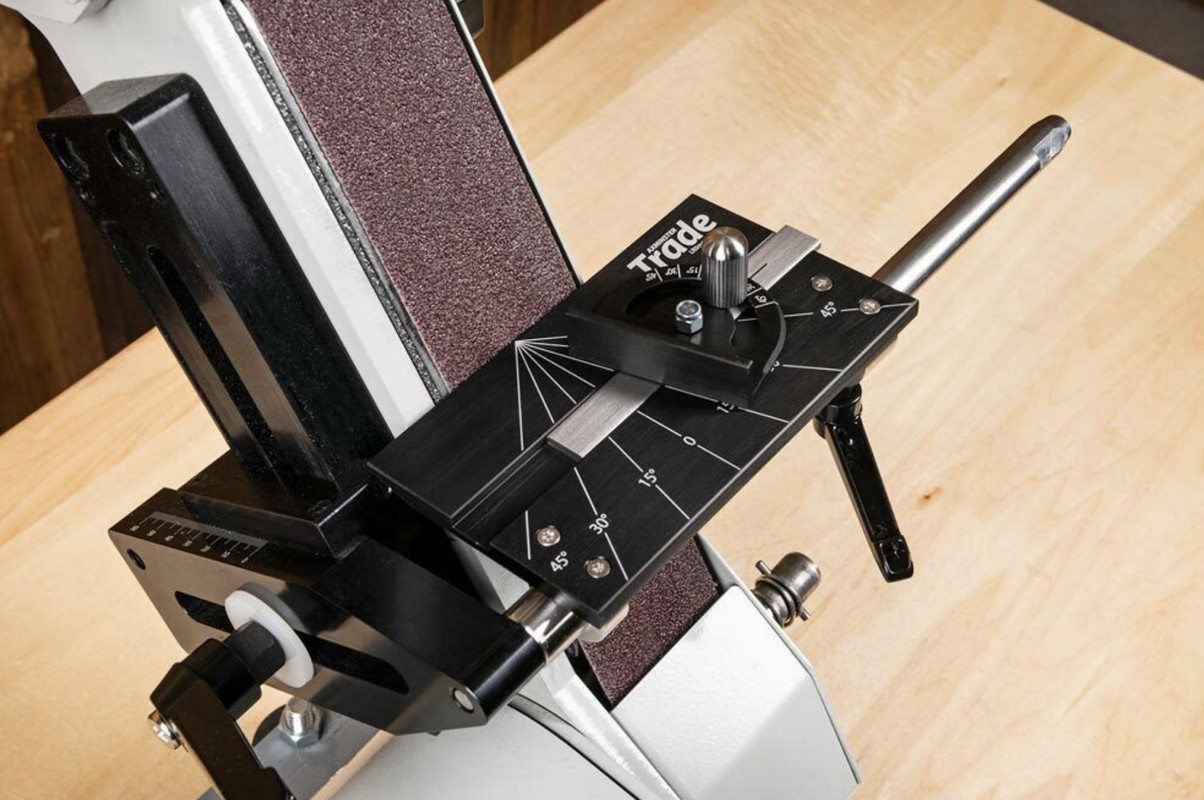
                                          I still use a bench grinder from time to time but more often use one of these. I’ve made a nice table and a few other jigs for it. Being able to change grits for anything from 40g to over 1000g in a few seconds is very handy. You can even get diamond belts and a leather strop for it. It is variable speed and has forward and reverse. It’s been designed to sharpen all kinds of tools from carpentry tools, woodturning tools and knives etc.

                                          A couple of product shots from Axminster.


                                          #632878
                                          IanT
                                          Participant
                                            @iant

                                            Nice machine Vic (I like the variable speed) – but so is the price (£450).

                                            Not tried roughing tools on my 4" Warco belt sander, might give it a go when the weather warms up a bit. Keep meaning to improve the work table in (vertical mode) but generally I use it for shaping bits of dead tree at the moment, so it's less of a problem.

                                            Regards,

                                            IanT

                                            #633035
                                            Vic
                                            Participant
                                              @vic
                                              Posted by IanT on 10/02/2023 13:37:13:

                                              Nice machine Vic (I like the variable speed) – but so is the price (£450).

                                              Not tried roughing tools on my 4" Warco belt sander, might give it a go when the weather warms up a bit. Keep meaning to improve the work table in (vertical mode) but generally I use it for shaping bits of dead tree at the moment, so it's less of a problem.

                                              Regards,

                                              IanT

                                              I have a Record Power Belt and Disc sander that I used to use, I made a proper table and jigs etc for it. The only issue was the lack of availability of different sanding belts for it. I can get Alox, Ceramic, Zirconium, Trizact or even diamond for the Axminster machine. The arbor on the side has also been handy for using satin mops. I bought the machine when it was on special offer, think I paid £399 for it. Still expensive but it’s a handy machine to have.

                                              #633133
                                              Howard Lewis
                                              Participant
                                                @howardlewis46836

                                                Readiung that "It took hours to grind a 3/8 toolbit", out of tinterest roughly timed a tool grinding job.

                                                The job was to grind an unused 1/4" HSS toolbit, to produce a double ended tool that can be used to produce either front or back chamfers.

                                                A Worden Cutter grinder was used.

                                                Set up time was approximately 5 minutes (Remove existing tool holder , set table square to grinding wheel, adjust table to give 7.5 degree clearance angle, fit appropriate tool holder,insert 1/4" toolbit, and set holder to 45 degrees )

                                                The tool was advanced by 0.005" for each pass (Possibly rushing things? )

                                                Grindi and inspect one end, invert tool and reverse, clamp, and grind.

                                                Total time, just under 30 minutes from start to finish.

                                                Cleaning up and putting away took almost as long!

                                                Holding the toolbit in a suitable holder, and grinding freehand would be less precose, and probably more brutal, but quicker.

                                                Howard

                                                #633144
                                                Nick Wheeler
                                                Participant
                                                  @nickwheeler

                                                  I don't have the cutter grinder, but if I did I would probably have roughed out the tool freehand, and done the final work on the Worden. That would probably halve the time by reducing a lot of the tedious 5thou at a time work.

                                                  #633172
                                                  bernard towers
                                                  Participant
                                                    @bernardtowers37738

                                                    5 thou at a time that's some grinding!

                                                    #633188
                                                    Nigel Graham 2
                                                    Participant
                                                      @nigelgraham2

                                                      More to the point with using a tool & cutter grinder – the 'Worden' as I have built, or other – don't use it for the bulk metal removal at umpteen thou a pass.

                                                      You don't want to exchange a lot of fairly expensive, dressed wheel for a lot of waste steel; plus more wheel to dress its over-worked surface back to condition.

                                                      Free-hand grind the tool blank to shape first, by bench-grinder or angle-grinder, then use the T&C machine for finishing to geometry and surface. And then 0.001" would be a lot more appropriate depth of cut than a hefty great 0.005".

                                                    Viewing 25 posts - 26 through 50 (of 53 total)
                                                    • Please log in to reply to this topic. Registering is free and easy using the links on the menu at the top of this page.

                                                    Advert

                                                    Latest Replies

                                                    Home Forums Beginners questions Topics

                                                    Viewing 25 topics - 1 through 25 (of 25 total)
                                                    Viewing 25 topics - 1 through 25 (of 25 total)

                                                    View full reply list.

                                                    Advert

                                                    Newsletter Sign-up