Fusion 360 Knurling – Efficiency?

Advert

Fusion 360 Knurling – Efficiency?

Home Forums CAD – Technical drawing & design Fusion 360 Knurling – Efficiency?

Viewing 25 posts - 1 through 25 (of 30 total)
  • Author
    Posts
  • #21232
    SillyOldDuffer
    Moderator
      @sillyoldduffer
      Advert
      #308117
      SillyOldDuffer
      Moderator
        @sillyoldduffer

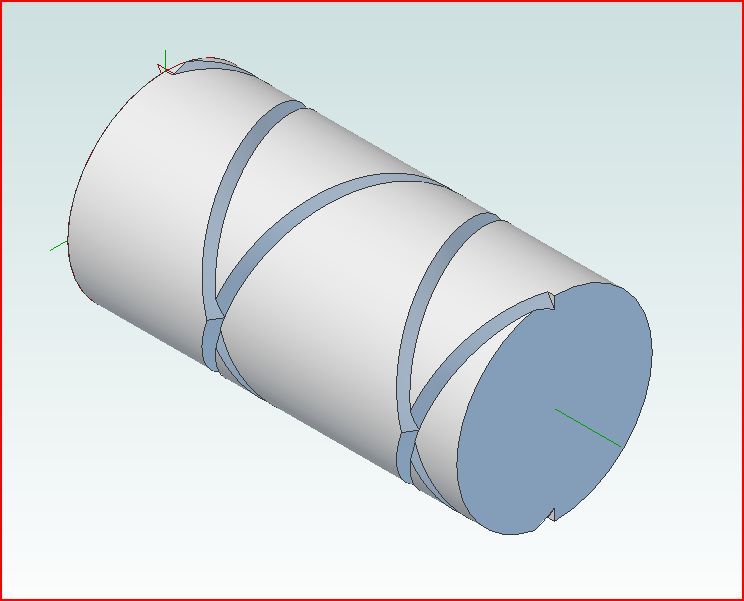
        Drawing (geddit?) on web advice I've managed to model an acceptable knurl with Fusion 360. It's been a challenge!

        knurl.jpg

        The knurl was achieved as follows:

        1. In Sketch, Draw Circle and Pull to create a cylinder
        2. Construct a Tangent Plane on the side of the cylinder
        3. Sketch a line tilted 30 degrees from vertical on the tangent plane.
        4. Use Sketch, Project/Include, Project to Surface to move the 30degree line on to the side face of the cylinder
        5. Use Sketch line to draw an isosceles triangle on the top face of the cylinder. The triangle is centered on the top end of the projected 30 degree line. One corner is inside the cylinder, the others outside.
        6. Use Sketch line to draw another isosceles triangle on the bottom face of the cylinder. The triangle is centered on the bottom end of the projected 30 degree line, one corner inside the cylinder as above.
        7. Create Loft (in cut mode) by selecting both top and bottom triangles.
        8. Create a Mirror of the cut on the other side of the cylinder.
        9. Use Create Pattern, Circular Pattern to copy one of the cuts 26 times around the cylinder.
        10. Use Create Pattern, Circular Pattern to copy the other cut 26 times around the cylinder.

        The intersecting cuts result in the knurl pictured, which I think acceptable and capable of improvement.

        My problem is how long it takes Fusion to complete the last action, step 10. On my laptop it takes a good few minutes with the cooling fan going full blast. Presumably, the computer does some serious number crunching to calculate and display the result of all those intersecting cuts. The time taken would be excessive if I modelled anything with several knurled nuts in it, especially if real threads were modelled as well.

        Can anyone suggest a way of speeding this up, perhaps using a different technique?

        Thanks,

        Dave

        #308121
        David Jupp
        Participant
          @davidjupp51506

          Things like a knurl, or any other pattern with a large number of elements represents an awful lot of processing.

          Altering technique may help a bit, faster processor, more memory, fancier graphics card may help a bit – but it is never going to be fast.

          I'd probably use a helical cut (of very long pitch) as the start of the knurl – that might reduce the number of steps slightly, but it would still be painfully slow to complete the entire pattern.

          #308143
          Alan Vos
          Participant
            @alanvos39612

            I got knurling working using the coil function. Recalculation takes 30 seconds. Maybe coils are more efficient, maybe I have a faster PC. I will try to recall and write up the recipe, which is based on something found online.

            #308147
            JasonB
            Moderator
              @jasonb

              I've done it using a pair of opposite hand helical cuts in Alibre you then need to do a circular pattern of the cuts to get the knurl look.

              Still takes a while so best to suppress the knurl until you do the final render so it does not slow up the rest of the job

              screw2.jpg

              screw6.jpg

              #308148
              Neil Wyatt
              Moderator
                @neilwyatt

                This is a challenge. Right its 20:08… back in a bit.

                #308154
                larry Phelan
                Participant
                  @larryphelan54019

                  Dave,I think you are just showing off,why can,t you stick to cutting up stainless steel sheet?

                  Do you never think of people like us,who can,t even do a decent knurl,in the first place.

                  You have a lot to answer for,but dont stop trying.

                  #308155
                  SillyOldDuffer
                  Moderator
                    @sillyoldduffer

                    Larry, you are too kind. And who said I can do a decent real knurl! Not me.

                    Anyhoo, I've just logged on to report failing to get a 'based on a coil' knurl to work as suggested by Alan and Jason. I don't see why it shouldn't work, so I must be doing something wrong. At the moment I'm feeling very frustrated. I need to do something else, like kicking the cat.

                    Dave

                    #308156
                    Neil Wyatt
                    Moderator
                      @neilwyatt

                      That took a bit longer than expected… I had to resort to plan B.

                      knurl.jpg

                      Edited By Neil Wyatt on 21/07/2017 21:03:29

                      #308160
                      SillyOldDuffer
                      Moderator
                        @sillyoldduffer

                        Very impressive Neil! Pretty good for Plan B: I'm long past Plan Z. I see it's TurboCAD but how did you do it?

                        Dave

                        #308168
                        Neil Wyatt
                        Moderator
                          @neilwyatt

                          kept getting 'degenerated' solids when i tried to combine spirals, let alone when I tried to subtract them from a cylinder (plan a).

                          Plan B:

                          Draw a cube.

                          Crop bits off it to make a 45 degree pyramid.

                          Stretch it a bit to make a diamond, the knack is getting the diamond in proportion.

                          Flip a copy and place one either side of the cylinder.

                          Select both (their 'barycentre' should be at the middle of the cylinder, if not move them)

                          Copy in place & rotate 90 degrees. You have four diamonds at 90 degrees to each other.

                          Work out how many it takes to fill 90 degrees by experiment/inspection, in my case 10 gave a small overlap.

                          So copy the four in place, rotate 9 degrees, repeat this nine times in all.

                          Copy the whole ring of diamonds, displace upwards by the half the height of the ring and rotate 4.5 degrees

                          Copy both rings and displace by the height of one ring, repeat until you have a decent band of knurl.

                          I cheated and did not actually fuse the thing into a single part, although this should work as no fancy curves.

                          Of course, there are no 'half diamonds' top and bottom, for perfection you could cut the top and bottom row off easily enough.

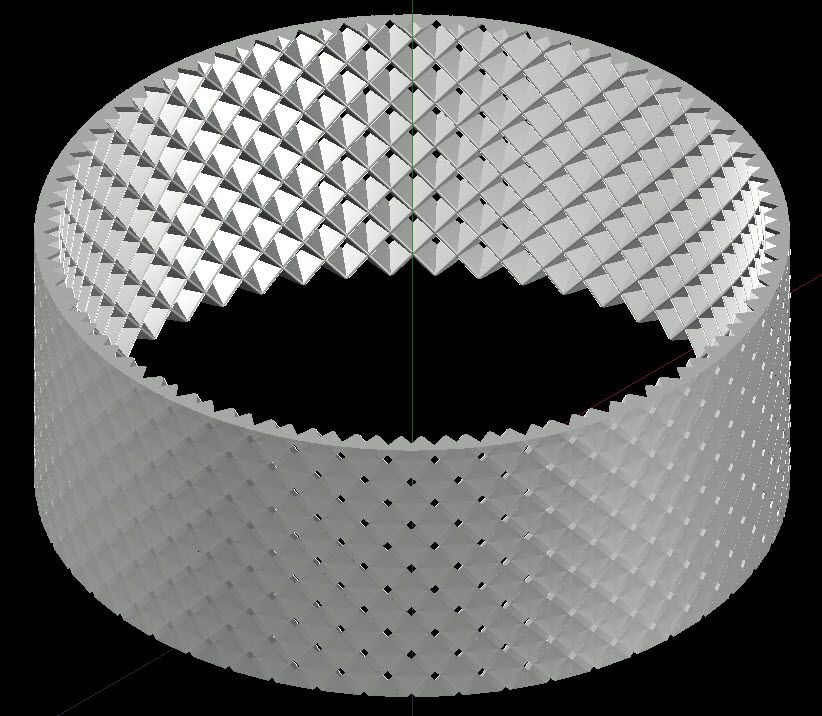
                          Now I'm 3D printing one with a 1/4" hole for a potentiometer shaft. It's working nicely but the knurl is a bit fine.

                          Neil

                          #308172
                          SillyOldDuffer
                          Moderator
                            @sillyoldduffer

                            I see – Plan B is different again. It should be possible to do similar in Fusion and I'll give it a whirl. Quite astonishing that I ask a 3D CAD question and the next thing I know you're printing a real one in plastic, miles away!

                            Thanks,

                            Dave

                            #308177
                            Neil Wyatt
                            Moderator
                              @neilwyatt

                              Well I'm a silly billy, I could have made the diamonds twice the size, they are tiny!

                              Lets the printer show its capabilities though.

                              knurl 2.jpg

                              #308189
                              duncan webster 1
                              Participant
                                @duncanwebster1
                                Posted by SillyOldDuffer on 21/07/2017 20:54:53:

                                Larry, you are too kind. And who said I can do a decent real knurl! Not me.

                                Anyhoo, I've just logged on to report failing to get a 'based on a coil' knurl to work as suggested by Alan and Jason. I don't see why it shouldn't work, so I must be doing something wrong. At the moment I'm feeling very frustrated. I need to do something else, like kicking the cat.

                                Dave

                                Don't kick the cat, I'll bring my dog round to sort it out (the cat that is)

                                #308190
                                Paul Lousick
                                Participant
                                  @paullousick59116

                                  Another option is to use a surface finish to represent a knurl. Available on some 3D CAD packages. Does not require as much processing power or file size. Also used for threads, etc.

                                  Paul.

                                  #308194
                                  Micky T
                                  Participant
                                    @mickyt

                                    Dave you should look at this video **LINK** . He covers making a knurl in fusion 360.

                                    Very similar to what Neil suggested.

                                    Mick

                                    Edited By Micky T on 22/07/2017 07:35:15

                                    #308196
                                    larry Phelan
                                    Participant
                                      @larryphelan54019

                                      All this talk of 3D and Cad brings me back many years,when we used to the Saturday Matinee in the local flea pit,for 4d. [This was long before the idea of "Home Entertainment" was ever heard of ] The Cad,of course,was the "Baddy" and was boo,ed every time he appeared.

                                      Ah ! Happy days,when we knew not a lathe from a latch key, and the only milling we knew about,we got from our Mothers,when we stepped out of line.

                                      #308197
                                      Neil Wyatt
                                      Moderator
                                        @neilwyatt

                                        Something interesting, which I've seen before, is that putting a fine surface texture on a 3D print obscures the 'layered effect' and makes for a part that is almost indistinguishable from an injection moulded part.

                                        The difficulty is wrapping 3D textures around parts.

                                        The new version of cura has a 'fuzzy' surface setting that dithers the surface but it doesn't look as good and you can't choose where it appears.

                                        I might try making some 'texture stamps' that I can 'subtract' from objects to give them surface textures.

                                        Neil

                                        P.S. The Cad, Terry Thomas, was my hero in all the movies I saw him in! And Dick Dastardly.

                                        #308264
                                        John McNamara
                                        Participant
                                          @johnmcnamara74883

                                          Hmm How would I do it with Autocad? I can export Acad solids to Fusion

                                          OK Here is what I did

                                          Drew a 20mm diameter circle centered on 0,0,0

                                          Drew a helix 100 mm high 10mm radius, it will be cut down later

                                          Set the helix to a quarter turn and payed with the height to generate about 45 degrees by eye, The math guys in here can work it out exactly if they like!

                                          I then extruded a triangle (Pointing in to the center) along the helix to make a single solid of a cut line. I then put a small fillet on the solid to create a root for the cut. I could have done that on the crude triangle it does not matter.

                                          Made an array of the solids spaced by eye to give a flat top on the finished knurl

                                          The above will create a single angle knurl.

                                          For a diamond knurl I mirrored the existing array then superimposed it on the first one creating diamonds.
                                          Then exploded the arrays and trimmed the height to 8mm by subtracting a solid from the top and the bottom.
                                          (Only explode an array of solids once or you will end up with useless lines that will not subtract from another solid)

                                          See image below. (The cutter is made)

                                          Next I made a plain cylinder put a hole in it and placed that centered within the cutter.

                                          We are ready to cut!

                                          The cut took a lot of time about 15 minutes! The processor was running at 100% So many points to resolve, Normally cutting a single solid takes about one second.

                                          Finally I created the chamfers by revolving a shape then using it to cut away the corner

                                          Done!

                                          knurl 1.jpg


                                          knurl 2.jpg

                                          DWG file Exported to Fusion

                                          knurl 3.jpg

                                          Rendered in Fusion
                                          23-07-2017 1-36-03 am.jpg


                                          Edited By John McNamara on 22/07/2017 16:38:05

                                          #308333
                                          Enough!
                                          Participant
                                            @enough
                                            Posted by Neil Wyatt on 22/07/2017 08:49:48:

                                            Something interesting, which I've seen before, is that putting a fine surface texture on a 3D print obscures the 'layered effect' and makes for a part that is almost indistinguishable from an injection moulded part.

                                            I've experimented with texturing too as a means to hide the layers. Mixed success though.

                                            #308337
                                            Nige
                                            Participant
                                              @nige81730

                                              Very nice John 😊 My Fusion 360 skills, actually not so much skills as still fumbling in the dark, are nowhere near this, but this is something to aspire to…….Time is the enemy 😳

                                              #308385
                                              Alan Vos
                                              Participant
                                                @alanvos39612

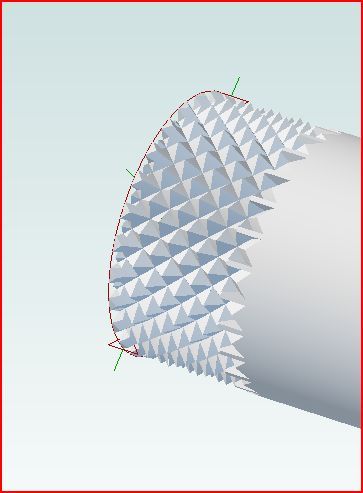
                                                As promised, Recipe for Fusion 360 knurling using a coil.

                                                Here the cylinder is centred on the origin. If anywhere else, you will need to create an additional axis and mirror plane.

                                                The extra circular sketch is to ensure the coil cuts fully through both ends of the cylinder. The second picture shows what happens if the coil is the same length as the cylinder.

                                                Create Sketch
                                                Sketch Circle (centred on origin)
                                                Extrude circle into cyclinder (Example below is 20x2mm)
                                                Construct Offset Plane parallel to and slightly below the lower face of the cylinder
                                                On the new plane, sketch the same circle as before
                                                Using that new sketch, create coil:
                                                – Diameter: Same as circle
                                                – Type: Revolution and Height
                                                – Revolutions: 0.03 in the example
                                                – Height: Negative, sufficient to cut to past end of the cylinder
                                                – Section: Triangular (internal)
                                                – Section Position: On Centre or Inside
                                                – Section Size: Reduce to something suitable
                                                – Operation: Cut
                                                Create Mirror:
                                                – Pattern Type: Faces
                                                – Objects: BOTH faces of the previous cut
                                                – Mirror Plane: Should appear for selection
                                                Create Circular Pattern:
                                                – Pattern Type: Faces
                                                – Objects: ALL FOUR faces of the two previous cuts
                                                – Axis: Through cylinder
                                                – Type: Full
                                                – Suppress: Cleared
                                                – Quantity: 150 in the example

                                                knurl.jpg

                                                truncated cut.jpg

                                                Edited By Alan Vos on 23/07/2017 14:02:49

                                                #308402
                                                SillyOldDuffer
                                                Moderator
                                                  @sillyoldduffer

                                                  Cheers Alan, I've just come in for a cup of tea and found your post. It works very well and is easier to set up than my loft method. Your instructions also explained why my equivalent attempts based on a coil yesterday weren't working! It also seems to run a lot faster.

                                                  Thanks also to Micky T for the youtube link which I hadn't found before. Not only did it fix a different problem with purple lines, but youtube popped up two other videos new to me, both good stuff. My search engine obviously isnn't on top form.

                                                  John McNamara's post got me thinking. Not just his method (which I've not tried yet), but I've been wondering how how I might cut an internal knurl in the real world?

                                                  It must be useful for something! Could it be the perfect excuse to buy a 3D-Printer?

                                                  Once again, many thanks,

                                                  Dave

                                                  #308408
                                                  Raglan Littlejohn
                                                  Participant
                                                    @raglanlittlejohn

                                                    Here is some some knurling done in Design Spark Mechanical. This is a free program based on Space Claim. It's limited in the file types that it can import/export, but I find it easier to use than Fusion 360.

                                                    knurl.jpg

                                                    #308420
                                                    Raglan Littlejohn
                                                    Participant
                                                      @raglanlittlejohn

                                                      I just realised the knurls should be in a spiral. Will have another go.

                                                    Viewing 25 posts - 1 through 25 (of 30 total)
                                                    • Please log in to reply to this topic. Registering is free and easy using the links on the menu at the top of this page.

                                                    Advert

                                                    Latest Replies

                                                    Viewing 25 topics - 1 through 25 (of 25 total)
                                                    Viewing 25 topics - 1 through 25 (of 25 total)

                                                    View full reply list.

                                                    Advert

                                                    Newsletter Sign-up