First efforts at 3D printing

Advert

First efforts at 3D printing

Home Forums 3D Printers and 3D Printing First efforts at 3D printing

Viewing 8 posts - 1 through 8 (of 8 total)
  • Author
    Posts
  • #651885
    John Hinkley
    Participant
      @johnhinkley26699

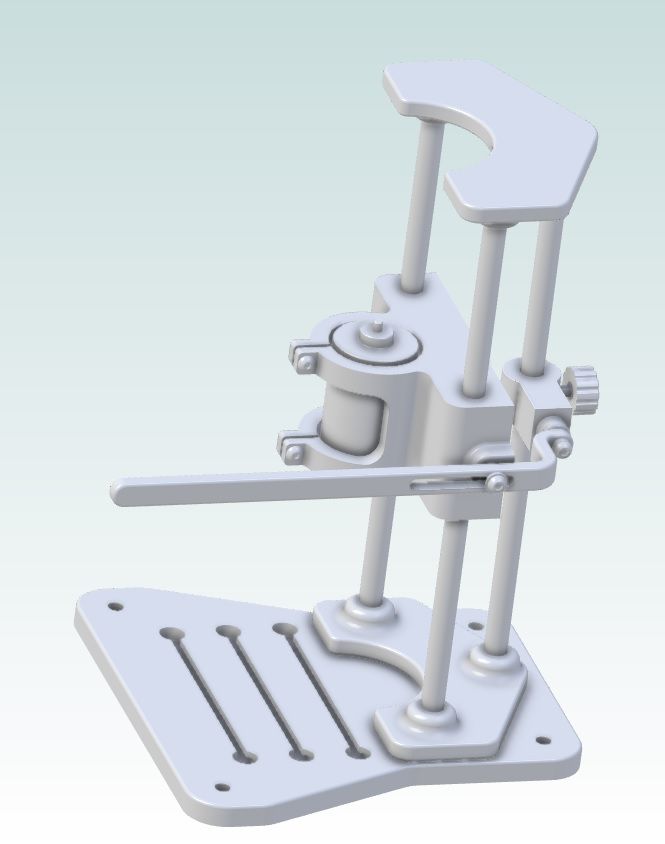
      After deciding to down-size and having sold all my workshop machinery, I purchased a 3D printer to stop the grey matter from atrophying and have started off my adventure with it by printing off some parts of a vehicle differential and rear axle downloaded from thingiverse.com. Mostly because I couldn't find a suitable file of the hypoid bevel gears I needed for my own design. It's been a long-held ambition of mine to construct a scratch-built racing car chassis and this seemed as good a place to start as any. Having reduced the size of the prints to 70% of their published size to suit my requirements, I soon found the need to enlarge various holes to suit the fasteners I intended to use. Problem – no drill stand and now no milling machine! So, thought I, why not print one? So that's what I'm going to do. But first, I had to design one which will fit within the printer's envelope (254x254x254mm). This is the render of my design, produced in Alibre Atom.

      Design overview

      For scale, it is about 250mm high. Power comes from a 12-24V motor left over from my die-filer project, fed by a 0-12V variable power supply. Should be good for up to about 3500 rpm or so. As I will only be drilling into plastic and mostly just enlarging holes already in the prints, torque shouldn't be a problem, I hope. Further progress will be documented in my album "3D printed drill stand", appropriately enough and I'll probably add the odd video to my YouTube channel, too, from time to time.

      John

      Link to my YouTube channel

      Link to thingiverse file source

      Edited By John Hinkley on 12/07/2023 20:15:17

      Advert
      #31734
      John Hinkley
      Participant
        @johnhinkley26699

        Just got a new toy – now what to do with it?

        #651890
        Neil Wyatt
        Moderator
          @neilwyatt

          Good luck john.

          You may need to modify the design to achieve success, but that's one of the benefits of 3D printing.

          My tip is don't try and replicate a metal design, but think about how 3D printing works and the properties of plastics and use these to your advantage e.g. it's cheap and easy to produce large hollow (or mostly hollow) sections to achieve stiffness that would be expensive and impractical in steel.

          Neil

          #651892
          John Doe 2
          Participant
            @johndoe2

            Blimey ! That is extremely impressive if that is your first attempt at CADing for a 3D print !

            I started with very simple things such as a replacement lid for the bird feeder ! And I have yet to do things that have axles etc. Great work !

            #651893
            Neil Lickfold
            Participant
              @neillickfold44316

              You can create matching splines as well. Some of the better designs, take into account different shrinkage rates of the elements being produced, so will use different things to make it all work. So instead of it bearing on 3 cylindrical bushes, one or 2 of them, may well be an oval geometry, aligned in the direction of the shrinkage, or you can make test pieces, and then remodel them, to correct for the shrinkage. It becomes a different way of working and solving problems. Of course, there are aspects of using metal rods and bushes and in moulded nuts etc to make things with as well. You will eventually sort out the method that you choose to solve the shrinkage issues with the different materials etc.

              #651897
              Fulmen
              Participant
                @fulmen

                Well done.

                Neil has some good advice, printing is not like machining. Much of the strength is in the skin, it also affects filament use and printing time. And the material is directional like wood, so consider your printing orientation carefully.

                #651902
                John Hinkley
                Participant
                  @johnhinkley26699

                  Thanks for all the encouraging comments, chaps.

                  Perhaps I should have been a bit clearer with my description. The three vertical columns are Ø12mm steel tubes to provide a bit of stiffness to the structure, but as I said most hole drilling will be to bring printed hole to size for tapping drills and clearance hole for the bolts, so not a lot of stress on any of it. Having said that, the proof of the pudding will be when I start using it. Time will tell.

                  Neil, I bought your 3D printing book some while ago and am about to start re-reading it to refresh my understanding of the materials and their various properties. So far I've only used basic PLA, because that was what was supplied with the machine (which, incidentally is a Bambu Lab X1 Carbon). I did try some carbon fibre impregnated filament without any success so went back to the basic stuff to get me going. More experimentation needed with settings.

                  John Doe2. Not my fist foray into CAD by any means, just its use to create STEP files for printing.

                  By the way I'm using Orca Slicer to produce the G-code and sending the files wirelessly to the printer. It also takes a micro SD card but, again, that's for the future. Some users are wary of sending their files via the cloud and I can't say that I'm overfond of the procedure.

                  John

                  #652084
                  Peter Cook 6
                  Participant
                    @petercook6

                    For small (M4-M6) tapped holes in PLA I find printing the thread inside the hole and then cleaning up with a tap more successful than printing or drilling to tapping size and tapping. Metal approaches tends to crack the surrounding material unless you are careful to thicken the walls around the holes when slicing.

                    I create the threads by drawing a threaded bolt of the appropriate size, insert it into the material at the relevant place, then doing a difference operation. A tap then "finds" the printed thread and cleans up the thread without applying too much outwards pressure.

                  Viewing 8 posts - 1 through 8 (of 8 total)
                  • Please log in to reply to this topic. Registering is free and easy using the links on the menu at the top of this page.

                  Advert

                  Latest Replies

                  Viewing 25 topics - 1 through 25 (of 25 total)
                  Viewing 25 topics - 1 through 25 (of 25 total)

                  View full reply list.

                  Advert

                  Newsletter Sign-up