Factory 3D Kit Build

Advert

Factory 3D Kit Build

Home Forums 3D Printers and 3D Printing Factory 3D Kit Build

Viewing 15 posts - 1 through 15 (of 15 total)
  • Author
    Posts
  • #313016
    Journeyman
    Participant
      @journeyman

      Well I thought it was about time I joined the party so I bought a kit from Factory 3D. Spent a few days building it and even longer making a few modifications as I went along. This is the final result:

      3dprinterl.jpg

      I am quite pleased and can report that it works, only slight problem was a non-functioning SD card reader but that was quickly sorted by Factory 3D.

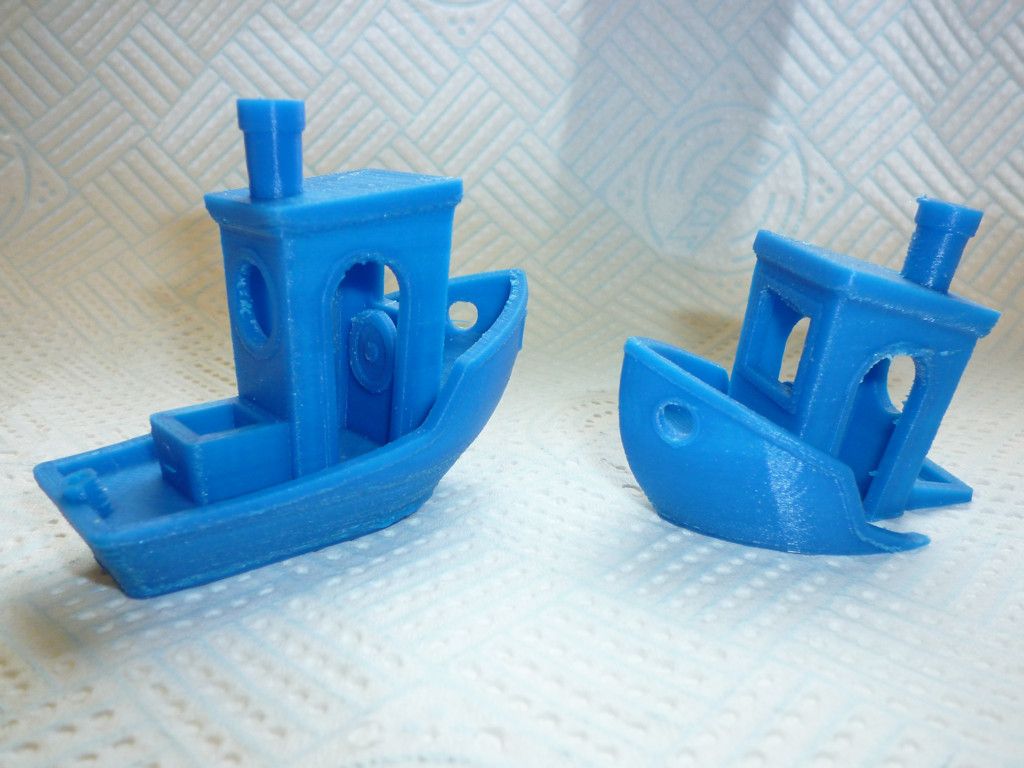
      benchyl.jpg

      Just to prove it works a picture of my Benchy, I actually have quite a fleet, some distinctly more seaworthy than others!

      I did a bit of a *** Build Log *** on my website for anyone interested.

      John

      Advert
      #31531
      Journeyman
      Participant
        @journeyman

        Am I Now A Maker

        #313275
        Nick Hulme
        Participant
          @nickhulme30114

          Nice build log, thanks for sharing it here,

          Regards,

          Nick

          #313283
          Paul Lousick
          Participant
            @paullousick59116

            Looks good John.

            I have just finished the assembly of an I3-X printer. Supposed to be an upgrade on the standard I3. Would have preferred an aluminium frame printer but will see how the acrylic one performs. Everything went together without too many problems (after they sent me the correct, upgraded instructions). Already have a few modifications in mind to improve the design. Now the fun begins.

            Paul.

            i3 x.jpg

            #313373
            Neil Wyatt
            Moderator
              @neilwyatt

              Well done John!

              A few tips from my experience with the same printer, that probably apply to all Prusa type machines:

              Make sure everything is done up with as little slop as possible (you benchy looks OK, so probably not an issue).

              Add something to keep wires clear of large prints and reduce flex near the hot end.

              Make sure the grub screw that hods the heater secure is done up properly – discovering a heater stirring a puddle of molten PLA is not good as separated from the thermistor it gets quite hot…

              Off the shelf nozzles, hot end tubes, thermistors and heaters for Mk8 hot ends are cheap as chips, stock up in advance then you can swap out.

              Finally, I started getting wonky prints and the extruder mechanism had come a bit loose in its frame, I wedged it in place and saw a big increase in quality, so I suggest checking this from the start.

              Mine is getting almost daily use, it's so useful for little bits and pieces and you can rapidly modify designs.

              Neil

              #313379
              Journeyman
              Participant
                @journeyman

                Thanks for the tips Neil. I already found that the belt tensioner was a bit loose and caused some Y-axis slip. I have laid in a supply of nozzles and hot end tubes as I had a problem removeing filament, found that the PTFE liner tube was about 3mm short causing a PLA berg! All the moving cables are in spiral wrap and are pretty well self-supporting added an extra cable clamp (3D printed of course) on X carriage to point the cable in the right direction.

                Still trying to find out how Cura works (v14.12.1) havn't altered any of the Marlin settings yet. Out of interest have you managed to get Cura 2.6 to work with the printer? I had a quick go but didn't function well at all.

                John

                #313399
                Nick Hulme
                Participant
                  @nickhulme30114

                  Posted by Journeyman on 22/08/2017 12:42:32:

                  Out of interest have you managed to get Cura 2.6 to work with the printer? I had a quick go but didn't function well at all.

                  John

                  You need to create a printer profile, use Custom Printer to avoid the assumptions made about the Prusa i3 fan profile, fill in the requisite values and save the profile. Then Manage Printers and add the start and end G-Code from the 14.x.x profile supplied by Factory 3D. You will need to remove the 3 lines of code prior to the Factory 3D start code after you generate the G-Code file.

                  Despite the fact it offers to let you specify filament OD in the profile it ignores this and defaults to 2.88mm in the settings in the main screen so set filament size there, you will have to edit the visibility of most settings but the later version is worth using, especially for the superior support options.

                  – Nick

                  #313400
                  Neil Wyatt
                  Moderator
                    @neilwyatt
                    Posted by Journeyman on 22/08/2017 12:42:32:

                    Thanks for the tips Neil. I already found that the belt tensioner was a bit loose and caused some Y-axis slip. I have laid in a supply of nozzles and hot end tubes as I had a problem removeing filament, found that the PTFE liner tube was about 3mm short causing a PLA berg! All the moving cables are in spiral wrap and are pretty well self-supporting added an extra cable clamp (3D printed of course) on X carriage to point the cable in the right direction.

                    Still trying to find out how Cura works (v14.12.1) havn't altered any of the Marlin settings yet. Out of interest have you managed to get Cura 2.6 to work with the printer? I had a quick go but didn't function well at all.

                    John

                    I've got Cura 2.6 working, but I'm still not happy. To many things to play with…

                    I think you can copy the start and finish scripts supplied with the printer across from C14 to C2 which helps.

                    Autodesk Print Studio works if you tell it the printer is a Printerbot Simple although the build volume is limited. Why use this unstable software? – because its tree-type supports can be useful on complex objects instead of the bulky hard-to-remove supports Cura generates. I try really hard to avoid needing supports now.

                    #313411
                    Neil Wyatt
                    Moderator
                      @neilwyatt

                      After seeing a query about a photo-deposition printer with 0.025mm/1-thou layers I thought i would have a go with the Prusa.

                      There was a lot of combing – you can imagine the amount of filament deposited in each layer was tiny, limiting the amount of retraction. My clumsy scalpel work got rid of this, the white specs are paint off my fingers.

                      The surface finish looks like tiny fish-scales and is comparable to a textured surface injection moulding. In short, the quality is awesome, I'm bowled over by it, but it's incredibly slow.

                      1 thou print.jpg

                      #313417
                      Journeyman
                      Participant
                        @journeyman

                        Nick & Neil, thanks for the info on 2.6 – I will have another go. I ran into the filament size problem which resulted in under extrusion and called it a day I am still at the bottom of a steep learning curve and this was a bit outside my comfort zone.

                        Neil the Benchy may look OK in the photo but the lower layers are quite rough, I think I have "elephants foot' and it definitely doesn't like overhangs at the bow. I think the photo is taken from an advantageous viewpoint. The sinking version is actually much better. Quite a lot of my prints seem to have a step at the bottom layer, is this down to the first layer being thicker and wider in the Cura settings?

                        John

                        Edited – Spelling

                        Edited By Journeyman on 22/08/2017 16:19:05

                        #313421
                        Neil Wyatt
                        Moderator
                          @neilwyatt

                          Yes the exact size for the bottom layer is very tricky as it is o critically linked to bed levelling and initial z-height, I prefer to allow a little over-extrusion and trim it off as you get a really solid, smooth first layer.

                          A deburring tool works well!

                          Assuming you already have fans on the print head you can get rid of benchy-bow issues with:

                          Thinner layers.

                          Lower temperature.

                          Slower print speed.

                          #313427
                          Nick Hulme
                          Participant
                            @nickhulme30114

                            You can put a fillet/radius on the bottom edge of your model to compensate for the outward "Squish" at the bottom edge.

                            #313627
                            Journeyman
                            Participant
                              @journeyman

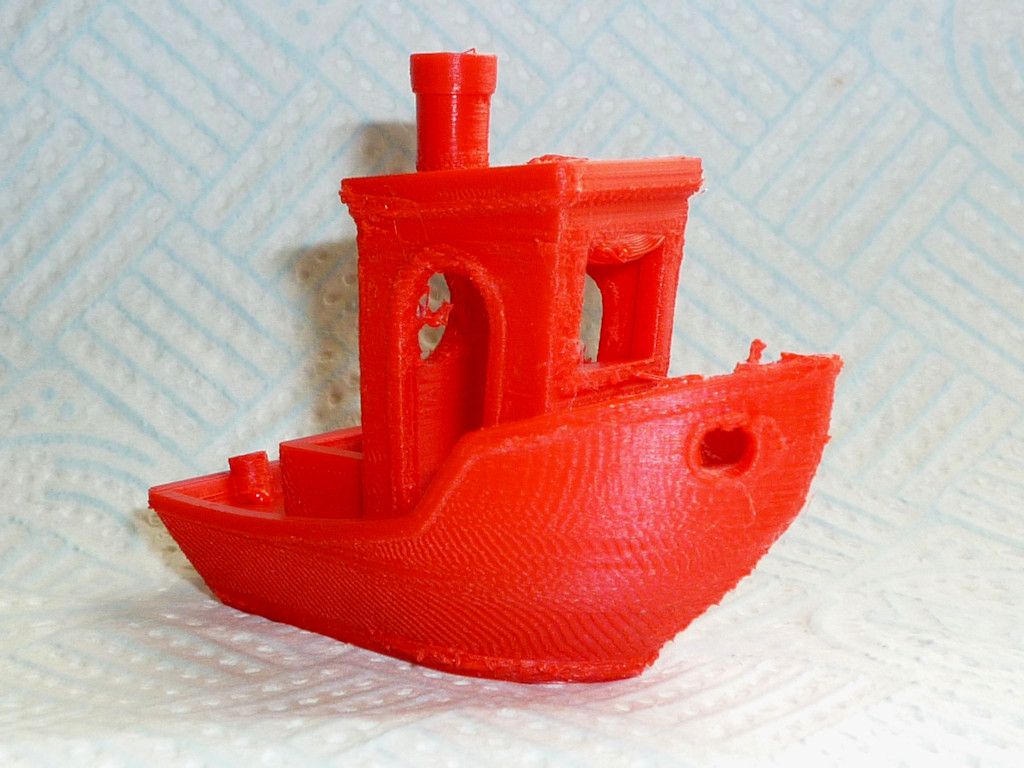
                              Well I had a go at Benchy MkXII using some of the things Neil suggested. Results below:-

                              benchyxii.jpg

                              Bed 55 degC Hot-end 190 degC .04mm layer height cut speed down to 50 mm/sec and — total disaster. Still bad near the bed loads of vertical lines which are quite deep, tops of windows not good and bits of spare PLA not whiskers but blobs in places. It took 6 hours! Oh well try, try, again…

                              John


                              Edited By Journeyman on 23/08/2017 18:43:58

                              #313768
                              Journeyman
                              Participant
                                @journeyman

                                Decided it was time to make something useful so printed this:-

                                vaccon.jpg

                                A connector for the dust extract on my belt sander – 65mm to 35mm to connect to the shop vac. Printed well and fitted, which is a result. Also printed yet another Benchy (sorry if this is boring but this 3D printing lark is all new and interesting to me) used the settings from 3DBenchy.com – yes there really is a web site just for this – and it came out the best so far, I won't bore you with yet another picture though…

                                John

                                #313785
                                Neil Wyatt
                                Moderator
                                  @neilwyatt
                                  Posted by Journeyman on 24/08/2017 18:46:57:

                                  Decided it was time to make something useful so printed this:-

                                  vaccon.jpg

                                  A connector for the dust extract on my belt sander – 65mm to 35mm to connect to the shop vac. Printed well and fitted, which is a result. Also printed yet another Benchy (sorry if this is boring but this 3D printing lark is all new and interesting to me) used the settings from 3DBenchy.com – yes there really is a web site just for this – and it came out the best so far, I won't bore you with yet another picture though…

                                  John

                                  I would probably use 0.1mm for a bog-standard benchy, 0.14 suits most objects. 0.4mm is 'I have got this printer completely dialled territory' I didn't go down to 0.08 for a few months.

                                  Don't forget there are different places to change the temperature that may have different effects, basic settings override the temperature in start up script unless set to zero.

                                  I use 40mm/sec outside layer, 45 inside and 50 infill. Time is cheaper than filament


                                  Edited By Neil Wyatt on 24/08/2017 20:11:04

                                Viewing 15 posts - 1 through 15 (of 15 total)
                                • Please log in to reply to this topic. Registering is free and easy using the links on the menu at the top of this page.

                                Advert

                                Latest Replies

                                Viewing 25 topics - 1 through 25 (of 25 total)
                                Viewing 25 topics - 1 through 25 (of 25 total)

                                View full reply list.

                                Advert

                                Newsletter Sign-up