Drill Sharpeners Compared.

Advert

Drill Sharpeners Compared.

Home Forums Workshop Tools and Tooling Drill Sharpeners Compared.

Viewing 25 posts - 1 through 25 (of 54 total)
  • Author
    Posts
  • #387712
    peak4
    Participant
      @peak4

      I've been having a bit of a play this afternoon as the weather wasn't up to much.
      Rather than hijack the other thread, which was asking specifically about the Sealey SMS2008 drill sharpener, I thought I'd start a new one for a quick comparison.

      Maybe others could contribute some ideas and photos to this thread, so that it could be used for reference and learning.

      Doubletop-Pete commented, in the above thread, that he felt that his Sealey was taking off too much metal; so was mine out of the box, albeit a second hand box.

      Sliding the wheel towards the motor, will reduce the depth of cut on the primary grind, as it's a tapered wheel.
      It's a bit of a fine line as moving the wheel also affects the split point grind.

      As you can see from my efforts, I've not quite got it right yet, but even 1/2" bits ground like this, will start off without a pilot hole or centre pop, though I accept the latter's bad practice.
      Sorry about the quality of the photos. I was trying to do it in natural light in the conservatory, but it was starting to get a bit dark.

      The whole project took rather longer than planned blush

      I sharpened several 1/2" bits using;

      A Sealey SMS2008,

      A brand new genuine Picador jig; Note that the Picador jig has the vertical pivot, and in theory at least, should work OK out of the box. Drill bit orientation is set by a movable detent on the flute to be ground.
      I used 1/4" projection beyond the end of the jig, as recommended for larger drill bits.
      It's a different geometry  to the various clones with the tilted pivot.

      A Reliance No.2 (which needs the bit cutting edge setting by eye). On this one it's recommended to use a projection of three times the drill diameter, so in this case  1 1/2"

      The two jigs (Picador and Reliance) were used on a cup wheel on a Clarkson cutter Grinder. (As you can see, the wheel's a bit coarse really, but it's all I had available at the time.)
      The new Picador had a bit of play in the mounting foot, as it's only held together with a cask Mazak name plate, so I temporarily nipped it up a bit with a little toolmakers clamp.

      I don't claim to be any expert at drill sharpening, but am generally considered reasonably dexterous. I'm sure many on here get perfect results freehand; I know can't crying

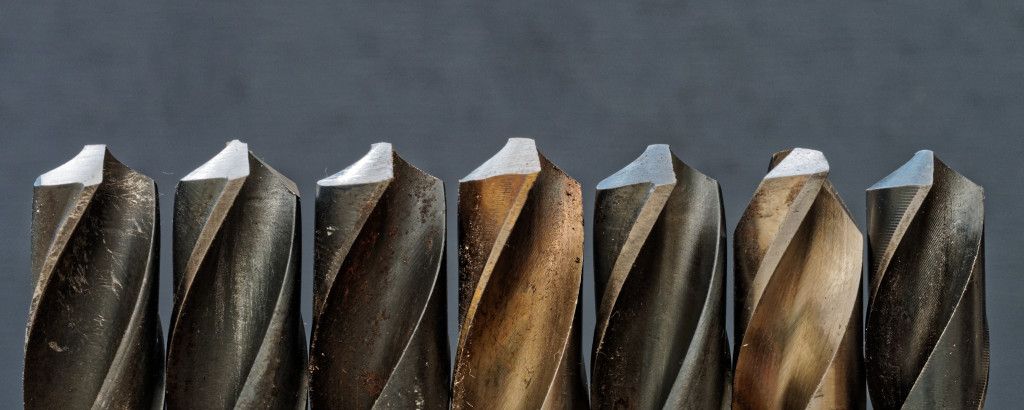
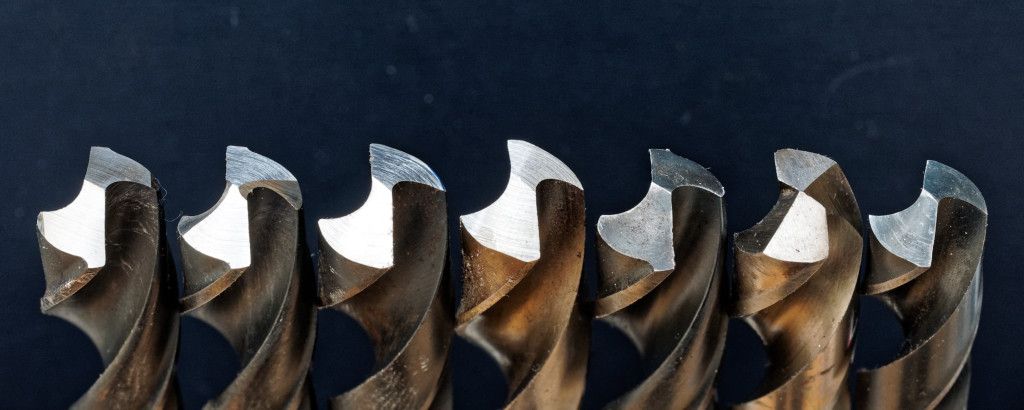
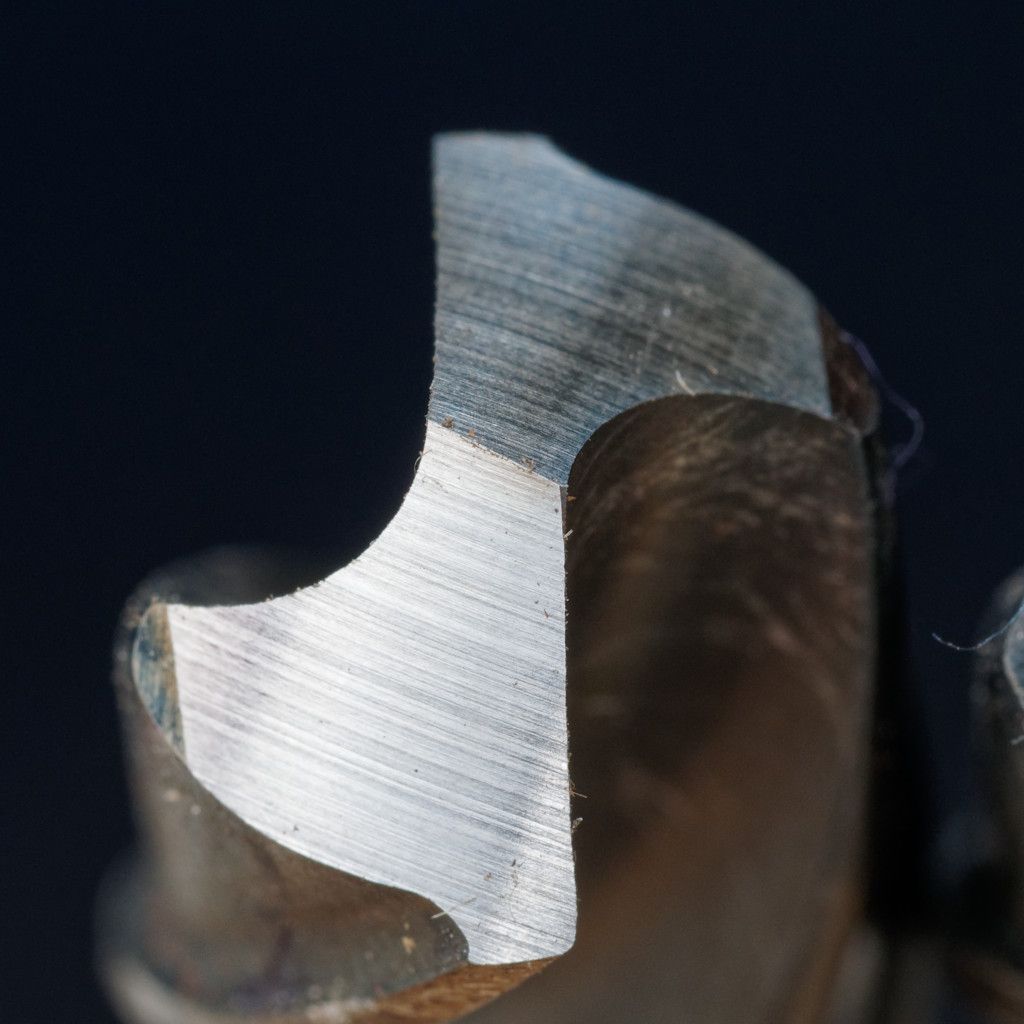
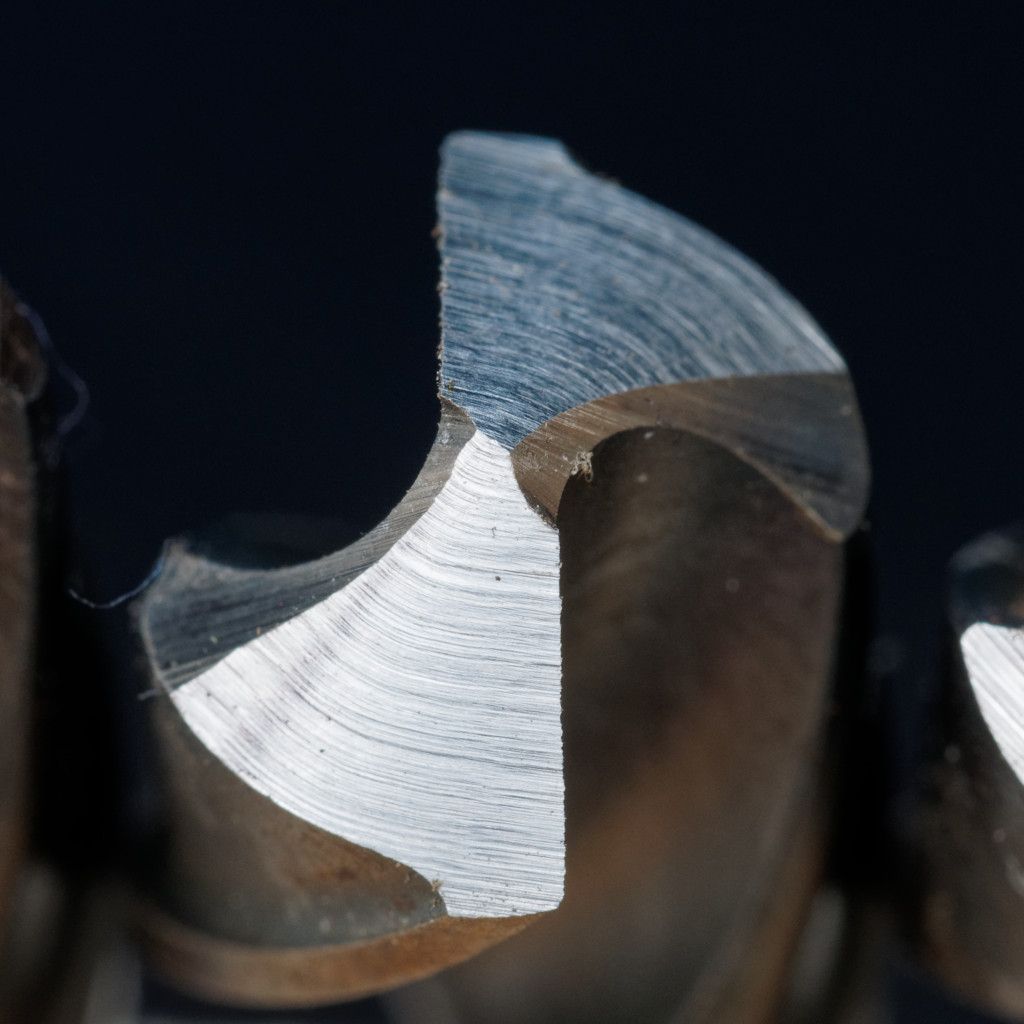
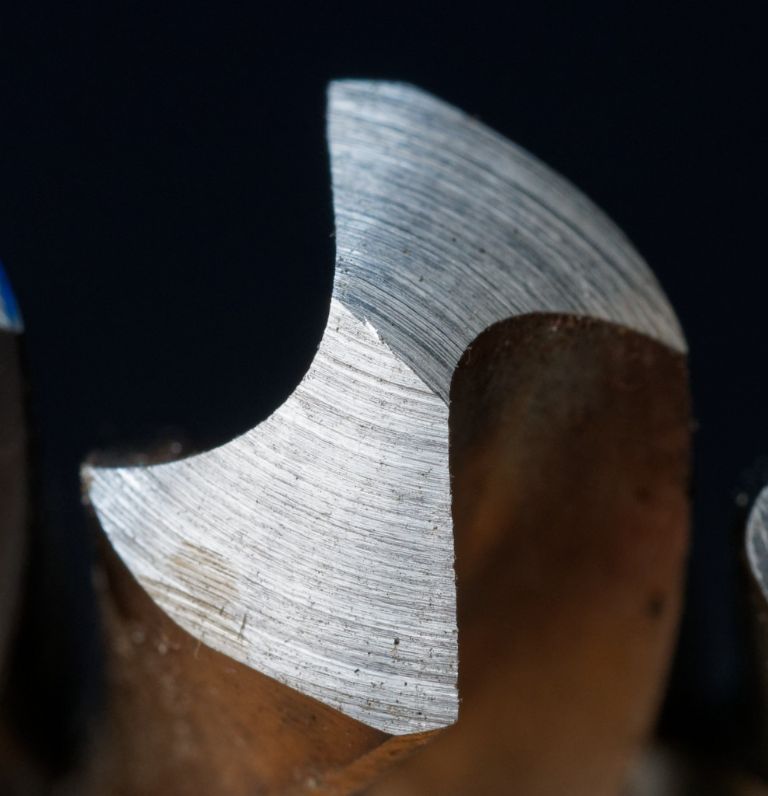
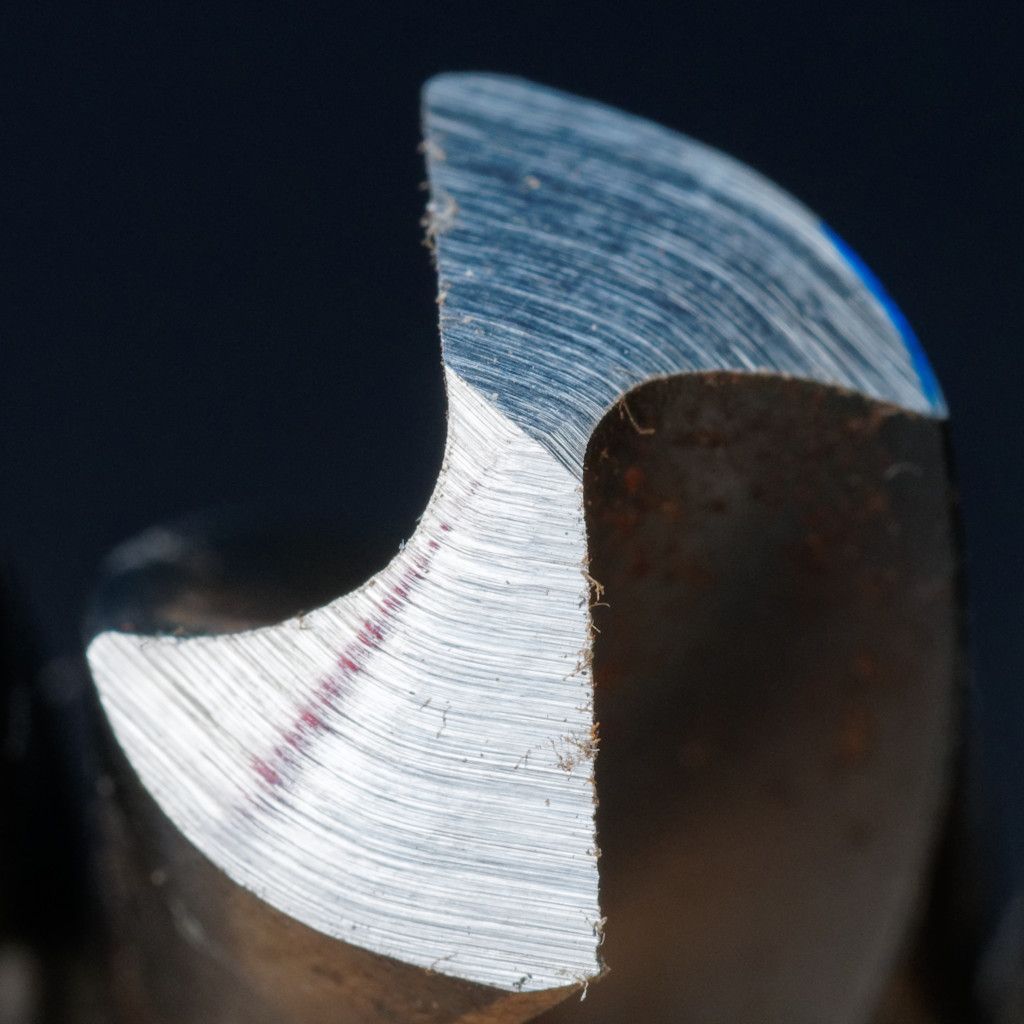
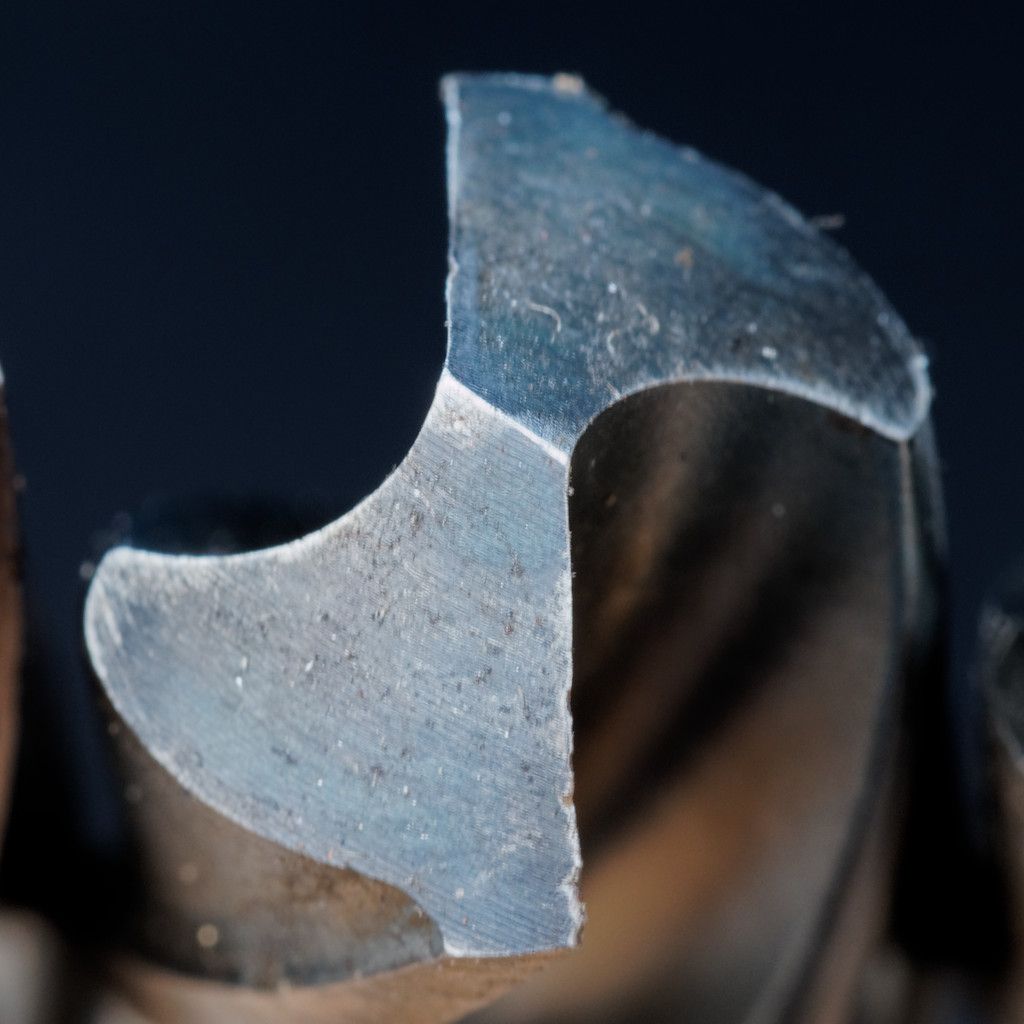
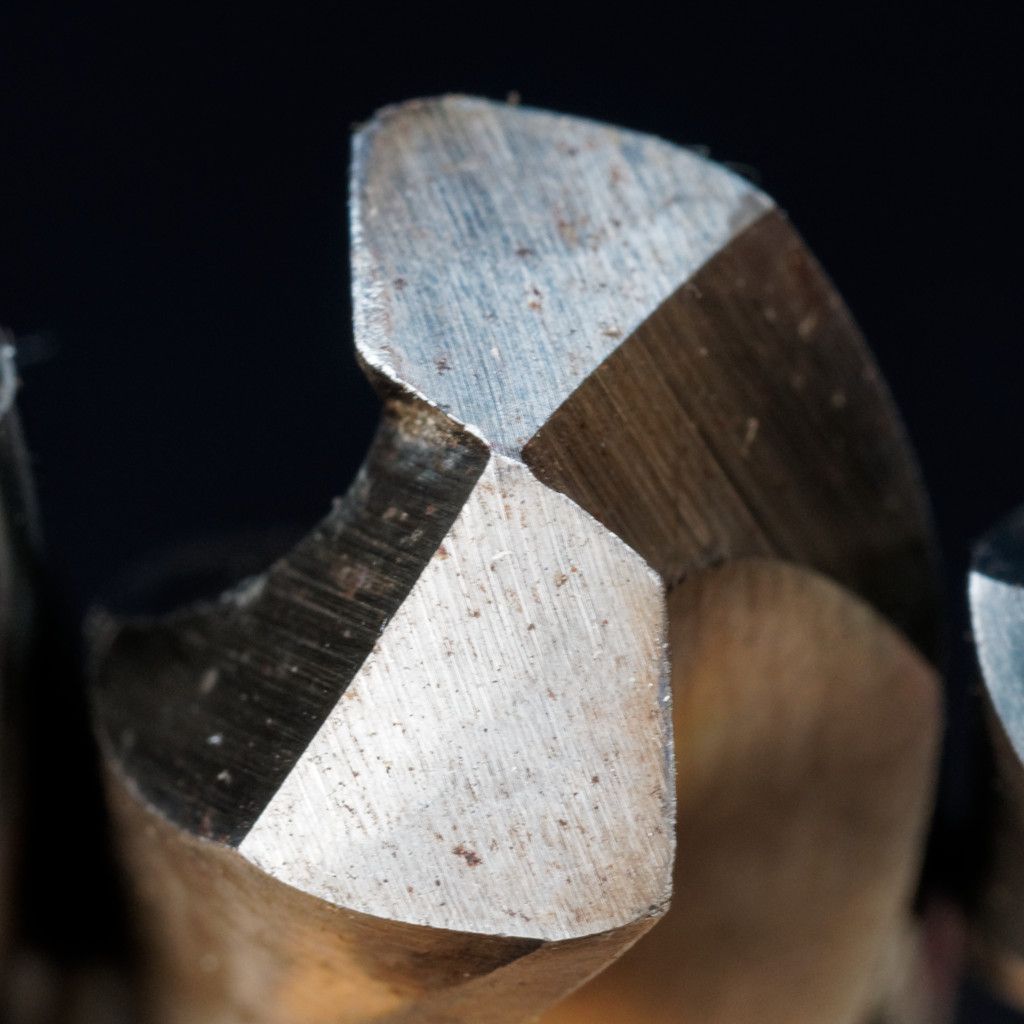
      Left to Right, Picador, Sealey Split Point, Sealey Plain Grind, Reliance, New Unknown Make, New Unknown Make Four Facet, and lastly a New Presto 7/16" ( I didn't have a new 1/2" one).

      The middle one, ground on the Reliance, was an older Morse tapered one which doesn't look to have had the flutes ground very well from new, hence the odd side view of the relief.

      Side View;drills-1 bc260095_dxo-small.jpg

      Top View;drills-2 bc260098_dxo-small.jpg

      Picador;photo-1 picador bc260099_dxo-small.jpg

      Sealey Split Point;photo-2 sealey split point bc260100_dxo-small.jpg

      Sealey Plain Grind;photo-3 sealey 1st grind bc260102_dxo-small.jpg

      Reliance No.2;photo-4 reliance bc260106_dxo-small.jpg

      Unknown Make New(ish) Commercially Ground;photo-5 commercial bc260107_dxo-small.jpg


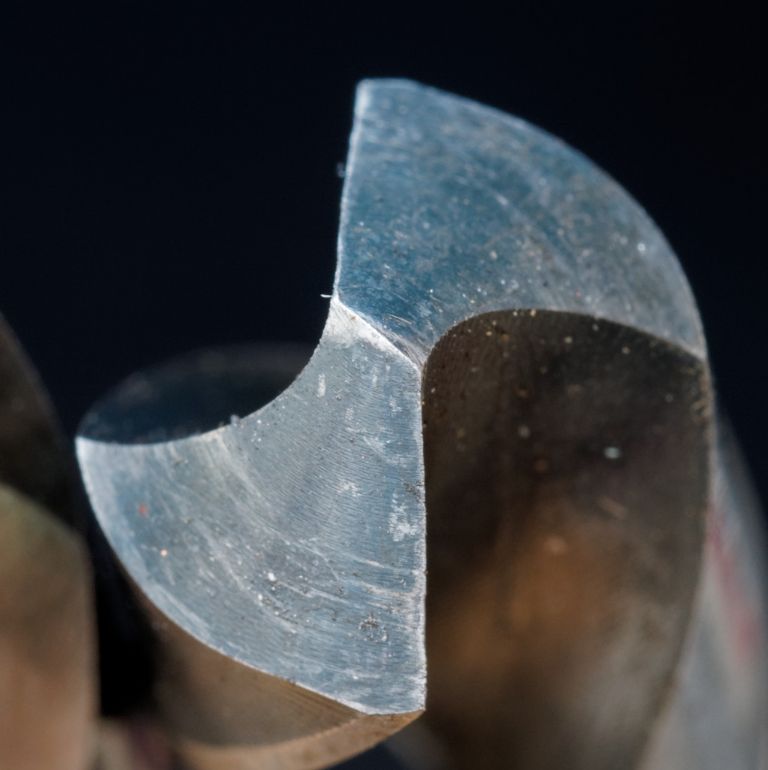
      Unknown Make New(ish) Four Facet Commercially Ground;photo-6 commercial four  facet bc260104_dxo-small.jpg

      New(ish) Presto 7/16" (enlarged to similar size for comparison);photo-7 presto bc260105_dxo-small.jpg


      Edited By peak4 on 26/12/2018 17:19:39

      Advert
      #19177
      peak4
      Participant
        @peak4
        #387714
        Clive Foster
        Participant
          @clivefoster55965

          Interesting results.

          I also did the "take out the pivot play" thing on a Picador. Discovered that the darn thing worked better with things "as delivered" slack. With the play taken out there isn't quite enough clearance angle at the a back of the flute with larger drills. From memory the effect starts to bite around 3/8" – 7/16". 1/2" drill ended up really sharp on the edge but barely, if at all, cut once fully engaged due to the back of the flute rubbing. Poor thing got a 5 years + stay in the box after that before I decided to give it another go following the instructions rather than improving things. Sometimes the maker does know better and sometimes crude works where precise doesn't.

          Essential to make arrangements to accurately and easily adjust the distance between drill jig base and grinding wheel without things twisting and sliding every which way. Mine sits on a scrap of 1/4 plate bolted to the bench with 10 gauge side-plates to keep the jig straight. Wort thing then is getting the projection and angle of twist right. That darn location finger is rather un-useful. Mine gets done more or less by eye with the finger as a reference rather than a stop. I found a narrow, 1/2" or so, cup wheel more reliable than just using the side of a normal wheel.

          When it comes to drill setting and location the cheap plastic, but rather decently performing, one in the original Plasplugs multiple sharpener set is the best I've seen. Positive stop for the projection with a sliding Vee gauge to set the angle of twist. "Grip the drill gently in the Vee holder and lightly push it forwards against the stop then turn until gauge is at it's lower point. Then tighten up the drill holder so that it is firmly held." Drill holder fits in the grinder proper both ways up so none of this business of trying to set the second edge exactly 180° to the first. Just grind one side, flip the whole darn thing and do t'other one. Genius. Why aren't they all made that way. Pity flexi plastic construction and trying to make the thing for thruppence three-farthing when fourpence ha-penny would have been a better budget makes getting best results a minor art.

          In the process of making the missing bits for my "wallet came out smoking" Clarkson drill sharpener attachment right now. 3 years marinating in t'cupboard is about par. Be interesting to see how well the professional option works.

          Clive.

          #387731
          doubletop
          Participant
            @doubletop
            Posted by peak4 on 26/12/2018 16:57:39:

            I've been having a bit of a play this afternoon as the weather wasn't up to much.
            Rather than hijack the other thread, which was asking specifically about the Sealey SMS2008 drill sharpener, I thought I'd start a new one for a quick comparison.

            Maybe others could contribute some ideas and photos to this thread, so that it could be used for reference and learning.

            Doubletop-Pete commented, in the above thread, that he felt that his Sealey was taking off too much metal; so was mine out of the box, albeit a second hand box.

            Sliding the wheel towards the motor, will reduce the depth of cut on the primary grind, as it's a tapered wheel.
            It's a bit of a fine line as moving the wheel also affects the split point grind.

            ……………

            Edited By peak4 on 26/12/2018 17:19:39

            Great thread. I'm going to have a play with my Sealey 2008 clone today. The realisation that the ginding wheel position was adjustable and would affect the depth of cut is the basis of my investigation . I have an idea of an approach to doing the basic setup without making it hit and miss. I'll see it there is a way of ensuring the split point still works. It may be a case of the best compromise position of the wheel to accomodate both.

            Pete

            #404801
            Henry Brown
            Participant
              @henrybrown95529

              Very interesting, following with interest as I'm in the market for something to do a better job than I do at present…

              #404811
              Dave Halford
              Participant
                @davehalford22513

                The depth of cut on the Sealey and the like is set by how far the drill sticks out of the holder, all you need to do is stick something on the metal pad, like layers of sticky tape for eample no need to mess with the wheel position.

                BTW you can buy new wheels for them.

                #490362
                Clive Foster
                Participant
                  @clivefoster55965

                  Bill

                  As requested shifting Clarkson drill sharpener discussions from Dereks Cup Wheel thread of 12/08/2020.

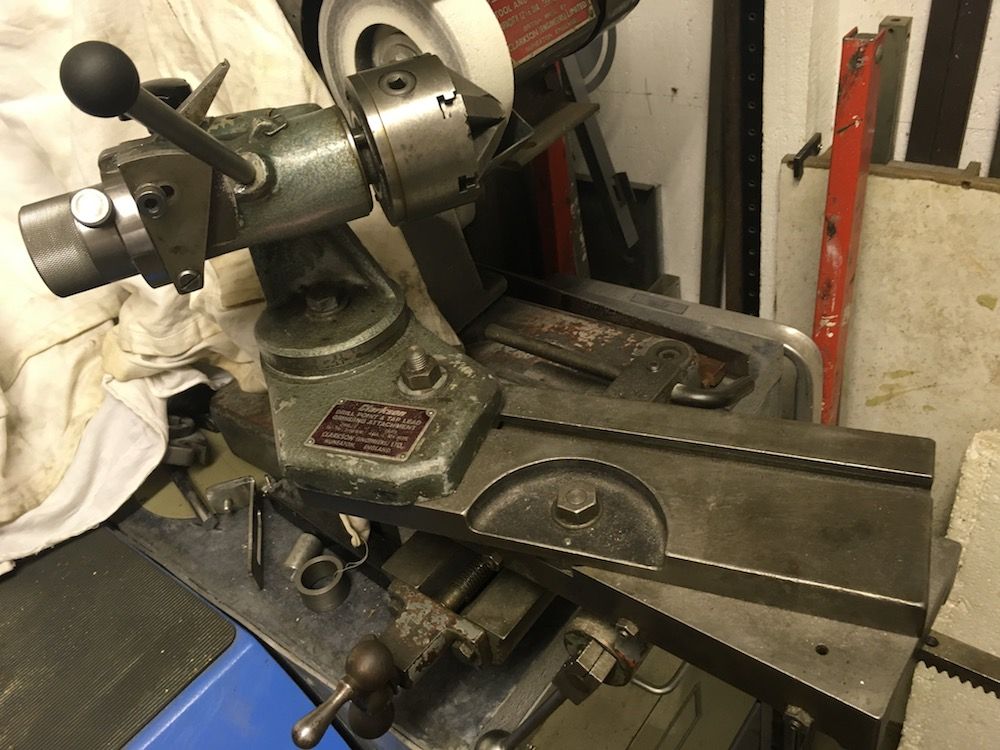
                  Starting at the beginning the Clarkson system uses a 6 jaw chuck with long sloped jaws to hold any drill from about 2.5 mm to 16 mm, 1/8" to 5/8" diameter. The chuck jaws are about 2 1/2" total length so as to grip the spiral lands in a stable manner.

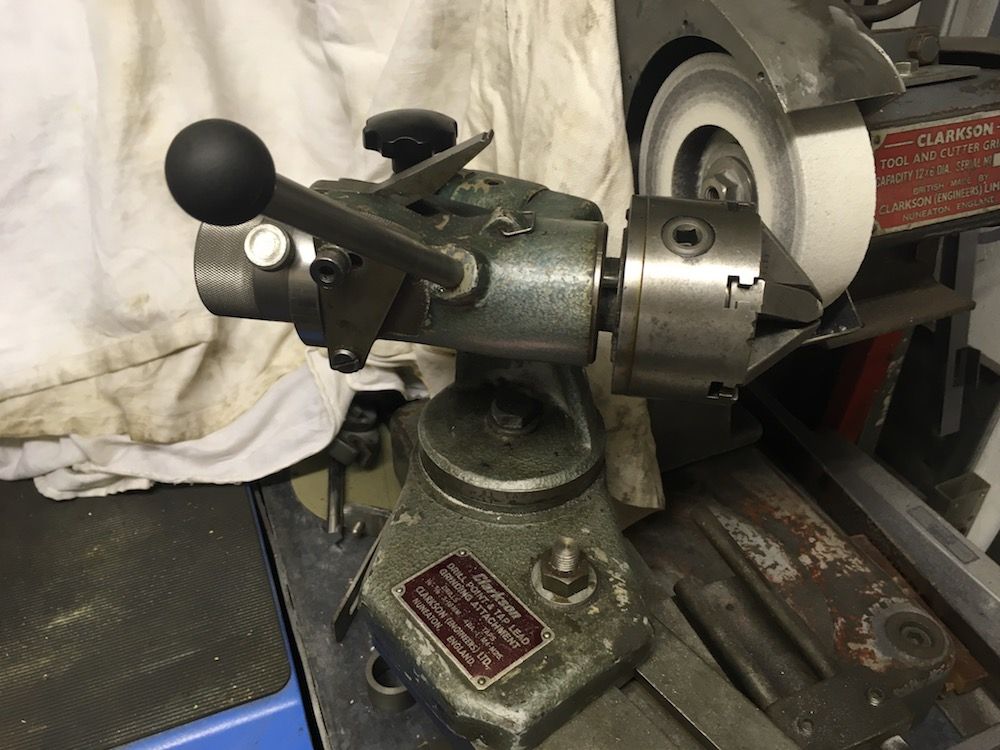
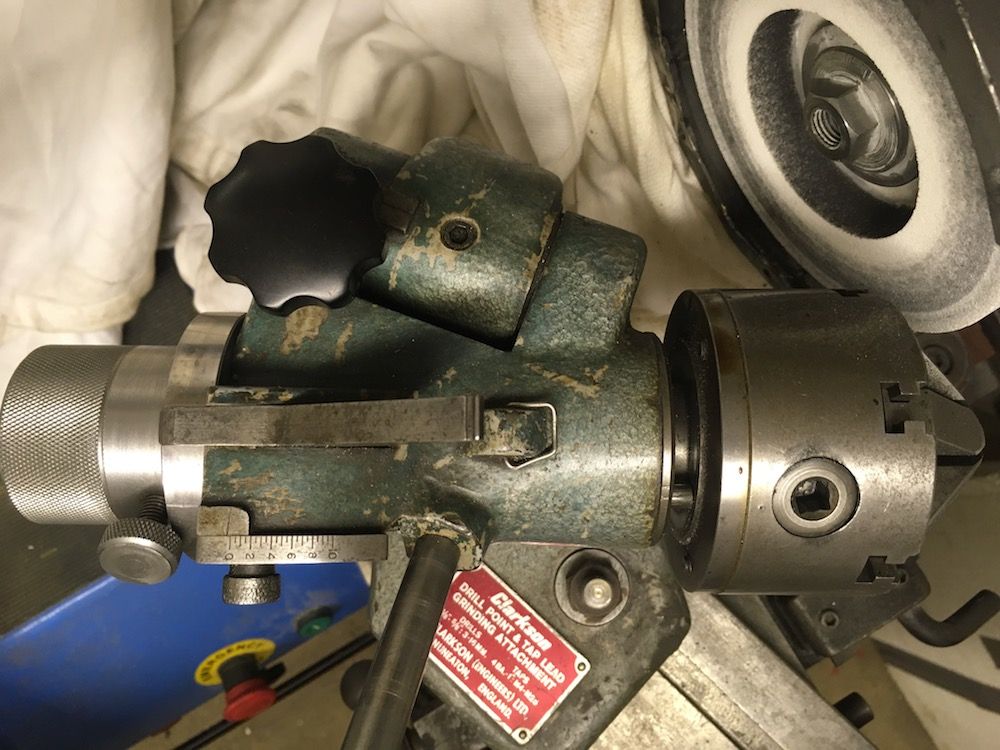
                  Setting up merely requires the cutting edge on the wheel side to be set level with its outside end, i.e the full diameter of the drill, 1/2" proud of the chuck jaws. The instructions say that there is a setting gauge to make this easier. I've never seen one or a picture of one. The chuck mounting shaft is free to rotate in its carrier casting with an indexing device at the other end to select the second edge. Obviously it is bored out to give the drill shank somewhere to go. The carrier casting pivots up and down on a shaft fixed into the main support post. The pivot shaft is set at an angle to the chuck carrying post so that swinging the cutting edge upwards grinds the correct clearance on the drill.

                  Assuming the chuck carrier shaft is set to as to give the correct point angle the only requirements for a correctly backed off drill are :-

                  1) the pivot shaft and chuck carrier shaft be at the correct relative angles

                  2) the drill cutting edge is the correct distance from the intersection of the shaft centre lines.

                  So far as I can see the shaft centre lines are in the same plane which is perpendicular to the cup wheel face.

                  Hence given the shaft angles it should be relatively easy to replicate the sharpening geometry with a simple post support. Some means of applying controlled small cuts is essential. Already present if fitted to a T&C grinder. Otherwise some sort of screw or micrometer controlled slide will be needed.

                  The actual Clarkson implementation is angularily more complex to incorporate tap lead grinding.

                  Photos show the device moved clear of the grinding wheel so a drill can be put in the chuck. Grubby wheel is still flat so not due for dressing. Yet!

                  Whole thing on Clarkson

                  14) whole set up r.jpg

                  Side View

                  11) side r.jpg

                  Top View showing indexing device, shaft angles and spring loaded pin that sets chuck position

                  13) top r.jpg

                  The calibrated cam-plate device next to the pivoting handle isn't used for drill sharpening.

                  Clive

                  #490369
                  peak4
                  Participant
                    @peak4

                    Thanks for that Clive, the top view makes things a bit clearer.
                    I do have a Mk1 Clarkson T&C grinder that I obtained from a neighbour who runs the local skip hire company.

                    I've never seen their drill sharpening gizmo in real life, nor spotted one at a justifiable price for hobby use.
                    I've also got a Speetol tap lead attachment completely separate, so no real need for incorporating it into a drill sharpener.
                    We've discussed this before, but I'll post a link for other readers.
                    I've still not used it properly yet as I spent most of the local lockdown fettling the Herbert.

                    I get the idea roughly now, in that you set the drill cutting edge's included angle on the top table of the grinder and the pivoting action of the chuck off-axis provides the curved relief.

                    A short reply as I'm between courses of our tea.

                    Cheers

                    Bill

                    #490372
                    Clive Foster
                    Participant
                      @clivefoster55965

                      Bill

                      Not quite. The grinder table angle is irrelevant. All that matters is that the drill is at the right angle to the grinding wheel to give the desired point angle.

                      The factory Clarkson set up has the table at 15° for drill sharpening because that makes calibration easier for the tap grinding function which has the table at a different angle anyway.

                      Clive

                      #490377
                      peak4
                      Participant
                        @peak4
                        Posted by Clive Foster on 12/08/2020 23:21:47:

                        Bill

                        Not quite. The grinder table angle is irrelevant. All that matters is that the drill is at the right angle to the grinding wheel to give the desired point angle.

                        The factory Clarkson set up has the table at 15° for drill sharpening because that makes calibration easier for the tap grinding function which has the table at a different angle anyway.

                        Clive

                        I sort of meant that, as I thought the base of the attachment was keyed to the slot in the table, with the photo showing the casting edge at apparently right angles.
                        Cheers

                        Bill

                        #490378
                        Ady1
                        Participant
                          @ady1

                          An interesting subject where no system has ever really become the definitive route for the hobby market

                          I had one of those picador type things but it was too fiddly for me

                          Used a great one from B+Q years ago which was fabulous for the 48 hours that the grinding stone lasted but the spare stones were about a fiver for two

                          The multisharp uses the same sort of simple stone system, the big problem is you put a gutter into the stone really fast once you start doing a few drills

                          Lidl cheapo ones for a fiver tend to have two spare cup stones

                          Grinding drills by hand helps to keep your eye in for when you need to grind a special cutting tool

                          It's a real whatever-works-for-you thing where hand sharpening gives the least hassle for an acceptable return

                          Edited By Ady1 on 13/08/2020 05:53:32

                          #490397
                          10ba12ba
                          Participant
                            @10ba12ba

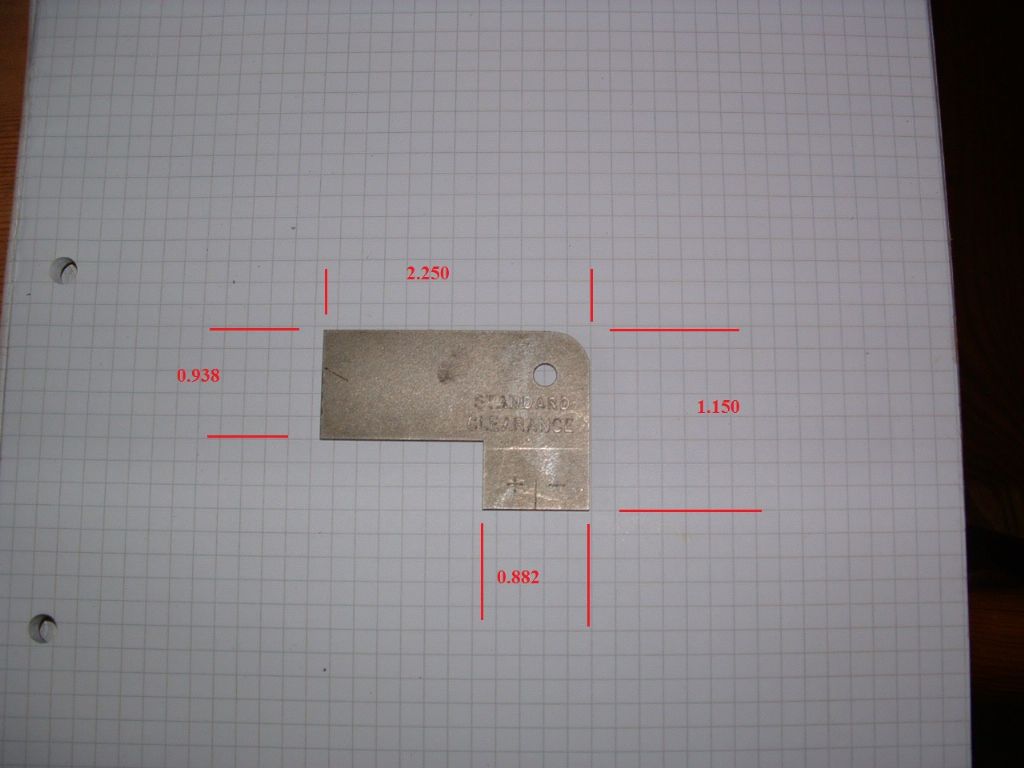
                            CLARKSON SETTING GAUGE.

                            poor photo attached, gauge is 1/16" thick, legend reads "STANDARD CLEARANCE" with + to lhs of the line and – to rhs.

                            gauge1.jpg

                            #490402
                            Emgee
                            Participant
                              @emgee

                              The lands look too wide to me on the Unknown Make New(ish) Four Facet Commercially Ground; pictured above, also I understood the grind lines between clearance angles should be parallel on a correctly ground 4 facet drill.

                              Emgee

                              #490429
                              Howard Lewis
                              Participant
                                @howardlewis46836

                                From the sublime to the Gor Blimey,

                                Plasplugs, via Picador to a Clarkson!

                                If you can access a cutter grinder, the four facet method is by far the best method of drill sharpening.

                                Effectively an end mill ground at an angle.

                                Very effective, and reputed to be self centering, and so no need for centre drills or spotting drills.

                                Howard

                                #490452
                                Clive Foster
                                Participant
                                  @clivefoster55965

                                  Great picture of the setting gauge. Many thanks.

                                  All drawn up and ready to make next time I'm on t'mill.

                                  Clive

                                  #760956
                                  Chris152
                                  Participant
                                    @chris152
                                    On peak4 Said:

                                    I’ve been having a bit of a play this afternoon as the weather wasn’t up to much.
                                    Rather than hijack the other thread, which was asking specifically about the Sealey SMS2008 drill sharpener, I thought I’d start a new one for a quick comparison.

                                    Maybe others could contribute some ideas and photos to this thread, so that it could be used for reference and learning.

                                    Doubletop-Pete commented, in the above thread, that he felt that his Sealey was taking off too much metal; so was mine out of the box, albeit a second hand box.

                                    Hi all, I’ve tried to access Doubletop-Pete’s thread but it doesn’t seem to exist anymore? I just received an SMS2008 and it seems to cut off too much metal on the first cut, and the chisel isn’t properly centred after the second side. I’d like to try to adjust the wheel position – can anyone advise how to do this? The manual says nothing about it.

                                    Thanks, Chris

                                    #760972
                                    Chris152
                                    Participant
                                      @chris152
                                      On Chris152 Said:
                                      On peak4 Said:

                                      I’ve been having a bit of a play this afternoon as the weather wasn’t up to much.
                                      Rather than hijack the other thread, which was asking specifically about the Sealey SMS2008 drill sharpener, I thought I’d start a new one for a quick comparison.

                                      Maybe others could contribute some ideas and photos to this thread, so that it could be used for reference and learning.

                                      Doubletop-Pete commented, in the above thread, that he felt that his Sealey was taking off too much metal; so was mine out of the box, albeit a second hand box.

                                      Hi all, I’ve tried to access Doubletop-Pete’s thread but it doesn’t seem to exist anymore? I just received an SMS2008 and it seems to cut off too much metal on the first cut, and the chisel isn’t properly centred after the second side. I’d like to try to adjust the wheel position – can anyone advise how to do this? The manual says nothing about it.

                                      Thanks, Chris

                                      Sorted – just undo the grub screw on the shaft and it moves!

                                      #760999
                                      Andrew Tinsley
                                      Participant
                                        @andrewtinsley63637

                                        Howard,

                                        Not exactly cor blimey. The results from the cheapo Plasplugs plastic unit are incredibly good. I have a few drill grinding jigs and this is by far the best one. So if the cheapo Plasplugs unit can do it why are other jigs inferior?

                                        Andrew

                                        #761013
                                        noel shelley
                                        Participant
                                          @noelshelley55608

                                          The Clarkson drill grinding attachment seems to fetch about £500 or more for a good one with the bits that go with it. I went for the Brierley and was lucky to get one with all the accessories for just under £1000. It is so easy to use and very quick even for drills of 1.25″, and 1, 2, & 3MT. The various cams and levers make the process simple and various point forms can be done.  The biggest problem I had was getting wheels balanced, even some new wheels were so far out it was a problem. A J & S balancing way sorted that out, it was then that I was able to see how far out the wheels really were. Even with the wheel only slightly out it would show as small lines on the drill face, not enough to matter but I knew they were there. The Brierley has a wheel carrier that can be balanced, then fitted but the Clarkson has no provision for wheel balancing, which seems strange.

                                          I had a picador but this was hopeless on a bench grinder with an out of balance wheel. Noel.

                                          #761020
                                          Neil Lickfold
                                          Participant
                                            @neillickfold44316

                                            Great thread and pictures.

                                            Your split point is what I call a web thinned drill.

                                            Your 4 facet is what I call a split point drill.

                                            The 4 facet drill grind, is when it is sharpened like the new plain ones, but then an extra relief is ground on each side, that aligns very closely to the very centre of the drill. I sharpen mine mostly by hand. The 4 facet that I mentioned, is not easy to do manually but, if I sharpen on a weekly basis it keeps my eye in. The relieved standard grind or the 4 facet as I call it, seems to last the most number of drilled holes.

                                            The split point drill geometry takes the least amount of pressure to drill a hole. Even with a 32mm drill, can be used without a smaller pilot drill in a large enough machine. On the S7, a split point 5/8 drill will drill very well without a pilot hole.

                                            Work has an old Darex drill sharpener that will create the std grind, the web thin option and the split point option as well. It won’t create what I call the 4 facet option and sharpens drills from 3mm to 3/4 inch. It will not hold a 20mm spot drill.

                                            I use a very small centre point/spot drill/centre drill to create the initial starting pocket. Usually only about 1mm deep or so. Then I drill at a slower rpm and a very fine feed rate until about 1 drill diameter deep. Then increase the speed for that size drill and drill at a modest feed rate. Normally no more than 2 thou per rev (0.05mm). I end up with mostly straight holes that are very close to the correct size. Sometimes a hole will wonder , and have found that to be in the cheaper material stocks where quality control is not the best, or it has got hot and effected the material being drilled. Use ample cutting fluid and if it gets hot, drill bit or work piece, then slow down the rpm.

                                            Neil

                                            #761027
                                            bernard towers
                                            Participant
                                              @bernardtowers37738

                                              If you grind a secondary point angle on the drill stays sharper longer as you are halving the angle on the outside corner of the dril where the most work is done and heat generated. This I believe comes from our friends over the pond some time in the middle of the last century and is also reputed to give a more polished finish to the hole.

                                              #761145
                                              Alan Wood 4
                                              Participant
                                                @alanwood4

                                                I struggled with the above discussed devices and then found John Moran’s design on Gadget Builder for a Four Facet Sharpener.  His notes on sharpening are worth reading and he has a YT video associated. Being fundamentally lazy I worked with him to produce a 3D printed version of the Four Facet Sharpener assembly.  It makes sharpening drills a pleasure.  The process is simple and most important of all it gives very accurate repeatable results.

                                                #761155
                                                Taf_Pembs
                                                Participant
                                                  @taf_pembs

                                                  Thanks to this thread I kicked myself into actually sharpening several of my poor drill bits this afternoon. I’ve had the Sealey 2008 for a good while and have used it occasionally in the past but never thought much of it.

                                                  Bits would often chip badly almost straight away after sharpening which now makes sense and after today I probably will do them by hand in future.

                                                  On closer inspection (thanks to this thread!) every bit would end up with 1 face slightly longer than the other. I stripped and cleaned everything including the holder but the outcome was still the same.

                                                  The finish was pretty rough but good enough for a drill bit and I ended up having to not fully grind the bits, once the face was full and all traces of chips removed I had to keep swapping sides and checking it until I could get an even grind on both flutes.

                                                  Obviously needs more investigation although the holder doesn’t seem to grab the bit evenly for some reason.

                                                  But then going by me luck I’ve probably got a dodgy one!!

                                                  #761206
                                                  noel shelley
                                                  Participant
                                                    @noelshelley55608

                                                    A simple way to check MT bits is to use the centre drilling in the tang ! Make a LONG L out of stout material, so it doesn’t flex, make the short end say 3″ and mount a point in it’s end. Sit the drill on the point and scribe a line with one flute edge and then the other, if both faces are the same length there will be only one line ! If two lines not which is the longer and regrind to get equal lengths. You get the idea ? Noel.

                                                    #761279
                                                    Howard Lewis
                                                    Participant
                                                      @howardlewis46836

                                                      I’ve got a Picador type, but never really got on with it. Others do, so have more skill and patience than me.

                                                      Being heavy handed, melted the plastic drill holder in a cheaper “Will sharpen anything” device.

                                                      Having made a Worden, that is now used to four facet grind drills; good results every time. But obviously at a cost in time, effort and cash, which is repaid in the ability to sharpen most tools accurately and consistently.

                                                      Howard

                                                    Viewing 25 posts - 1 through 25 (of 54 total)
                                                    • Please log in to reply to this topic. Registering is free and easy using the links on the menu at the top of this page.

                                                    Advert

                                                    Latest Replies

                                                    Viewing 25 topics - 1 through 25 (of 25 total)
                                                    Viewing 25 topics - 1 through 25 (of 25 total)

                                                    View full reply list.

                                                    Advert

                                                    Newsletter Sign-up