DIY Epoxy Frame based CNC MILL

Advert

DIY Epoxy Frame based CNC MILL

Viewing 25 posts - 1 through 25 (of 78 total)
  • Author
    Posts
  • #15204
    John McNamara
    Participant
      @johnmcnamara74883

      A heavy bench top V mill

      Advert
      #380411
      John McNamara
      Participant
        @johnmcnamara74883

        Hi All

        This is going to be a very long thread, I suspect I may be adding to it for at least a year.

        As a few in this place will already know I am interested in using mineral castings to make machine frames. A mineral casting made from granite or quartz aggregates and a polymer my interest lies in using epoxy as the binder for various reasons preferable to say the polyester used in making fiberglass boats. Polyester resins shrink too much so that counts them out. Portland cement falls short for the same reason it shrinks and cracks. I will cover this in more detail as the build progresses. For those that want to do their own research there are many many papers on the subject. Link

        **LINK**

        The machine is a vertical milling machine that very roughly will fit within a 1 Metre cube Travels are Y300 x X520 x Z250 Quite easy to extend if you have the room, I do not.

        I have drawn in a Chinese high speed spindle, this will work fine for non ferrous metals, most plastics and wood. For steel a slower more powerful spindle will be a better choice that is an option for the builder.

        As you can see I have built a 3D Cad model of the machine.

        Having built other machines in the past I decided that I did not want to make every part of the machine, In particular I wanted to use laser cut steel where possible and this includes the complex steel molds to make the castings, The molds will be reused by others this will share the cost.

        Image below is for the cross member that supports the X Axis.

        Support column mold 1 of 2

        Base Mold

        Z axis carriage ​

        As you can see from the images Extensive steel reinforcement is used made from 12 and 8mm all thread these days in Australia very inexpensive.

        There are also numerous turned steel inserts I made myself on the lathe (Nothing that a small lathe cannot handle) also a number of store bought steel hex long nuts.

        I am going to post this here in case the forum software will not post; that sometimes happens when you edit for too long. I will then keep going.

        #380412
        Michael Gilligan
        Participant
          @michaelgilligan61133

          An excellent project, John

          I look forward to following your build.

          MichaelG.

          #380416
          John McNamara
          Participant
            @johnmcnamara74883

            To build this machine a surface plate will greatly assist while not essential without it much time will be wasted.
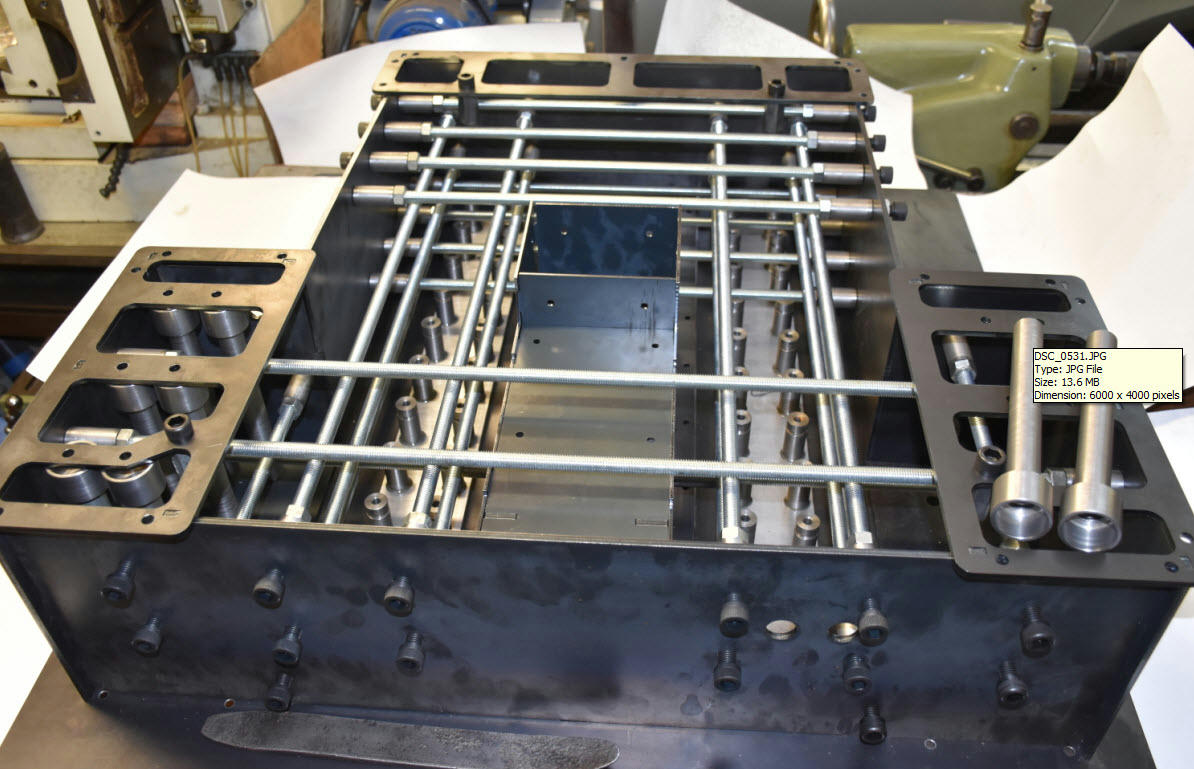
            Observe the image below. The flat plate is the bottom plate of the mold that will form the top of the base, it will be cast upside down. Note the steel bars with multiple inserts projecting from them. They are sitting in rectangular holes These bars were precision ground by an outside contractor. Not very well unfortunately so I spent many hours scraping them flat, the inserts are epoxied in after the grinding, this will no doubt not make sense at the moment it will later.

            The join between the bars and the base plate, part of the mold not the machine will be sealed with silicone. The scraped face of the bars will be aligned by the face of the surface plate and constrained laterally by the laser cut holes in the mold plate, when the mold is removed the the bars will be left projecting 5mm from the casting. These bars will be used mount the linear rails.

            Example of how the rails will be aligned by Laser cut Then countersunk by me later cams Held by 30mm x M8 CSK machine screws, screwed into the pre turned drilled and tapped inserts glued into the lapped mounting bars. (Prior to drilling and tapping the M6 holes to mount the liner rails). This will be done after the casting has been made, small errors in placement prior to casting is easily corrected here. The cams will also make a very rigid mount for the rails.

            The inserts sit slightly below the surface of the scraped bars The only significant force on them is the force applied by the machine screw, they are deeply cast in, there is little chance of them pulling out.

            As shown the molds are bare metal, the next step is to disassemble them then wrap the individual pieces in self adhesive plastic. This is the primary mold release it will also be coated with silicone mold release prior to casting.

            None of the molds have any draft. They are designed to disassemble piece by piece like a giant puzzle there are hundreds of locating tabs that keep all the parts perfectly aligned (within .1mm or better straight off the laser)

            There is no reason apart from the time needed to construct them that Say painted MDF molds could be used.

            There is no welding of any machine part apart from whatever tube frame is used to make the stand it sits on.

            I am making the cross member mold first. The images are not quite complete there are a number of small parts to be added before the first casting. I will be using the same epoxy aggregate mix I used for the epoxy warden grinder I posted here some years ago. Once cast I will post.

            Regards
            John

            #380453
            David George 1
            Participant
              @davidgeorge1

              I worked on a CNC mill made of composite material it was an OPS Ingersoll made in Germany and worked pretty well except before we bought it someone tried to lift it with a fork lift truck and it had slight damage to front base casting.

              David


              Edited By David George 1 on 13/11/2018 19:29:57

              #380517
              John McNamara
              Participant
                @johnmcnamara74883

                Hi

                I thought I should talk a little about how the machine castings will be assembled and aligned.

                The Base and cross member support the X and Y axis linear rails, together with the 2 columns this assembly defines the X, Y and Z geometry of the machine. My plan is to fit and properly align the linear rails to the base and cross member castings first before assembly. As noted previously the rails are mounted on steel supports that were aligned to the surface plate before they were cast in position. After the casting has cured these support plates will blued and rechecked against the surface plate again. This will confirm if any errors are present that need to be finally corrected by scraping. At this point I will be able to move on and set the rails in position on their respective castings before the machine is assembled. This is where the cams come into play. Remember the M6 tapped holes have not yet been drilled in the rail support plates. The cams allow about 1.5mm of lateral adjustment this is more than enough to correct any lateral misalignment of the support plates in the casting mold.

                The cams allow extremely fine adjustment of the rails I have already tried this, it turns a chore into a joy, left in position they also provide very strong lateral support for the rails.

                The laser cut mold base plate shown was checked with a Moore & Wright 600mm precision square for squareness it was perfect by eye measurement. Measuring the piece I could find no outside the design plan errors, all was well within 0.1mm.

                When mounting linear rails there is a built in tolerance that allows slight adjustment after the rails are positioned. The rails I am using have 7mm counter bored holes provided, the cap head mounting bolts are M6. the hole spacing in this case is 60mm, there are a lot of holes to drill and tap. Once drilled this allows a .5mm lateral adjustment for any mounting or positioning error provided the holes are perfectly drilled and tapped on center, I have made a drilling jig to do this. without a jig it is easy to get one or two holes of center maybe binding and forcing the rail to the side.

                The base plate and cross member castings with their attached rails are supported by the two columns. They all have to be aligned. I considered this for some time, what is the best way to do it?

                For this design I decided to simply attach the columns to the base without adjustment. The columns are bolted to the base with 6 by M12 high tensile all thread and nut fastenings. Both the base and the column base have 10mm laser cut and drilled mild steel plates cast in position, the plates have been flattened on the mating sides this will form a very rigid joint. I do not expect the columns to be perfectly aligned to each other. I do however expect them to be within the allowed tolerance.

                My plan is to do all the alignment of the X Y and Z planes using built in adjustment of the cross member.

                There are built in screw jacks in the cross member that will allow me to align the rails, this will leave a gap between the cross member and the two column mounting faces. This gap would certainly not provide a rigid joint, it will be filled with epoxy grout (a mix of metal powder and epoxy) I make my own, Google "Epoxy Bearing material and method" or Moglice If you want to know more.

                Once this has been done the jacks have done their job and will be no longer operable unless the grout was removed. The machine frame will be one integrated rigid unit.

                To be Cont…….

                Edited By John McNamara on 14/11/2018 00:03:16

                #380593
                John McNamara
                Participant
                  @johnmcnamara74883

                  Hi All
                  The rail drilling jig mentioned previously in this thread.

                  It is important the the tapped M6 holes are accurately centered on the 7mm rail mounting holes
                  After studying various alternatives I decided to use the rail bearings themselves to mount the drilling jig I also made a center punching jig and mounted that on a bearing as well the bearings will be later used on the machine.

                  The counter bored holes on the rail itself provide an ideal locating point. Note in the images below how this is done, there is a hardened drilling bush that slides into the counter bore locking and centering the bush drill and punch together with the precision linear bearing this creates a very accurate setup. easily made from mild steel.

                  Also note the two 2.5mm in the cams, these are for a pin wrench to allow adjustment. The cams are 4mm thick.

                  Accurately Drilling over 100 holes through 16mm steel plate would require a great physical effort, my bench drill press is too small. I needed a small hand drill press that I could attach to the drilling jig. Remarkably I found one at the side of the road (in Australia we have hard rubbish days once or twice a year) It was made by AEG. Perfect for what I wanted to do. I found out later they are quite inexpensive. I already had an AEG drill that fitted.

                  Drilling a through hole against the epoxy aggregate would result in a chipped dull drill, I have decided to glue a strip 12mm sq balsa wood to the steel rail mounts behind the drill line prior to casting to protect the tip of the drill and to allow easy through tapping of the holes.

                  The press had a base plate and 25mm steel column. I slid that off and made a new column to fit the jig as shown above, I now have proper control and the necessary leverage to drill the holes. Job done!

                  To be cont….

                  Edited By John McNamara on 14/11/2018 14:15:40

                  #380691
                  John McNamara
                  Participant
                    @johnmcnamara74883

                    Hi

                    I forgot to point out that the rails are positioned with the cams laterally before the mounting holes are drilled. The cams are set so that tightening the M8 x 30 CSK screws presses the cam against the side edge of the rail on tightening. the reason for the length of screw is to reduce any tilting of the screw in its tapped hole.

                    Positioning is done with a tenth indicator and straight edge for the first rail then the other rail is set to that.
                    The indicator is mounted on a linear ball bearing that will later be used on the machine.

                    Once the rails are tightened down the positioning may need to be adjusted to correct any small errors caused by the tightening procedure.

                    This is why the drilling is so important, done perfectly we have 0.5 of a mm available if it was.

                    Regards
                    John

                    Edited By John McNamara on 15/11/2018 02:42:16

                    #380706
                    John McNamara
                    Participant
                      @johnmcnamara74883

                      As the cross member will be cast first it is a good time to review its components

                      The cross member has a volume of 0.02 cubic metres The granite and silica sand aggregate used weighs about 2200 KG per cubic metre therefore the epoxy composite material used should weigh about 44 KG add to this the steel parts and the component will weigh maybe double that. When I have the time I will compute the steel. Autocad does not do this automatically I have to do it piece by piece.

                      Cross member see through view

                      As mentioned previously built in jacks are used to position the cross member before it is epoxy/metal powder grouted in position. See red arrows below

                      Side View showing jacks, also the joint between the columns and the cross member, green arrows and purple and green lines. It is between these lines that the grouting will be inserted after the machine is aligned.

                      Alignment jacks red arrows oblique view.
                      Also note Left limit switch Right switch not shown. They sit in laser cut protective housings. The switches are moderately priced standard industrial micro switches, rated for millions of operations.

                      To be cont….

                      #380849
                      John McNamara
                      Participant
                        @johnmcnamara74883

                        How much does Epoxy cost?

                        I did a quick google search for UK suppliers and found this example, I have no connection to the company.
                        I did not do a comprehensive search, no doubt there are other suppliers.

                        A 2.6 litre pack costs 36 pounds inc vat About 13.84 per litre (standard cure we do not want fast)

                        **LINK**

                        The volume of the cross member casting is 20 Litres (I have not deducted the volume of the steel inserts so it will be a little less)

                        Depending on the aggregate and the particular epoxy used I have found that 12 to 15% epoxy by volume will be needed. There are numerous technical papers on the internet that discuss the mix.

                        The 2.6 litre pack above should be about the right size to make the cross member part.
                        Add a couple of pounds for the aggregate and silica sand and that about it for the casting materials.

                        Edited By John McNamara on 15/11/2018 23:22:32

                        #381040
                        John McNamara
                        Participant
                          @johnmcnamara74883

                          Notes re laser cutting joints.

                          The cross member and base has a laser cut steel enclosures attached that terminate the wiring, air and (water kept separate) lines and provides a base for the connectors. red arrows Also the green arrow points to the way cover blind roller brackets (hidden from view)

                          Some parts have been cleaned and the edges have been ground removing sharp corners.

                          Test assembled without fastenings they just fit together.

                          Joints
                          There are a few basic joints I use two are shown below, one for plain cap screws and one for countersunk screws.
                          Most of the time the screw size is equal to or one size higher than the plate thickness. Countersunk screws require that the hole is countersunk after the laser cutting, an easy job.

                          CSK joints have to be planned carefully to match the screw.

                          0ne standard M6 cap screw and one CSK cap screw, a firm joint. the bracket is 5mm thick mild steel

                          Edited By John McNamara on 17/11/2018 14:34:45

                          #381125
                          S.D.L.
                          Participant
                            @s-d-l

                            This looks an interesting post, keep them coming as you can.

                            Steve

                            #381167
                            SillyOldDuffer
                            Moderator
                              @sillyoldduffer

                              Threads like this leave me slack-jawed with amazement. Saying "Wow!" is the limit of my contribution. I agree with S.D.L – please keep publishing. Sometimes the better the thread the fewer the comments!

                              Dave

                              #381171
                              Watford
                              Participant
                                @watford

                                Absolutely and completely fascinating.

                                Thanks for all the effort.

                                Mike

                                #381496
                                John McNamara
                                Participant
                                  @johnmcnamara74883

                                  Firstly thank you for the words of encouragement Michael, Steve, Dave and Mike. and Nick from another place.

                                  I had a couple of questions re the cams?

                                  The first test was made by parting off some 25mm mild steel, drilling the offset 8mm hole than countersinking it.
                                  a wood block was used to provide a base.
                                  The test worked very well however the time taken was longer than I would like, and this did not include the spanner holes.

                                  To save time the parts were laser cut as below including the 2,5mm spanner holes
                                  The countersinking I would have to do.

                                  A simple jig was made to hold the part using the spanner holes.

                                  The jig was placed in the 4 jaw chuck and centered on the 8mm hole using the tail stock centre.

                                  Finally the hole was countersunk using the tail stock ram.
                                  I tried using the drill press and found that it did not have the rigidity of the lathe,
                                  the tail stock offered better control.

                                  The part was not clamped the tool keeps it pressed against the jig when cutting
                                  The pins are a good fit. Made from M3 cap head screws screwed in from the back of the jig.
                                  I ground the projecting part to 2.5mm to fit the spanner holes in the cam.

                                  I also spent some time over the weekend tiding up the cross member mold. It is almost ready to cast!
                                  Maybe next weekend if all goes well.

                                  Edited By John McNamara on 20/11/2018 10:08:42

                                  #381599
                                  SteveI
                                  Participant
                                    @stevei

                                    John,

                                    Wonderful thread and please do keep posting, the more detail the better!

                                    Steve

                                    #382269
                                    John McNamara
                                    Participant
                                      @johnmcnamara74883

                                      Hi All

                                      This week I purchased 20 litres of Megapoxy H This was the epoxy I used to make the Epoxy Worden Grinder I made about 7 years ago. and published on this forum. The spec sheet for Megapoxy can be downloaded from their Australian website. I have no connection to the company apart from being a satisfied customer. Yes I am very happy to recommend them they have been most helpful.

                                      For other countries there are many companies that will offer a similar product. look for an epoxy with similar physical properties and make sure it does not contain solvents. As the name suggests solvents evaporate causing shrinkage, we do not want any mold shrinkage.

                                      To see the casting process page down a little here: **LINK** This project was made some time ago using a simple MDF mold.

                                      Why is it that the weekend is not long enough! I had planned to pour the first casting however the few loose ends to tidy up grew. Much progress has however been made, the mold plates have been covered in plastic sheet that was in stock. Ignore the age spots, aAlso some components have been wrapped in silver vinyl duct tape. this will form a barrier stop the epoxy sticking to the steel. Before the pour the mold will also be coated with mold release

                                      Cross member mold assembled 98%

                                      As above inner frame removed

                                      #382274
                                      Neil Wyatt
                                      Moderator
                                        @neilwyatt

                                        Have you considered embedding tubes or even wires for stop switches and things like DRO strips directly into the cast?

                                        A magnetic scale in the surface could be very neat.

                                        Neil

                                        #382279
                                        John McNamara
                                        Participant
                                          @johnmcnamara74883

                                          Hi Neil

                                          I provided for embedded 20mm PVC conduit to carry the y axis servo encoder and drive and the Y axis limits in the base mold. it connects to the control junction box noted earlier in this thread.

                                          Thanks for reminding me to do it for the cross member limits, that list just keeps growing……

                                          Aqua blue lines are the mold.

                                          #382366
                                          John McNamara
                                          Participant
                                            @johnmcnamara74883

                                            While i was preparing the transparent base image above I grabbed a couple of views that show the way the swarf guard blinds are set up

                                            As can be seen there is not a lot of room available in this area after the Ball screw, linear rails, limit switches and cable chain are accomodated.

                                            See earlier in the thread how the roller end brackets already laser cut are joined. aluminium swarf blinds are available commercially they have neoprene sealed joints to keep coolant out. Alternatively industrial heat resistant conveyor belting could be used, More investigation is required for the best solution at reasonable cost.

                                            The belt is not rolled up it hangs down with a weight at each end, Rolling it up dirty I suspect would be problematic. A catchment tray is planned under the table. the rollers are sized for low cost skate board bearings.

                                            The swarf guard blinds are supported by the top of the linear rails as well as at the edges, There is also a lip at each end of the table to keep swarf out. in combination with the blind the mechanism should remain pretty clean.

                                            This is where CAD comes into its own, every part given its own space, and not much more.


                                            Edited By John McNamara on 26/11/2018 08:20:27

                                            #382370
                                            martin perman 1
                                            Participant
                                              @martinperman1

                                              Many years ago, 80's, when I worked as a machine tool fitter we had grinding machine's, from memory Studer, whose bases were made from concrete, the reasoning was that manufacture was quicker and they didn't need stabilising.

                                              The mechanical's sat on inset plates which stood proud so that when the base was finished the plates could be machined to get everything level and steel plates were embedded into the base underside so that leveling feet could be fitted.

                                              Martin P

                                              #382379
                                              John McNamara
                                              Participant
                                                @johnmcnamara74883

                                                Hi Martin

                                                **LINK**

                                                The Swiss company Fritz Studier Held one of the early patents. Now lapsed.
                                                They used "polymer concrete" With their proprietary name Granitan using Ciba Geigy resin.

                                                Polymer concrete is the description used by the Europeans, Epoxy Granite is used more on the other size of the Atlantic by the US

                                                The reason for the break from Cast iron was not cost it was about the considerably higher vibration damping properties. The almost, and some say zero shrinkage of the cast after curing. and the advantage of being able to place steel inserts, pipework and other fittings within the almost cold mold. Casting accuracy of a thou .001" is not uncommon. Compare that to cast iron and the considerable amount of metal removal required to finish machine it.

                                                On the con side it has a much lower tensile strength. You have to use thicker sections. and possibly for me anyway you have to rethink a project model to gain the benefits it offers.

                                                For the home builder polymer concrete opens many doors. Form work can be just about anything; plywood, metal, chip board, plastic etc. Simple molds can be made for once only use or more durable materials for reuse.

                                                And the rest of the world? See link below.

                                                **LINK**


                                                Edited By John McNamara on 26/11/2018 10:24:08

                                                #382489
                                                David Taylor
                                                Participant
                                                  @davidtaylor63402

                                                  This is an amazing project John. The forethought in the design is something else.

                                                  #383346
                                                  John McNamara
                                                  Participant
                                                    @johnmcnamara74883

                                                    Hi All

                                                    The first casting was made today!

                                                    Image below
                                                    This is the last time I will see all the components I made. as you can see there are no complicated parts.
                                                    Mainly a lot of simple lathe work, tapping holes and preparing threaded rod.
                                                    A few laser cut 2.5mm sheet parts. deliberately rough ground on one side for adhesion.
                                                    Also 2 16mm x 70 rail supports. I lapped one side flat (A lot of work)

                                                    Before starting the cast all the parts have to be cleaned with solvent I used methylated spirits.

                                                    The surface plate was very carefully cleaned then checked with the palm of the (clean) hand, this will detect tiny specks that you cannot see.

                                                    The surface plate was then covered with a new sheet of 80 gsm plan paper (with 2 large slots cut out 25mm all around wider than the bearing support rails) The bearing supports rails sit on waxed baking paper not plan paper, (When I measured it I found it has very uniform thickness) This is to protect the granite surface plate. The waxed baking paper was sprayed around the edges with silicone.

                                                    The 5mm thick mold bottom plate was then placed on the surface plate.Note all the long nuts screwed in from the bottom of the plate in countersunk holes all carefully checked that no CSK bolt head sits proud of the bottom of the plate.

                                                    The top of the plate is covered with self adhesive plastic to stop the epoxy sticking.

                                                    Laser cut mold parts ready for assembly. These will be reused.

                                                    Poured!
                                                    I am sorry I don't have any pictures of the molding process I was kept very busy placing and tamping the 4 mixes of about 5 litres of Epoxy aggregate This was topped of by a thin layer of sand epoxy as seen above.
                                                    I will try to get a helper to do the photographs on the next pour, There are 4 pours to go!
                                                    As you can see the finish is so so, I kept the mix ratio to 14% epoxy by volume, this makes a fairly stiff mix.
                                                    The 8mm Aggregate contained a few larger stones, For the next pour I will sieve the larger stones out. they made the tamping more difficult. I did it layer by layer. so the layer on the bottom would have been unworkable (but still very sticky) by the time I was doing the top layer.
                                                    The process took about 1.5 hours The weather was cool so there was no problem with the mix going off before it was placed

                                                    Exotherm? The mixing bucket got slightly warm only. When placed in the mold I could not detect any heat with my hand.

                                                    The mix was one part aggregate and about and 0,45 parts washed fine sand.
                                                    This was determined by filling a container with aggregate then slowly pouring the sand over the aggregate until no more sand could be poured in. I used a mechanical vibration. Note when this process was finished the volume is only one part. The sand simply filled the voids between the aggregate particles.
                                                    The final step is to sieve the aggregate to recover the sand which was then measured to determine its volume.

                                                    I used a cheap disposable bucket to mix with an 2500 Watt electric drill, and I needed those watts it was only just enough. The agitator was a low cost spiral mixing unit purchased from the local hardware for about 10 dollars.
                                                    Power mixing is essential.

                                                    This is for Neil Wyatt. Yes the Limit switch wiring is routed through the casting, they will go straight into the control box shown earlier this forum thread.

                                                    it's been a long journey, at last it will be possible to test how accurately the bearing support rails are aligned. Hopefully they will not have moved during the cure and I will not have to re-lap them.
                                                    The next step is to strip the mold, I will wait 48 hours at least to allow the material to cure.
                                                    This will be followed by attending to any small voids with body filler grinding off any rough spots, and rounding sharp edges followed by epoxy paint.

                                                    Regards
                                                    John

                                                    #383349
                                                    Neil Wyatt
                                                    Moderator
                                                      @neilwyatt

                                                      Excellent progress, John.

                                                      Neil

                                                    Viewing 25 posts - 1 through 25 (of 78 total)
                                                    • Please log in to reply to this topic. Registering is free and easy using the links on the menu at the top of this page.

                                                    Advert

                                                    Latest Replies

                                                    Viewing 25 topics - 1 through 25 (of 25 total)
                                                    Viewing 25 topics - 1 through 25 (of 25 total)

                                                    View full reply list.

                                                    Advert

                                                    Newsletter Sign-up