Crop Circles – poor surface when milling

Advert

Crop Circles – poor surface when milling

Home Forums Beginners questions Crop Circles – poor surface when milling

Viewing 25 posts - 1 through 25 (of 51 total)
  • Author
    Posts
  • #241391
    Iain Downs
    Participant
      @iaindowns78295

      Why do I get 'crop circles' when face milling?

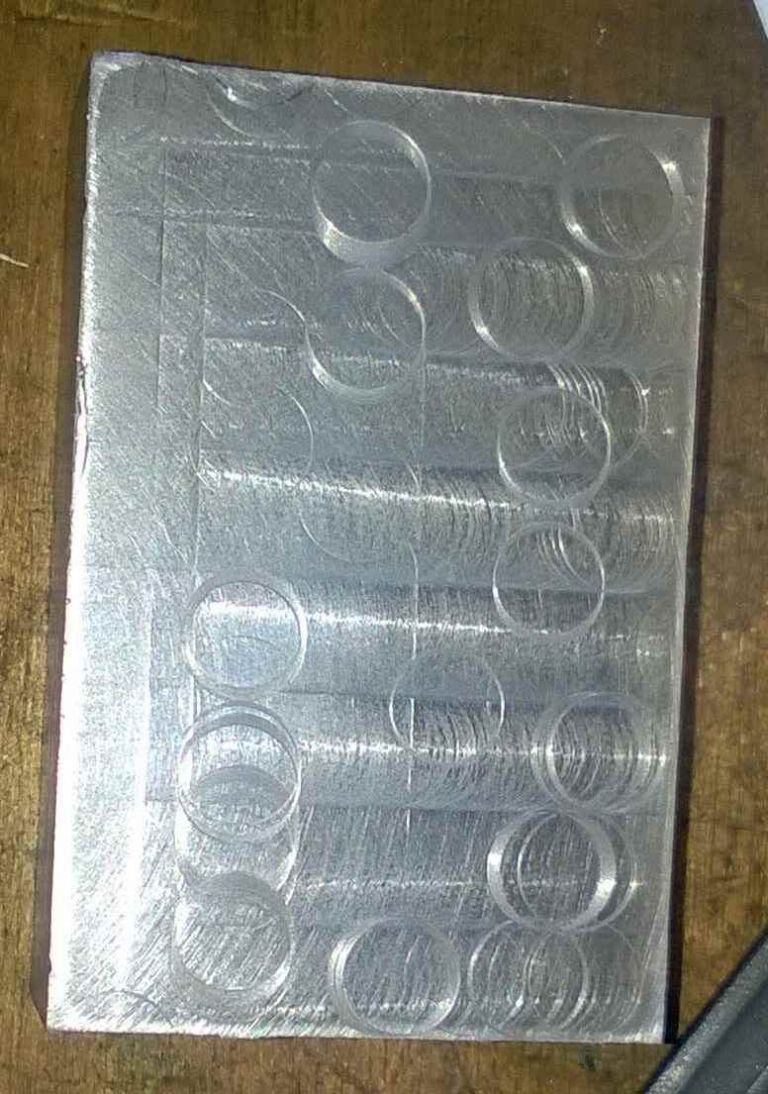
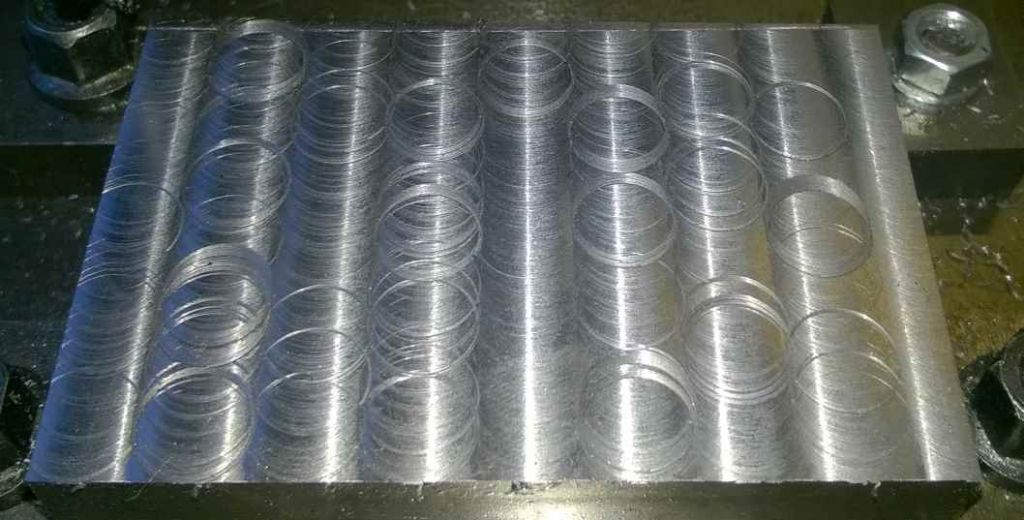
      Mill is a CMD 10. tool is a 10mm carbide mill from ARC depth of cut about 4 thou / .1mm. The first picture shows the result of a manual cut.

      by hand.jpg

      The crop circles are plain.

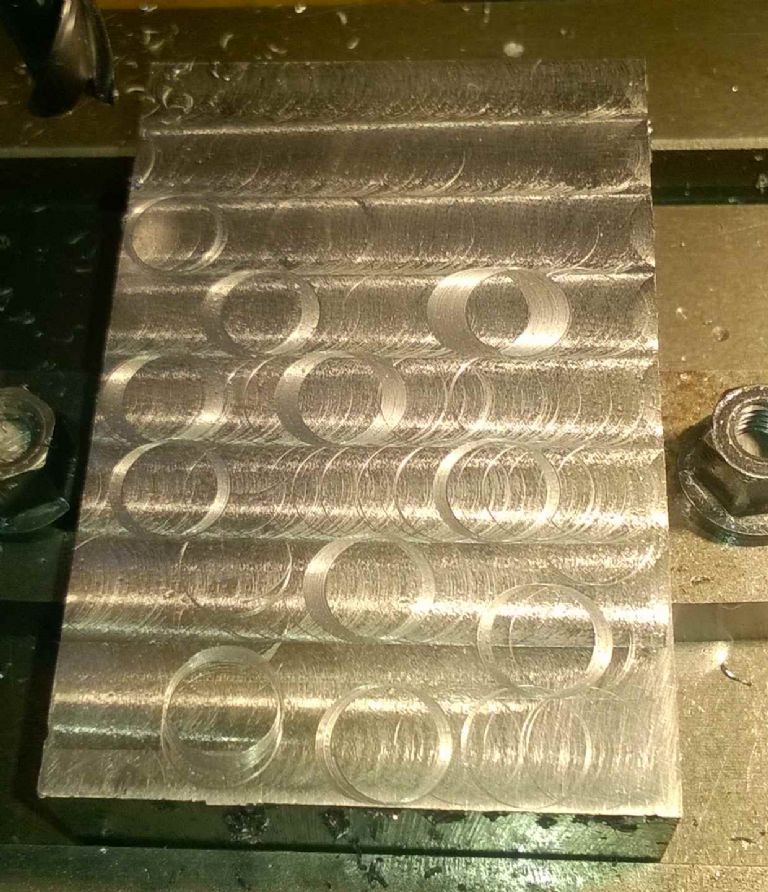
      I'm in the process of converting the Mill to CNC (of sorts) so the next picture is with the same piece of metal with a power feed (about 4mm / second and whole stop at 100 steps / mm)

      auto full step 4mm ps.jpg

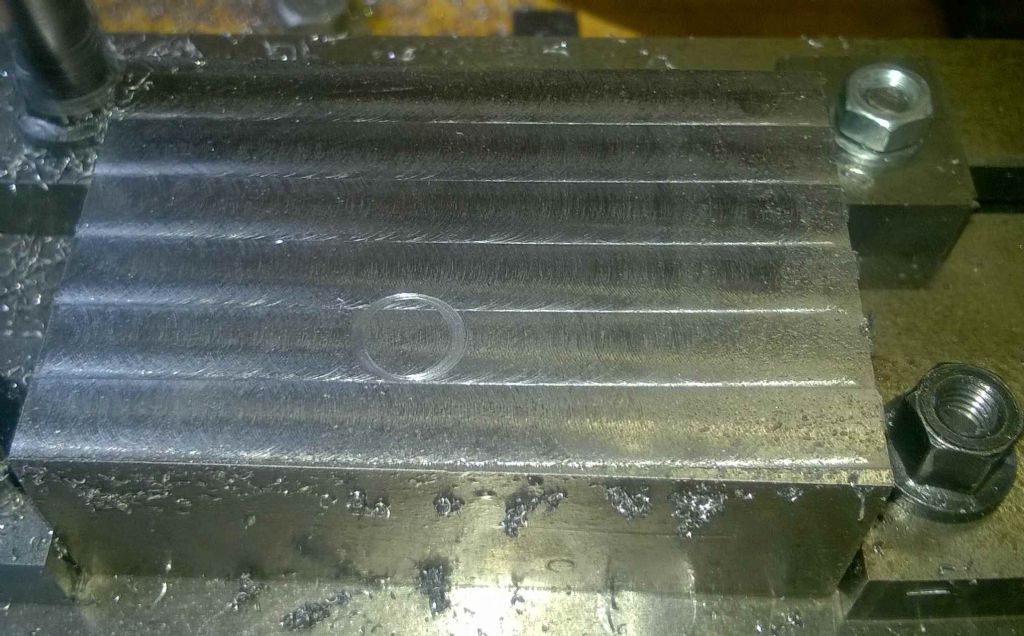
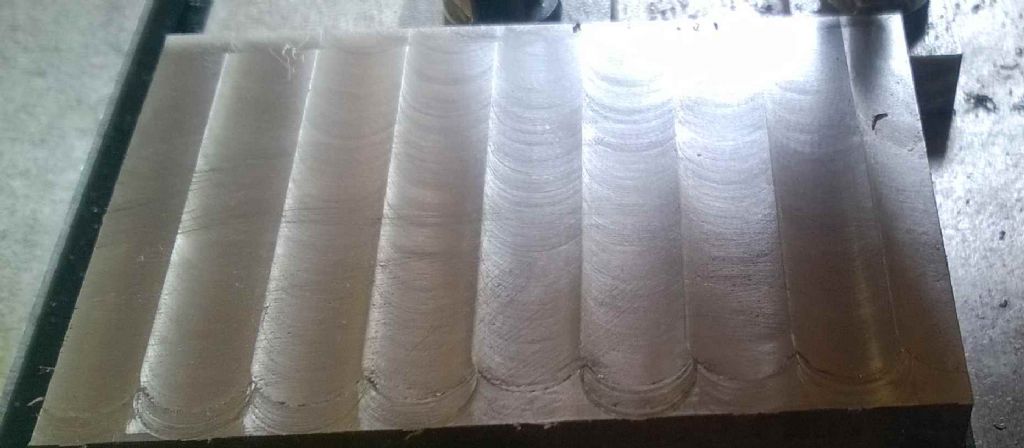
      Dissapointing, eh? then I switched to 1/4 step (should be much smoother – and certainly was by sound) and down to 2mm / sec.

      quarter step 2mm ps.jpg

      This one seems much better (the ridges are the subject of my other question).

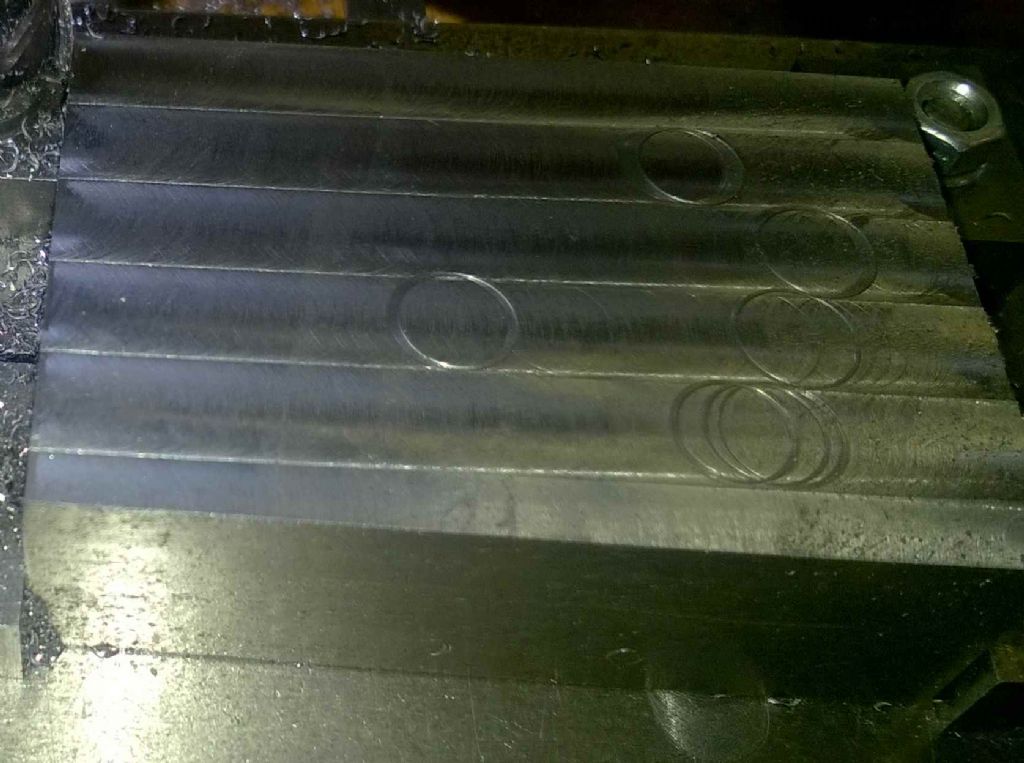
      However, here is a second run at the same spec

      quarter step 2mm ps 2.jpg

      So what causes the crop circles and how can I adjust the mill to avoid it.

      I should not that the Z axis is locked, but the spindle is not. Will that make a difference?

      Iaiin

      Advert
      #8148
      Iain Downs
      Participant
        @iaindowns78295
        #241404
        Neil Wyatt
        Moderator
          @neilwyatt

          I've been milling aluminium and steel with Arc's 10mm carbide endlmills today ai I haven't had any problems like that at all. I was going to say lack of rigidity somewhere and have just seen you 'spindle not locked' comment. yes that will cause this, the spindle only has to be dragged down by a fraction of mm to make a 'crop circle'.

          You need to completely lock out any up-down movement when facing, there's a surprising amount of force pulling the cutter down into the work, even on light cuts.

          Can you feel the ridges? If so, you may need to shim the column very slightly, you may also get better results if you overlap each cut by a bit more, but you will always be able to 'see' the pattern.

          #241407
          JasonB
          Moderator
            @jasonb

            At 4 thou I would say your cutter is riding up on the surface and then every so often the cutter is forced back down and the whole thing starts again. Hand feeding gives the cutter that momentery pause where it can drop back into the work.

            You say its one of ARCs carbide cutters but how much work has it done previous to this? If there is slight wear on the tips then it wil make matters worse.

            I have altered the title as some people may overlook it as chit chat.

            These are hand fed with Arcs HSS


            Edited By JasonB on 04/06/2016 18:41:38

            #241408
            Iain Downs
            Participant
              @iaindowns78295

              Interestingly, I've run the cut the other way as per below.

              mill face y x.jpg

              Which is much worse.

              As far as locking the spindle is concerned (CMD10), I'm not right sure how to do it. there's a hint I saw somewhere about a locking bolt on the bottom right face of the headstock, but if that's the way you lock it, then it's pretty damned stiff and seems to have not much effect on the spindle.

              The Z axis (the riser) IS locked – that's one I have learned.

              The ridges are caused (I think) by the table being out. See my other post…

              #241416
              Peter Krogh
              Participant
                @peterkrogh76576

                Your first few photos look like there's relative Z axis motion from somewhere. Could be anywhere. Something is jumping up and down.

                The last photo "Which is much worse." adds additional information that looks very much like chip welding. Put the two together and ……

                Cutters for aluminum need to be razor sharp and have a good rake like 10* or more. That and a cutting lube to stop any hint of chip welding will, given a rigid set-up, yield a good surface.

                That's my experience anyway….

                Pete

                EDIT: I just looked at the earlier photos again and I see no evidence of lube. Were you using any??

                Pete

                Edited By Peter Krogh on 04/06/2016 19:46:40

                #241418
                frank brown
                Participant
                  @frankbrown22225

                  Your end mill is not cutting across the centre, so it cannot have the long over centre cutting edge or you are picking up a bit of ali right at the tip – is there a bit welded on? Have you tried using WD40 as a cutting fluid?

                  Frank

                  #241421
                  Neil Wyatt
                  Moderator
                    @neilwyatt
                    Posted by Iain Downs on 04/06/2016 18:38:13:

                    Interestingly, I've run the cut the other way as per below.As far as locking the spindle is concerned (CMD10), I'm not right sure how to do it. there's a hint I saw somewhere about a locking bolt on the bottom right face of the headstock, but if that's the way you lock it, then it's pretty damned stiff and seems to have not much effect on the spindle…

                    Looking at the manual that is for reducing play in the spindle by pinching up the casting.

                    For milling you should have the fine-feed (handle at front left) engaged. I can't work out if there is a proper spindle lock or you have to rely on this for z-axis locking?

                    You might find this manual for essentially the same machine more useful.

                    Neil

                    #241422
                    JasonB
                    Moderator
                      @jasonb

                      Third photo where the cutter is still turning in the top left suggests you are climb milling which is not ideal on a less that rigid machine.

                      The last photo in your opening post also looks like there is a lot of movement somewhere as the line of the cutter seems to curve up towards the right hand side of the block

                      #241426
                      John Purdy
                      Participant
                        @johnpurdy78347

                        Are you using any cutting fluid? What is the material you are milling? This looks like the material is welding itself to the corners of the mill, hence making it slightly longer, causing the grooves. It then breaks off allowing the mill to cut normally till some more builds up. Hence the erratic pattern. I've seen this before when milling (or turning) very ductile materials, like soft aluminum or mild steel. The application of lots of cutting fluid will prevent the buildup on the cutting edge thus preventing the rings.

                        John Purdy

                        #241428
                        Iain Downs
                        Participant
                          @iaindowns78295

                          At the moment, my best guess is that the Y gib is a bit loose – I softened it up to try and see why I was having trouble with my CNC conversion and I've not reset it. I shall have a look that tomorrow.

                          The mill has done little other than face this 3 x 2 a dozen times – which is early in life for a carbide mill – at least I hope so at those prices!

                          I've been using paraffin as a cutting fluid.

                          I'm not entirely sure what 'chip welding' is, however google seems to think that a cure with carbide is to speed up. This piece was done at 1000rpm and the other pictures at 2000 rpm. However a previous run at 2K cutting along the X axis was not this bad.

                          I will check the gibs and end mill tomorrow and also try a deeper depth of cut to see if that helps. Mind you I'm trying this out as I want to take about .1 mm off my tailstock which is high, so it's sort of a practice run. But that's another 'how do I…'

                          Thanks to all.

                          Iain

                          #241438
                          Dave Halford
                          Participant
                            @davehalford22513

                            How about the work piece moving?

                            I have two big lenzkes edge clamps and on only one tee nut each even they work loose and the work can get lifted up.

                            Or you are re-milling chips already milled off which grinds them into the surface.

                            #241441
                            Dusty
                            Participant
                              @dusty

                              I am inclined to agree with Jason, take a bigger cut. Carbide is not sharp like HSS tools and they need a bit of work to do they do not like little scrapeing cuts. The other factor as other contributors have said is everything needs to be locked solid. I have a 4" face mill with 5 inserts, looking at the inserts you would think they would not cut butter, I run this at 200rpm on cast iron and achieve a beautiful finish.

                              #241461
                              John Reese
                              Participant
                                @johnreese12848
                                Posted by John Purdy on 04/06/2016 20:10:21:

                                Are you using any cutting fluid? What is the material you are milling? This looks like the material is welding itself to the corners of the mill, hence making it slightly longer, causing the grooves. It then breaks off allowing the mill to cut normally till some more builds up. Hence the erratic pattern. I've seen this before when milling (or turning) very ductile materials, like soft aluminum or mild steel. The application of lots of cutting fluid will prevent the buildup on the cutting edge thus preventing the rings.

                                John Purdy

                                I think John Purdy has the answer.

                                #241478
                                Circlip
                                Participant
                                  @circlip

                                  Not told us what the "Metal" is, looks to be Alumininininum, but what grade? certainly doesn't look like a heat treated grade. Why hacking Alumin with Carbide? HSS works better. Finally, ever heard of a fly cutter? You would probably get a better surface finish although material looks to be a soft grade and yes, you can see the difference between hard and soft in a photo.

                                  Is the vertical slide in tram?

                                  Regards Ian.

                                  #241480
                                  Vic
                                  Participant
                                    @vic

                                    Is there any particular reason for using such a small milling cutter? Most of the time I use a fly cutter for a job like that and get a great finish.

                                    #241484
                                    Mike Poole
                                    Participant
                                      @mikepoole82104

                                      Recutting chips affects surface finish, probably wouldn't give a crop circle but chip clearance is important, brush frequently or use flood coolant to clear chips. To combat built up edge problems cutting fluid can help and also a good polished edge to the tool. Tips for aluminium are usually highly polished for turning to help the built up edge problem and promote the clearance of swarf.

                                      Mike

                                      #241486
                                      Neil Wyatt
                                      Moderator
                                        @neilwyatt

                                        I cut a lot of 6028 aluminium with an identical cutter yesterday (I'm assuming you are using the uncoated version to avoid chip welding?) these are razor sharp and leave a very fine machining pattern on aluminium. I used it without coolant and had no problems of chip fouling or welding.

                                        #241491
                                        Iain Downs
                                        Participant
                                          @iaindowns78295

                                          First Prize to Neil, Jason and Dave.

                                          The (main) cause is that I'd loosened the Y gibs and not re-tightened them. I'd forgot I;d done it.

                                          I tightened up the Y gib and put the speed back up to 2K rpm and this was the result.

                                          yx after job tighten.jpg

                                          Although it looks like I've actually carved semi-circular runnels in the metal (mild steel from m machine metals), it's actually pretty flat. my dial indicators shows a few microns clicker as it passes over the mark.

                                          I will take a look at the tramming of the spindle next I think and also a bit more on the levelness of the table.

                                          Thanks for all of the help.

                                          Iain

                                          #241499
                                          Neil Wyatt
                                          Moderator
                                            @neilwyatt

                                            laugh

                                            #241525
                                            John McNamara
                                            Participant
                                              @johnmcnamara74883

                                              Hi Ian

                                              In your last image looking at the test cut images makes me wonder if there is still some looseness in the machine. If the machine is out of square you will get a different pattern at the ends of the a cut line but it should be very regular, it appears you have cut in both directions, judging by the heavy marking every second line.

                                              But the second line patterns are not very regular, some are heavier then others.

                                              The feed appears to quite fine with little grey arcs showing up in the middle of the cut line. When I see that it suggests to me that the feed is too slow and the tool is rubbing rather than clean cutting. I would try increasing the feed a little.

                                              For a really Fine finish milling where appearance is important I prefer to cut in one direction. the pattern is more regular.

                                              Every now and again I like to part disassemble a machine removing the slides to check for bits of swarf that have worked their way into the mechanism. This is also a good time to check for any abnormal wear or scoring that needs to be attended. Also time to check that the oil ways and lubrication system, is functioning correctly. The gibs can be inspected, cleaned lubricated and reset.

                                              I also check the spindle for any play using a dial indicator while levering it, A piece of hardwood will make a good lever and it will not mark or damage the spindle. A quick test that will reveal any looseness.

                                              Having written this prompts me to do mine, its been a while….

                                              Regards
                                              John


                                              Edited By John McNamara on 05/06/2016 16:28:04

                                              #241526
                                              Bob Youldon
                                              Participant
                                                @bobyouldon45599

                                                Hi Iain,

                                                I still think a large fly cutter at speed and a fairly slow feed rate will give you a surface finish like the finish from a surface grinder, but you must ensure everything is spot on, no slack anywhere. I did a pair of Rover V8 cylinder heads exactly that way on my Dore Westbury several years ago and they were spot on. I will often use a fly cutter, far cheaper than end and face mills etc.

                                                Regards,

                                                Bob Youldon

                                                #241532
                                                Muzzer
                                                Participant
                                                  @muzzer

                                                  I agree about the fly cutter for skimming large areas. And ideally regardless of the cutter you should keep the table moving until the cutter has completely cleared the edge of the work. Doesn't look right and proper having the nasty circular marks in the surface like that. Afterwards you should see marks from both the leading edge and trailing edge of the cutter in the tool path if the head is trammed properly.

                                                  #241538
                                                  Iain Downs
                                                  Participant
                                                    @iaindowns78295

                                                    Hi, John. I'm not sure I see the same things that you do.

                                                    I can't see any difference in the alternate cuts.

                                                    the cuts were made under power with the cutter coming towards, then back then to the right then towards and so on.

                                                    For a variety of reasons the cutter does not clear the block at the top and I made the cut too short. And the block wasn't square on the table (just lazy on that one).

                                                    I've fully stripped the machine fairly recently, so I think it's about as good as it can be without fettling.

                                                    I will try both faster and deeper cuts on this block – it's all part of getting a handle on what the machine can do.

                                                    as far as fly cutting is concerned, this is a weak and small machine. my one attempt at flycutting mainly had the effect of wearing the cutter flat. I've since learned that this was likely due to this being scrapyard steel with scale on it (no more scrapyard for me!).

                                                    However, I think it's worth me trying again on this block as a know test piece.

                                                    Iain

                                                    #241547
                                                    Ajohnw
                                                    Participant
                                                      @ajohnw51620

                                                      I was going to add that my DW produced finishes like that with any sized cutter even when I tried it just before I bought it. Suspect this was why it was been sold.

                                                      Neil beat me to it though. The gibs were way too loose. I think they need to be set a little on the firm side to get the best out of them. Doesn't help adding a power feed much though as I have no idea how powerful a motor to fit.

                                                      The same sort of thing will happen if the bearings are loose or the quill a poor fit.

                                                      There was a post on depth of cut too recently. My "worst" was circa 1/16", 3/4" deep on the side of a 3/8 cutter in cast iron with the sort of level of feed I would expect to use to get a decent finish.

                                                      Fly cutters are interesting. Cutting action rather similar to a shaper if they have a big sweep but there is a need to use a speed to suit.

                                                      John

                                                    Viewing 25 posts - 1 through 25 (of 51 total)
                                                    • Please log in to reply to this topic. Registering is free and easy using the links on the menu at the top of this page.

                                                    Advert

                                                    Latest Replies

                                                    Home Forums Beginners questions Topics

                                                    Viewing 25 topics - 1 through 25 (of 25 total)
                                                    Viewing 25 topics - 1 through 25 (of 25 total)

                                                    View full reply list.

                                                    Advert

                                                    Newsletter Sign-up