Creality 3D For Christmas – Impressions so Far

Advert

Creality 3D For Christmas – Impressions so Far

Home Forums 3D Printers and 3D Printing Creality 3D For Christmas – Impressions so Far

Viewing 25 posts - 51 through 75 (of 116 total)
  • Author
    Posts
  • #444168
    Pete Rimmer
    Participant
      @peterimmer30576

      I'd call that bloody good.

      Advert
      #444177
      Andrew Entwistle
      Participant
        @andrewentwistle

        Not bad considering I have not yet refined the extrusion multiplier since changing to a dual drive extruder that indents the filament more than the original one did. The slicer really does a remarkable job, Simplify3D in this case, but I am sure Cura would have worked just as well.

        Andrew.

        #444178
        Michael Gilligan
        Participant
          @michaelgilligan61133
          Posted by Andrew Entwistle on 01/01/2020 14:11:28:

          Hi,

          I printed a couple of 4mm thick Meccano style 57T gears, modelled using the CAMBAM involute gear generator using a quite old 0.4mm nozzle. The first image is a scan of the gears, top face towards the scanner glass. The second image (inverted) shows the deviation from design profile, along with a 0.4mm circle for scale. Material is PLA, 0.1mm layer height.

          .

          Very nice job, Andrew yes

          What is the secret of your success ?

          MichaelG.

          [posted  before I saw your follow-up]

          Edited By Michael Gilligan on 01/01/2020 15:45:00

          #444179
          Andrew Entwistle
          Participant
            @andrewentwistle

            Hi Michael,

            The secret is that I started 3D printing a few years ago by replacing the woodworking router on my ex-education Conect CNC machine with a homemade extruder. This gave flawless positional accuracy and allowed me to concentrate on optimising just the extruder. Although slow (600 mm/minute maximum traverse speed) the machine gave results that I have not been able to beat even using an expensive machine at work. The current machine is a £120 Anet A2 kit where the only original parts now left are the aluminium frame extrusions and the switch mode power supply. Even the extrusions have been machined, dowelled and clamped to improve rigidity. I am sure I in total have spent much more than the cost of a more turn-key Creality machine, but for me the fun was in the re-engineering.

            Andrew.

            #444181
            Michael Gilligan
            Participant
              @michaelgilligan61133

              Thanks, Andrew … That makes a lot of sense.

              MichaelG.

              Edited By Michael Gilligan on 01/01/2020 16:24:02

              #444183
              Andrew Entwistle
              Participant
                @andrewentwistle

                I should also mention that I have read my copy of Neil's book on 3D printing.

                Andrew.

                #444205
                Martin King 2
                Participant
                  @martinking2

                  WOT Book please, cannot find it for some strange reason?

                  martin

                  #444208
                  Andrew Entwistle
                  Participant
                    @andrewentwistle

                    Hi Martin,

                    Just google 1785004255

                    3D Printing for Model Engineers: A Practical Guide by Neil Wyatt

                    Andrew.

                    #444209
                    jimmy b
                    Participant
                      @jimmyb

                      I didn't know about it either!

                      On order now

                      **LINK**

                      Jim

                      #444210
                      Bill Davies 2
                      Participant
                        @billdavies2
                        #444213
                        Bill Davies 2
                        Participant
                          @billdavies2

                          Browsing, I notice that there is an offset for nozzle height, but is there an offset for the extruded plastic? It seems a lot of 3D prints seem to be wider than the designed part, as in Andrew's second image above. I've no experience with 3D printers, but getting interested.

                          Bill

                          #444217
                          Andrew Entwistle
                          Participant
                            @andrewentwistle

                            Hi Bill,

                            All slicers have at least one parameter that can be used to tune the width of plastic deposited. The slicer starts with an assumption of filament diameter and motor steps/mm filament linear feed rate, but in reality the filament diameter varies slightly between varieties, as does the way it flows to produce a layer, as does the effective diameter of the filament due to resistance of the filament to compression by the drive gear(s). To achieve an exact width I print an open topped empty cube, with single wall thickness (turn off infill and top layers) and then adjust the 'extrusion multiplier' by trial and error until I achieve say 0.4mm wall thickness for 0.4mm nozzle diameter. Changing filament usually requires a different calibration.

                            Andrew.

                            #444220
                            Bill Davies 2
                            Participant
                              @billdavies2

                              Thanks, Andrew, that's very informative.

                              It seems to require a lot of experimentation to get desired results. Some printings (castings? mouldings?) I have seen at exhibitions are capable of very fine finishes. I've seen copies of museum pieces made so that school children can handle them without concern.

                              I'm aware that some use solvent vapour to improve surface finish, such as used on machined perspex, but I suppose that's at the expense of 'accuracy' (i.e., to the required dimensions).

                              Bill

                              #444224
                              Anonymous

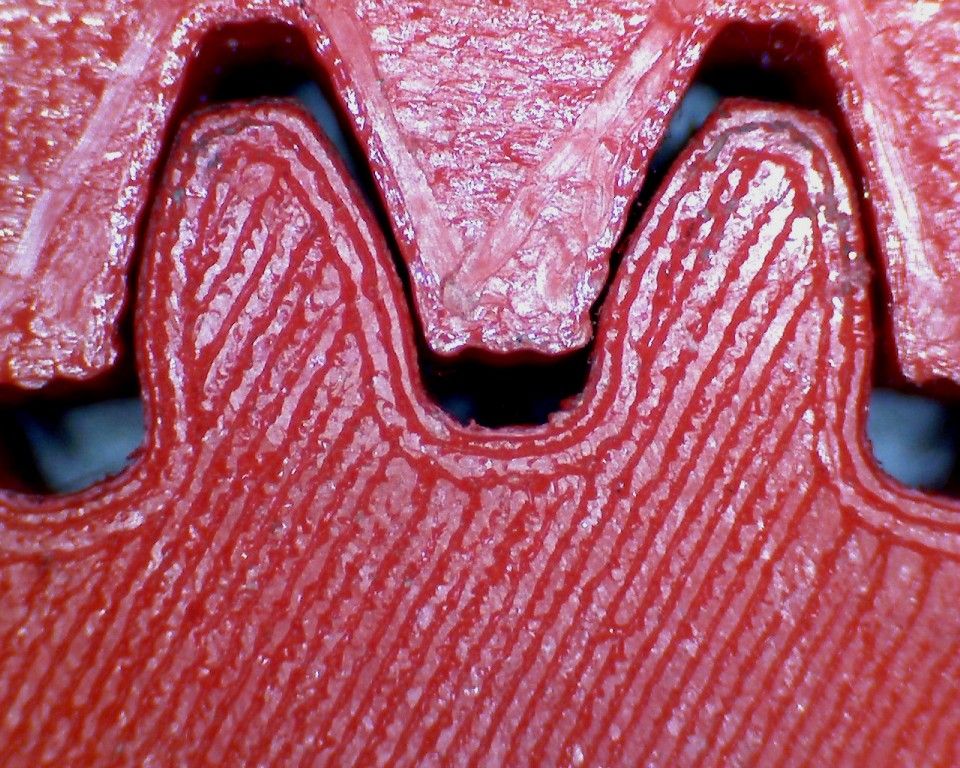
                                This is a magnified view of my 10DP internal gear and pinion:

                                3d printed gear.jpg

                                The involute curves are a fair representation and the gears mesh smoothly, and just as well as the final metal gears.

                                Andrew

                                #444227
                                Andrew Entwistle
                                Participant
                                  @andrewentwistle

                                  Hi Bill,

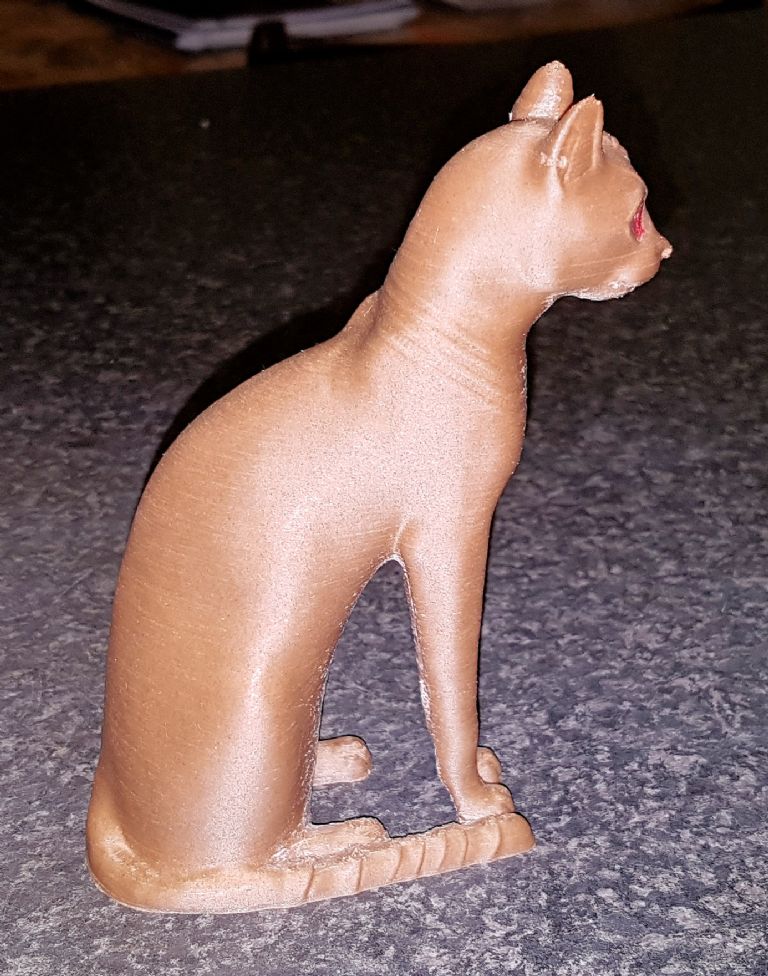
                                  Experimentation is only really required to achieve higher accuracy, default settings will in most cases produce a useable part. As you suggest solvent vapour can be used to reduce/remove layer lines on ABS prints, but at the expense of softening sharp edged features. PLA printed with a shell of several outer layers and >20% infill density feels almost indestructible when there are no slight features. I have found that PLA wood filament printed at 0.1 mm layer height results in layer lines that are invisible a foot away – see this 13 cm high rendering of the Gayer Anderson Cat (a standard test of printing overhangs)..

                                  20200101_204618.jpg

                                  Andrew.

                                  #444228
                                  Michael Gilligan
                                  Participant
                                    @michaelgilligan61133

                                    Looks pretty darned good at 10DP, Andrew [Johnston]

                                    … trouble is, I want that quality at [say] 40DP sad

                                    MichaelG.

                                    Edited By Michael Gilligan on 01/01/2020 21:12:50

                                    #444230
                                    Andrew Entwistle
                                    Participant
                                      @andrewentwistle

                                      Hi Michael,

                                      The 57T Meccano gear is 38DP, I am sure dropping the nozzle to 0.3 mm or 0.2 mm would yield the same quality for 40DP as Andrew's 10DP (at least in the areas where meshing occurs).

                                      Andrew.

                                      #444232
                                      Michael Gilligan
                                      Participant
                                        @michaelgilligan61133
                                        Posted by Andrew Entwistle on 01/01/2020 21:39:35:

                                        Hi Michael,

                                        The 57T Meccano gear is 38DP, I am sure dropping the nozzle to 0.3 mm or 0.2 mm would yield the same quality for 40DP as Andrew's 10DP (at least in the areas where meshing occurs).

                                        Andrew.

                                        .

                                        We’re certainly heading in the right direction !!

                                        Truth is … I was originally going to ask for that quality at 100DP but reined myself back.

                                        Perhaps it’s a realistic proposition for next Christmas.

                                        … I shall watch progress with great interest.

                                        MichaelG.

                                        .

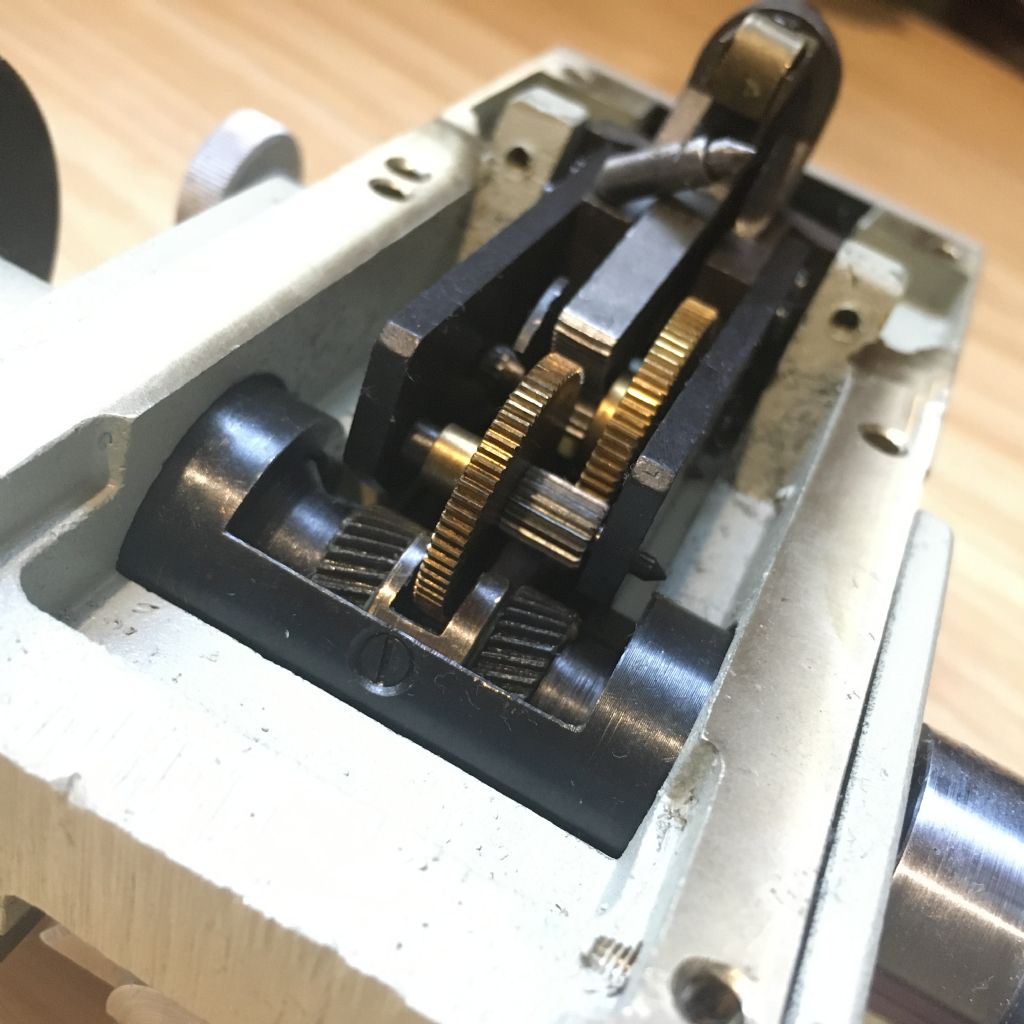
                                        This [the fairly agricultural focus mechanism from a large Russian microscope] is the scale of gears that I tend towards:

                                        6b50e924-45ac-4ce6-8fff-6fd182e07ef6.jpeg 

                                        Edited By Michael Gilligan on 01/01/2020 22:02:23

                                        #444246
                                        not done it yet
                                        Participant
                                          @notdoneityet

                                          Some printings (castings? mouldings?) I have seen at exhibitions are capable of very fine finishes.

                                          Question here, Bill, might be what quality printer is being used? Are we still considering ‘entry level’ printers (for hobbyists) at this point?

                                          #444262
                                          Andrew Entwistle
                                          Participant
                                            @andrewentwistle

                                            A finely honed hobbyist FDM (squirting molten plastic) printer can achieve the ultimate surface finish of professional models, but that is never very good anyway for FDM printers of any class. For a finer finish UV resin printers are used. They are coming down in price e.g. Elegoo Mars £230 with build volume 120 x 68 x 155 mm, but they are messy and the choice of materials is smaller.

                                            #444282
                                            Martin of Wick
                                            Participant
                                              @martinofwick

                                              With not much effort, results on my bottom end printers generally exceed expectations, the limit for me using a 32 bit machine is being restricted to Cura V15.x. (cant bring myself to pay for a slicer!) I did try to use a 0.2 nozzle for a while although it gave quite good results for small fine work it was very prone to clogging and sooo very slooow printing, gave up in the end. Might try again one day with a better quality nozzle and hot end.

                                              I like the idea of calibrating the extruder on the output result rather than the filament input side – good tip.

                                              My bone of contention with the 'economy' end of the 3d printer market is the hot ends are limited in the software to about 260 degrees (or less) and it appears to be something of an intimidating trial to load alternative user configurable firmware. I would like to try printing with polycarbonate and nylon one day.

                                              It would be nice if someone produced a decent generic mainboard already loaded up with Marlin and some start profiles for the common budget machines, rather than having to nerd surf the web to piece together what is required.

                                              #444283
                                              Andrew Entwistle
                                              Participant
                                                @andrewentwistle

                                                Hi Martin,

                                                the most important feature that Marlin offers over bottom end printers is thermal protection (detection of sudden changes in temperature such as a temperature sensor falling out and causing a fire through thermal runaway). I don't think a generic board is possible because much of the customisation to a particular machine has to be specified in the configuration files before compilation. I bought an MKS GEN 1.4 board for about £20, plus four stepper driver boards and found installing Marlin very straightforward. This enabled me to add touch probe mesh bed levelling and silent stepper driving, as well as customising temperature ranges etc.

                                                1. Download Marlin code zip file from GitHub,

                                                2. Download and install the Arduino IDE

                                                3. Edit the two Marlin configuration files (There may already be templates to suit your machine for config.h and config_adv.h in the Marlin release)

                                                4. Plug the board into the PC and in the Arduino IDE press the upload button to compile and upload to the board.

                                                Andrew.

                                                #444292
                                                Andrew Entwistle
                                                Participant
                                                  @andrewentwistle

                                                  Step by step instructions for installing Marlin can be found here:

                                                  **LINK**

                                                  #444293
                                                  SillyOldDuffer
                                                  Moderator
                                                    @sillyoldduffer

                                                    Now that I understand the limits of this machine in respect of gears, thanks everyone, I'm experimenting with moulds. It's apparent that the software is as important as the printer, and I'd be grateful for suggestions!

                                                    My daughter, who manages a team of young people and the quality of their written work, asked if I could use my new toy to make her a rubber stamp containing the word 'IDIOT!' Being a Linux Fanboy, the following is based on Open Source software.

                                                    I used Inkscape to draw and invert the text. Inkscape is a 2D Vector Graphics editor, ie drawn objects are represented mathematically, not constrained to any particular size or media. Everything is editable and scaleable without loss of resolution. It can rotate, invert, and perform many other graphical manipulations. Excellent for developing 2D layouts thus:

                                                    idiot.jpg

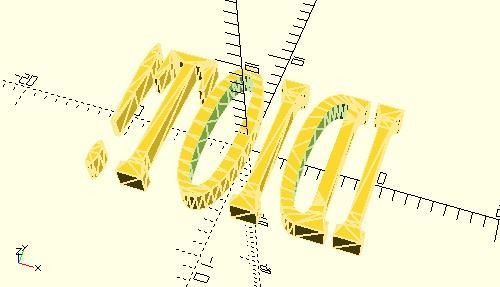
                                                    So far so good, but rubber stamps are 3D objects. I used an extension called 'Path to OpenScad' to generate a 3D STL file. The extension traces the paths representing the text and boundary box and extrudes them by a standard amount. The result is a 3D mesh, displayed in OpenSCAD:

                                                    idiotoscad.jpg

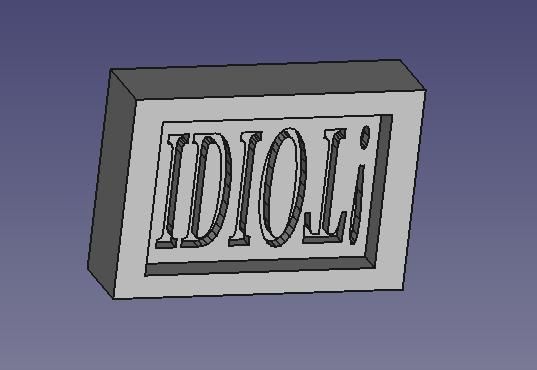
                                                    OpenSCAD is just used to save the file in a format FreeCAD can read (*.csg). FreeCAD is used to add the moulds base and sides to the letters:

                                                    idiotfcad.jpg

                                                    FreeCAD can output the mould object as an STL file, for slicing and printing, oh dear!

                                                    dsc06209.jpg

                                                    The whole job had to be done twice because the first print came out far too small. (The lower idiot.) Turned out to be a limitation of the extension 'Path to OpenSCAD', which – unlike Inkscape – assumes pixels (dots per inch). As my Inkscape master was defined in millimetres, the result is 25.4/90 too small. There are quite a lot of other tripwire details to get right using this software combination, and I may be overcomplicating the process due to ignorance. Is there is an easier way?

                                                    However, it worked. The top idiot is good enough for this idiot and his daughter! Next post describes a more complex mould using the same method, which – so far – is a failure, cause obscure.

                                                    sad

                                                    Dave

                                                    #444298
                                                    SillyOldDuffer
                                                    Moderator
                                                      @sillyoldduffer

                                                      Confident of success, I moved on to a more advanced mould, the original pinched (if my memory can be trusted) from Terrance Holland's ME series on 'The Barclay Well Tanks of the Great War'.

                                                      barclay2.jpg

                                                      As can be seen Inkscape can bend text around an oval (actually text can follow any path), alter font size, and draw specials like the government Broad Arrow. Slight flaws in the drawing are due to me experimenting with the shape in hope of fixing problems found later.

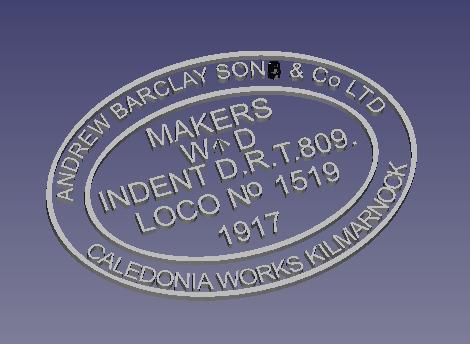
                                                      When the engine plate is exported to OpenSCAD, a problem is detected when rendered.

                                                      barclayfloat.jpg

                                                      The 'S' in SONS is mangled. I managed to fix that in Inkscape by tweaking the 'S' paths nodes, but found no obvious error.

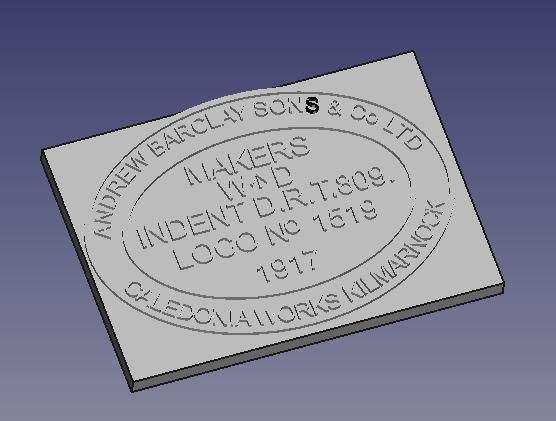
                                                      More trouble followed. I've not been able to combine the engine plate in FreeCAD with a separately drawn base. This is the closest I've got, but – although it looks right – the object is illegal and can't be printed. Likely cause is still something wrong with that pesky 'S'

                                                      barclaybroken.jpg

                                                      Although I'm comfortable with computers and like learning new software, this is starting to bug me!

                                                      Dave

                                                    Viewing 25 posts - 51 through 75 (of 116 total)
                                                    • Please log in to reply to this topic. Registering is free and easy using the links on the menu at the top of this page.

                                                    Advert

                                                    Latest Replies

                                                    Viewing 25 topics - 1 through 25 (of 25 total)
                                                    Viewing 25 topics - 1 through 25 (of 25 total)

                                                    View full reply list.

                                                    Advert

                                                    Newsletter Sign-up