Correct / best way to make shim washers?

Advert

Correct / best way to make shim washers?

Home Forums Workshop Techniques Correct / best way to make shim washers?

Viewing 20 posts - 1 through 20 (of 20 total)
  • Author
    Posts
  • #628404
    samuel heywood
    Participant
      @samuelheywood23031

      I did search the forum but suprisingly found no references.

      Seems shim washers are more readily available at a reasonable price these days than when i was hunting the interweb a few years back in need of some.

      That said, sometimes you need one there & then, or maybe of a special size.

      What's the correct method?

      I rather envisaged them being stamped out of shim stock of the required size but how would you (meaning me laugh ~you may well ) get concentric circles? would they even be flat?

      My current method is extremely wasteful of material but i do end up with useable washers.

      Select bar of required OD, drill required ID, part off after using topslide dial for setting required thickness.

      They neve quite come out exactly the thickness i wanted but ususally near enough ~ i get as thin as 10 thou before running into problems.

      Is there a better method anyone?

      Advert
      #16418
      samuel heywood
      Participant
        @samuelheywood23031
        #628407
        Martin Connelly
        Participant
          @martinconnelly55370

          There are two Joe Pie videos on YouTube called:

          Machining ultra thin shaft spacers and precision washers

          How to Hold and Bore Out Thin Shims

          These may give you useable ideas.

          Martin C

          #628409
          Nimble
          Participant
            @nimble

            Sam

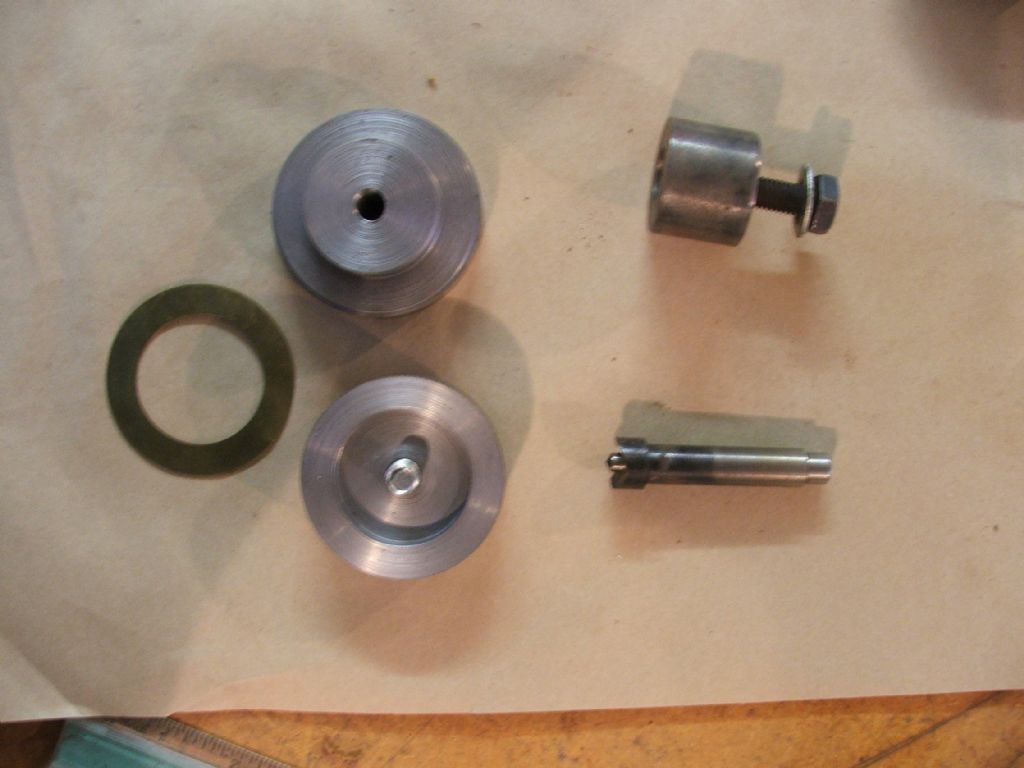
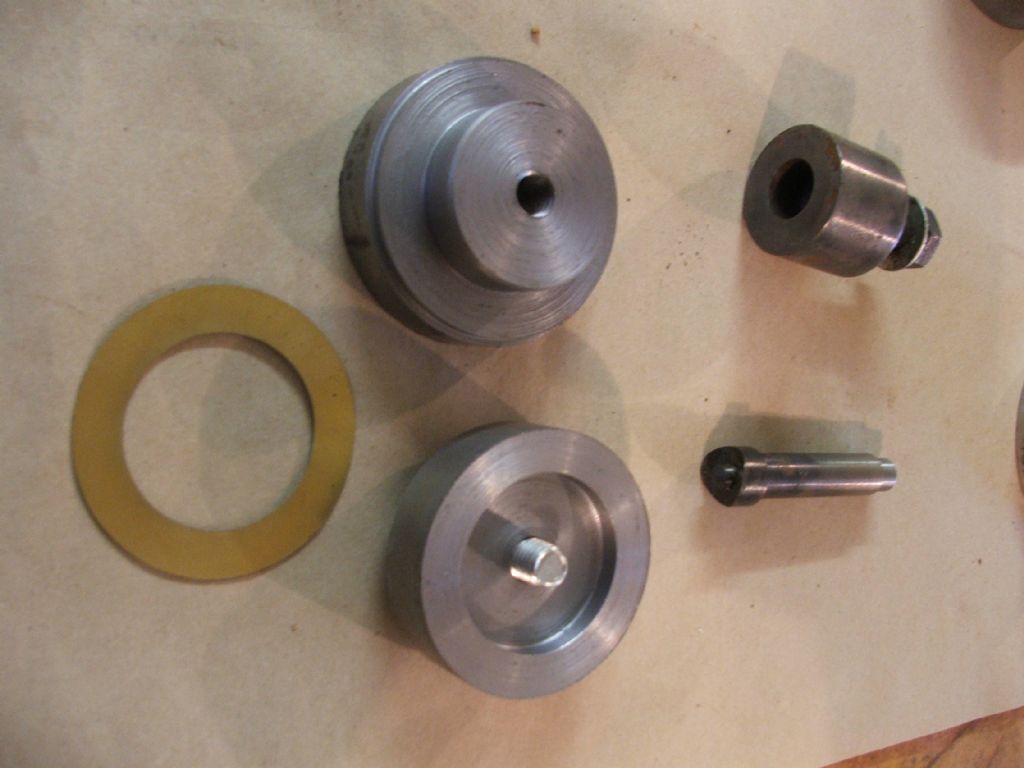
            I had a need when overhauling my differential for some shim washers and to make them I followed the following procedure. Initially I cut the shim stock into squares slightly larger than the final diameter required. The first operation then was to mark the centre of the square and use a small wad punch to cut a 3 mm diameter hole in the centre of the shim stock. This operation can be missed, if there is plenty of leeway on the final size. I then made a piercing punch and counter that was held in my bench drill, the shear being held in the chuck and the counter centralised on the table. The shear had a locating pin, which was used to centralise on the 3mm punched hole in the shim stock. Then a second cut of 15mm diam was then pierced in the centre of the shim stock. Two pieces of 3mm plate were then cut into two squares the plates had a holes machined for the aligning spigot and to allow the boring bar to pass through Clearance holes were drilled in the corners of one the squares, the other was threaded to take the clamping bolts. Assembling the punched shim stock on the spigot centralised the shims on the clamping squares and by turning the plates at 45 degrees the bolts were able to be tightened to form a solid unit .This unit was then centred in a 4 jaw chuck and was bored out to the required bore size of the shim washers. A large piece of round was chucked and it was bored and threaded and a spigot was turned to fit the bore of the shims, another round was bored to fit over the spigot and a through bolt was used to clamp all the shims together. The whole assembly was then turned to the final diameter required. Maybe not as quick as hand cutting, but the satisfaction of having well made shims was worth the effort.

            I have since realised that another method of producing shim washers now, would be to get them either water or laser cut, this method could also be used for producing tabbed lock-washers, although some sizes are available from bearing suppliers.

            Nimble Neil

            #628410
            Paul Lousick
            Participant
              @paullousick59116

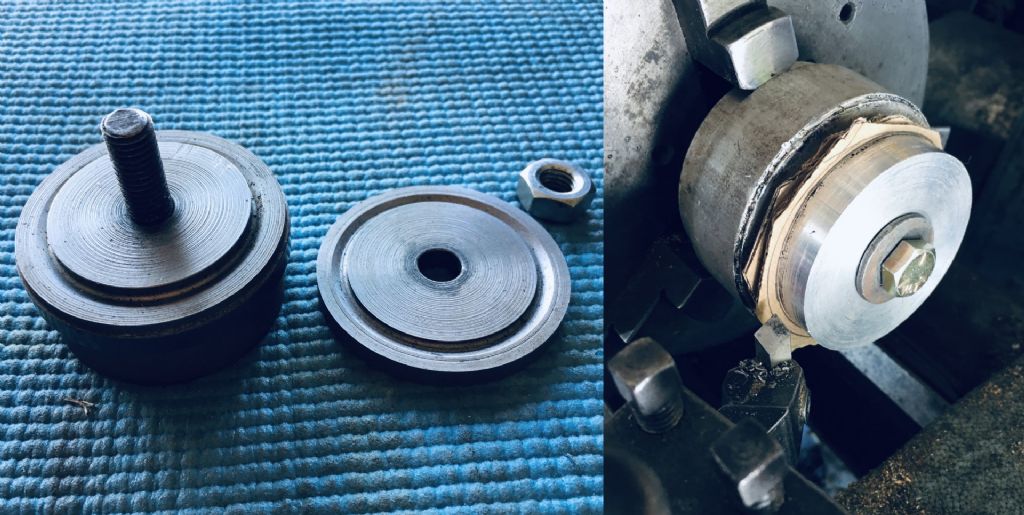
              Similar to the above post by Neil and the reference to Joe Pyzynski is how I make washers. The machining jig below on the left was used for making copper washers 42mm ID x 58mm OD x 1mm thick. (similar jigs used for smaller dia. washers 0.25mm thick).

              The shim material was roughly cut, slightly bigger than required and sandwiched between 2 square plates. The plates clamped together with bolts at each corner and mounted in a 4 jaw chuck on the lathe. Then drill/bore a hole thru the complete assembly to the the required ID.

              Remove from the end plates and mount in a jig as shown for turning the OD. (cardboard shown as example only)

              Clamping the washers together with a solid plate on either end eliminates any roll-over and produces a sharp machined corner. (On very thin material it is best to make a number of them at the same time)

              shim.jpg


              Edited By Paul Lousick on 10/01/2023 06:07:36

              #628411
              Nimble
              Participant
                @nimble

                resto photos 087.jpgresto photos 086.jpg

                #628412
                Paul Lousick
                Participant
                  @paullousick59116

                  yes

                  #628417
                  Jeff Dayman
                  Participant
                    @jeffdayman43397

                    An additional way is to use the type of punch and die set at the link below. Not inexpensive but does a good job. They are good up to about .010 steel or stainless shim stock, but better with thinner materials. Excellent for gaskets also.

                    https://www.mcmaster.com/3861A56/

                    #628431
                    not done it yet
                    Participant
                      @notdoneityet

                      I’ve made big end shims for connecting rods by clamping multiple layers of shim material between jigs and hand-working/machining to size. OK, like Paul above, if circular and of sufficient thickness. However, for thinner shims I have found it better to grind to shape, rather than cutting by other means because I got better edge thickness that way. There is not just one way ‘to skin this cat’, depedent on the required finished product.

                      #628518
                      old mart
                      Participant
                        @oldmart

                        If you want the bores of thin shim stock burr free, it helps to sandwich the shim between two thicker plates, aluminium or hardboard, possibly and then when the hole is made it should be perfect.

                        #628533
                        Tim Stevens
                        Participant
                          @timstevens64731

                          There is a way I have used which does not require a lathe or column drill – an ordinary electric hand-drill, and an ordinary bench vice was all I had access to. But I did have a selection of hole 'drills' – the sort which has a central boss carrying a twist drill of 6mm (or 1/4 inch). Around the boss is a thread onto which can be screwed steel tubes in various sizes, with the end of the tube formed into saw teeth. One name for such things is 'Hole Saws' – and plumbers use them to bore the holes in the sides of your kitchen fittings.

                          You will need two of the saws themselves, one to fit inside the required shim, and one to go outside it. Now you need two oddments of plywood, one fairly thin (8mm +/-) and the other rather thicker, both a bit larger than the finished shim should be. Use the twist drill to bore a hole in the middle of the thin plywood, and clear off the splintery edges to leave smooth surfaces. Clamp a piece of shim material between the two plywood offcuts, and clamp one edge of this bundle in the vice, leaviung the whole surface area of the desired shim visible. If you have a small G-clamp or a similar tool, add it to the free edge to hold the two sheets of ply tight against the shimstock. Set the hand drill to a slow speed, and fit to it the smaller of the two hole saws. Guide the twist drill into the prepared hole, and drill slowly through the thin ply and the shim behind it. A squirt of oil will help. Lift out the disc of ply, and the inner off-cut of shim – carefully as the edges will not be nice and smooth. Now fit the larger hole saw, and repeat the operation, relying on the hole in the thick plywood to maintain concentricity.

                          This should produce a reasonable shim, which is likely to need trimming to neaten the edges, and it can be held in vice between the remains of the plywood to do this. If the shim material is thin (as they often need to be to take up clearance) you could trim the outer edge using tin-snips or a reject pair of scissors (when no-one is looking).

                          Don't be tempted to hold the assembly in your 'spare' hand as you do the drilling. If things start to go wrong you need to keep all your organs well away from spinning sharp edges … And if you are not sure, don't try and hope for the best. Gambling is never worthwhile.

                          Regards, Tim

                          #628576
                          samuel heywood
                          Participant
                            @samuelheywood23031

                            I knew i was doing it all wrong, just couldn't figure out 'right'.

                            Thank you all, it's been very educational, much appreciated.

                            The more i learn about engineering , the less i realise i know!

                            "Standing on the shoulders of Giants"is the phrase that springs to mind.

                            #628592
                            PaulG
                            Participant
                              @paulg46657

                              Electrochemical etching? Can make odd shapes that way.

                              #628619
                              noel shelley
                              Participant
                                @noelshelley55608

                                Another job for the spark eroder ? Noel.

                                #628688
                                Stueeee
                                Participant
                                  @stueeee

                                  I used to rebuild lots of car differential units. This work calls for a fair bit of shimming to achieve the correct bearing preloads, gear mesh & engagement depth. Unfortunately the shims only seem to come in bulk packs of the same size from the differential manufacturers. I'd have been quite some way into 3 figures of £££s by the time I had bought a full set of each size (and would have ended up with several lifetime's supply of shims). My solution was (and is) to use a pair of chassis punches to punch the inside and outside in steel shimstock.

                                  These and other punches were bought off ebay for not much money; but I have made smaller size punch & die sets at home from silver steel, turned all the parts and used a flycutter to put the cutting radius on the punch before hardening and tempering.

                                  #628708
                                  Neil Wyatt
                                  Moderator
                                    @neilwyatt

                                    I've had success with shop made punches similar to Steweeeeeeeeeeeeee's

                                    Neil

                                    #631944
                                    Jon Duke
                                    Participant
                                      @jonduke82320

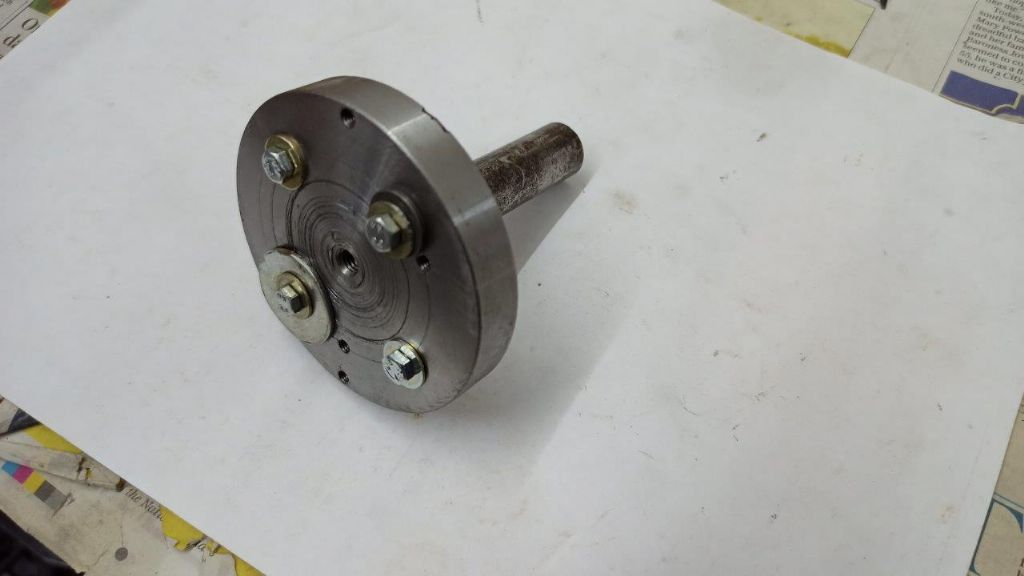
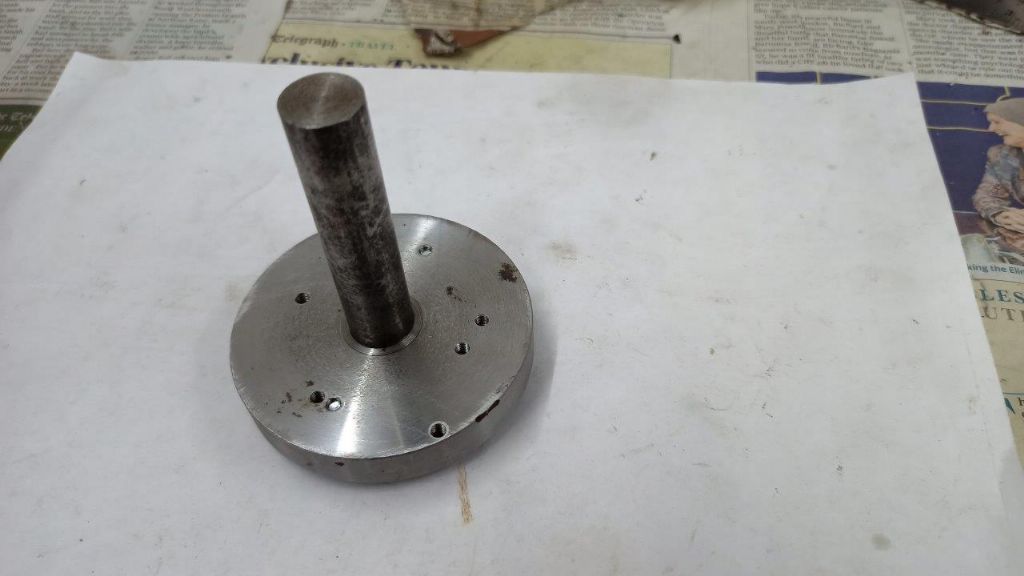
                                      Hi, I have made shims in the past using Paul Lousick's method, but for many years I've made shims from shim stock by clamping pieces of the stock, cut into a rectangle using shears, to a flat disc that has a shaft on it, so it can be mounted in the lathe and then cutting the shim out from the stock.

                                      Cutting shims from this is not trivial, but it can be done, and with practice it can be done very quickly. I've used a watchmaker’s graver (difficult to keep it steady), a sharpened up piece of hacksaw blade held in the tool-post (tricky, needs to be very sharp and not to have any top rake or it digs in badly especially when breaking through), and, best of all, a small air die grinder held in the tool-post (using a small cylindrical wheel held at 45 degrees).

                                      I scribe the ID and OD on the piece of shim and then in the lathe I centre it and tighten the clamp screws, which have washers under them, and then start the cutting. You cut out the inside first and then the outside. The cut edges are sharp and I often tidy them up using a small abrasive mounted stone.

                                      I use this device mainly to make shims needed on classic motorcycles, typical shim thicknesses are in the range 3 to 12 thou. The pictures below show the tool used to hold the shim. I tend to drill and thread holes as demanded by the size of shim to be cut. It takes me about a quarter of an hour to make a shim provided that the shum doesn't snag when breaking through (the die grinder method more or less obviates that). I hope that helps.

                                      img20230203220707.jpgimg20230203220759.jpg

                                      #631951
                                      Huub
                                      Participant
                                        @huub

                                        For this kind of work, I use sharp insert for turning aluminium (CCGT060204).

                                        I make thick (2 mm +) shims by parting of a faced piece of stock. The back of the shim is than pressed against an adjustable stop and that side is faced. After that the front of the shim is faced to get the right thickness. Differences in thickness are less than 0.02 mm. If I face the adjustable stop, I can get differences in thickness less than 0.01 mm.

                                        For thin shims, I glue the shim (superglue) on a faced arbour and face the back. The faced arbour is the reference point for the thickness of the shim. The shim is released (heated) and the shim and arbour are cleaned (acetone) Then the front is done the same way and faced to get the right thickness. Differences in thickness are less than 0.02 mm

                                        An alternative would be using a magnetic holder (upside down) to clamp the shim and mill or grind the shim.

                                        #631955
                                        Clive Steer
                                        Participant
                                          @clivesteer55943

                                          To make accurate thin spacers I use a bar turned to the correct OD and bored to the correct ID. I face off the front face and then part off a spacer thick enough so that the front face remains reasonably flat.

                                          I then use superglue to stick the front face of the spacer to the lathe's face plate and then slowly face off the spacer to the thickness needed. I have a DRO so can zero the DRO with the cutting tool against the face plate surface so it effectively reads the spacer thickness. Thinning down does have to be done slowly so the spacer doesn't detach from the face plate.

                                          A rather tedious process but if you only need to make a couple of spacers it works well enough. I release the spacer with acetone.

                                          CS

                                          #632149
                                          Martin Dowing
                                          Participant
                                            @martindowing58466

                                            I am using hole puncher normally applicaple for punching rubber or PTFE washers but only on rather thin shimstock. Works OK.

                                          Viewing 20 posts - 1 through 20 (of 20 total)
                                          • Please log in to reply to this topic. Registering is free and easy using the links on the menu at the top of this page.

                                          Advert

                                          Latest Replies

                                          Home Forums Workshop Techniques Topics

                                          Viewing 25 topics - 1 through 25 (of 25 total)
                                          Viewing 25 topics - 1 through 25 (of 25 total)

                                          View full reply list.

                                          Advert

                                          Newsletter Sign-up