Class 22 Diesel (next project)

Advert

Class 22 Diesel (next project)

Home Forums Locomotives Class 22 Diesel (next project)

Viewing 25 posts - 101 through 125 (of 240 total)
  • Author
    Posts
  • #426040
    Ron Laden
    Participant
      @ronladen17547

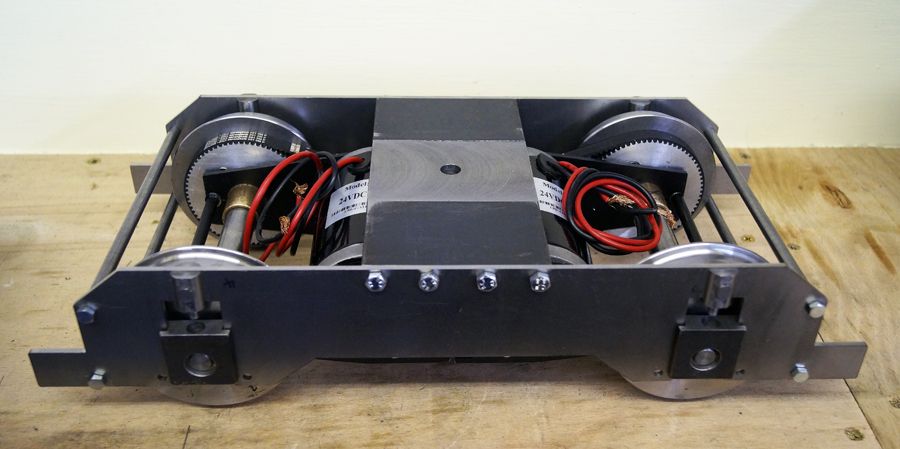
      The main metal work is finished on the bogies, waiting for some axle springs plus I have to add detail parts to the side plates but will probably leave that until just before starting on the body.

      Chassis is next.

      dsc06917.jpg

      Advert
      #426584
      Ron Laden
      Participant
        @ronladen17547

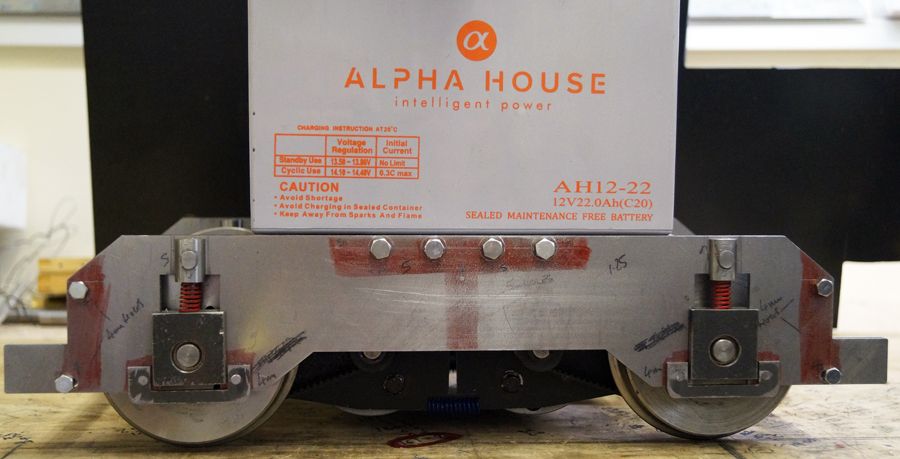
        The axle die springs arrived which I have fitted to the bogies, I went for the red ones which I consider to be medium/heavy and it looks as if they are just about right. Each pair of batteries (14kg) will sit directly over the centre of the bogie plus I estimate a further 4 kgs at each bogie from chassis/body. The piccie below shows one of the bogies with a pair of batteries plus some ballast which I added to make up the weight. The spring compressed approx 2.5 mm which leaves 6mm of travel in the suspension which I think should be ok.

        dsc06928.jpg


        Edited By Ron Laden on 30/08/2019 11:12:58

        #426810
        Ron Laden
        Participant
          @ronladen17547

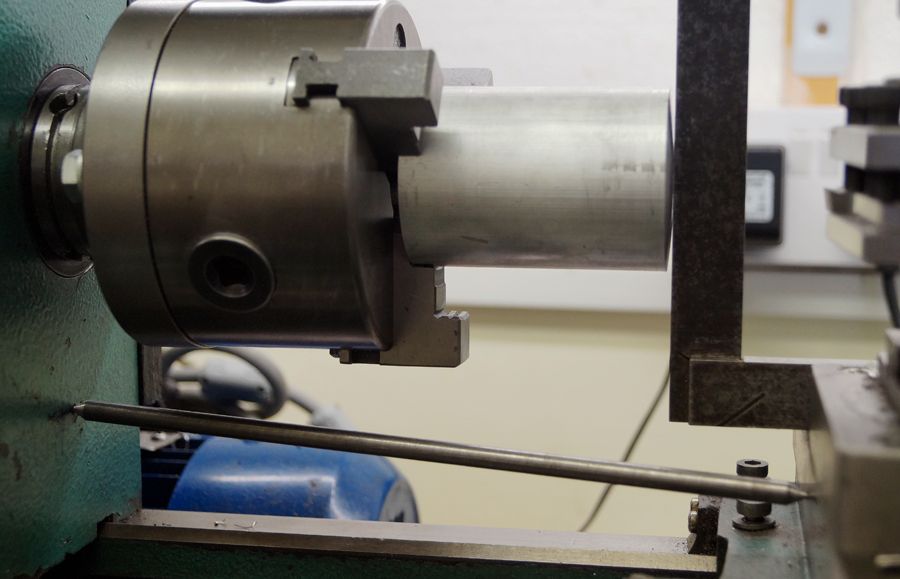
          Fancied some lathe work this morning so made a start on the buffers using the guide rod method for creating the convex face. I did the 0-4-0 buffers this way after some of you guys told me of it, it is so simple to do and works a treat. I put a square up to the face to show the convex, I went with a 220mm radius on 50mm diameter.

          dsc06937.jpg

          Edited By Ron Laden on 31/08/2019 15:20:15

          #427042
          Ron Laden
          Participant
            @ronladen17547

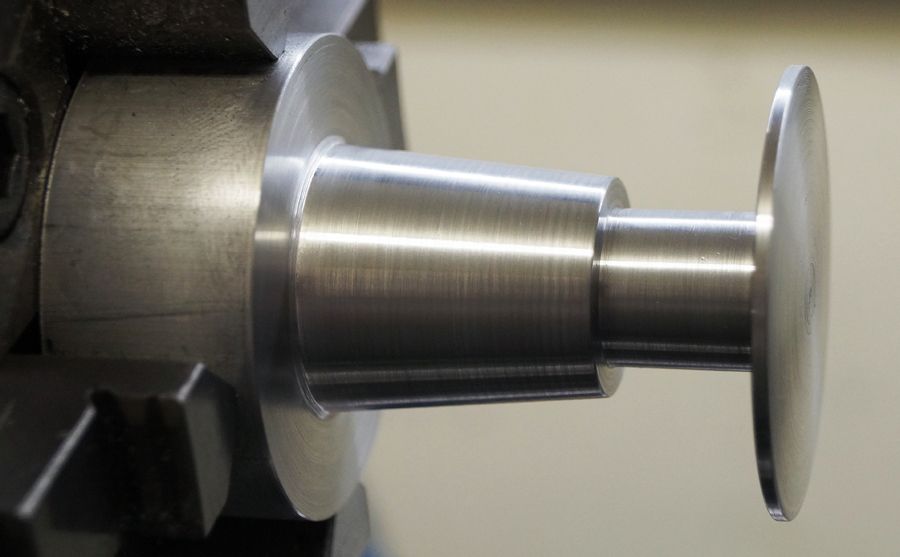
            Turned the first of the buffers to a shape and type I,m happy with. To the mill next as the base mounting plate is square plus I currently dont have a deep enough parting tool so I will cut it off with a slitting saw. The buffer face is the oval type and I think I will shape that by hand.

            dsc06945.jpg

            #427052
            SillyOldDuffer
            Moderator
              @sillyoldduffer
              Posted by Ron Laden on 02/09/2019 09:19:29:

              Turned the first of the buffers to a shape and type I,m happy with. To the mill next as the base mounting plate is square plus I currently dont have a deep enough parting tool so I will cut it off with a slitting saw. The buffer face is the oval type and I think I will shape that by hand.

              dsc06945.jpg

              Very nice!

              As you seem to pick skills up quickly why not have a go at turning the oval as well? In theory, offsetting the job's centre in a 4-jaw will cut one side of an oval, then offset equally in the opposite direction to put the same curve on the other side. It won't be a perfect geometric oval, but could be finished to look good by hand as necessary. The advantage of turning is producing four identical buffers without lots of manual work. This assumes there's enough swing on your lathe; check with a dimensioned drawing.

              Be warned – I've never tried it myself and would practice on lots of scrap first!

              Dave

              #427111
              Ron Laden
              Participant
                @ronladen17547

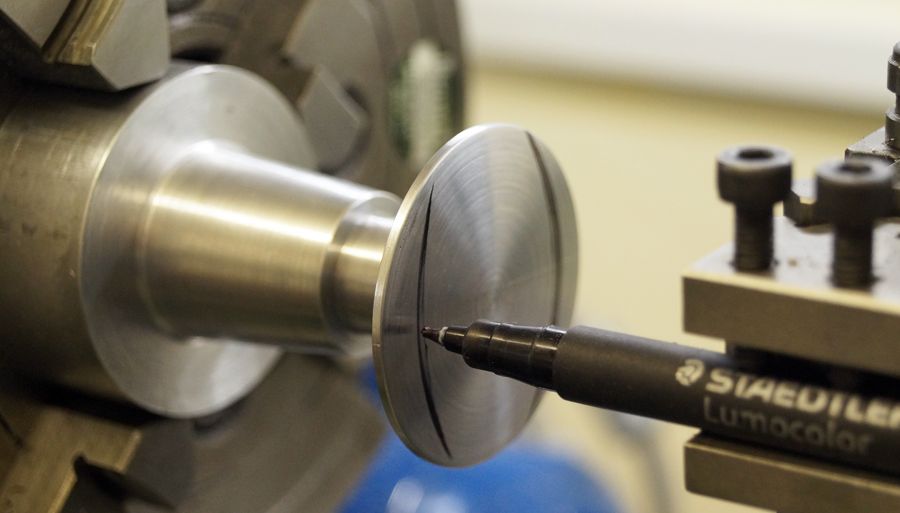
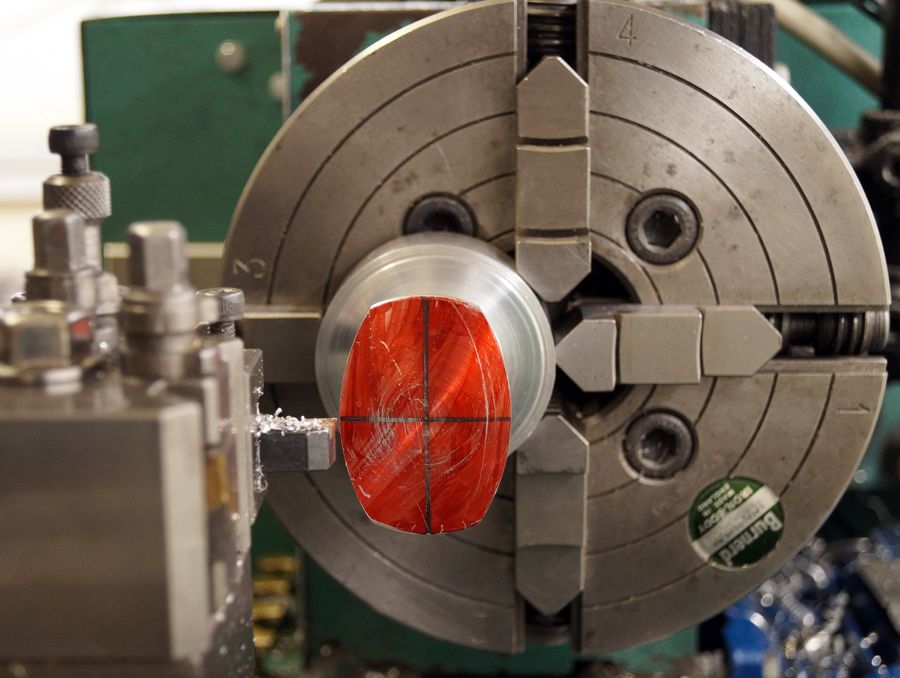
                Thanks Dave, thats a good idea so I did a quick rough and ready check with the buffer offset in the 4 jaw and a marker pen in the tool holder. I will obviously need to calculate the offset and the tool position more accurately to bring me close to the finished shape but as you suggest it should reduce the hand work and will be repeatable on all four buffers.

                Thanks again, Ron.

                dsc06946.jpg

                #427515
                Ron Laden
                Participant
                  @ronladen17547

                  Just experimenting with a bit of added detail, turned up some bearing caps and added some pipe work. This was a bit thrown together this morning, the final finish will be better plus there is more to add but it doesnt take much to improve the look of it I think.

                  dsc06949.jpg

                  #428803
                  Ron Laden
                  Participant
                    @ronladen17547

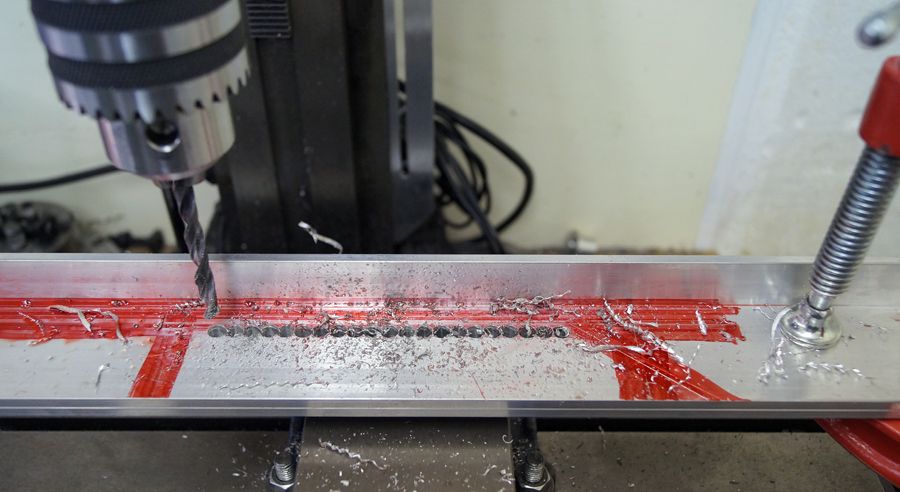
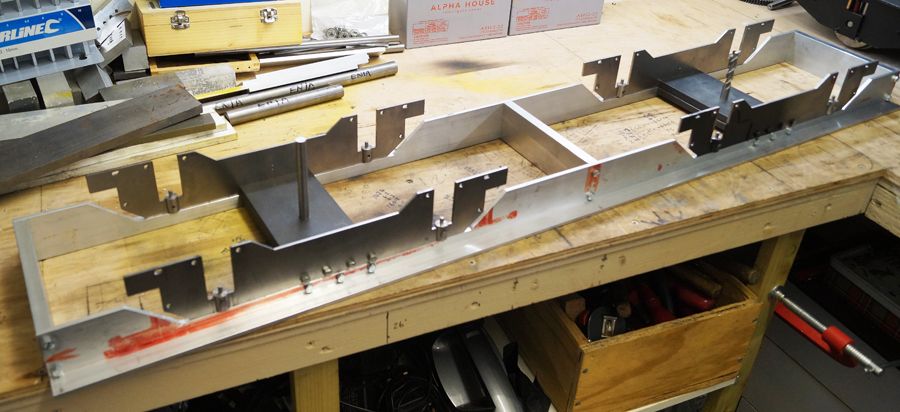
                    Chain drilling the chassis rail side walls for clearance at the bogie positions, 2" x 1" x 3/16" alu angle back to back to get a matched pair. I did remember (just) to set the depth stop to prevent drilling the vice..smiley

                    dsc06992.jpg

                    #428901
                    Ron Laden
                    Participant
                      @ronladen17547

                      You cant beat some early morning (5am) smiley machining to get the day off to a good start.

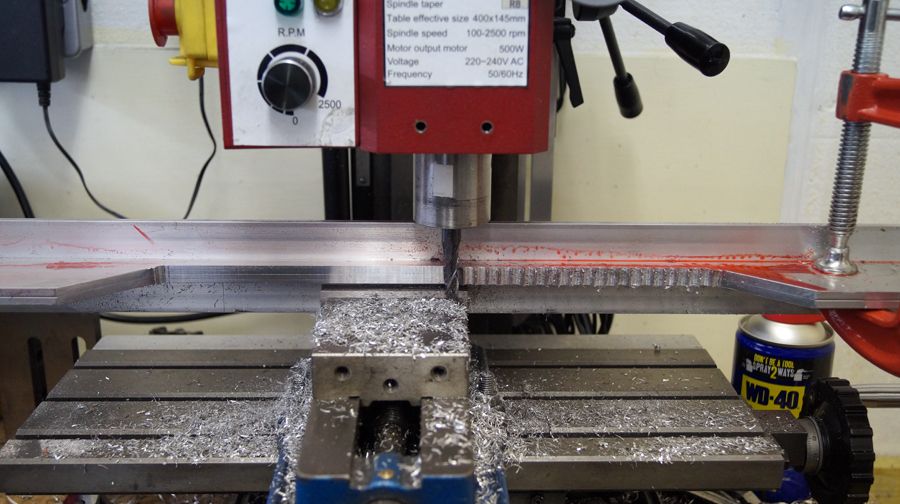
                      Anyway, 2 x 46 holes later, waste pieces removed and the angled ends cut and filed to shape it was back on the mill to clean back the drilled edges. Its a case of sliding the work along so as not to get too far away from the vice but it works well enough.

                      I would have used a 10mm 2 flute carbide alu cutter but its past its best so need to get another one. So it was a case of having to use a 8mm 3 flute coated HSS cutter from ARC,s premium range. I am really impressed with this cutter I have used it on both steel and alu with great results, think I will get a 10mm version also.

                      dsc07008.jpg

                      #429221
                      Ron Laden
                      Participant
                        @ronladen17547

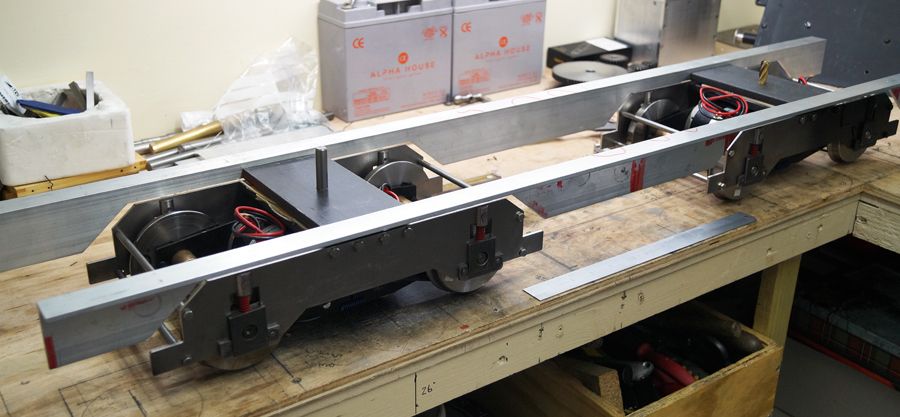
                        Today I machined and fitted the bogie mounting plates to the chassis rails so obviously I just had to offer up the bogies to see how it looks, something must be wrong….it all fits..smiley

                        A lot more to add to the chassis but awaiting some material to continue, also material for the traction engine. I must admit I thought I was mad and biting off more than I could chew running the engine and loco builds side by side but it seems to work. I,m enjoying both of them and its good fun which is what its all about I guess.

                        dsc07062.jpg

                        Edited By Ron Laden on 16/09/2019 18:01:48

                        #434274
                        Ron Laden
                        Participant
                          @ronladen17547

                          I have put the traction engine to one side for now to put some time into the class 22, the loco is a much quicker build and it would be good to have it finished for late spring next year.

                          I made up and fitted 3 frame spreaders, of which the 2 end ones also serve as buffer plates. The chassis is very simple 2 x alu angle side beams 2" x 1" x 3/16", 2 x steel bogie mount/swivel plates 3" x 1/2", 3 spreaders 2" x 1,2" alu bar. The top of the chassis beams will have 3mm steel plates connecting it all together, simple but strong.

                          Just started making up some detail parts for the bogie side plates plus the sides of the chassis beams.

                          dsc07226.jpg

                          #434445
                          Ron Laden
                          Participant
                            @ronladen17547

                            I need to silver solder a hex head bolt to a 3mm steel plate, assuming thats possible of course..?, having no experience with silver soldering I would appreciate some guidance on suitable solder and flux type.

                            Ron

                            Edited By Ron Laden on 23/10/2019 16:34:21

                            #434446
                            Former Member
                            Participant
                              @formermember19781

                              [This posting has been removed]

                              #434452
                              Dave Smith 14
                              Participant
                                @davesmith14

                                Ron

                                Buy one of CUP's EF starter packs, they are about £16, has flux and 2 x 1 mm dia and 2 x 1.5 mm dia 455 rods which will be fine for what you want to do. It also includes a hints and tips document. I bought one when I first started silver soldering.

                                Dave

                                #434469
                                Ron Laden
                                Participant
                                  @ronladen17547

                                  Thanks guys, I will order a starter pack from CuP, sounds good.

                                  Ron

                                  #434510
                                  Ron Laden
                                  Participant
                                    @ronladen17547

                                    As well as the starter pack, I see from CuP,s website they also do 455 in paste form, recommended for small or awkward parts. I wonder if that would also be worth getting I can see how that could be useful but as I mentioned I,m new to all this.

                                    Edited By Ron Laden on 24/10/2019 09:18:08

                                    #434522
                                    Former Member
                                    Participant
                                      @formermember19781

                                      [This posting has been removed]

                                      #435283
                                      Ron Laden
                                      Participant
                                        @ronladen17547

                                        I am thinking of moulding a couple of parts and giving JB Weld (original) a try as the material but before I do I wonder does it machine and tap ok. I have filed and sanded it in the past and its fine but never machined or tapped it, the parts wont be heavily loaded so as long as I can get a half decent thread for fixing it will be fine.

                                        #435291
                                        JasonB
                                        Moderator
                                          @jasonb

                                          Certainly machines ok,not tried tapping it but they say it can be done

                                          #435921
                                          Ron Laden
                                          Participant
                                            @ronladen17547

                                            Would anyone mind double checking my school boy level calculations, a taper from 22mm dia to 28mm dia over a length of 30mm which I make is a taper angle of 5.71 degrees..?

                                            #435925
                                            Former Member
                                            Participant
                                              @formermember19781

                                              [This posting has been removed]

                                              #436814
                                              Ron Laden
                                              Participant
                                                @ronladen17547

                                                Back to the buffers I went with setting up in the 4 jaw to get the basic shape (Daves idea, thanks Dave) and it worked well. I did start out using the parting tool which would probably have been ok but I chickened out worrying about a grab which would wreck the buffer. I went with a standard tool and 10 thou cuts, didnt take long as it is only a thin face to machine. The secret was cutting one face and then turning the buffer through 180 and getting it pretty much spot on otherwise you would end up with a weird shape. Just some hand shaping now on the ends which is not too much.

                                                dsc07246.jpg

                                                #437259
                                                Ron Laden
                                                Participant
                                                  @ronladen17547

                                                  No visual just sound, I am giving a budget priced sound system a try for the loco. Its a third of the price of the top end systems which can cover a particular class of loco. It comes complete with a speaker and is ready to go, no setting up other than the volume which is adjustable. The two tone horn is not correct for a class 22 but I can live with that, I rather like the engine start up and the run down, sounds quite good I think.

                                                  It sounds better than it does through the camera and I have also found that the sound quality improves if the speaker is housed and not free standing in the open.

                                                  You may need to adjust your volume up or down.

                                                  Sorry wrong recording will be back with the correct one

                                                  Edited By Ron Laden on 14/11/2019 14:09:49

                                                  Edited By Ron Laden on 14/11/2019 14:13:11

                                                  #437286
                                                  Ron Laden
                                                  Participant
                                                    @ronladen17547

                                                    Sound system as mentioned above

                                                    #438389
                                                    Ron Laden
                                                    Participant
                                                      @ronladen17547

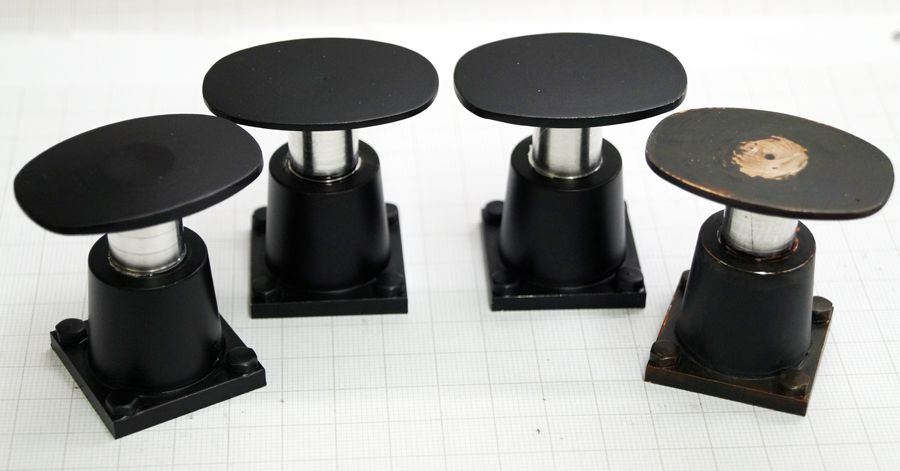
                                                      Still working away on the chassis so I thought I had better get the buffers finished. I was going to make them one piece but went for a separate base plate in the end. The fixing bolts are dummies (5BA) and not even threaded, I drilled a close fitting hole and fixed them with 638, the buffer assy is fitted to the chassis with a single M6 cap head.

                                                      I started a bit of light weathering on one of them and will do more when I weather the buffer plate. I am quite pleased with them though they are not perfect but the best I can make of them.

                                                      dsc07256.jpg

                                                    Viewing 25 posts - 101 through 125 (of 240 total)
                                                    • Please log in to reply to this topic. Registering is free and easy using the links on the menu at the top of this page.

                                                    Advert

                                                    Latest Replies

                                                    Home Forums Locomotives Topics

                                                    Viewing 25 topics - 1 through 25 (of 25 total)
                                                    Viewing 25 topics - 1 through 25 (of 25 total)

                                                    View full reply list.

                                                    Advert

                                                    Newsletter Sign-up