Can You Identify This Tool Post?

Advert

Can You Identify This Tool Post?

Home Forums Workshop Tools and Tooling Can You Identify This Tool Post?

Viewing 22 posts - 1 through 22 (of 22 total)
  • Author
    Posts
  • #576615
    felis concolor
    Participant
      @felisconcolor37847

      Guys hello,

      I have recently obtained a Myford ML7 lathe.

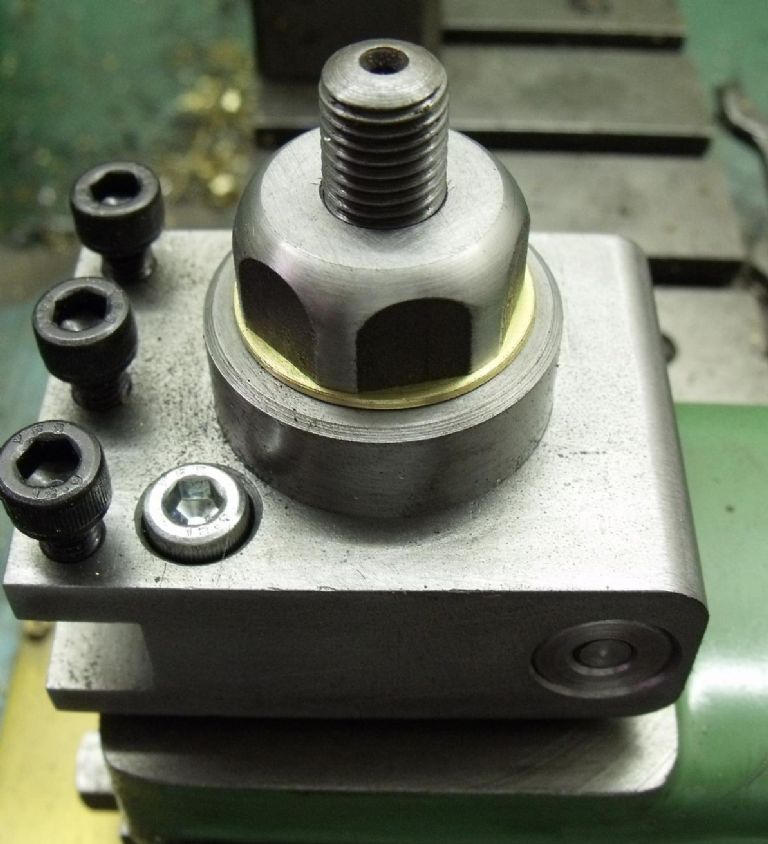
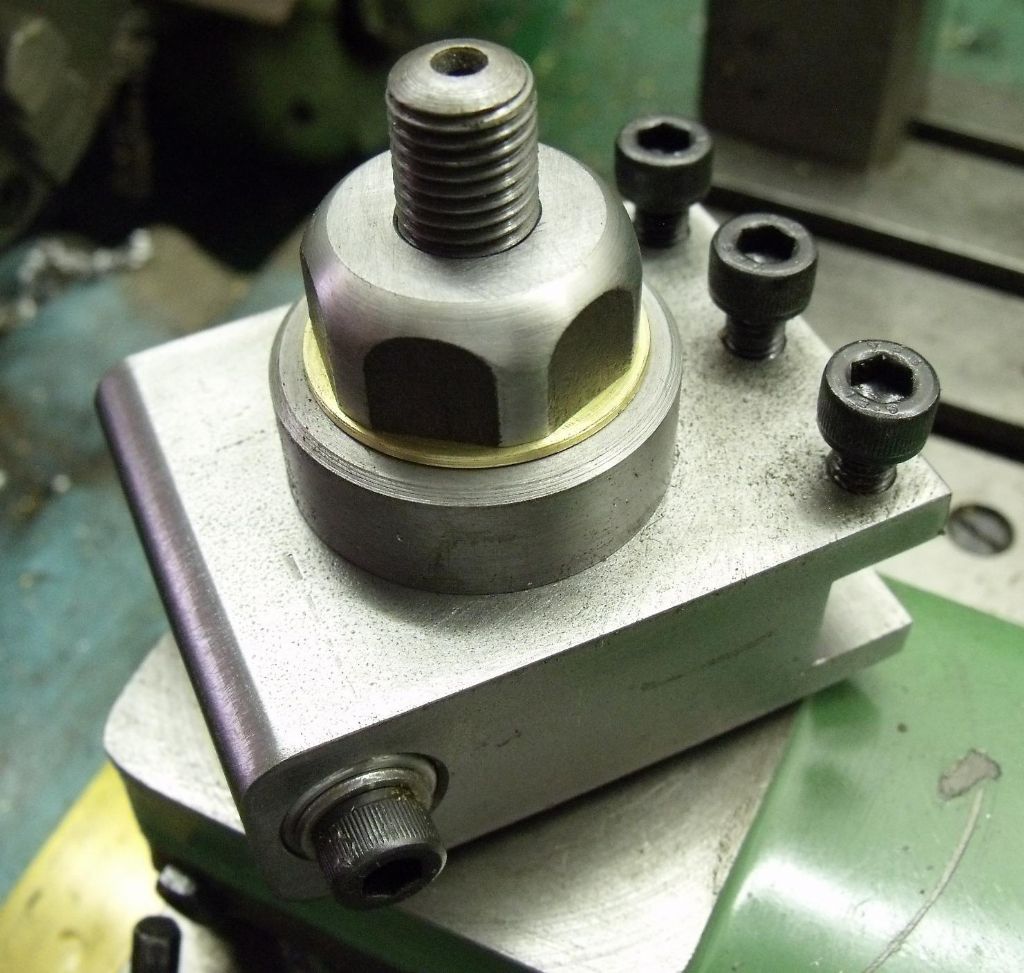
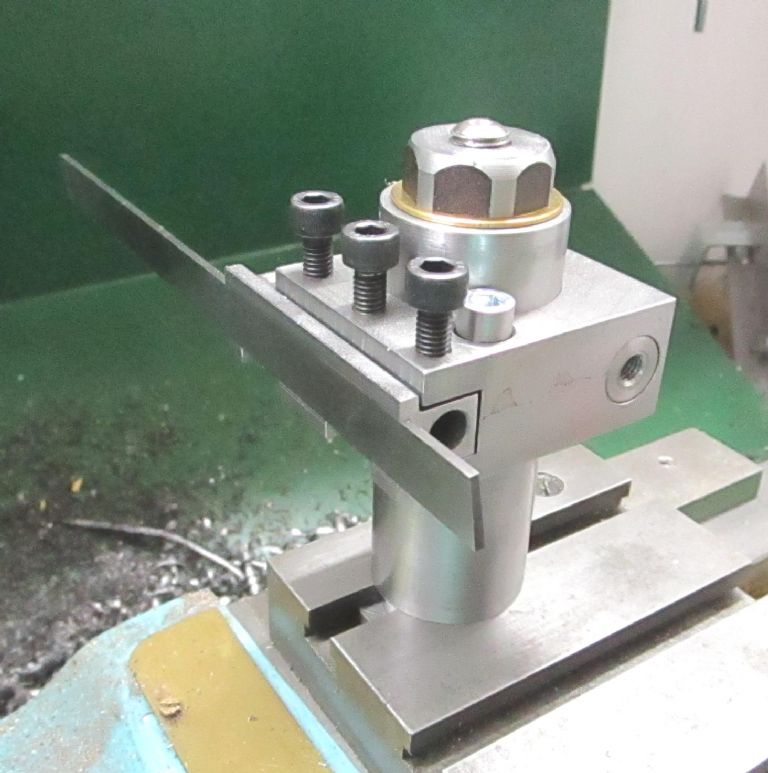
      It has a unique tool post and tool holders. Can anyone in the know please identify the brand or manufacturer for me? I cannot find any other pics of a similar one on the net to compare it to. Also, the original owner has passed, so I cannot ask him.

      I'm a newbie……FYI, so I'm not capable of making my own tooling at this time.

      Cheers.

      I posted pics of it in my album. I just can't figure out [ yet ] how to post pics from my album to this thread.

      Advert
      #20545
      felis concolor
      Participant
        @felisconcolor37847
        #576622
        Keith Long
        Participant
          @keithlong89920

          Hi Felis, and welcome to the forum.

          Your tool holder looks very much like the Chronos Engineering "Economy Quick Change Tool Post" as illustrated on the Chronos website ( **LINK** ). I've never seen or handled one in person so I can't help you with dimensions etc but if you measure your post up and contact Chronos after the holidays they should be able to tell you if it is one of theirs or if their tool holders will fit your post. It looks as though there are some detail differences so it's possible that the post that you have is a home brewed version rather than a commercial offering.

          #576625
          Clive Foster
          Participant
            @clivefoster55965

            Don't know whether that was ever a commercial product.

            But I have seen a reference "somewhere" showing a home made version of slightly simplified design with the clamp bolt closing a simple slit in the post body rather than having a proper pivot point like yours. As I recall it the source implied he had obtained plans and simplified the design to make it easier to make. Performance was claimed to be perfectly acceptable.

            I think you will have to accpet that you will be making your own tool holders unless the dovetail size corresponds to a commercial wedge or piston type post.

            Clive

            #576630
            Howard Lewis
            Participant
              @howardlewis46836

              Welcome to the Forum.

              And good for asking the question, even if it could be a "How long is a piece of string"?.

              Be aware that the toolpost may not be a commercial product, but one made by a previous owner.

              If this is the case, it may have have been made to a known design, or could be a design quite unique to that maker.

              Sorry to be Job's comforter, but without a full set of dimensions, it may be difficult for anyone even stand a chance of identifying the item.

              IF it is a commercial item, the dimensions will enable someone, possibly, to tell which model (i e " Ultragrip" Size 2, or perhaps a "J Bloggs" design ).,

              Hope that someone can identify it for you, so that can source, or make further tool holders.

              Howard

              #576733
              old mart
              Participant
                @oldmart

                It may well be shop made and coloured with gun blue. I like the pivot design with the SHCS to do the clamping. Neil has a thread showing how to post photo's running at the moment which will explain for you. You might need a mill to be able to make additional toolholders.

                 And welcome to the forums.

                Edited By old mart on 25/12/2021 15:20:33

                Edited By old mart on 25/12/2021 15:22:34

                #576759
                felis concolor
                Participant
                  @felisconcolor37847

                  Thank you for the replies gents.

                  I think Keith nailed it. Its a Chronos Economy. Yep….made in India.
                  I had hoped that it was not a china or india tool post, but it is what it is.
                  It will have to do to get me making chips for now, and i can always upgrade to a better tool post in the future.

                  I do not have the parting tool holder for this chronos tool post. I am going to buy a rear mounted parting tool post / holder for the ML7. I’ve been looking at s few options available from the UK, as there is nothing here in Canada for Myford-specific rear tool posts.

                  Which brings me to…..which brand / make / design is a quality tool, proven to work well?
                  I saw the “Hemingway kit” rear tool post, but do not know exactly what machining needs to be done to assemble it. It may well beyond this newbies scope at this time.

                  One more consideration relative to a parting tool holder…..do you guys prefer carbide insert parting blades or hss blades? Again, this is for the capabilities and limitations of the ML7.

                  thank you for your thots.

                  #576761
                  Clive Foster
                  Participant
                    @clivefoster55965

                    felis

                    Stick with what you have. Assuming a reasonable fit between the dovetails on clamp and toolholder it will work fine.

                    Objectively its one of the more mechanically secure types of small, affordable, QC posts. Main disadvantage is that it only has one mounting dovetail. Having a second one at 90° is convenient when needing to mount a boring tool. But its not a deal breaker. Generally its not too much trouble to shift the toolpost 90° for boring but sometimes its nice not to have to.

                    The inexpensive wedge and piston types are likely to be less secure. Good Dickson and Multifix clones need to be made to a degree of accuracy that is generally incompatible with affordability. For obvious reasons Myford toolposts need to be quite small so its difficult to accommodate really effective part turn, friction jamming, locking systems as used on all the other types shown on that Chronos link.

                    Clive

                    #576785
                    ega
                    Participant
                      @ega

                      felis concolor:

                      The Hemingway RTP is strongly recommended but if you have the standard ML7 cross slide you will find that the clearance between toolposts is quite limited.

                      If you have any doubts about making the RTP you could try buying just the drawings and instructions or, as a long term investment, get the G H Thomas Manual where the process and a great deal else is described in detail.

                      #576791
                      Nicholas Farr
                      Participant
                        @nicholasfarr14254

                        Hi, there were / are a few different commercially made styles of this type of QCTP, here's a photo of two different makes that I have, the one on the left I believe I bought from Chronos several years ago and the other one came with the lathe in the photo.

                        qctps.jpg

                        Regards Nick.

                        #576856
                        Howard Lewis
                        Participant
                          @howardlewis46836

                          A Rear Toolpost will improve parting off, if only because the swarf falls out of the cut, reducing the risk of jamming.

                          If you have a post with more than one tool location, the other slots can carry a chamfering tool as well. (My shop made four way Rear Toolpost caries a Front and Back chamfering tools, as well as a Parting tool &nbsp

                          Now that you have identified the QCTP as coming from Chronos, you should be able to obtain further tool holders from them,

                          Howard

                          #576994
                          felis concolor
                          Participant
                            @felisconcolor37847
                            Posted by ega on 25/12/2021 23:03:10:

                            felis concolor:

                            The Hemingway RTP is strongly recommended but if you have the standard ML7 cross slide you will find that the clearance between toolposts is quite limited.

                            If you have any doubts about making the RTP you could try buying just the drawings and instructions or, as a long term investment, get the G H Thomas Manual where the process and a great deal else is described in detail.

                            Thanks for your thots ega.

                            Would you happen to know exactly what machining is required for the Hemmingway Rear Tool Post Kit? I have read a few posts from those that have this kit completed, but no one has outlined the machining steps needed to complete it. Dunno if I have the skills and tools to do this or not, until I have an idea as to what is involved. Please remember that I am brand new to lathe work / precision machining. I have an ML7 and an old Buffalo drill press, a TIG welder, and that's it.

                            #576996
                            felis concolor
                            Participant
                              @felisconcolor37847

                              Thanks all for chiming in.

                              The Chronos tool post came with 4 holders……..but none are for a parting blade.

                              Rather than order a chronos parting blade holder at this point, I'm thinking that I'm just better off to buy a quality rear mounted tool post for a parting blade.


                              There really doesn't seem to be many options for one other than making my own, which, I may be able to do in time but not as a very 1st project.

                              So I have found the Hemingway kit, and another version sold by "Jan" in the Netherlands, and that's about it. Both of these take HSS blades.

                              Are there any other rear tool posts for the ML7 available? Feedback on any of them please? Good? Just OK? Stay clear of??


                              And then there is the conundrum of HSS vs carbide inset parting blades…….. I can afford one or

                              the other, but not both. Hummmmm.

                              Edited By felis concolor on 27/12/2021 18:13:00

                              #577005
                              Clive Foster
                              Participant
                                @clivefoster55965

                                No-brainer decision.

                                Get a decent industry standard carbide parting blade and a holder for it. Sort out a way to repeatably and accurately mount the parting blade at exactly 90° to the axis. Use it at a respectable approximation to book speeds, your Myford probably hasn't the power and heft to get right up to book. But given proper adjustment and wise choice of insert it will come close. Hafta choose well. Some are made to work at seriously scary speeds! Then get on with making stuff rather than worrying about tooling.

                                With quality carbide parting blades and tips available at something like affordable prices the major advantage of a rear toolpost mount becomes instant readiness due to permanent mounting. As it will always be in place on a rear toolpost its worth taking extra time and trouble to get it set dead right rather than the "close enough to work OK" setting that tends to be the norm when switching into and out of the normal toolpost.

                                The fundamental problem with parting off is that the cutting action makes the chip a bit wider so it tends to jam in the groove. Carbide tips have a concave Vee shape top that folds the chip making it narrower than the groove so it escapes more easily. A little lubrication is a great help too. Consider arranging a drip feed just for parting. Full time use of cutting lubricants tends to be excessively messy at home.

                                As ever carbide gives you the advantage of speed. Being able to run at pretty much normal turning speeds makes it much easier to steadily apply a nice fine cut to keep the chips thin and flowing freely. It has to be said that the width of a parting blade makes a relatively heavy cut for any small lathe.

                                Running at low speed with a, probably imperfectly sharpened and slightly out of line, HSS blade is not an appealing way of going about things. Although lots of folk have done and still do. Running slow its very difficult to keep the chips thin to help them escape. A moments inattention results in an over-thick chip which prompty jams up stimulating, at best, considerable workshop esperanto and worst a broken tool and / or ruined job. No wonder parting off has always been considered the stuff of nightmares for the home workshop person.

                                Get things just so and both faces of the part off will be smooth and unmarked. Digs, gouges and marks indicate that the chip is trying to jam.

                                Clive

                                #577077
                                Howard Lewis
                                Participant
                                  @howardlewis46836

                                  An inserted carbide parting tool worked well; most of the time,

                                  But maybe just bad luck, using it in the front toolpost resulted in dig ins. The last one not only smashed the tip, but distorted the holder. So reverted to HSS in the rear post.

                                  This works so well that I now part off under power cross feed!

                                  Whatever you choose, if possible use a rear post.

                                  Howard

                                  #577087
                                  Clive Foster
                                  Participant
                                    @clivefoster55965

                                    Howard

                                    Dig ins with a carbide parting blade on a front toolpost would have me taking a very serious look at how rigid the toolpost set up is and how well your alignment method works. Not forgetting the obvious things like cleaning the innards of a QC system out on a regular basis. Dicksons get remarkably "loose" if not cleaned on a regular basis. Innards of mine are total swarf magnets when it comes to tiny shavings.

                                    Although the OPs' Chronos post is inexpensive it looks to be inherently really solid with the cap head screw pulling up the floating part hard against the dovetail.

                                    Cabide blades seriously don't like being fed in at anything other than perpendicular to the axis.

                                    Had one part off going a bit iffy a while back. Stopped to check the toolpost alignment and found it was maybe 3 thou per inch of travel off perpendicular. Let my mate Paul "I trained as a toolmaker" use the lathe and he'd moved the top slide and set it back using the scale rather than my preferred method of putting a drill carrier in the parallel to axis station of the Dickson and gently bringing it up to touch the extended tailstock poppet. Full line contact means its dead nuts on with my S&B 1024. Adjustment was invisible on the scale.

                                    Power cross feed when parting off is certainly the key to a stress free experience. Nice steady fine feed means the chips are thin enough to drop out. Spare hand to squirt lube in to prevent them hanging up on the sides if they do drag. Although having to drop the feed occasionally to break the chip when you get a "snail" rolling up on top of the tool is annoying and usually leaves a mark. Adjusting speed and feed settings usually cures that. But I have a varispeed drive and lots of settings on the gearbox. Harder for folk who work with less.

                                    As always power feed tests your set-up ability.

                                    No skilled hands working around an error if its a bit wrong.

                                    In this game its well worth taking the extra time and trouble at the beginning to learn how to do it right, do it quick like a pro rather than hurrying to get started doing things via Haynes manual style short cuts.

                                    Right out of my copy of the "Don't Do As I Do, Do As I Say" book. Were I honest with myself I'd admit that it has taken decades for the penny to fully drop along with, probably, "years worth" of wasted time. Don't mention the scrap. Just don't!

                                    Clive

                                    #577125
                                    SillyOldDuffer
                                    Moderator
                                      @sillyoldduffer

                                      Posted by felis concolor on 25/12/2021 18:12:26:

                                      … there is nothing here in Canada for Myford-specific rear tool posts.

                                      Which brings me to…..which brand / make / design is a quality tool, proven to work well?

                                      One more consideration relative to a parting tool holder…..do you guys prefer carbide insert parting blades or hss blades? Again, this is for the capabilities and limitations of the ML7.

                                      Another vote for Carbide mounted in a rear tool-post.

                                      Bee in my bonnet I'm afraid, but I dislike 'quality' used as a requirement because the word's meaningless! I prefer to think in terms of 'value for money' and 'fit for purpose'.

                                      The problem with parting off on small lathes is lack of rigidity. The cutter puts a lot of force into the tool-holder, causing it, the tool-post and the saddle to twist and tilt. Not much movement results in a dig-in. Much easier to part off on big heavy lathes than small ones, however well-made the small lathe is. Big lathes are more rigid.

                                      A rear-tool post is a simple solid lump of metal bolted direct to the saddle. In comparison front tool-posts are towering, spindly affairs that bend. QCTPs are extra bad because the cartridges add extra overhang. Parting-off with a QCTP is a little like going off-road in a Porsche – not what sports cars are good at!

                                      Basically any hefty lump of metal configured as a rear tool-post whizzes all over the best QCTP available when parting off. Of course, front-tool posts and QCTPs are better for almost everything else! By the by, your QCTP may be fit for purpose whoever made it. Do the cartridges sit firmly and adjust OK? Unless it doesn't work effectively, buying 'better' is a waste of money – an unforgivable sin in engineering! Test it action, and make an evidence based decision before replacing it.

                                      Ideally, the lathe is run in reverse when parting-off from the back, but that's unwise on a Myford even though it's a 'quality brand'. It has a screw-on chuck, and even the very best Pratt-Burnerd is liable to come off in reverse! Never mind notions of quality the combination of screw-on chuck and reverse running isn't 'fit for purpose'. (Not a big problem – mount the cutter upside down.)

                                      Dave

                                      #577135
                                      Bazyle
                                      Participant
                                        @bazyle

                                        I thought the idea of a rear toolpost for parting off was to mount the tool upside down and running normal direction so the carriage lifts instead of digging in.

                                        On a small lathe the carbide tools are all too wide needing extra power and wasting metal. I mostly use a 1mm width blade on model engineering sized stuff and on thicker bits like 3/4 inch start it off to set the line and finish with a hacksaw. No point in risking a mess just to boast how you part off bits of 2in EN24 at 15000rpm.

                                        #577158
                                        John Baron
                                        Participant
                                          @johnbaron31275
                                          Posted by felis concolor on 27/12/2021 18:12:22:

                                          Thanks all for chiming in.

                                          The Chronos tool post came with 4 holders……..but none are for a parting blade.

                                          Rather than order a chronos parting blade holder at this point, I'm thinking that I'm just better off to buy a quality rear mounted tool post for a parting blade.

                                          There really doesn't seem to be many options for one other than making my own, which, I may be able to do in time but not as a very 1st project.

                                          So I have found the Hemingway kit, and another version sold by "Jan" in the Netherlands, and that's about it. Both of these take HSS blades.

                                          Are there any other rear tool posts for the ML7 available? Feedback on any of them please? Good? Just OK? Stay clear of??

                                          And then there is the conundrum of HSS vs carbide inset parting blades…….. I can afford one or

                                          the other, but not both. Hummmmm.

                                          Edited By felis concolor on 27/12/2021 18:13:00

                                          Hi Felis,

                                          I have an S7 and have made both front and rear tool posts for it ! Pictures below.

                                          25-09-2018-006.jpg

                                          This is my front toolpost, it is a Norman Patent one, designed to take a maximum of a 1/2" tool bit and will raise up to allow a 3/8" tool bit to be used.

                                          25-09-2018-007.jpg

                                          This is a view from the other side showing the clamping screw.

                                          31-07-2019x002.jpg

                                          And this is the rear tool post set up for parting. That blade is a 200 mm long by 12 mm by 2 mm thick Hss one out of China. The post was designed to accept any of the 52 mm bore tool holders. I've since added a 25 mm thick block that sits flat on the top slide, after having been warned that the parting force, particularly if the blade jams, could break out the rear slot.

                                          norman-001.jpeg

                                          Here is my original drawing for my Norman Patent tool post.

                                          #577413
                                          Howard Lewis
                                          Participant
                                            @howardlewis46836

                                            Anyone suspecting a flexible QCTP for the inserted carbide tip, parting tool, on my lathe, has been misled.

                                            It was mounted in a 75mm square four way turret, which allows cuts of 0.125" when turning, so not flexible, or misaligned. The only flexibility would be lateral, in the 3 mm holder for the parting tips.

                                            When it worked, it worked superbly, but when it dug in, CURTAINS!

                                            A 3/32" wide HSS tool in a similar, shop made, 4 way rear toolpost works very well under a power feed of 0.0025"/ rev. Now that is rigid

                                            Recently, a two piece, article in MEW described the manufacture of the toolpost, from f our pieces of 25 mm thick steel..

                                            Howard

                                            #577442
                                            DiogenesII
                                            Participant
                                              @diogenesii

                                              If you want something that will work in your front toolpost until you find (or more likely, end up building) something for the back, the 'chip-breaker' blades from Chronos work well;

                                              Chronos – Chipbreaker Clamp type parting…

                                              ..I find I still use mine – it's not always convenient to leave a rear tool on a short ML7 slide – personally I prefer a 3/32" or 2mm blade for the ML, but each to their own..

                                              I also use a 'George Thomas' style rear toolpost (same as 'the Hemingway one', the drawings and build instructions were published in his book 'The Model Engineers Workshop Manual' – it contains many useful projects, observations and advice, and the detailed drawings are sufficient to enable you to hack a body out of steel if you can't easily get an iron casting for the base – if you ever decide to buy a book of Myford-based projects, this is probably the one to get..

                                              On the subject of the base casting, I got mine from AJReeves – and have to say it was a very nice piece to work..

                                              ..and oh, yes – in the rear toolpost I use a 2mm carbide insert, upside down, lathe running forward..


                                              Edited By DiogenesII on 30/12/2021 09:36:09

                                              Edited By DiogenesII on 30/12/2021 09:37:41

                                              #577452
                                              John Haine
                                              Participant
                                                @johnhaine32865

                                                It's worth noting that you can add a chipbreaker groove to the top of an ordinary wide parting tool in a few minutes using a diamond needle file.

                                              Viewing 22 posts - 1 through 22 (of 22 total)
                                              • Please log in to reply to this topic. Registering is free and easy using the links on the menu at the top of this page.

                                              Advert

                                              Latest Replies

                                              Viewing 25 topics - 1 through 25 (of 25 total)
                                              Viewing 25 topics - 1 through 25 (of 25 total)

                                              View full reply list.

                                              Advert

                                              Newsletter Sign-up