Buying a 3D printer, but which one?

Advert

Buying a 3D printer, but which one?

Home Forums 3D Printers and 3D Printing Buying a 3D printer, but which one?

Viewing 25 posts - 51 through 75 (of 124 total)
  • Author
    Posts
  • #233427
    Russ B
    Participant
      @russb

      Well that paragraph about the short stiff wire brush didn't make much sense but I think you get the gist of it!

      Advert
      #233439
      Ajohnw
      Participant
        @ajohnw51620
        Posted by Russ B on 05/04/2016 15:23:25:

        Well that paragraph about the short stiff wire brush didn't make much sense but I think you get the gist of it!

        I did.

        I'm trying to understand stepper ratings as the moment. It seems that the head line figures give an 80C temperature rise with 2 phases energised and ambient can be -20 to 50C. This is from an RS spec sheet though and I wonder if the ebay spec's are rated in the same way. Had a bad experience when I had to switch from industrial ratings of resistors to commercial. The difference is a factor of 2. Under normal circumstances the industrial ones can be used as stated on the can – the commercial ones can easily let the smoke out or change colour pretty quickly.

        Next problem will probably be the drivers – 2.5 amps turning out to need an infinite heat sink but doubt if there is any need to drive them that hard. Seems extruders need 5kg/cm / 0.5nm though.

        John

        #233441
        Michael Gilligan
        Participant
          @michaelgilligan61133

          John,

          Re: Stepper Motors

          Roy put a link in this thread, which might be useful.

          MichaelG.

          #233520
          Ajohnw
          Participant
            @ajohnw51620

            Interesting link Michael. I'd add does someone want their steppers to run at 80C over ambient as well. This does seem to be how they are spec'd and ok with ambients of up to 50C. To get less it should just be a case of proportioning the current used accordingly.

            I'm a little less bugged by the motor power question now having found a decent manual for what looks like a UK produced reprap prusa kit. They suggest using a little more drive current than what is needed to achieve smooth movement and with the motors that they use. They will get RATHER warm and not hot. On the drivers they supply seems this is usually about 1/4 turn of the pot past the stage where things move rather than judder.

            The extruder is much trickier but it looks like it's best to stick with 1.75mm filament. The technique used to drive the filament results in lots of plastic dust too.

            crying Interesting kit. Well priced, very clear manual, comes with firmware loaded so no get it from git and find that there is currently a miss match. It also comes with everything even the files to reprint parts. Some don't. Looking at the feedback it suggests they have sold 4 and haven't relisted again last time I looked. The man who has started making and selling small slightly lower temperature kilns at reasonable prices seems to be doing better.

            John

            Edited By Ajohnw on 06/04/2016 11:02:15

            Edited By Ajohnw on 06/04/2016 11:03:20

            #233521
            Russ B
            Participant
              @russb

              I know, I know……. I'm sounding terribly one sided here for the SeeMeCNC camp cheeky

              My motors are just a little more than luke warm after 5 or so hours of running. The extruder does get much hotter (45-50 degrees, I'd call it very warm, but not hot)

              Also, I have absolutely no dust in my extruder unit after 8 months, if it doesn't slip or chew/knurl the fillament then you should be fine. I have an EZstruder branded one – sorry, not a RepRap, its another injection moulded commercial product – All the rep rap stuff is designed to be self replicating so you can make one for a friend/pass it on, which is novel, but do you want a machine that works, of do you want to be part of something bigger?

              Don't get me wrong, the RepRap stuff "works" but it can't beat a quality controlled product, the quality of the knurl on the gripping wheel, the balanced weight of the spring etc – it's impossible for everyone to source the same thing, it's just a case of getting what fits from any number of people that have a version of it.

              #233625
              Ajohnw
              Participant
                @ajohnw51620

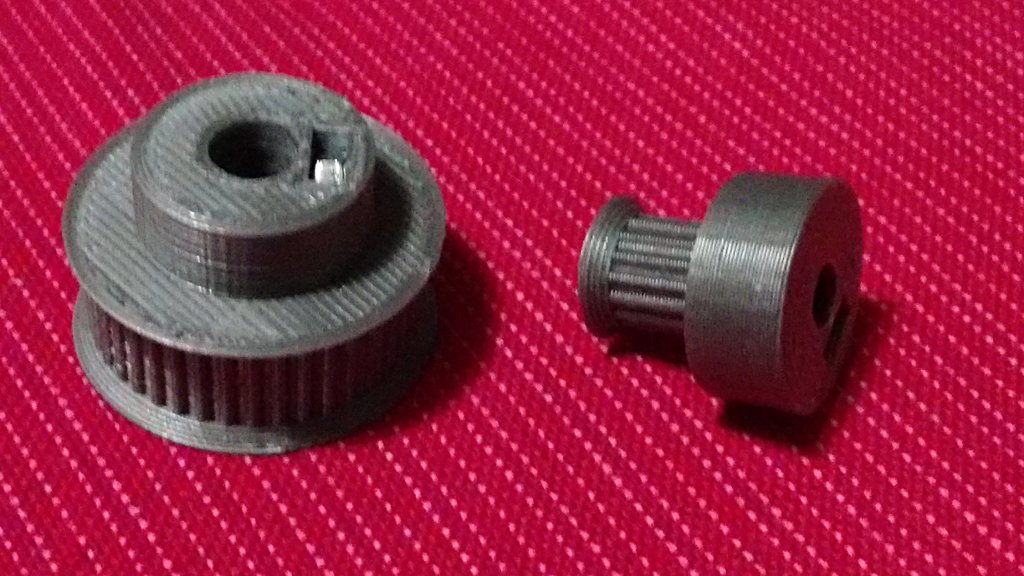
                Not so sure about that Russ. All / most of the extruder designs seem to be copies of reprap. They can do good work. These for instance were made using a decent Prusa kit

                That one has the usual look of some one in a rush. This one would have been done more slowly.

                Both use the usual reprap'd plastic geared extruders that could even have been made on the machine. The dust is usually mentioned by people who print a lot and sometimes often with a 1.2mm nozzle to speed things up.

                Personally I will go for a metal one just to extend the range of plastics that can be printed. Not sure which one though. It looks like that can mean using a gear for some reason rather than the usual dished serrations for the part that actually drives the filament. However a metal extruder feed unit conducts heat more easily than the plastic ones.

                John

                #233629
                Russ B
                Participant
                  @russb

                  Yes design wise absolutely, they are all similar/the same but the in house quality controlled manufacturing/injection molding and controlled/regulated selection of ancilliary parts is what separates them, just like anything I suppose.

                  #233646
                  Ajohnw
                  Participant
                    @ajohnw51620

                    From what I have seen settings are the main difficulty. There are a number of parameters involved and even things like a relatively small change to the extruder temperature can make a big difference. Then there is feed rate, the rate the other axis move at and bed temperature and layer height plus the nozzle diameter. A lot of variables.

                    Injection moulded extruders can have an advantage. They can be made out of a plastic that has a higher melting temperature. It seems they usually are.

                    There is a useful book on Amazon called Maintaining and Troubleshooting Your 3D Printer. It can clear up all sorts of things in terms of what is used and what it does, software and hardware. Pretty good value really. There is a sort of commercial bias in it in places – Makerbot's but it seems to be pretty thorough in all areas – Not read the troubleshooting yet. I didn't think the 1st half of the book would be much use to me but it did clear up one or two aspects.

                    Come on Neil do something about the font changes. Actually this is more like the size it should be on modern screens. Makes it easier to see typo's.

                    John


                    Edited By Ajohnw on 07/04/2016 13:27:06


                    Edited By JasonB on 07/04/2016 13:31:19

                    #233652
                    Russ B
                    Participant
                      @russb

                      John,

                      I'll look out for that book but I think I'm past that now (but no doubt there's always room for improvement)

                      I tend to get a new roll of filament and irrespective of if its the same as the last or not I go though a rough procedure:

                      measure the diameter accurately over a short length (just for the initial "calibration" and I fit my mid sized 0.5 nozzle. I set the nozzle temp to "well below" what is should be (lets say, 190 for ABS) and I apply pressure on the hand wheel that directly drives the pinch roller for extruding filament. I turn the temperature up to 240 and watch on screen as it rises. All the time, I maintain pressure on the handwheel and I get a "feel" for what temperature the material starts moving at and this is my lowest temp.

                      I then get ready to print a 20mm square box with no top/bottom and a single wall thickness via the "sprial vase" method (which is a tick box in almost every software). This removes the "layers", so each of the 4 sides increments up 1/4 of the layer height and it just continues up and up etc.

                      I start by going 10-15C over my lowest temp with a layer height 2/3 of my nozzle diameter. I then go in and manually add lines to the Gode. After 2.5mm I crash them temperature to 10C below my minimum, I then add 5deg at 10mm intervals upto my max for the material, 245 in this example (Max for my machine, I'd try higher if I could)

                      So I end up with a tall single shell box, often the temperature changes are visible, but I measure and mark them on with pen. I then assess the test piece visually and make a mental note of the nicest looking temp range (usually the lower end). I then squash and squeeze it across the diagonals and get a feel for where the strength is (usually up towards the higher temperatures). I then make a decision on the best balance between the two which I usually pick as a range of +/- 5 or 10 degrees (I found expensive filament like Verbatim have a wide range, cheap £10 a kg Chinese stuff sometimes has no cross over at all)

                      As I've been talking about ABS, I will make a decision when printing the part on how much layer strength I need and which end of my range I'll use, large flat parts tend to warp and need higher layer strength, typically with PLA I am only interested in the cosmetic appeal since they're not working parts so I'm usually always biased to the good looking bits.

                      I then print a 20mm square with 20% infill, which has a 10mm thru hole and is 5mm thick. I use and this for calibrating the dimensional accuracy via the under/over extrude multiplier.

                      I then do another 20mm square temperature shell and usually, the "neat" looking bit and the "strong" bit, gets more overlap, so basuically, I can now print neater, at higher temps.

                      So, up the temp, and print another 20mm square 20% infill square, and check again.

                      Usually, once or twice is enough – the more you do, the quicker you get it at it. If this is done accurately, changing layer height or nozzle diameter has little effect, but I guess there is no arm reprinting the temp. and dim. pieces for the 0.35 and 0.7 nozzle just to check the numbers don't need adjustment.

                      Once it's done, its done, and a 1kg roll then goes a hell of a long way!

                      #233657
                      Russ B
                      Participant
                        @russb

                        I'm still pining for a CEL Robox……….

                        They are working on a Stylus/cutter/plotter head which I think will be released very shortly! I'm sure it could be modified for engraving but I guess you'd want some sort of vacuum at the tip of its going to be an expensive mess inside!

                        Edited By Russ B on 07/04/2016 15:01:02

                        #233659
                        V8Eng
                        Participant
                          @v8eng

                          OK, I give up, where are the Pit Crew hiding?👹

                          Edited By V8Eng on 07/04/2016 15:46:14

                          #233669
                          Ajohnw
                          Participant
                            @ajohnw51620

                            It's only £780 in the UK Russ, Can't understand why your hesitating.

                            Your set up methods sound entirely sensible to me.

                            I'm still trying to make up my mind on the basic design. So far it will be built into a 500mm cube frame and have a 300x200mm build area which should fit in that easily. V rail for guides. I don't like the look of the usual Z axis so am thinking about going more along the lines of a router. As this means moving heavier parts about nema 23's on x and y. A rigid table wont be that light. Probably 24v power for the steppers. Maybe nema 17 on the Z axis but I have noticed a nema 16 that is lighter and has similar power levels. I'm thinking of buying the extruder built and complete. It's not even worth considering making some of the parts but things such as the plates which carry the guide rollers will be well worth making going by the initial look at prices. Z might best be done with a screw feed just to make things awkward. Then separate 12v for the bits that needs it and also 5v if that's what the boards need. Some people mess with PC power supplies but I'm not sure it's worth it.

                            Costs apart from the frame look to be well under what a typical kit would cost. I'm not going to be happy about the cost of the frame but needs must.

                            secret Think it's time for some pencil sketches. What I will be trying to do is build something far more rigid than the accuracies that they seem to hold. I feel most if not all lack in that respect unless the price rockets up to very high levels.

                            John

                            #233875
                            Michael Checkley
                            Participant
                              @michaelcheckley34085

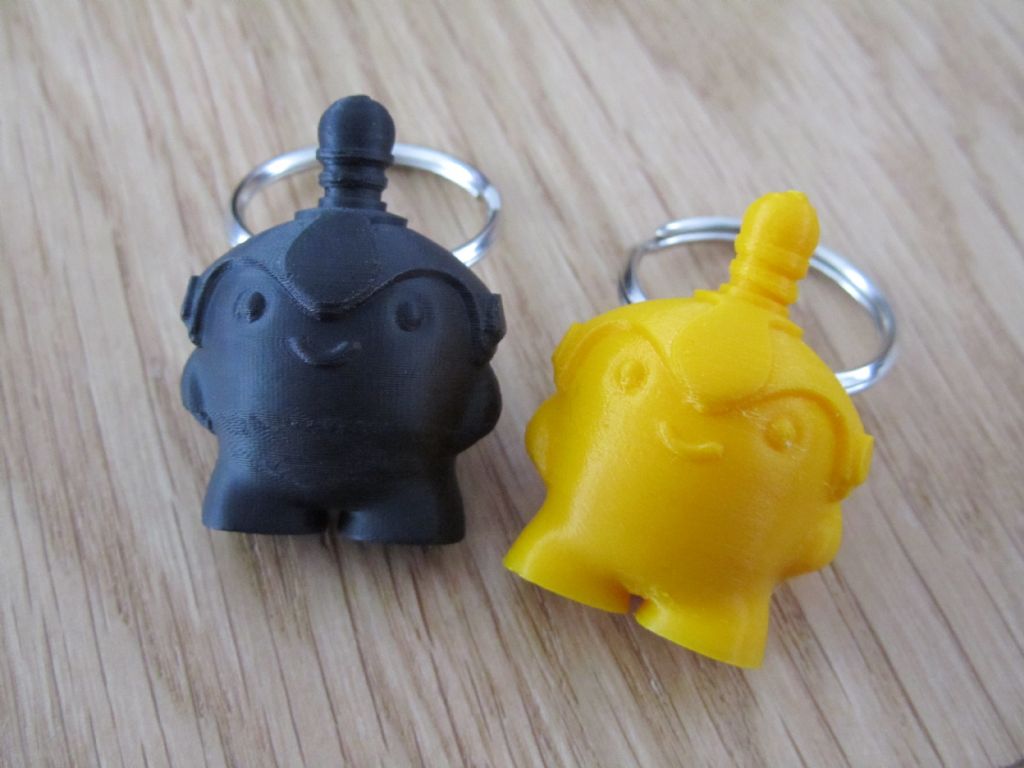
                              A couple of samples arrived this week. The Black one was printed on a Zortrax M200 in ABS and the yellow one on the Ultimaker 2+ in PLA. Both 90micron layers.

                              Not much between them some areas better than others on both. Still leaning towards the flexibility of the Ultimaker.

                              Samples

                              #233888
                              Russ B
                              Participant
                                @russb

                                PLA prints like dream, it's an absolute doddle. Prints look good, they don't warp, they are stong – minimal effort required.

                                ABS is very tricky, it's inherently low friction so bonding to the build plate and to itself is much more challenging. It also requires much higher temperatures and warps easily.

                                It's not a fair comparison really, but I think even with all the above stated, the Zortrax takes it, just keep in mind that with the Zortrax your locked to their own brand consumables, there's no tweaking or playing, no settings to adjust, it's all locked out. I would get an ABS sample from the Ultimaker and the CEL Robox for comparison.

                                The CEL also has preprogrammed print settings, but you can change, modify, source your own materials if you wish – it's an incredible amount of innovation for the money, but a limited Z height (usually not a problem)

                                #233895
                                Ajohnw
                                Participant
                                  @ajohnw51620

                                  On of them has a perforated build plate Russ. I think it's the Ultimaker. Not access to settings would worry me a bit as it all seems to be about settings. A built machine should be supplied all set up. When buying things like this an others I find there can be 2 useful sources of info. Amazon reviews if there are any and YouTube.

                                  I wouldn't have bought my son a certain laptop when he went to university if I had known that the lid hinges failed. I had to machine up some brass and buy screws to fix it.

                                  Anyway extruder arrived. Seems to be the latest and greatest but I'm inclined to wonder if it's down to some of the same parts can be used on Bowden feeds as well. Not that I am a cynic. That's why I went for it. If needed I can make the separate hot end bits quickly.

                                  3dextruder.jpg

                                  It weighs in at circa 450g. Most of that is the drive.

                                  John

                                  Edited By Ajohnw on 09/04/2016 16:44:10

                                  #233907
                                  Michael Checkley
                                  Participant
                                    @michaelcheckley34085

                                    Hi Russ,

                                    I agree, I thought it was a unfair comparison when I saw they were different materials. I have read mixed reviews about the Robox, have you any photos of parts you have printed?

                                    #233915
                                    Russ B
                                    Participant
                                      @russb

                                      John, The Robox and the M200 both have perforated build plates – I've noticed they get excellent ratings so I'm looking for one myself. From photo's they look like the material PCB's are made from but I haven't seen one up close – no doubt they have a specific coating, or are perhaps a specific type of PCB board if that's what they are (I'm thinking – probably not)


                                      Michael,

                                      I don't have a Robox, I have a Rostock MAX v2 (rev 3 or 4) cheeky

                                      I think the early Robox did have some software issues so I admit, it is a tricky one. My Rostock MAX got some poor reviews but now I've updated to the lastest ball joint effector arms and injection moulded spring loaded carriages, its smooth (and very accurate) sailing all the way!

                                      What height are those samples and can you point me to a model or website. I'll make an ABS and PLA version on my printer for comparison using the same 90 micron layers but I can print at 5 microns! I would be very interested to find out how long each printer took to print those samples.

                                      The smallest layer height isn't the best, you're just increasing the chances of a slip up, and massively increasing print time – it depending what you're doing.

                                      I'm sampling some XTC-3D from Bentley Advanced Materials in the next week or so which will be interesting.

                                      Edited By Russ B on 09/04/2016 18:25:46

                                      #233934
                                      Michael Checkley
                                      Participant
                                        @michaelcheckley34085

                                        Dream can be found here:

                                        **LINK**

                                        The samples I have been sent are about 35mm high and the paperwork says they both took 1 hour to print with a layer height of 90 microns.

                                        Interested to see how well the XTC-3D smoothens off your prints!

                                        #233950
                                        Ajohnw
                                        Participant
                                          @ajohnw51620

                                          There are some interesting comments about achieving high printing speeds on the Vulcano extruder web set – on video if I remember correctly. Looking quickly at the site which is here it may have been on youtube.

                                          **LINK**

                                          I'd guess that 90um layers would be printed with the usual 350 / 400um nozzle but it is only guess. There isn't much info around on that area but I'd guess layers of about 1/2 the nozzle dia are about right but this can allter accuracy.

                                          It a sad fact but it seems this area is the biggest bottle neck with printing speed. The plastic can only be so hot etc.

                                          John

                                          #233951
                                          Enough!
                                          Participant
                                            @enough
                                            Posted by Russ B on 09/04/2016 15:18:53:

                                            ABS is very tricky, it's inherently low friction so bonding to the build plate and to itself is much more challenging.

                                            I haven't had any problems bonding to the build plate with ABS on my DaVinci as long as I follow the manufacturer's recommendation to apply a thin coating of a UHU glue-stick to the print area before printing

                                            If anyone is having adhesion problems with other printers, they might want to try that.

                                            #234134
                                            Ajohnw
                                            Participant
                                              @ajohnw51620

                                              Sounds like a nice idea Bander's. Some machines now have perforated plates. I wonder if they are anodised aluminium mesh but can't be sure. The types that used to be used on meat safes to keep flies out. There is an interesting video on youtube showing a German gent removing a part from one of those while comparing the 2 makes mentioned here previously.

                                              Michaels link leads to this one

                                              **LINK**

                                              Over and above that it's worth looking around to find out what microstepping does to torque. Google comes up with one concerning the truth about microstepping at the top. Best look further it isn't as simple as that and some of the comments about drivers are probably down to the use of low voltage driving which will interfere with the drivers ability to do what it should.

                                              John

                                              #234143
                                              Neil Wyatt
                                              Moderator
                                                @neilwyatt

                                                I have discovered that what they don't tell you about microstepping is that, at slow speeds, it generally doesn't work very well.

                                                The reduced back emf from the coils at low speed means that between zero crossing and about half way up the sine wave the current limiting cuts in straight away and you get a large chunk 'cut' out of the drive signal and lose about 1/5 of the steps in each half-cycle. In practice this means you can see the stepper 'cogging' as it stops then jumps forward twice a cycle.

                                                Many drivers have a mode to prevent this. I was able to activate it on a pololu by shorting a 10K resistor to earth (in accordance with the datasheet for the chip on the board). This improved things by the drive is still far from smooth at a stepping frequency of about 16 Hz in 1/16 microstep mode – you can still see teh drive speed up and slow down, irrespective of drive current.

                                                Neil

                                                #234152
                                                Ajohnw
                                                Participant
                                                  @ajohnw51620

                                                  Couple of links.

                                                  **LINK**

                                                  and

                                                  **LINK**

                                                  There is always the question – is the web 100% correct. Sadly fairly often not.

                                                  The slowest movement I have seen in a 3D printer is when the auto bed levelling is used and during homing. It seems microstepping factors of 16 are often used on them and maybe 8 on the extruder to get a more rapid response. I've seen mention of 8mm pitch 4 start lead screws as well. Interesting as resolutions of some 10's of um are needed. It looks like I will be using real HTD belts.

                                                  crying They talk about lead and pitch just to add to the confusion. Maybe it's a transadlantic thing but I doubt it.

                                                  cheekyAnyway I have £100 worth of ebay bunce so will blow lots of it on the frame and the drivers. winkJust have to hope I have identified the reasons for problems correctly.

                                                  John

                                                  #234192
                                                  Russ B
                                                  Participant
                                                    @russb

                                                    Bandersnatch, yes I use Elmers Dissapearing Purple glue sticks, it can simply be rinsed off under a tap.

                                                    I find it best to warm the bed up a little (50-60) then apply in lines, allow it to dry (it goes from purple to white) then go over it in lines again at 90 degrees, and start the print. I find if I leave the glue on their too long, its less effective.

                                                    I wouldn't even consider doing a print without it, if you get 2 or 3 hours in and the part comes off the bed, its not a happy day – it's so easy to clean the purple stuff off, its just not worth the risk.

                                                    #234196
                                                    Enough!
                                                    Participant
                                                      @enough
                                                      Posted by Russ B on 11/04/2016 17:34:49:

                                                      I find it best to warm the bed up a little (50-60) then apply in lines, allow it to dry (it goes from purple to white) then go over it in lines again at 90 degrees, and start the print. I find if I leave the glue on their too long, its less effective.


                                                      I'm not as fastidious as that actually, Russ. I just do a quick rub over with a large glue stick in just the area that will print (no point in having more clean-up than I need to). I do this on the cold platen figuring that, during the heat up before printing, the glue will dry if it needs to.

                                                      After printing, I find that it's best to let the platen cool right down before removal of the part. It then takes just a little force to free it. (It's much harder while it's still warm). After that, I lay a scrap of paper towel soaked in water over the print area for a few minutes to soften the glue then wipe off with another wet towel.

                                                      I also don't have any qualms about applying the glue some time before printing. Just this weekend I had a long print to do which I wanted to start first thing in the morning. (The printer's in the basement but the "melodious" sounds travel up the heating ducts so I don't do it overnight). I just got it all ready to go – including glue – the night before and started it from my machine in the den next to the bedroom when I got up the next morning. I've done that before, too. Works perfectly well in my setup.


                                                      Edited By Bandersnatch on 11/04/2016 18:29:47

                                                    Viewing 25 posts - 51 through 75 (of 124 total)
                                                    • Please log in to reply to this topic. Registering is free and easy using the links on the menu at the top of this page.

                                                    Advert

                                                    Latest Replies

                                                    Viewing 25 topics - 1 through 25 (of 25 total)
                                                    Viewing 25 topics - 1 through 25 (of 25 total)

                                                    View full reply list.

                                                    Advert

                                                    Newsletter Sign-up