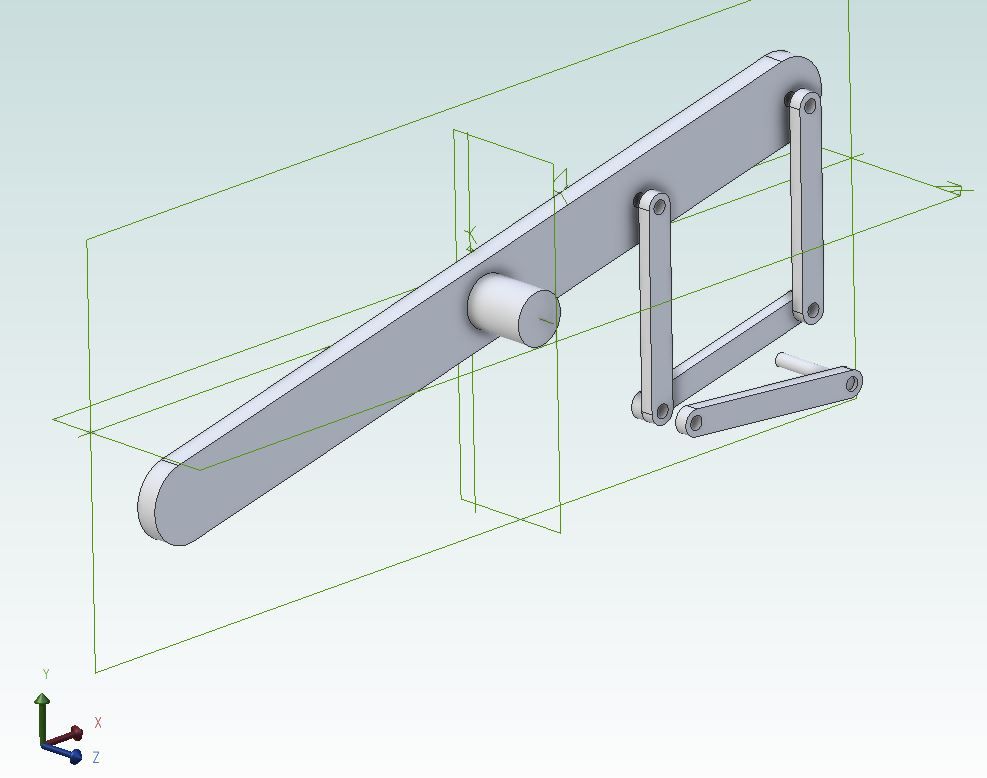
What would be an acceptable amount of lateral movement in the piston rod for a beam engine?
I know the Watts linkage does not produce a perfect vertical path, I have moddeled the linkage and can get the error down to to less than 0.19mm (0.0075 ins)
Would this be an acceptable error on an engine with a stroke of 60mm in a 22mm bore ?
I have moddled the motion in GeoGebra but I can't post the file on here.
It would also depend on how close a fit all the pins are in the linkages, clearance of piston in the cylinder and clearances of piston rod in end cover and gland
Mr Watt has 2 straight line linkages, one as used typically on beam engines, the other on verticals (cylinder at bottom, crank overhead). As you have found they both produce a shallow S shape, but if you frig the position of the fixed points you can get top middle and bottom on a straight line. Is this what you have done? I ftf so the maximum error will be at 1/4 and 3/4 stroke, so there will be a bit of rod sticking out to accommodate bending. Ideally you'd make the gland float, but difficult in small sizes
The piston rod would be 98 mm long SS plus the piston thickness.I am working on a diameter of 5.5 mm to 6 mm.
The error is 0.19mm right at the bottom of the stroke and is down to 0.04mm after 60 Degrees of crank rotation which equates to 5mm of piston movement. At 254 Degrees the error is -0.05mm and at TDC 0.09 mm.
I have placed 4 screenshots of the model in my Beam engine album.
I am wondering if or how I could post the actual file. I have set it up so that I have options to adjust the various linkages. This may be of interest to others on here.
7 thou is not much. Just make the packing gland a loose fit and let the packing fill in the gap. Teflon can do wonderful things. And make the piston a loosish fit, maybe even a little barrel shaped to allow a little angular clearance. Use a viton o-ring as piston ring and let that do the sealing. James Watt did not run one thou clearances in his engines. Some of his engines ran 1/8" piston to bore clearance and more.
Plus a bit of clearance on all the pins and links and piston rod bearing will all add up to provide some relief as Jason says.
As Mr Harley famously said to Mr Davidson: A little extra clearance never got in the way.
The piston rod would be 98 mm long SS plus the piston thickness.I am working on a diameter of 5.5 mm to 6 mm.
The error is 0.19mm right at the bottom of the stroke and is down to 0.04mm after 60 Degrees of crank rotation which equates to 5mm of piston movement. At 254 Degrees the error is -0.05mm and at TDC 0.09 mm.
I have placed 4 screenshots of the model in my Beam engine album.
I am wondering if or how I could post the actual file. I have set it up so that I have options to adjust the various linkages. This may be of interest to others on here.
You could host the file on something like Dropbox and then post the link to that in your thread then people could open it.
You said 60mm stroke in your original post, I see you now have a crank throw of 26mm = 52mm stroke.
5mm dia would be more than enough for the piston rod on an engine with that size bore, it's what I tend to use on engines upto 25mm bore and similar strokes to what you now have.
The error is 0.19mm right at the bottom of the stroke and is down to 0.04mm after 60 Degrees of crank rotation which equates to 5mm of piston movement. At 254 Degrees the error is -0.05mm and at TDC 0.09 mm.
One simple way to reduce the effect of that -0.05 to +0.19 error would be to move the position of the cylinder -0.07. This would then give you -0.12 to +0.12 about the cylinder's new ctr line at the extreames and the +0.04 would become -0.03. That reduces the maximum deviation by about 30%
I just plotted out the geometry of the Stuart Beam engine in Alibre by way of comparisson as there are plenty of thos ethat work. With no play in the pivots
Piston mid stroke 0.00mm offset
Piston top stroke +0.14mm offset
Piston bottom stroke -0.14mm offset
This is 51.8mm stroke, 25.4 bore
If I allow for an H7 tolerance on all the pivots which is 0 to + 0.01mm and what your average reamer will give there is 0.07mm of sideways play at the pivot on the end of the piston rod so those offset figures could be halved allowing for play in the links.
Anyone playing with this will need GeoGebra installed. It is supposed to be a teaching aid, but I think it goes way beyond that.
I did start out with a 60mm stroke but have since shortened it to 52mm to get rid of the biggest error at the bottom of the stroke.
This started out as an exercise to improve my skills with Turbocad and I was re-drafting some drawings I found on the net. During the process I found some anomalies so thought I would check them, that is when I found GeoGebra as a maths program. I am now well and truly down the rabbit hole and have the ambition to build this engine when I am back on my feet and in the workshop.
Do be careful with some of the drawings you find on the net, some have errors due to converting from imperial to metric often compounded by a scaling factor and some pivot pin and hole sizes have excess clearance to make design work on a computer screen but have not physically been built by the designer.
That was exactly the problem, they were not the best drawings either.
As an excercise to learn CAD they were good enough. Then OCD raised its head and I thought I would correct the errors. I am now pretty well starting with a new design but trying to retain the original concept of the tripple B engine to make it from barstock but doing a metric conversion.
Having built the Stuart Beam many years ago I'm unlikely to do a scratch built metric one like I have with their other engines like the Real and James Coombes but the beam would make an idea candidate for conversion if you are not too far on with the BBB
I am working on drawings at the moment. I can't get out to do anything in the workshop for a while, probable 3 to 4 weeks but when I do I have to finishthe air intake for the car and put the exhaust back on. The management wants household repairs done as well. This is a future project.
JasonB has beaten me about pivot clearances and moving the cylinder.
There was a mantra at work – "fit, form and function". In the case a such a model, fit has to be good, form (the way it looks) is all important and, usually, function is a poor third. The model should work quite happily with your Watt linkage offset and Jason's quoted clearances. If it is tight due to the offset open up the holes for the piston rod in the cylinder cover and gland slightly. This should free up the movement and not effect the gland seal or anything else.
This has been a nice little exercise but I doubt if Watt and his engineers would have done it.
I find that I do not give enough clearance on pivots etc. This then becomes a problem on assembly.
We always used to work to function follows from, and if it looks right it probably is.
I am quite sure Watt and his engineers/draughtsmen never went to these extents, however if they had had the tools, computers etc that are available today I do wonder if they would.
We have the benefit of their trial and error, and clearly as a result of their over engineered machines which have lasted to the present the benefit of their efforts. More than can be said of modern practices which par evrything down to the bone.
I have yet to visit the Crosness pumping station which is supposed to be a work of art.
I just plotted out the geometry of the Stuart Beam engine in Alibre by way of comparisson as there are plenty of thos ethat work. With no play in the pivots
Piston mid stroke 0.00mm offset
Piston top stroke +0.14mm offset
Piston bottom stroke -0.14mm offset
This is 51.8mm stroke, 25.4 bore
If I allow for an H7 tolerance on all the pivots which is 0 to + 0.01mm and what your average reamer will give there is 0.07mm of sideways play at the pivot on the end of the piston rod so those offset figures could be halved allowing for play in the links.
Edited By JasonB on 07/02/2023 09:50:38
So what I'd suggest is rotate the piston centreline so it passes through the 3 points Jason has identified, then rotare the whole thing back again to get the piston CL vertical. This will mean the beam doesn't go equally up and down, but not noticeably, but the deviation from a straight line will be reduced, and the max deviation won't be at the bottom of the stroke, so the piston rod will be further extended and more accommodating.
I have started building Gerry's beam engine and have wondering about the linkage and alignment.
Would it be a bodge or cheating if I mounted the cylinder base on a pivot to allow it to move slightly. It would seem preferable to any binding at the gland or piston. The pivot could be hidden if necessary and I am guessing any movement would be hardly noticeable.
You could even do a least squares fit to the locus of the pin, but that might be OTT, and it wouldn't be on centre at the bottom which feels like a good thing.
As regards this 'if it looks right it is right' idea, in reality that means it looks like the last one, no idea whether it will fulfill new requirements, or you could make it cheaper. Making things last for 100 years is probably false economy, it will almost certainly be obsolete long before that as technology advances.
Having read all this I am considering a slight shift of the cylinder away from true, It would be such a small deviation so hardly noticable if at all. Havn't got round to the cylinder yet.
Just spotted this thread, wish I'd seen it earlier.
Having completed my first simple beam engine recently I found it most frustrating trying to set it up to run smoothly.
I couldn't understand why the piston rod was binding at around a 1/4 and 3/4 of its travel. Of course I now know why!!
It didn't help that I reamed the holes (3/16" in the cylinder and gland cap so the piston rod was a precise fit. I decided to enlarge them to 4.9mm and rely on the ptfe plumbers tape between the caps to give a good seal.
It certainly did the job, much smoother, still a little binding but nowhere near as bad as it was. Engine now ticks over really slowly, so I'm really happy about it.
This may be the last post in this thread, if so thanks to all I really enjoyed reading all your posts.
Geoff
Author
Posts
Viewing 23 posts - 1 through 23 (of 23 total)
Please log in to reply to this topic. Registering is free and easy using the links on the menu at the top of this page.