Backlash Allowances for Gears

Advert

Backlash Allowances for Gears

Home Forums Help and Assistance! (Offered or Wanted) Backlash Allowances for Gears

Viewing 17 posts - 1 through 17 (of 17 total)
  • Author
    Posts
  • #33266
    Alan Charleston
    Participant
      @alancharleston78882
      Advert
      #371483
      Alan Charleston
      Participant
        @alancharleston78882

        Hi,

        In the past I have cut gears by making a blank with an OD of the pitch diameter plus twice the addendum and, using commercial cutters, cutting to a depth of 2.2 times the addendum.

        This has worked OK but I watched a youtube video by Keith Rucker – https://www.youtube.com/watch?v=9Dl5J9b8GBw – where he used an excel spreadsheet he had devised to calculate the measurement across pins to ensure the gears were cut to the proper depth. A screenshot of the spreadsheet is shown at 36minutes into the video. There are two inputs which are the backlash which is defined as 0.040/P and the clearance which is defined as 0.157/P where P is the Diametral Pitch. He said he was going to publish the spreadsheet but I don't think he ever did.

        I have found a calculater here – http://salemcompany.com/cgi-bin/cabAS.py?a=./gears/pages/Salem1501HS.html&b=./gears/pages/Spur1501S.html&c=./gears/pages/Salem1501FS.html .

        There is a box labelled Backlash Allowance. If this is left empty, and the dp, pressure angle and number of teeth are entered and the calculater run, a recommended backlash allowance shows up in the results which I assume you can put into the front end and recalculate. There is no allowance for a clearance input.

        The problem I have is that the recommended backlash allowance is quite different (higher) than the 0.040/P suggested by Keith Rucker.

        Can anyone tell me if the backlash allowance worked out by the calculater is perhaps a combined backlash/clearance figure?

        One of the reasons I am keen to measure gears across pins is that I have an old Boxford lathe and I want to make some more change gears for it. As I understand it, the pressure angle on these should be 14.5degrees but the two reversing gears at the top have 20P.A. stamped on them so I'm unsure as to whether the main train gears have 14.5 or 20 degree pressure angles. I've made a pair of dp18 racks with the two pressure angles but they both seem to mesh with the gears OK. That's when I came up with the bright idea of measuring the gears across pins. The problem is that if I use 0.040/P as the backlash allowance, they look like 20 degree gears and if I use the backlash allowance recommended by the calculater they look like 14.5 degree gears.

        Can anyone help me?

        Regards,

        Alan

        #371484
        Michael Gilligan
        Participant
          @michaelgilligan61133
          Posted by Alan Charleston on 13/09/2018 07:59:40:

          [ … ]

          One of the reasons I am keen to measure gears across pins is that I have an old Boxford lathe and I want to make some more change gears for it. As I understand it, the pressure angle on these should be 14.5degrees but the two reversing gears at the top have 20P.A. stamped on them so I'm unsure as to whether the main train gears have 14.5 or 20 degree pressure angles. I've made a pair of dp18 racks with the two pressure angles but they both seem to mesh with the gears OK. That's when I came up with the bright idea of measuring the gears across pins. The problem is that if I use 0.040/P as the backlash allowance, they look like 20 degree gears and if I use the backlash allowance recommended by the calculater they look like 14.5 degree gears.

          Can anyone help me?

          .

          You have evidently put a lot of thought into this, Alan … but there is clearly something wrong with either your Boxford, or your measuring technique.

          It should be reasonably simple to distinguish visually between 14.5 and 20 degree pressure angles.

          Assuming that you don't have access to a 'Shadowgraph' or similar profile-projector: Scan a couple of gear teeth at high resolution on a flatbed scanner.

          I don't know if Boxford used a mix of pressure angles in the train; it is quite feasible … But they should never be run as mating pairs! … If you can't detect the mis-match, then perhaps the lathe has been abused in the past.

          MichaelG.

          .

          https://en.m.wikipedia.org/wiki/Pressure_angle

          Edit: There are also two helpful drawings linked from this page:

          https://khkgears.net/new/gear_knowledge/gear-nomenclature.html#Pressure%20Angle

          Edited By Michael Gilligan on 13/09/2018 08:54:13

          #371486
          Anonymous

            Personally I'd forget pootube videos and unknown spreadsheets and go back to basics. thumbs up

            The conventional way to calculate the OD of a spur gear is number of teeth plus 2 all divided by the diametral pitch (DP). Although given that the addendum (J) is one over the DP it's the same as the PCD plus 2P. In theory the dedendum (K) is also 1/P. However from a practical point of view there needs to be clearance at the bottom of the tooth for the crest of the mating tooth. The clearance is arbitrary, but is often set as 0.157/P, or pi/20 for a 1DP gear. The clearance needed varies with number of teeth and pressure angle. The "standard" total tooth depth is 2.157/P. But for small numbers of teeth it can be 2.25/P. Any proper involute cutter should have the total tooth depth engraved on it.

            Backlash allowance is different to clearance, but is also arbitrary. The value of 0.04/P is an average. For minimum backlash the figure can be 0.03/P, or for a maximum it can be 0.05/P.

            To get the calculated backlash you cut the spaces slightly deeper. For 14½° PA the excess depth on each gear is the same as the backlash value. For 20° PA and on both gears the value is 0.73 time the backlash.

            When I first started making spur gears I spent a lot of time fannying around with gear verniers and tweaking the depth of cut. Turned out to be a waste of time, now i just cut to the calculated depth without backlash and the gears work fine.

            For changewheels it's a complete waste of time mucking about with backlash calculations, as you can achieve the same effect by twiddling with the centre to centre distances. In theory gears with different PA will not mesh, but if they're sloppy enough then of course they will do so. I don't know what the PA is for Boxford gears, but I'd guess 14½°. I suspect that the tumbler gears are 20° PA to avoid undercutting on relatively small gears. The need for undercutting is dependent upon PA and gets less as the PA gets bigger. There is a formula for it, which I can't remember, but I think for 20° gears under about 12/13 teeth may need undercutting.

            To summarise: forget backlash and overcutting on depth, cut to calculated depth and the gears will work fine.

            Andrew

            #371487
            Martin Johnson 1
            Participant
              @martinjohnson1
              Posted by Michael Gilligan on 13/09/2018 08:36:24:

              It should be reasonably simple to distinguish visually between 14.5 and 20 degree pressure angles.

              Assuming that you don't have access to a 'Shadowgraph' or similar profile-projector: Scan a couple of gear teeth at high resolution on a flatbed scanner.

              I don't know if Boxford used a mix of pressure angles in the train; it is quite feasible … But they should never be run as mating pairs! … If you can't detect the mis-match, then perhaps the lathe has been abused in the past.

              MichaelG.

              I think the idea of using a scanner as a "Shadowgraph" is excellent and have stashed that one away for further use!

              However, distinguishing visually between 14.5 and 20 PA will be all but impossible UNLESS you have the tooth profile drawn out for the relevant tooth number, base circle and PA you are trying to look at. It is not particularly difficult to draw out such a profile using the most basic of CAD programs, although a bit too lengthy to describe here.

              I wonder if Boxford used 20 PA on the reversing tumbler as they will usually be quite low tooth numbers, so 14.5 PA might have been a bit spindly for the rough and tumble of workshop use? Then perhaps used 14.5 PA on the remainder of the train?

              Good luck,

              Martin

              #371488
              Michael Gilligan
              Participant
                @michaelgilligan61133

                Beware the typo. in the video captions.

                This is a good representation: **LINK**

                https://www.psmotion.com/mechanism-design-software/gear-design-software/gear-pressure-angle

                MichaelG.

                #371497
                John Hinkley
                Participant
                  @johnhinkley26699

                  You might be interested to know that HPC Gears provide a useful downloadable technical publication giving all sorts of information about gears, including formulae for calculating backlash for not only spur gears, but other forms as well. It can be found on their website at:

                  **LINK**

                  John

                  #371500
                  John Hinkley
                  Participant
                    @johnhinkley26699

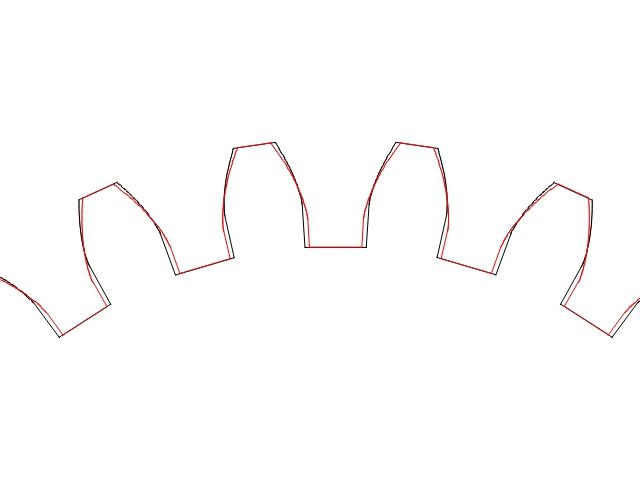
                    Apropos of nothing and just as an exercise, I generated two spur gear drawings with GearDXF and compared them in QCAD. I have uploaded a jpeg of part of the two gear profiles overlaid and magnified. The gears are 22 tooth, 8DP with an OD of 3in., 20° PA in red and 14.5° PA in black. There is a noticeable difference in the tooth profile, as you would expect, but very difficult to determine by eye, in my opinion. Especially if using 72 year old eyes!

                    20deg v 14-5deg.jpeg

                    John

                    #371512
                    RichardS
                    Participant
                      @richards31161

                      On a Boxford the tumbler gears can be 14 1/2 or 20 deg PA and the changewheel train is 14 1/2 deg PA. The tumbler gears drive the stud gear spindle and thus never come into mesh with the changewheel chain.

                      Edited By RichardS on 13/09/2018 12:41:00

                      #371514
                      fishy-steve
                      Participant
                        @fishy-steve

                        Hi Alan,

                        Take a look at lathes.co.uk.

                        Back gears, tumbler reverse and drive gears on the Underdrive Boxfords were 20PA. All change wheels were 14.5PA from the first to the last 9" and 10" Boxfords.

                        I agree with Andrew above. Don't waste your time worrying to much about backlash figures for change gears. You will be setting the backlash yourself. I set my backlash with a piece of paper sandwiched between gears. Works fine.

                        I've cut quite a few change wheel gears and never had any problems.

                        Steve.

                        Edited By fishy-steve on 13/09/2018 13:42:50

                        #371520
                        Muzzer
                        Participant
                          @muzzer

                          Bear in mind that, technically, gears are designed to operate with zero backlash and indeed when you measure them for "accuracy", you generally do this by meshing the test gear with a precision "master" gear with a (close to) perfect profile and observing any variation in centre distance. There is usually a spring to preload them with a defined force.

                          The reason for creating a deliberate, finite amount of backlash is to guarantee that there is no (statically indeterminate) radial preload, with some margin for thermal expansion and other tolerances. Ideally you would minimise the backlash, consistent with ensuring some is always present. Traditionally a fag paper suffices for workshop requirements.

                          Murray

                          #371521
                          Oldiron
                          Participant
                            @oldiron

                            I stopped watching Keith Rucker a long time ago when I realised that he is a hammer & chisel merchant. (Who belts gears on a shaft with a steel hammer)? Besides that he is a bit to smarmy for me.

                            regards

                            #371523
                            Michael Gilligan
                            Participant
                              @michaelgilligan61133
                              Posted by John Hinkley on 13/09/2018 10:28:51:

                              Apropos of nothing and just as an exercise, I generated two spur gear drawings with GearDXF and compared them in QCAD. I have uploaded a jpeg of part of the two gear profiles overlaid and magnified. The gears are 22 tooth, 8DP with an OD of 3in., 20° PA in red and 14.5° PA in black. There is a noticeable difference in the tooth profile, as you would expect, but very difficult to determine by eye, in my opinion. Especially if using 72 year old eyes!

                              20deg v 14-5deg.jpeg

                              John

                              .

                              That's very helpful, John yes

                              … It can obviously be as an overlay for checking the scan that I suggested this morning.

                              MichaelG.

                              #371528
                              not done it yet
                              Participant
                                @notdoneityet

                                Remember, too, that sets of eight involute cutters are a compromise for every tooth count less eight, at least. High volume OEMs likely produce, or use, gears that are not constrained by only having a choice of eight cutters – particularly in high speed transmissions.

                                On most of our change-wheel machines, only the spindle, tumblers and next change-wheel drive gear are really high speed – and these are often the same tooth count (so the same involute cutter) and likely chosen for quiet running. Don’t under-estimate lathe designers – most were engineers – although compromises were often accepted.

                                #371624
                                Alan Charleston
                                Participant
                                  @alancharleston78882

                                  Thanks for all the helpful advice. I agree that as far as the change gears are concerned, I don't need to be too fussy. They are DP 18 which is equivalent to Module 1.4111. I have a set of Module 1.5 cutters (20 degree P.A.) and I figured that the difference in the profile between Module 1.5 a 1.4111 would be small so I cut 3 extra change wheels using Module 1.4111 to calculate the OD and depth of cut. I made them from Delrin so I wouldn't damage the existing gears. The gears worked well. They seemed to mesh OK with the existing gears.

                                  I then had a go at cutting a 14 tooth pinion on the handwheel shaft in the apron. The DP of the gears here are DP 20 which is equivalent to Module 1.27. I repeated what I did for the change gears using a Module 1.25 cutter (20 degree P.A.) and cutting a Module 1.27 pinion. I made the new shaft and pinion out of steel. It didn't mesh at all well with the second wheel in the apron train. This situation is quite different to the change gears as the shafts are in fixed positions and the clearance needs to be right which is why I was interested in getting some guidance on how to go about it. I managed to set the pinion up in the dividing head again and cut the pinion a bit deeper but the meshing was still not good, so I put the old one back in.

                                  I concluded that the problem was the pressure angle so I'm looking to get a set of DP20 cutters with a P.A. of 14.5 degrees.

                                  The reason I'm looking at working on this is that there is a lot of backlash in the handwheel on the apron although looking more closely at it I think the main wear could be on the pinion which engages with the rack on the bed. I'll pull it apart and measure the pinions and gears across pins but again, I need to know how to determine the backlash allowance so I can calculate what the correct across pins measurements should be.

                                  Regards,

                                  Alan

                                  #371627
                                  Phil P
                                  Participant
                                    @philp

                                    Just out of interest, the tumbler gears on my Myford S7 are 20° PA and the rest of the change gears are 14½° PA.

                                    I made that discovery when building the Meek screw-cutting dog clutch for it.

                                    Phil

                                    #371915
                                    Howard Lewis
                                    Participant
                                      @howardlewis46836

                                      Gears should never be run without backlash (If, for some reason, you MUST have Zero backlash, then you need two thinner gears pushed in opposite directions by one or more springs).

                                      The easy way to set backlash is to adjust each mesh so that it just nips a piece of paper (about 0.003" or 0.075mm in round figures thick).

                                      Howard

                                      Edited By Howard Lewis on 15/09/2018 21:38:26

                                    Viewing 17 posts - 1 through 17 (of 17 total)
                                    • Please log in to reply to this topic. Registering is free and easy using the links on the menu at the top of this page.

                                    Advert

                                    Latest Replies

                                    Viewing 25 topics - 1 through 25 (of 25 total)
                                    Viewing 25 topics - 1 through 25 (of 25 total)

                                    View full reply list.

                                    Advert

                                    Newsletter Sign-up