A Well-Tempered Hybrid Pendulum Clock Project

Advert

A Well-Tempered Hybrid Pendulum Clock Project

Home Forums Clocks and Scientific Instruments A Well-Tempered Hybrid Pendulum Clock Project

Viewing 25 posts - 26 through 50 (of 96 total)
  • Author
    Posts
  • #657700
    S K
    Participant
      @sk20060

      I'm close to having to decide where I want to support the bob. There are three main possibilities: support it from the top (easiest, but worst temperature effects), support it from the middle by a compensator tube (requiring a larger hole from the bottom too), or support it from the bottom.

      If both the bob and temperature compensation support is the same material (e.g. brass), then there should be no need to support the bob in the middle. Instead, it's exactly equivalent to support the bob from the bottom and stack it on top of a shorter compensator, correct?

      Advert
      #657701
      S K
      Participant
        @sk20060

        Also: I've almost finished the pendulum's support bracket. I now have to decide whether to cut V's or leave the bracket flat on top (i.e., for lower friction during settling). Someone, maybe John, had suggested the latter.

        If flat, I'd add clamps, and locating the pendulum in one axis would need to be done manually (no V for it to fall into).

        Any comments about this choice?

        (I guess I could make both V's and clamps.)

        Edited By S K on 23/08/2023 23:32:15

        #657710
        Michael Gilligan
        Participant
          @michaelgilligan61133
          Posted by S K on 23/08/2023 23:28:51:

          .

          […]

          Any comments about this choice?

          […]

          .

          Jo No’s use of locked-up bearings seemed ‘inspired’ to me …and could read-across to your support.

          MichaelG.

          #657716
          John Haine
          Participant
            @johnhaine32865

            Bateman has flat top bracket and no clamp. My Arduinome had clamps but I recently slackened those off as I suspected the pendulum might be slightly out of plumb.

            Compared to my Helmholtz coil configuration your magnets are rotated 90 degrees. Also thinking about the force lines from each magnet, as the other end is in contact with the rod the flux may be "bent back" at the hot end, how will they interact with the coils?

            #657760
            S K
            Participant
              @sk20060
              Posted by John Haine on 24/08/2023 08:06:55:
              Compared to my Helmholtz coil configuration your magnets are rotated 90 degrees.
              Also thinking about the force lines from each magnet, as the other end is in contact with the rod the flux may be "bent back" at the hot end, how will they interact with the coils?

              Ah, your magnet is oriented vertically, with the coils then applying a twisting torque in the direction of the motion. Now it makes more sense to me that you put it at the top of the rod (and the Helmholtz arrangement that suits it). Unfortunately, I can't easily do the same.

              In answer to your second point, I don't know. It's clearly not an optimal solution, but I've assumed that the pair will mostly net out as a single magnet. The assembly certainly appears to when I play around with it.

              I could retreat back to a single magnet and a single coil, but my instinctive preference is for a symmetrical arrangement.

              #657829
              S K
              Participant
                @sk20060

                More progress:

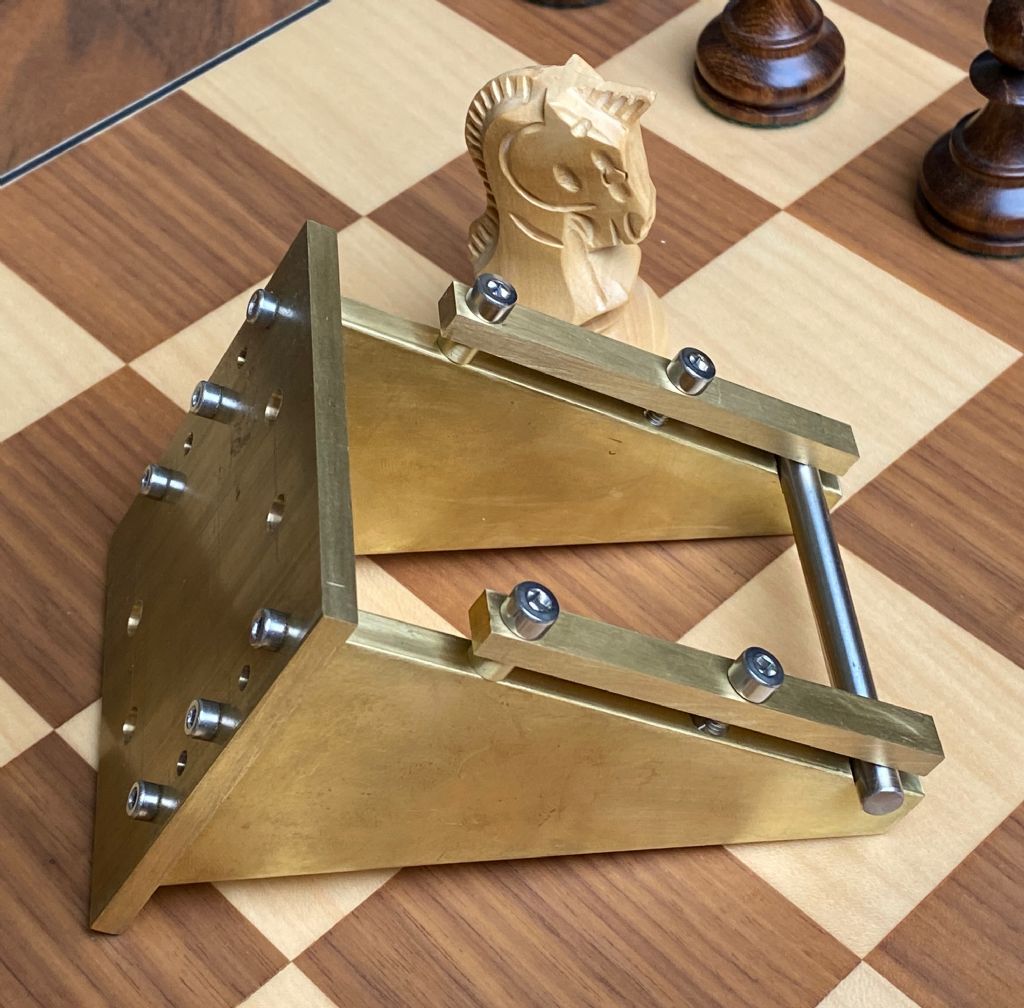
                I've finished the pendulum's bracket. It's designed to fit 8020 aluminum profile (80x20mm), and the bolt positions were spaced accordingly, with the two supports being 60mm apart. The throat is about 3.25" to the V.

                The top of the bracket is intended to allow a flat-placed pendulum cross-rod, with or without the clamp. Of course the V can also be used with or without the clamp. Flatter is better, but the clamp is currently set with a very slight down-angle, capturing the 1/4" cross-rod (better than ejecting it). Taller, well-tuned clamp supports would be needed to clamp a "flat" cross-rod.

                img_4965.jpeg

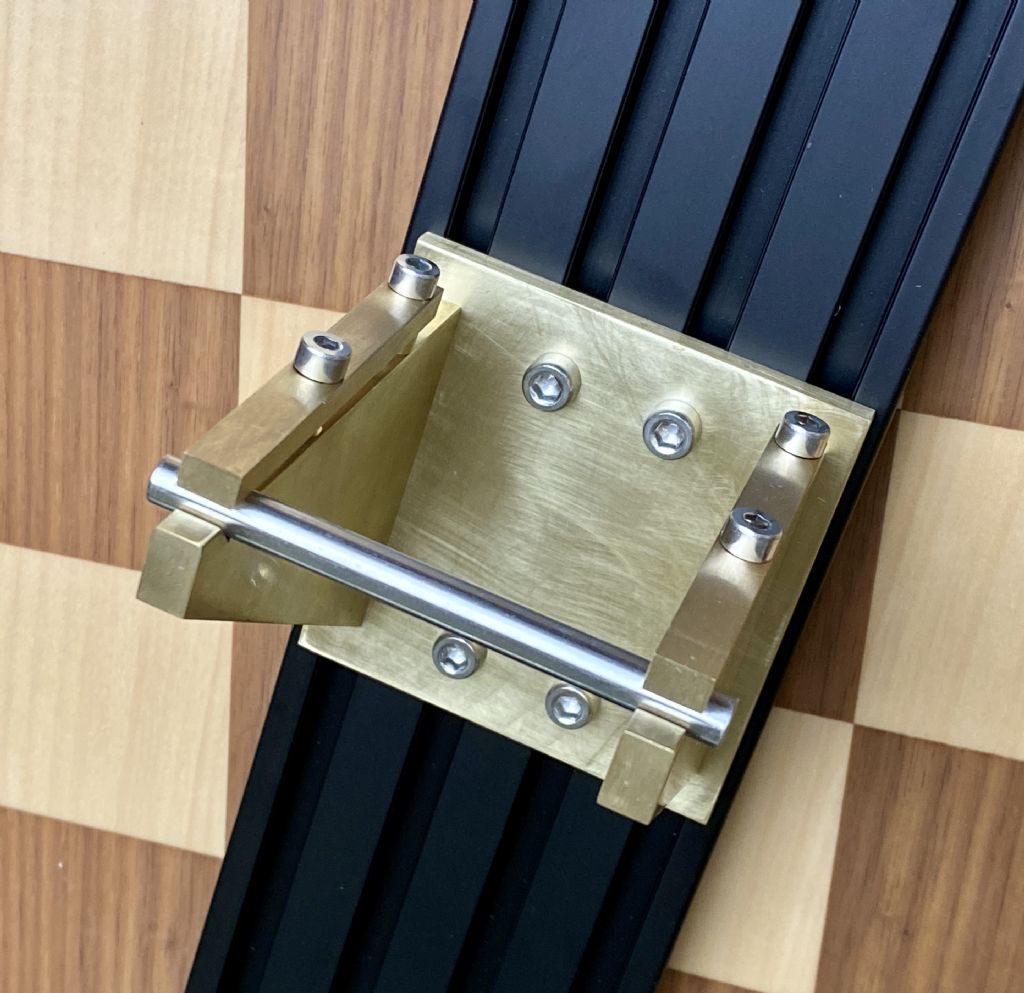
                Here it is bolted to an 8020 aluminum profile, with a weird perspective lying down on the chessboard. M3 bolt heads are small enough to slip into 2020 T-channels, allowing bolting things from the back. M5 bolts are used with T-nuts to clamp the bracket to the profile.

                img_4981.jpg

                I chose 8020 profile because it should allow mounting sensors and coils wherever I please, with easy adjustment. With this bracket, a 3" diameter bob will have nearly 2" clear spacing to the profile.

                I'm pleased with how it came out. 🙂

                #657842
                Joseph Noci 1
                Participant
                  @josephnoci1

                  Well made SK…

                  There are always a few haunting thoughts when playing around with this stuff. Pendulums are an easy subject till you start reading, and the more tomes read, the less easy it becomes…Of course it's only hard if you are chasing that deep trough on the ADEV plot, but why else would we be making such complex structures for a simple pendulum?

                  So, in that vein of the extreme..

                  A 3 inch Bob swinging 2 inches from the rear structure will suffer some aerodynamic effects – esp a round bob – a rugby ball bob a little less, but the displaced air has to go somewhere, and it has nowhere to go between the bob and support. This has been evaluated in the literature with bob's in a clock case, etc..

                  Not sure what your bob weighs, but I suspect there will be some flexing of that vertical support, or rather a twisting, and even if only a few 100'ths, its enough to wreck the ADEV…Symmetry of support and structure is your friend in this, with diagonal struts and/or bracing a good aid.

                  Your have not indicated how the 8020 profile will 'mount' – if bolted well to a good wall, then flexing should be eliminated.

                  John commented on my cross support with the V's – – there is also good coverage on the concept in Matthys –

                  The friction between the rod and V is an issue and recommendations are a V of about 120deg angle , with the rod or pins riding the V being 3 or 4 mm diameter, hard and polished – also that the V should be of steel, polished if possible, but certainly very smooth, no machining or sanding marks. All in an attempt the get the pendulum hanging truly vertically. I have a 4mm polished pin and and mild steel polished V's and to the best I can measure, about 0.04 to 0.1 mm hysteresis when the pendulum bob is gently swung front'back and comes to a halt. I think 0.1mm is not great and will probably affect my ADEV in the end.

                  I will most likely get rid of the V block, and replace with flats and a spring blade pressure clamp, increasing pressure once the pendulum has swung for a while and 'stabilised' .

                  A +-1deg swing front to back should also dampen to a halt within 10 min or so, so knife edge supports in the forward plane are a no-no.smiley

                  #657898
                  S K
                  Participant
                    @sk20060

                    This project isn't intended to generate the best pendulum ever, just hopefully a pretty good one. In part it's a beginner's exercise in machining, and so some design compromises are accepted in that light. I've read Matthys and as much of the other literature as I've found.

                    I'm close to finishing a bob that is a 3" diameter by 3" thick brass cylinder, weighing about 6 lbs. I wish I could make an oblate spheroid, etc., but that's beyond me and my equipment for now. The bracket seems appropriate for the pendulum's weight, but I'll consider adding a cross-brace for added horizontal stiffness. I've also contemplated silver soldering it in addition to the bolts.

                    The V is 90 degrees simply because that was the cutter I had, but I also allowed for using the flat portion too, albeit with the bob a bit closer to the profile. I polished the riding surfaces. The cross rod shown in the V is 1/4" stainless, ground to a polish.

                    I'm planning to bolt the aluminum profile to a 1+ inch thick plank of wood, and then to a wall. Yes, 2" from the bob to the profile isn't a lot of distance, but it will have to do. The profile includes channels which may reduce aerodynamic efficiency, too, but I could cover the channels near the bob.

                    My next dilemma is whether and how to attempt temperature compensation, and I've hesitated trying to drill a straight and accurate hole all the way through the bob (on my sad, inadequate hardware). The rod is Invar, and I'd need to add a bit over 2" of 360 brass under the bob. I'd like to think of a way to trim the compensation in place.

                    I've also been thinking of making a new hinge assembly, this time out of Invar too, as my current design will contribute to temperature errors.

                    #657904
                    Joseph Noci 1
                    Participant
                      @josephnoci1

                      I think the brass bracket is structurally sound – I was referring to the 8020 Al profile section – I presume its a seconds pendulum and if the Al profile is the length of the pendulum or longer, it will tend to flex or rather twist with each cycle – your bob would be around 6 lbs so not trivial. I don't think there is a practical way to brace that profile – it is flat without sufficient dimensions ( as in 2 or 3..) to cross brace to. You would need to bolt it to a resilient surface.

                      For temp compensation – as you have an invar rod, the bob is the main item of expansion in this setup – bore into the bob about 2/3 up from the bottom, and make that the suspension point on the invar rod – As you know the idea is to get the bob mass to expand evenly up and down from the suspension point , so that the CG remains at the suspension point. To fine tune you can add short brass or steel ( or quartz..) sleeve between the suspension point and the bob to increase the upward expansion by different amounts.

                      If I am preaching, shut me down!

                      #657913
                      S K
                      Participant
                        @sk20060

                        The profile will not be free-standing, and so its stiffness is not very critical. Rather, the profile will be firmly bolted to a solid wood plank, and then to a wall. I'd expect that assembly to be quite stiff, solid and flex-free.

                        The rod is 36", and with a bit more subtracted here and there in the supports, it will be a little under a "seconds" pendulum. The arbitrary net length will be rated computationally.

                        I don't understand supporting the bob 2/3 up from the bottom. That would leave a net increase in temperature sensitivity vs. supporting it in the middle. My rough math (may easily be wrong; someone please correct if so):

                        TC of Invar: 1.2 ppm. Times 35 net inches = 4.2E-5 inches expansion/contraction per degree.

                        TC of 360 brass: 20.5 ppm. To counteract 4.2E-5" per degree, I'd need the mid-point of the bob to be supported by 2.05" of 360 brass below it. As the 3" tall bob itself is 360 brass and the mid-point is already 1.5" off the bottom, I need an additional 0.55" of 360 brass below the bob. Therefore, I think I can support the bob from below (not the midpoint) via 0.55" additional brass. Does this sound right?

                        Edited By S K on 25/08/2023 14:29:37

                        #657927
                        Joseph Noci 1
                        Participant
                          @josephnoci1

                          The cylindrical bob, stood on a table would expand upwards from the table when heated. If the bob is suspended in its middle, the CG, assuming a solid cylinder, then it would expand evenly up and down from that point, ie, expansion will be above and below the suspension point.

                          So if you attached the brass bob to the invar rod, only at the middle of the bob, bob expansion would have 'no' effect of the pendulum rate. Since the invar rod also has a coefficient, moving the bob suspension point up or down from the midpoint of the bob can compensate for that.

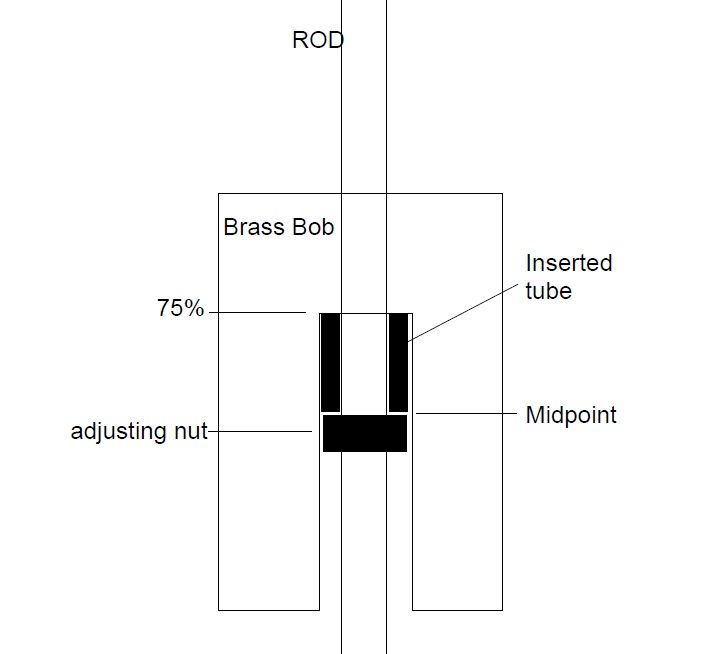
                          Placing that suspension point around 75% upwards in the bob allows you to insert a tube between the bob midpoint, and the bob suspension point. If you inserted a brass tube 25% the length of the bob, it would bring the bob suspension point to its midpoint, and being brass, the bob would then expand evenly up and down again. This allows you to play with the expansions amounts up and down. The inserted tube can be of materials that grow or shrink with tem, giving more freedom to compensate for expansion in the total system.

                          Something like this: ( the adjusting nut is just for completeness – not a practical implementation)

                          bob support.jpg

                          #657948
                          SillyOldDuffer
                          Moderator
                            @sillyoldduffer
                            Posted by S K on 25/08/2023 14:14:53:

                            The profile will not be free-standing, and so its stiffness is not very critical. Rather, the profile will be firmly bolted to a solid wood plank, and then to a wall. I'd expect that assembly to be quite stiff, solid and flex-free.

                            Really good work, but welcome to the Great Grippen Mire, where nothing is solid.

                            When John says 'a good wall' he means something truly medieval. To minimise vibration, I think the French kept their standard pendulum clocks in an underground vault cut deep into the bed rock.

                            Many accounts of pendula synchronising when clocks are mounted well apart on the same wall. The tiny forces exerted by the pendula must be enough to upset the clocks by vibrating massive walls.

                            Much better than mine though, which is free-standing. Not good. Far too sensitive to run on a dining table, almost a seismograph.

                            sad

                            Dave

                            #657949
                            S K
                            Participant
                              @sk20060

                              I'm sorry, but there's some fundamental difference in strategies that I'm not following, at least per my understanding of your proposal.

                              You are placing the adjusting nut at the center of the bob, and the bob's rest location above that (i.e., 75% from the bottom of the bob). I feel this is wrong. In fact, if your bob and your compensating tube is made of the same material (e.g. both 360 brass, as I am proposing), then your scheme will not address the temperature coefficient of the rod at all! It will just leave the bob with its center at the rating nut regardless of the temperature. If it's not the same material, you are just complicating matters, since by supporting the bob at other than its mid-point, you have to consider its TC as well as the TC of the compensating tube.

                              What I'm proposing: First, keeping in mind that I am making an arbitrary-length, arbitrary-period pendulum: I don't need a rating nut, but merely a support (e.g. a pin), and there's no point in leaving unused rod below that. Hence, in my case, that support can and likely would be merely at its bottom.

                              Next, I think we can agree that, if we had a perfect rod, then the ideal place to rest a non-zero TC bob is at its center point (50% from the bottom). That way, the bob's own expansion or contraction is a wash, as then the position of its center of mass along the rod would not change.

                              Now, having nullified the bob's TC (by supporting it at its center), we want to compensate for the rod's non-zero TC. I compute that a 2.05" long compensating tube is needed. This would nominally support the bob at its center, and for my 3" tall bob, it would extend 0.505" below the bottom of the bob.

                              But if that compensating tube is the same material as the bob itself (as I propose), then supporting it at its center is redundant, since the 1.5" of the compensating tube within the bob would expand or contract exactly as much as the lower 1.5" of the bob itself. Therefore, I can just support the bob – from its bottom – with a shorter 0.505" tube of the same material.

                              Does this make sense?

                              Edit: I think this also means that, for a 35" long Invar rod, a 360 brass bob that is 2 x 2.05" tall, supported from the bottom, would not need any special compensation – the bob would move its CG up and down by the appropriate amount on its own. And also that my 3" bob would be appropriately sized for an Invar rod that's ~35/2.05*1.5=25.6".

                              Also, the math is just a bit more complicated, as the rod has its own CG and, as it changes length, its CG will shift too. So the net CG of the pendulum would still change slightly with temperature unless one works harder at it.


                              Edited By S K on 25/08/2023 19:41:56

                              #657951
                              Joseph Noci 1
                              Participant
                                @josephnoci1
                                Posted by S K on 25/08/2023 19:10:56:

                                if your bob and your compensating tube is made of the same material (e.g. both 360 brass, as I am proposing), then your scheme will not address the temperature coefficient of the rod at all!

                                Not what I said at all –

                                If you inserted a brass tube 25% the length of the bob, it would bring the bob suspension point to its midpoint, and being brass, the bob would then expand evenly up and down again. This allows you to play with the expansions amounts up and down. The inserted tube can be of materials that grow or shrink with temp, giving more freedom to compensate for expansion in the total system.

                                Brass brings you back to net zero, using other materials, steel, quartz, carbon fibre, aluminium, etc allows further compensation which is difficult to apply if the bob is suspended at midpoint and it is much easier to change a compensation tube than moving the bored hole at midpoint…

                                But, many ways to skin a cat…I like to follow sound concepts proposed by those skilled in the art, rather than inventing new ways to make the pendulum behave obtusely…

                                #657953
                                S K
                                Participant
                                  @sk20060

                                  Joseph, I know that's not what you said, I was just taking the argument to a limit. And I know that your scheme can be made to work, too. I just think it's overly complicated since you have to worry about both TC's – those of the bob and of the compensating tube. By leaving the support at 50%, one only needs concern for the compensating tube's length and TC.

                                  But is my proposal sound and mathematically correct, or wrong somehow?

                                  Edited By S K on 25/08/2023 19:54:49

                                  #657955
                                  S K
                                  Participant
                                    @sk20060

                                    Actually, Joseph, I still don't understand. What about suspending the bob at its midpoint makes anything at all difficult?

                                    #657959
                                    duncan webster 1
                                    Participant
                                      @duncanwebster1

                                      This claims that Invar has expansion coeff in the range 0.5 – 2 e-6, so you're unlikely to compensate it with a calculated length of brass. Run it without compensation for a while and get some data on rate vs temperature, which should give you a starter for 10 on what the coeff actually is. Of course Invar has been known to change its properties spontaneously. I did have visions of running my clock in a temp controlled environment, but the fit of the door on the case isn't very good. Not very good at woodwork I fear. Compared with running in vacuum, controlled temp would be easy I think

                                      #657964
                                      S K
                                      Participant
                                        @sk20060

                                        Yes, Duncan, I've felt worried about those sorts of potential variations, and commented on how easy it would be to make matters worse earlier in this thread. Unfortunately, the traceable certificate I received for this metal did not quote the TC.

                                        So with this contingency in mind, how would you recommend cutting the bob? I suppose all the way through at 1/4" (the rod's diameter) is good enough for now, as I don't have an easy way to cut a flat-bottomed hole 1.5" deep at the moment anyway.

                                        I did just experiment drilling a sacrificial rod 3" deep to see if it would come out straight when reamed 0.001" oversized, and thankfully it did, so I'm ready to go.

                                        Also, I'm not too stressed about the stability of Invar, infamous as it may be here, since my expectation is that carbon fiber is just as unstable if not more so. Quartz might be the real go-to for both stability and low TC.

                                        I could also go with electronic temperature compensation, as many here are. I already have a high resolution thermometer up and running on an Arduino.

                                        Edit: If supporting the 3" bob from the bottom, the computed TC of Invar would need to be 0.9 ppm for zero net TC. Lower than that would require drilling into the bottom, and higher would require stacking it on an external compensator below the bob. So I think that's a reasonably safe starting configuration, and any compensation for higher than 0.9 ppm can be external.


                                        Edited By S K on 25/08/2023 20:41:57

                                        #658040
                                        SillyOldDuffer
                                        Moderator
                                          @sillyoldduffer
                                          Posted by S K on 25/08/2023 14:14:53:

                                          The rod is 36", and with a bit more subtracted here and there in the supports, it will be a little under a "seconds" pendulum. The arbitrary net length will be rated computationally.

                                          I don't understand supporting the bob 2/3 up from the bottom. That would leave a net increase in temperature sensitivity vs. supporting it in the middle. My rough math (may easily be wrong; someone please correct if so):

                                          TC of Invar: 1.2 ppm. Times 35 net inches = 4.2E-5 inches expansion/contraction per degree.

                                          TC of 360 brass: 20.5 ppm. To counteract 4.2E-5" per degree, I'd need the mid-point of the bob to be supported by 2.05" of 360 brass below it. As the 3" tall bob itself is 360 brass and the mid-point is already 1.5" off the bottom, I need an additional 0.55" of 360 brass below the bob. Therefore, I think I can support the bob from below (not the midpoint) via 0.55" additional brass. Does this sound right?

                                          I don't know if it's right or not because maths makes my head hurt, but I dislike the idea of compensating in the bob. Not that I know the idea is wrong, but the approach with Brass is unusual.

                                          The main temperature error is caused by expansion of the long pendulum rod, with a component coming from expansion of the bob.

                                          Expansion of the bob can be eliminated by hanging it from the middle. Then it balances out by expanding equally up and down. a useful trick. Then only the rod need be compensated, whilst a simple nut allows rate adjustment.

                                          Mechanical compensation is usually achieved by arranging two metals such that expansion of one cancels expansion of the other. For convenience, the rod is low expansion and the compensator is high expansion.

                                          The only way of compensating in the bob I know of is by making it a jar part filled with Mercury. Mercury has a high coefficient of expansion, and it rises in jar as it warms up. The rod expands down, and the Mercury expands up. The maths is intimidating, at least for me.

                                          Other methods compensate in the rod.

                                          The classic method is Harrison's Grid Iron in which the rod ends in a horizontal bar, on which are mounted two vertical columns. On top of the columns, are a cross-piece from which two rods drop down to a cross-bar to which the bob is attached. When temperature rises the rod comes down, but this is counter-balanced by the columns expanding up. The maths is much easier.

                                          Later it was realised that the grid-iron can be implemented with tubes. The rod runs loosely through and supports a tube of high expansion metal. A second tube, low expansion, sits on top of the expansion tune and drops down over it to the bob. The original high expansion metal was Zinc, which tends to very slowly compress under the weight of the bob. I'd be inclined to try Aluminium alloy, stronger than Zinc, similar coefficient of expansion.

                                          The maths can be simplified by using the ratio between the two temperature coefficients of expansion to keep dimensions relative rather than starting with absolutes. If the ratio between rod expansion and compensator expansion is 1:20, the compensator tube is 1/20 rod length. (I think!!!)

                                          All done above the bob, which only has to hang from it's mid-point.

                                          Dave

                                          #658061
                                          S K
                                          Participant
                                            @sk20060

                                            Compensation below the bob, i.e. with a compensating sleeve, only became practical after suitable low-TC materials such as Invar became available. Otherwise, since common metals all have roughly the same TC (~15-20-ish ppm), the below-the-bob extension would have to be very long, i.e. a quite significant percentage of the above-bob rod length. Grid-irons are fairly extended in length for this reason, too.

                                            After some thought, I'll just include the ~0.5" compensator below the bob anyway, since it's easy enough to incorporate. If I'm going to throw a dart at compensation (because I don't know the actual TC), I might as well aim for the bulls-eye. But I'll think about how to conveniently change it.

                                            #658064
                                            John Haine
                                            Participant
                                              @johnhaine32865

                                              It's worth looking up Harrison's tin whistle compensator for fine tuning.

                                              My Nome has a stepped hole in the Bob with a ledge. Upper part of hole is 10mm, lowere about 14 fro memory. No need for a square step, just use ordinary drill.

                                              #658084
                                              duncan webster 1
                                              Participant
                                                @duncanwebster1

                                                The bob will change temperature a lot more slowly than the rod (surface area to mass relationship) so introducing the bob into compensation will introduce time delays.

                                                #658088
                                                S K
                                                Participant
                                                  @sk20060
                                                  Posted by duncan webster on 26/08/2023 16:54:40:

                                                  The bob will change temperature a lot more slowly than the rod (surface area to mass relationship) so introducing the bob into compensation will introduce time delays.

                                                  True. But since 3/4 of a 2" compensating sleeve (as calculated) would be inside the bob anyway, those time delays would have to be lived with. To improve that situation, an Invar sleeve could be used inside the bob, but I don't have the material for that right now and I'm not sure I want to go that far. I need to keep things simple until I have something working.

                                                  More progress:

                                                  I successfully drilled and reamed the bob – very carefully. That was a bit nerve-wracking.

                                                  I did make a 0.5" brass sleeve (3/8" OD) as a compensator, supporting the bob from the bottom. This was per the calculation assuming that the TC of the rod is 1.2 ppm. This will inevitably be wrong, and possibly quite wrong, but I might as well add it since it was trivial to do and it's the best guess I have.

                                                  I also drilled a 3mm hole in the bottom of the rod and created a stainless-steel pin (with a very slight taper) to fit into it. This will be the rest for the compensator or bob. It's easy to put in and pull out if/when I change the compensator.

                                                  Now I need to clean up and wax or lacquer the bob and the other parts, and the physical part of the pendulum should be about finished.

                                                  #658091
                                                  S K
                                                  Participant
                                                    @sk20060

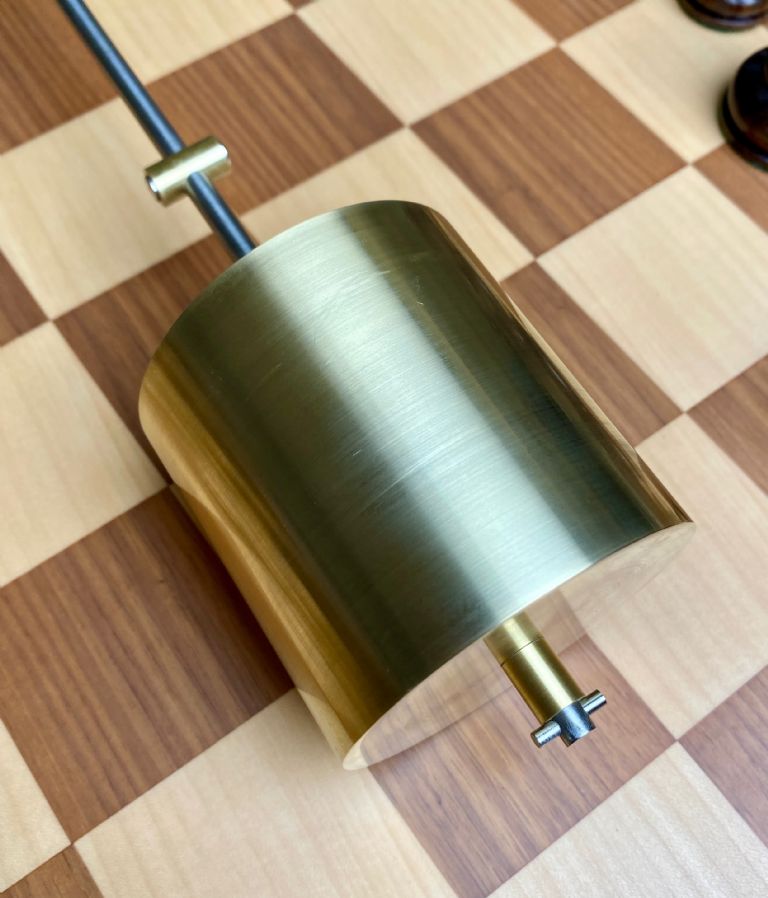
                                                    Here's the 3" by 3" bob, with the short compensator and stainless support pin. I used wax on the parts. The magnet holder is up top:

                                                    It came out OK too. 🙂


                                                    img_4984.jpeg


                                                    Edited By S K on 26/08/2023 18:40:40

                                                    #658100
                                                    SillyOldDuffer
                                                    Moderator
                                                      @sillyoldduffer
                                                      Posted by S K on 26/08/2023 13:29:29:

                                                      After some thought, I'll just include the ~0.5" compensator below the bob anyway, since it's easy enough to incorporate. If I'm going to throw a dart at compensation (because I don't know the actual TC), I might as well aim for the bulls-eye. But I'll think about how to conveniently change it.

                                                      Yeah I vote for that, it will be interesting to see how the approach works out.

                                                      Your Brass Bob is gorgeous but I happened to read this morning that the best bob material is annealed cast-iron. It seems Invar isn't the only internally unstable metal! My rod is made of Silver Steel, the Bob is Bright Mild-Steel, and I wouldn't be surprised to find both of them are unstable. Might be the Brass Bob moving about if you get poor results from your proper Invar Rod.

                                                      It's a nightmare – every time something is improved, other smaller problems become obvious enough to be worth fixing. Having GPS and GPSDO make it much too easy to detect and chase tiny pendulum issues. I'd be happy if my clock only had a minute hand!

                                                      Dave

                                                    Viewing 25 posts - 26 through 50 (of 96 total)
                                                    • Please log in to reply to this topic. Registering is free and easy using the links on the menu at the top of this page.

                                                    Advert

                                                    Latest Replies

                                                    Viewing 25 topics - 1 through 25 (of 25 total)
                                                    Viewing 25 topics - 1 through 25 (of 25 total)

                                                    View full reply list.

                                                    Advert

                                                    Newsletter Sign-up