At £43 I'll give that one a miss, but instead of 3 phase 20 teeth it could be 2 phase 30 teeth?
There lots of other good stuff in it. I've been thinking about this and I believe that to make 2 phases work you have to have permanent magnets as well. But maybe combine the stepper with one of the gears?
Posted by Michael Gilligan on 25/04/2021 22:33:21:
Posted by John Haine on 25/04/2021 10:44:48:
Sorry, lost a bit at the start of last post! I should have said that this chap, Weston Bye who writes in the Digital Machinist mag, has designed an interesting stepper that could be a better bet than the Lavet type.
At £43 I'll give that one a miss, but instead of 3 phase 20 teeth it could be 2 phase 30 teeth?
There lots of other good stuff in it. I've been thinking about this and I believe that to make 2 phases work you have to have permanent magnets as well. But maybe combine the stepper with one of the gears?
I'd assumed there were magnets in that toothed disc, but on reflection it should work without if 3 phase. There are lots of magnets in his gear train, quite fascinating. I wonder if a fly would reduce bouncing. Or a loose disc like the Gents motor to act as a damper.
Ugh – that one's a bit rough to say the least – some nasty resonances interacting by the look of it. Definitely in need of some damping somewhere. There's an awful lot of inertia in that drive system which isn't helping.
Talking of resonances, we have a long case clock that occasionally strikes a "duff" note – never the first of a strike sequence, and never more than a couple of times when (for example) striking 12. Nothing wrong with the striking mechanism as far as I can tell; I eventually concluded that sometimes the hammer strikes the bell at just the right point in its oscillation for the movement of the bell and the hammer to effectively cancel each other out.
I bought the book eventually, very good. He refers to #37 Magnet Wire. As it is an American book do I assume AWG? This would be 0.00445" diameter, which is near enough 41 SWG
I was thinking further about the bounce problem, I think if one could ramp the current to the solenoids, up and down, so the "holding" magnet ramps down while the "next" magnet ramps up, it should be possible to get smoother motion, even quasi-continuous. A 2-phase version might use a standard stepper driver with microstepping to do this; otherwise I wonder if an Arduino could do it using its PWM "analogue" outputs?
I bought the book eventually, very good. He refers to #37 Magnet Wire. As it is an American book do I assume AWG? This would be 0.00445" diameter, which is near enough 41 SWG
I bought the book too – makes an interesting read!
I was thinking further about the bounce problem, I think if one could ramp the current to the solenoids, up and down, so the "holding" magnet ramps down while the "next" magnet ramps up, it should be possible to get smoother motion, even quasi-continuous. A 2-phase version might use a standard stepper driver with microstepping to do this; otherwise I wonder if an Arduino could do it using its PWM "analogue" outputs?
You can certainly do that – apply two sinusoids, 90 degrees out of phase, to the two coils of a conventional stepper and it should give you continuous motion or near enough. In effect that is what happens in a brushless motor.
I was thinking further about the bounce problem, I think if one could ramp the current to the solenoids, up and down, so the "holding" magnet ramps down while the "next" magnet ramps up, it should be possible to get smoother motion, even quasi-continuous. A 2-phase version might use a standard stepper driver with microstepping to do this; otherwise I wonder if an Arduino could do it using its PWM "analogue" outputs?
I tried and failed to get a stepper to run smoothly with sinusoidal (PWM) outputs from an Arduino, but I made it do half steps fairly easily. This made it a lot smoother. Quarter steps would just be a bigger table of inputs. If anyone wants the code just send me a pm
I bought the book eventually, very good. He refers to #37 Magnet Wire. As it is an American book do I assume AWG? This would be 0.00445" diameter, which is near enough 41 SWG
I eventually emailed a USA horological group, who confirmed it is most likely AWG
I'm following the electronic free pendulum clock articles in ME Workshop, but need to secure details of successful motion work before committing to the project.
To be honest and with respect, I'd much prefer a solid state digital LED display. I'm hoping that'd be easier and more reliable. Quiet, too. Can anyone advise how to go about it, please?
Well, Tony Jeffree is using BBC Micro:bit microcontroller, for which LCD and LED modules are available. Examples picked randomly off the web from the Kitronics Web Shop:
This chap documents a Micro:bit and LCD display coded to be a stopwatch, not complicated and a reasonable start point. The software part is done with a graphical Blocks language called 'MakeCode', lots more examples and tutorials here.
Tony hasn't shared his code yet, but in principle, however he's done it, it will be possible to add digital clock functionality. Basically a clock display just counts pendulum pulses, and, knowing how long they each take in seconds, uses them to increment a counter working in HH:MM. The main complication is the code needed to set HH:MM to local time in the first place.
Also possible to program another microcontroller as a separate HH:MM clock ticked by the pendulum. The advantage is avoiding the need to understand and modify Tony's code, which might be time critical or otherwise tricky to modify. (Probably won't be.)
I'd use an Arduino for this, but only because I'm familiar with programming them and have never seen a Micro:bit in the flesh!
Dave
My simple mind would just press the reset button at midnight
I'm following the electronic free pendulum clock articles in ME Workshop, but need to secure details of successful motion work before committing to the project.
To be honest and with respect, I'd much prefer a solid state digital LED display. I'm hoping that'd be easier and more reliable. Quiet, too. Can anyone advise how to go about it, please?
Well, Tony Jeffree is using BBC Micro:bit microcontroller, for which LCD and LED modules are available. Examples picked randomly off the web from the Kitronics Web Shop:
This chap documents a Micro:bit and LCD display coded to be a stopwatch, not complicated and a reasonable start point. The software part is done with a graphical Blocks language called 'MakeCode', lots more examples and tutorials here.
Tony hasn't shared his code yet, but in principle, however he's done it, it will be possible to add digital clock functionality. Basically a clock display just counts pendulum pulses, and, knowing how long they each take in seconds, uses them to increment a counter working in HH:MM. The main complication is the code needed to set HH:MM to local time in the first place.
Also possible to program another microcontroller as a separate HH:MM clock ticked by the pendulum. The advantage is avoiding the need to understand and modify Tony's code, which might be time critical or otherwise tricky to modify. (Probably won't be.)
I'd use an Arduino for this, but only because I'm familiar with programming them and have never seen a Micro:bit in the flesh!
Dave
Hi Dave
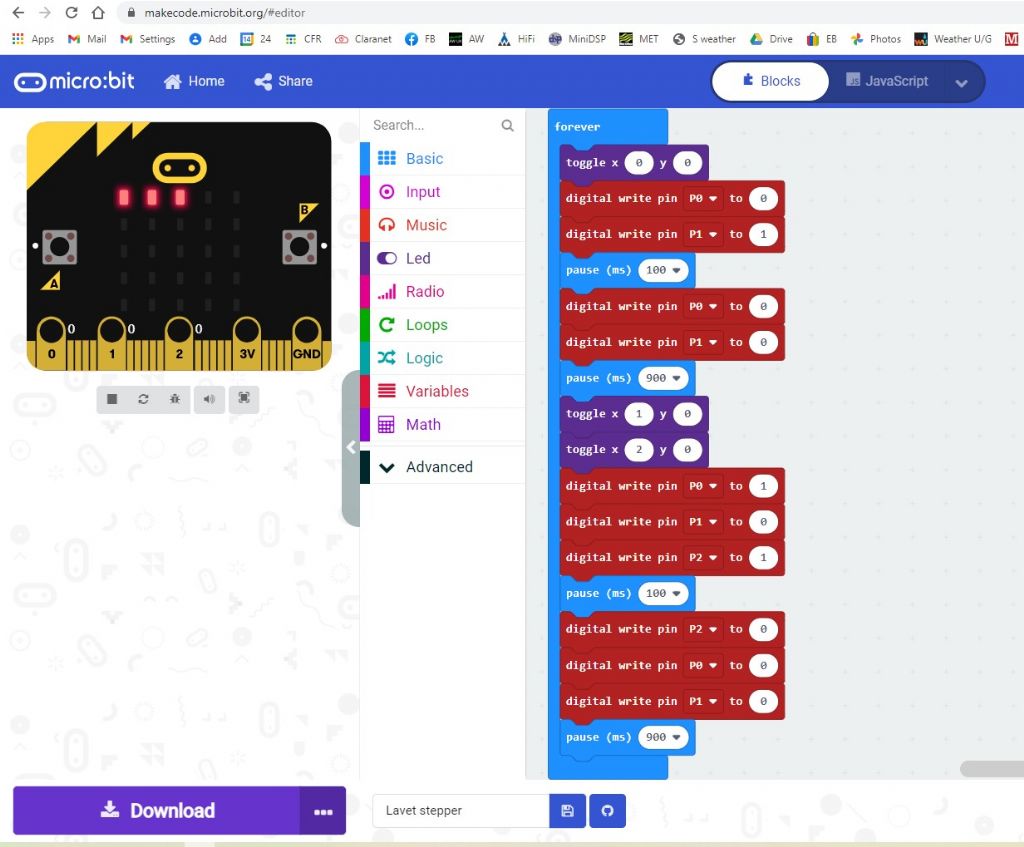
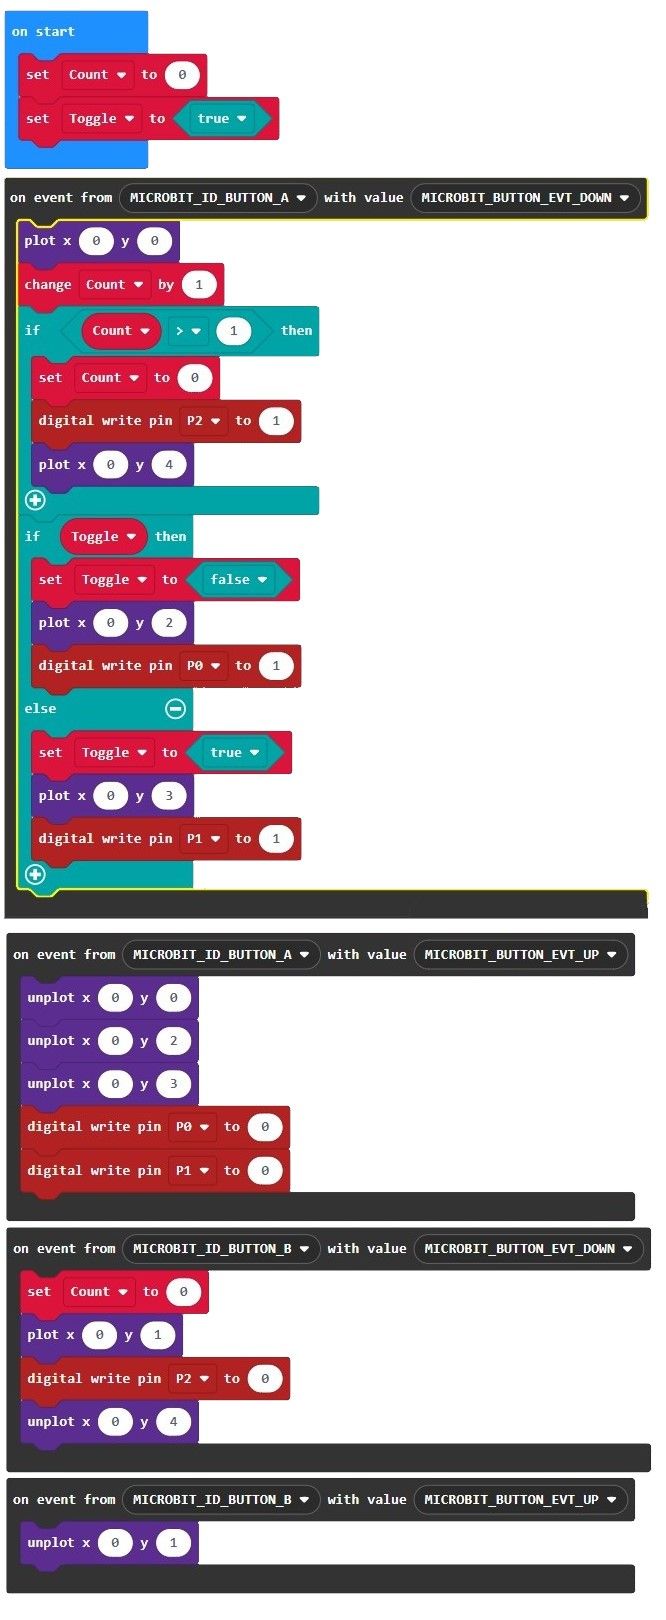
The code is actually pretty trivial, especially when you see it in the "block code" format. It is printed in part 3 of the series (just out) but unfortunately it is a bit of an eye chart, so I have uploaded Photo 21 and Photo 27 (the two block code programmes from the article) to one of my albums so people can access it more easily. Also inserted below.
In principle you could indeed extend the code to allow a digital display and I did consider doing just that, but as you rightly observe, the issue isn't displaying the current time, it is setting the initial time, which takes much more effort. Not clear to me whether this would tax the capacity (memory-wise) of the micro:bit but it could easily be off-loaded to a second processor if need be.