Having now joined the fray I was hoping to see the various people who have recently bought 3D printers showing fancy things and discussing the various aspects of said minefield.
My first test print was in PLA which came with the machine and was easier and more successful than I thought.
I have had mine for a week now and have moved into the more problematic area of ABS printing. I am just starting to see results (no photos yet) but there is a fair way to go.
The one recommendation I have is reprint in abs certain parts near the hot end if already made in pla…prolonged use at abs temperature will effect ( warp) pla parts .. Other than that ..you already know what hot abs smells like so keep ventilated.. Also note shrinkage rates of pla and abs very different
Finally saw some 3D printed bits. Finish was almost like wood with a fine pronounced grain, but more regular. It could clearly produce usable light duty gears, for example.
These were from a mid-range printer. Would anyone with a reprap type printer be willing to send me a small sample to compare?
I noticed an advert on TV the other day for the first part of a magazine about building a 3D printer . Since the first part only cost £2, I had a look in a few newsagents but there was no sign of it and I gave up looking. Looking at the small print on the advert I noticed there are 90 issues of the magazine ( 89 of them costing £6-99 each! ) so the total cost of building the printer would be very high, and I wonder if there is enough demand for this venture to be viable.
What then happens if the magazine bites the dust after a number of issues? I also see that the version sold by Maplins has just had a £200 reduction in price, which suggests that they are not selling well.
After all the media hype has died away there will be some cheap units offered second hand as the buyers discover that unless you want to print something someone else has drawn then they just have an expensive toy.
This is one of those toys you definitely have to have a need for and way of getting the idea from idea stage to 3D model.
Working is Singapore a few weeks I have noticed there's a keen interest in 3d printing among the hobby community.
I visited a dedicated 3d printing outlet selling a range of printers including this nifty little printer selling like hot cakes, currently they are struggling to meet the demand.
With so much open source software about nowadays and 3D CAD becoming cheaper (and taught in schools and colleges), I’m not so worried about the missing step between the idea and the CAD model. There’s a whole generation coming through now that simply accepts this as the way things are done. The current 3D printers are like the dot matrix printers of 25-30 years ago (in more ways than one!) and I’m sure they will become more robust and commoditized pretty rapidly. And with milling, routing and laser cutting heads already being added, you can see that we aren’t far off having some pretty interesting equipment at our disposal. These are basically miniature CNC machines and even use the same g-codes for the tool path. Give it time…
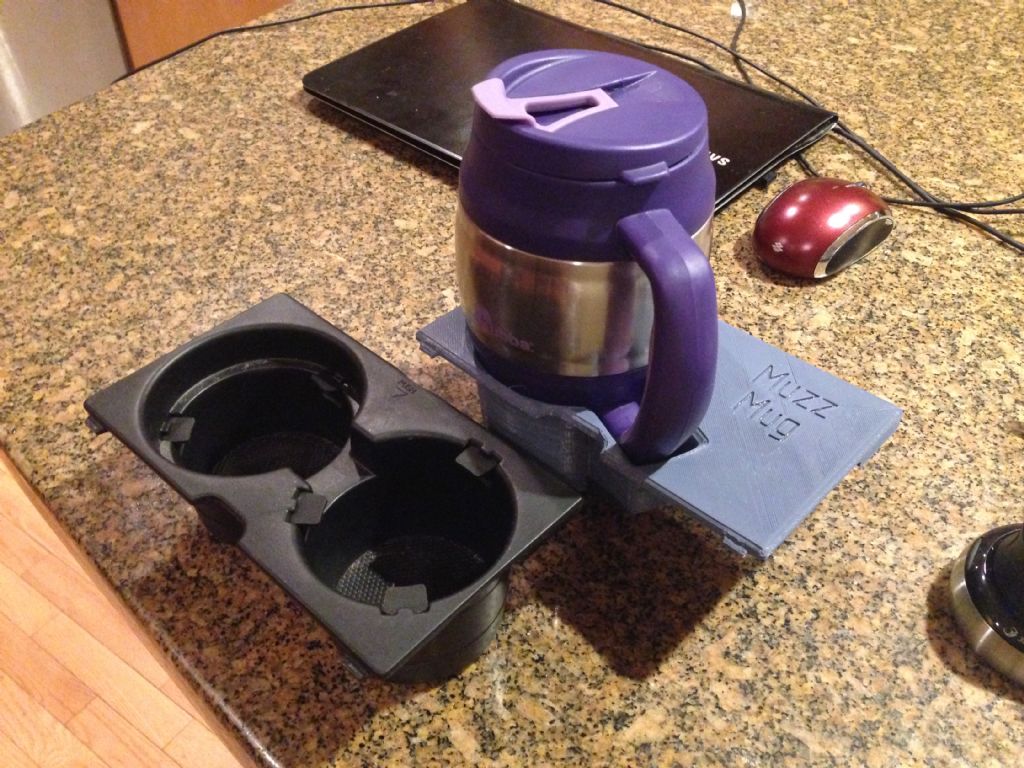
Our printer at work (Ultimaker 2) has now got about 100 hours or so on the clock and we’ve used it for making samples of connectors, cable clamps and small junction boxes for customer and certification use, while non-work examples have included a chain protector and jockey wheels (for a mountain bike) and a proper sized mug holder (for my car), which would be almost impossible to make any other way. I also made up some parts for the screw cutting clutch I’m working on, to get a better feel for what it would look like in the flesh (I posted pictures earlier – they are in my "stuff" album). You can go from CAD model to test sample in as little as 30 minutes for a simple part, or let it run overnight if it’s a larger part. The default density is 20%, which means that it generates a honeycomb structure inside the part to save material. However, you can change that all the way up to 100% if you need a solid part. And this plastic is actually pretty tough.
I’ve been working away at my 3D CAD skills recently and the mug holder was a nice test of my capability, combining thin walls, draft angles, swept sections etc. Nice to be able to print out what you have to verify you’re on the right tracks. As I said, there’s no realistic way to make one of these using any other process. If you are sensible where you buy the filament, the cost should be a few pence per gram, so the mug holder for instance probably cost less than 2 quid. The final part will be in black, with a better surface finish but at this stage I'm able to check it fits the vehicle and finesse the dimensions. Not a very good photo, sorry.
I think your examples of real uses instead of wobbly star wars models greatly improves the reputation of this process. The model screwcutting clutch is a good example of how it can help prototype something tricky.
I wonder if the design element will make it appeal to women who will then become more involved with mechanical design and construction. I remember my girlfriend in the late seventies first resenting that my home made computer got more attention than her, then getting interested in computers herself, finally becoming a professional programmer.
I hope no one objects that this question is a little off topic.
While thinking about the plastics used in 3D printing and injection moulding it made me wonder if it is possible to melt any type of scrap plastic and cast in to usable lumps (Bars or slabs.) I have found one reference to using scrap plastic (ABS I think) for injection moulding. Has anyone tried casting lumps of plastic ?
The future possibilities are quite mind boggling once they sort the material strength/properties out
Print out a loco boiler in 24 hours and an entire Tich loco in a month !
The time saved with production will be put to better use, like new ideas methods and developments for models like steam powered units
Except you also then have to still machine in bores holes threads flats, just because its preinted you need to remember at this stage all you are effectively doing is printing a cast part in both terms of strength and finish the only real benefit at this point in time is the reduction in logistics time and tooling
of course also the new design engineer straight out of university will actually be able to design round the corner holes and not be dejected when you tell him to eff off back into the drawing office for being stupid
Posted by Douglas Johnston on 08/03/2014 17:41:20:I also see that the version sold by Maplins has just had a £200 reduction in price, which suggests that they are not selling well.
…or maybe economies of scale and competition. I can see that one being very popular as a result of the very clear instructions supplied.
Just to clarify. Apart from the first object I printed (the makerbot robot) in PLA all the other things I've done have been drawn by me and in ABS. I settled on cubify design as it was affordable and seems to do what I want. Given that all software has its good and bad and that I have no experience of 3D drawing (not a bad thing in this case) I figured that I will bash away until I have got the hang of it.
So far the learning curve isn't as bad as I expected although learning about CNC has probably helped here. I should also point out that time wise I haven't spent that long playing about with it yet.
Les, I too had thought about that. I have a small tabletop injection moulding machine that consists of a heated cylinder with a piston on a lever. The nozzle of the cylinder is spring loaded and arranged that when the lever is pulled the nozzle locates into the opening of the mould and when the spring has compressed the plastic flows into the mould.
If this cylinder were mounted on the XY stage of a 3D printer with a suitable drive to the piston then any scrap plastic could be put into it and Bobs your uncle
Andrew has been showing what he has been printing, just not on this forum. I hope to see the bits in the flesh in a couple of weeks
That's the plan, among other bits 'n' pieces.
I've been printing models of the hollow cast iron pistons I am designing for my traction engines, just to see what they look like. I've also been doing a FE analysis of the piston halves to fine tune the radial stiffeners and fillets to minimise stress variations.
I am also using the 3D printer to make press tooling for sheet brass parts for the traction engine lamps I am designing, based on the recent series in ME. The press tooling works fine; it's just my lack of design knowledge on pressings that is sometimes at fault.
Leave it there for a year or so, then suggest that you have an office clear-out & all unused machinery is to be got rid of. Once the tools are at home, the possibilities are limitless.
I have a Norton 6DB Flypress & an industrial scroll saw from doing this on the company's shop floor.