3D Modeling Tutorial – A Basic Approach

Advert

3D Modeling Tutorial – A Basic Approach

Home Forums CAD – Technical drawing & design 3D Modeling Tutorial – A Basic Approach

Viewing 25 posts - 1 through 25 (of 66 total)
  • Author
    Posts
  • #597158
    PatJ
    Participant
      @patj87806

      I took drafting in classes in school back in the 1980's, and I hand-drew all of my engineering drawings up until 2D CAD programs came along in about 1987.

      I finally learned 2D CAD drafting in 1994, and that was a slow process, but not too difficult, since it mimicked manual drafting on a computer screen.

      I started learning to draw model engines in 2009, and while I knew how to use a 2D drafting program, I did not know how to design or draw model engines.

      My first atttempt to create 2D drawings for one of my dad's engines was a disaster, when I discovered that none of the various pieces that I had drawn would actually fit together when assembled (who knew things have to align on an engine?).

      The drawings went into the garbage can, as did some machined parts.

      To borrow a Monty Python phrase, "I got better" at engine design, using my 2D CAD program, but I was still having problems visualizing new designs, and was restorting to using cardboard mock-ups to try and figure out some designs.  I was having too many parts not fit or align correctly.

      I began to see some very nice 3D work online, some of which was by a guy in the UK. I was most impressed with what could be done with 3D modeling, and vowed to learn how to use it.

      I purchased a 3D program in 2012 and began to learn 3D modeling.

      Once again, it was a trainwreck. I could not begin to figure out how to use a 3D modeling program, and could not wrap my head around the fundamentals, in spite of seeing both written and video tutorials.

      The problem for me was that while it was easily to conceptualize doing 2D drafting on a computer screen instead of on vellum, it was not easy to conceptualize exactly how to translate 2D work, or design work in general, to a 3D program.

      I am one of those folks who have to be able to reach a satellite overview of an entire topic before I can begin to see exactly how to use something, and how to use it effectively.

      What follows is my paper trail for learning 3D modeling.

      .


      Edited By PatJ on 06/05/2022 12:08:13

      Advert
      #21380
      PatJ
      Participant
        @patj87806
        #597163
        PatJ
        Participant
          @patj87806

          I recall loading my new 3D software, opening the program, and being totally baffled at the array of menus and toolbar buttons that were available.

          My thoughts at the time were "boy, have I stepped into something deep on this one".

          I am a visual person, and I don't learn well by reading text (call me dyslexic, or stupid, or whatever, but I most definitely have learning problems with text-based narratives, and always have).

          My approach to learning 3D was to somehow figure out how to use 2D CAD techniques to force 3D modeling to work, but without really understanding the 3D process.

          The result was some extremely frustrating floundering around like a fish on a beach, with absolutely no progress for months.

          I was finally able to model a few crude shapes in the 3D program, but I still had no idea how a 3D program worked, or what exactly I was trying to achieve.

          I distinctly recall asking myself over and over "what the flock am I doing? and what am I trying to do?".

          .


          Edited By PatJ on 06/05/2022 12:17:56

          #597166
          PatJ
          Participant
            @patj87806

            I felt a bit like I was just floating is space, and randomly tossing out things, hoping that something would help me make sense of it all.

            I recall thinking that perhaps a 3D model of an engine was supose to be one big mass/blob in 3D.

            I had several "light-bulb" moments, that are probably obvious to the rest of the world, but were not obvious to me at the time, as follows:

            1. A very good approach is to create one 3D model per engine part.

            2. Once the various 3D models are created, they can then be assembled into a complete engine.

            But where does one start with a 3D modeling program?

            That was the $100.00 question.

            It was akin to going backpacking in the moutains, and being at the start of 20 different trails, and not knowing which trail to beginning hiking on, or where a trail may lead (in circles it would seem).

            .

            Edited By PatJ on 06/05/2022 12:25:50

            #597168
            PatJ
            Participant
              @patj87806

              I finally figured out the 2D sketch plane vs 3D modeling space toggle.

              When drawing using a 2D CAD program, there is only one sketch plane, which is the X-Y plane, and it represents a piece of paper.

              Drawing in 2D CAD is basically "what you see (or draw) on the screen is what you get".

              Creating a 3D model from a sketch involves two steps, which are to first draw a section of some object on a 2D plane (just like drawing in 2D CAD), and then toggling over to 3D model, and using a 3D funtion such as "extrude" to extrude that flat shape into a 3-dimensional object.

              It took me a very long time to figure out just this simple toggle thing, but there is nothing analogous to it in 2D CAD or in manual drafting.

              .

              #597169
              PatJ
              Participant
                @patj87806

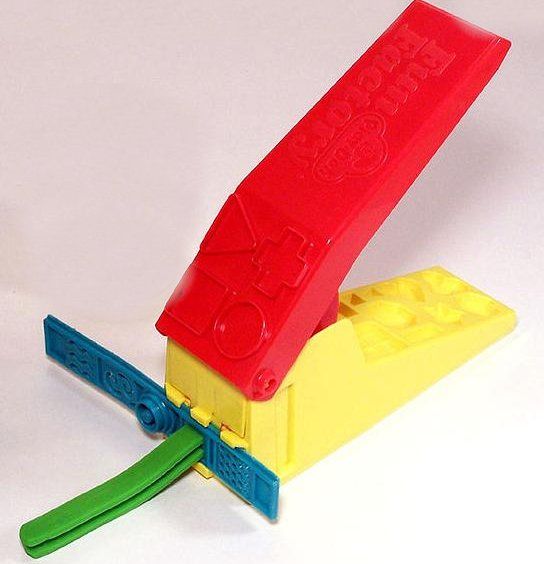
                I recalled a toy that a neighbor had when I was a kid, and that was the "Play-doh" extruder.

                The extruder had various dies that could be inserted, and then the play-doh could be forced through the die to extrude any number of shapes, such as spagetti, round, square, rectangular, oval, etc.

                The approach I use with 3D modeling is to imagine an object, such as an orange, and then imagine cutting the orange in half to create a section.

                The shape of the face of a section of an orange is a circle.

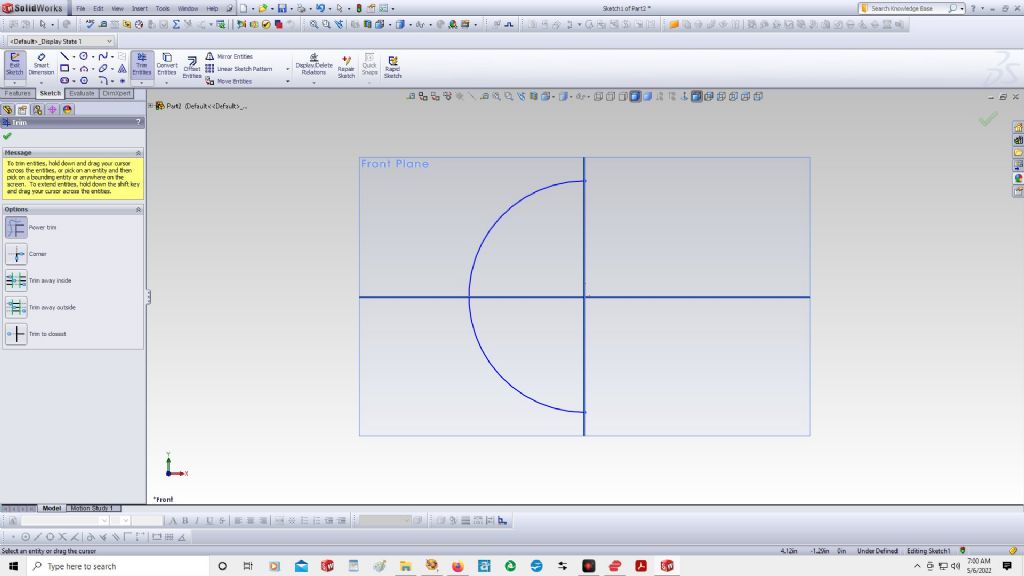
                If you want to create an orange in 3D modeling, you get on a sketch plane, draw a circle, cut it in half, create an axis, toggle to 3D mode, and revolve/sweep the 1/2 circle shape around the axis to create a sphere.


                extruder-01.jpg

                .

                Edited By PatJ on 06/05/2022 12:42:28

                #597171
                PatJ
                Participant
                  @patj87806

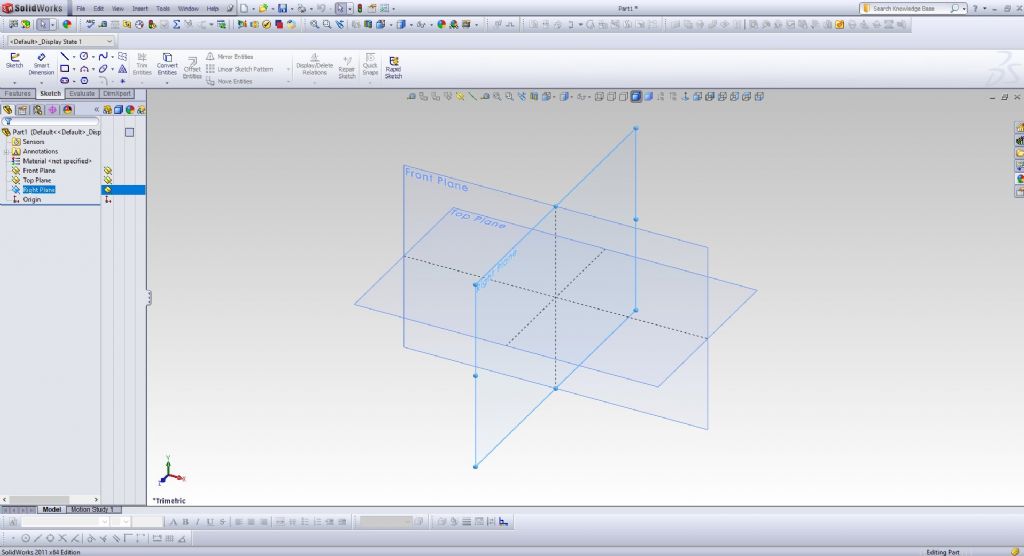
                  Instead of the typical X-Y planes used with 2D drafting, a 3D program has an X, Y and Z plane.

                  You can create sketches on any one of these planes.

                  I typically begin my first sketch on the front plane, but it really makes little difference; you can begin on the top or right plane.

                  image148.jpg

                  #597172
                  PatJ
                  Participant
                    @patj87806

                    For my program (Solidworks), the proceedure is to use the pulldown menu, as follows:

                    (I suspect the other 3D programs work similarly).

                    FILE, NEW, and you are given three options, which are "PART", "ASSEMBLY", and "DRAWING".

                    You want to make a "PART", which is to create a 2D sketch that will be extruded into some 3D shape.

                    Some programs will automatically place you on a sketch plane when you open the program.

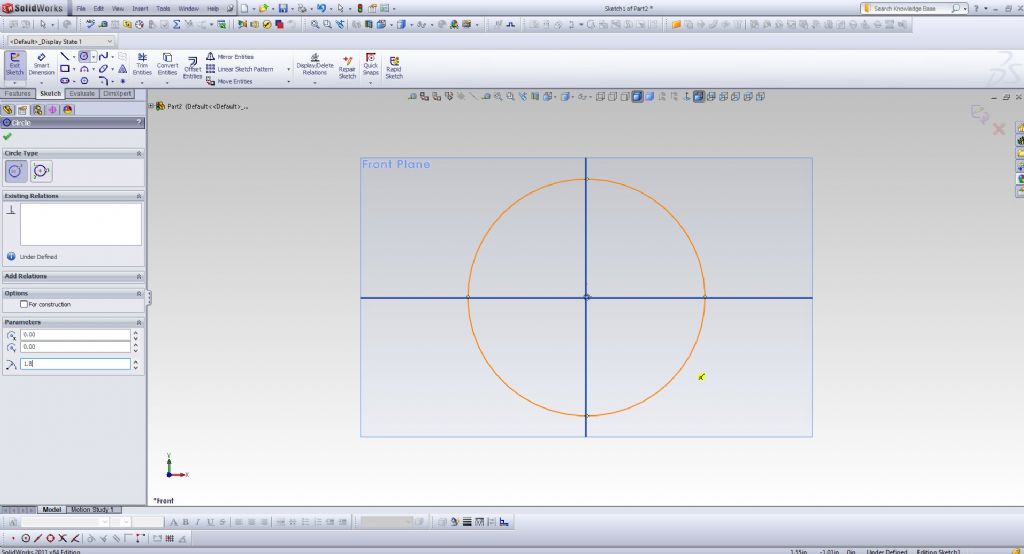
                    My program asks me to select which plane I want to begin sketching, on, and as I mentioned, I typically select the "FRONT" plane (by picking the front plane on the screen with the mouse), and then hitting the toolbar button "SKETCH".

                    The program rotates the front plane so that it is flat on the screen, just like a flat piece of paper on a drawing board. You can still see lines for the TOP and RIGHT planes.

                    image149.jpg

                    .

                    Edited By PatJ on 06/05/2022 12:55:56

                    #597175
                    PatJ
                    Participant
                      @patj87806

                      So now I am basically doing exactly the same thing as if I were using a 2D CAD program, ie: drawing lines on a flat piece of virtual paper.

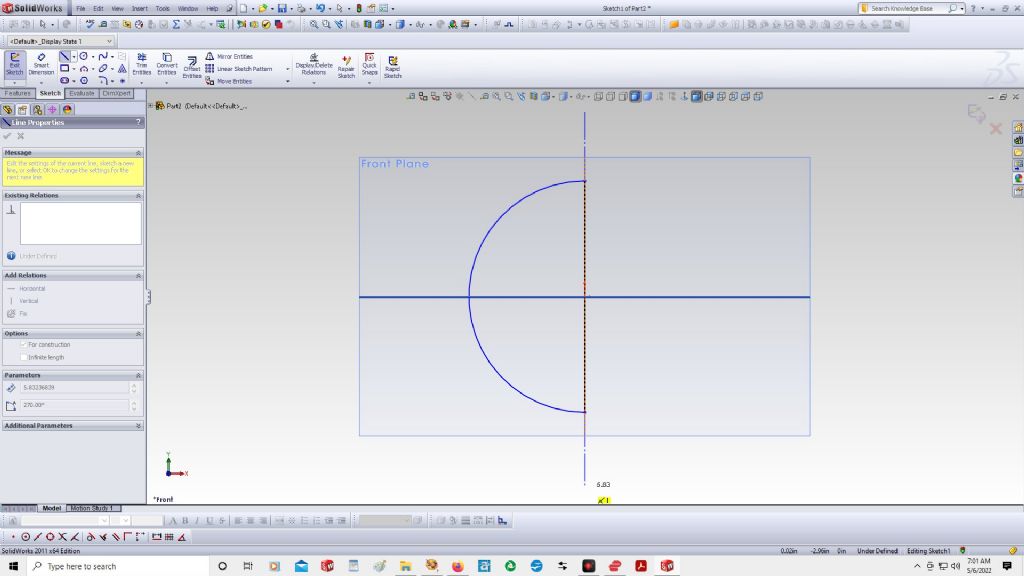
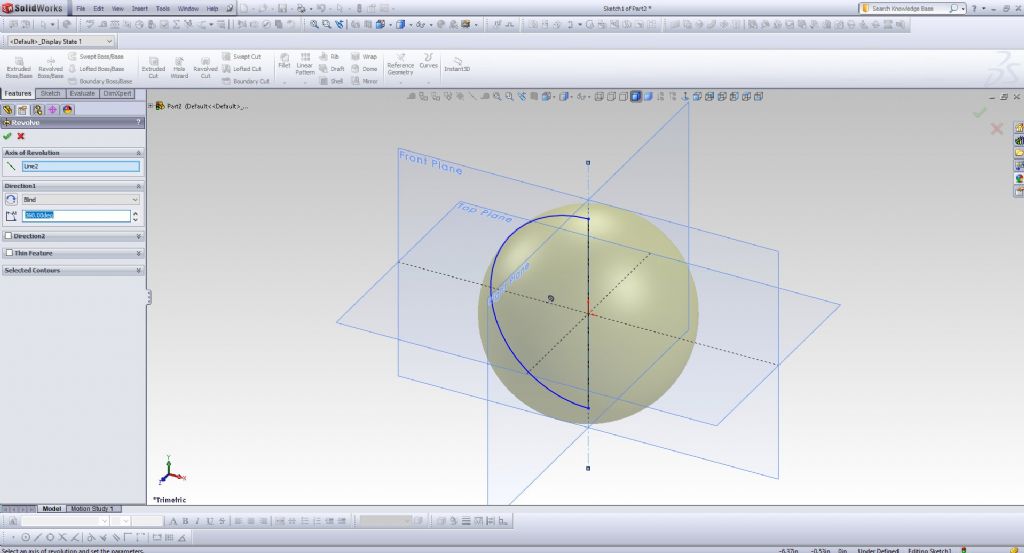
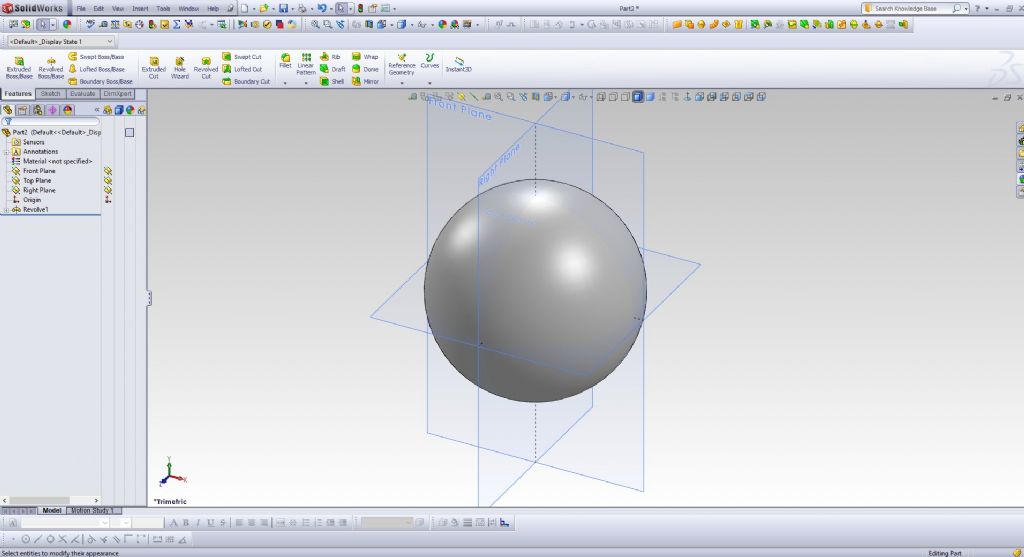
                      We will create a sphere, and will start by drawing a circle, cutting the circle in half, adding an axis, switching to 3D mode, and then revolving the 1/2 circle around the axis to create our sphere (the REVOLVE BOSS/BASE command in my program is used to sweep the 1/2 circle around the axis to create a sphere).

                      The result is a 3D solid sphere.

                      image150.jpg

                      image152.jpg

                      image153.jpg

                      image154.jpg

                      image155.jpg


                      Edited By PatJ on 06/05/2022 13:07:31

                      #597176
                      PatJ
                      Participant
                        @patj87806

                        One should become familiar with selecting a sketch plane, drawing a sketch on it, toggling to 3D mode (may not be necessary on some programs), and then using a 3D command to create some solid shape.

                        These steps must be mastered before you can progress with 3D modeling.

                        .

                        #597180
                        PatJ
                        Participant
                          @patj87806

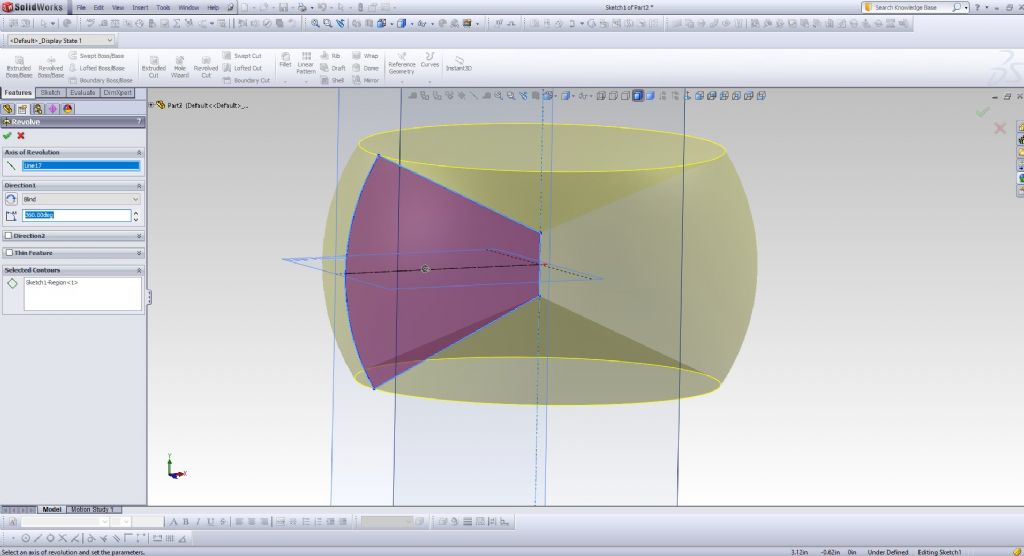
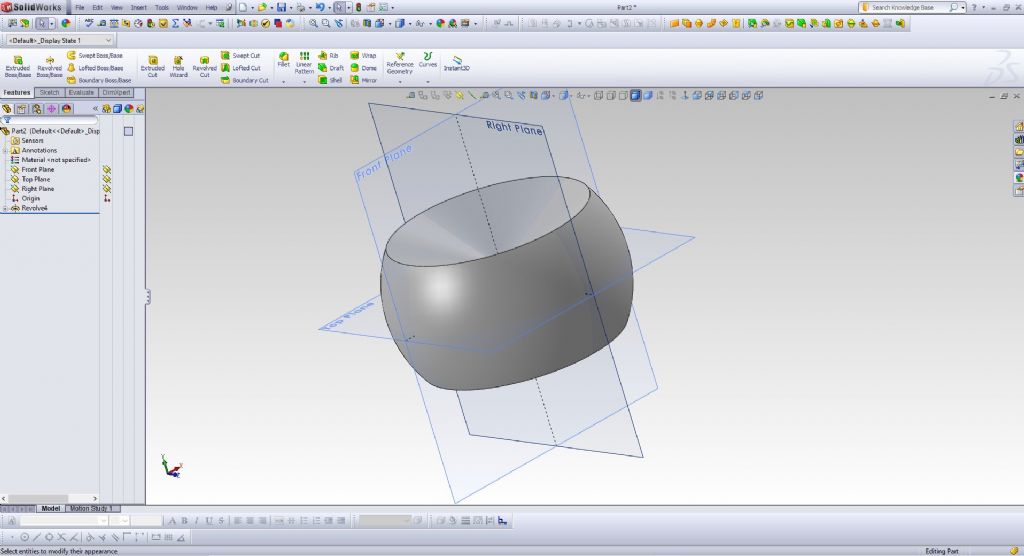
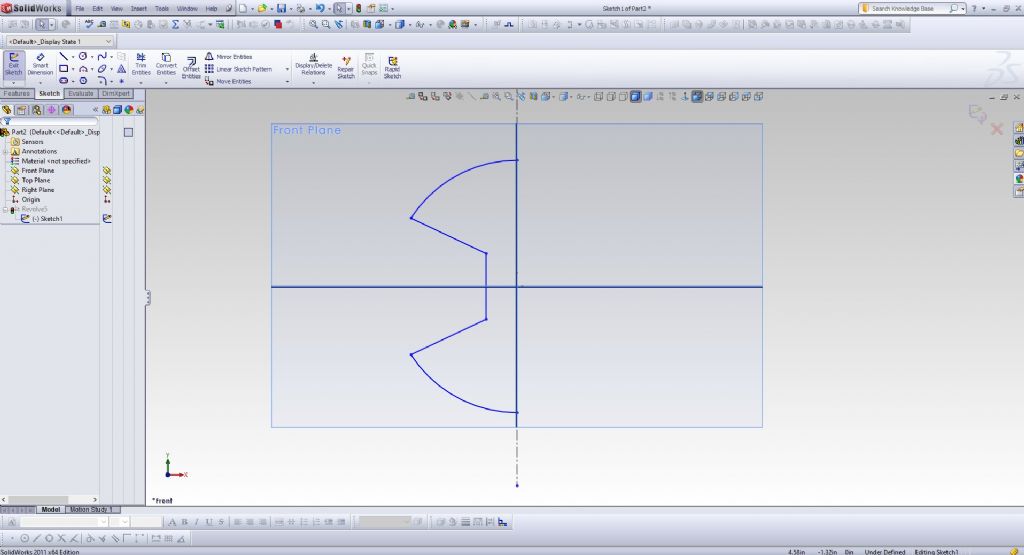
                          In this example, whatever sectional shape I draw will be revolved around the vertical axis I drew.

                          I have created my first sketch plane, and it should be listed on the left side of the screen.

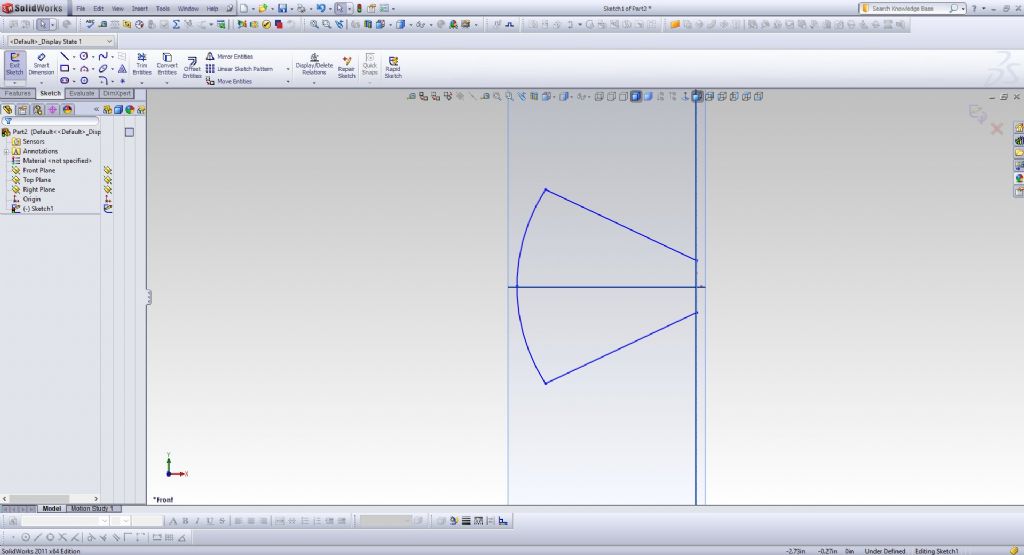
                          I can right click on that sketch plane name, and toggle back onto that plane, and edit it to create a different revolved solid, as follows:

                          Note that when I start to edit the sketch I created, the program presents the three planes to me in an isometric arrangement, and I have to pick a button to bring my sketch plane flat on the screen. I am not sure what the exact command in my or other programs is to do this.

                          image159.jpg

                          image160.jpg


                          image161.jpg

                          Edited By PatJ on 06/05/2022 13:27:33

                          #597181
                          PatJ
                          Participant
                            @patj87806

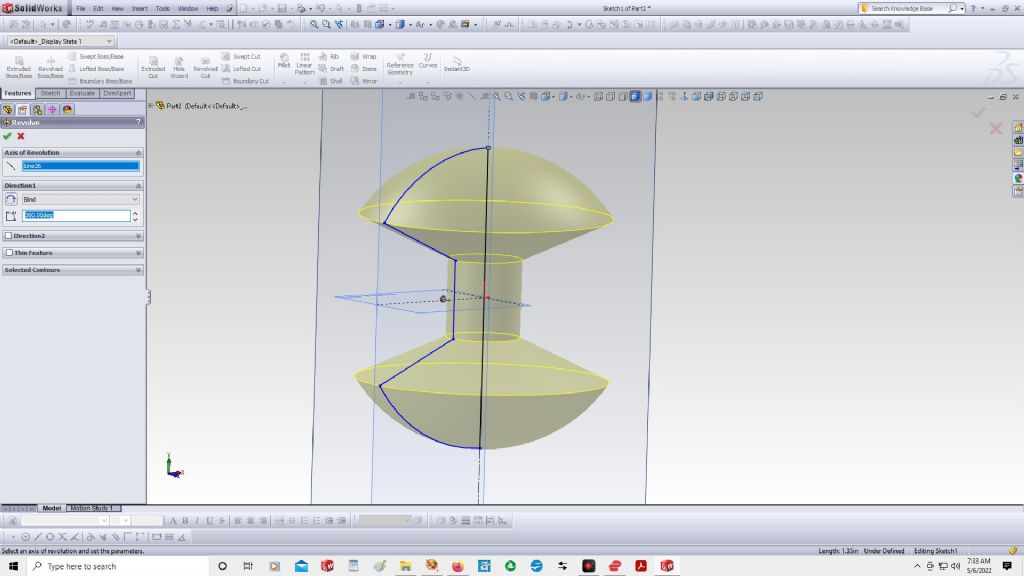
                            Lets modify the 1/2 circle sketch again to create yet another 3D shape.

                            Basically, whatever shape you make the sketch, that shape will be revolved around the axis you choose (in this case the vertical axis), to create a 3D object.

                            image164.jpg

                            image165.jpg

                            image166.jpg

                            #597228
                            PatJ
                            Participant
                              @patj87806

                              So basically you are creating a Play-Doh die on the sketch plane, and extruding that shape into a 3D solid.

                              You can also use your sketch to create a cut, such as using a formed cutting tool on the lathe.

                              .


                              Edited By PatJ on 06/05/2022 19:28:16

                              #597229
                              PatJ
                              Participant
                                @patj87806

                                There are many approaches to creating a 3D model.

                                Two of the methods I use are as follows:

                                Method #1:

                                This method is very similar to machining, and you can extrude a round solid, and machine away what is not needed, or add to it as needed.

                                Method #2:

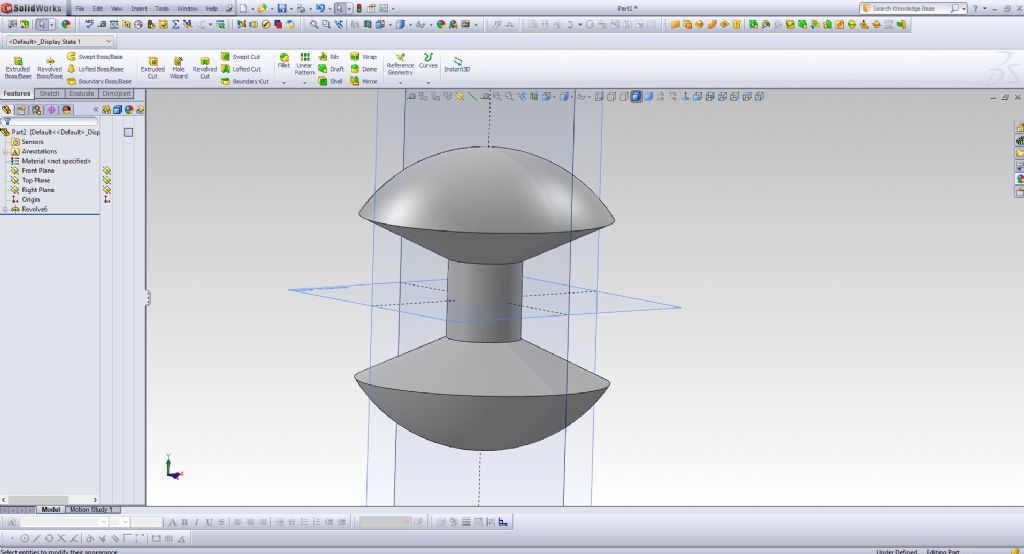
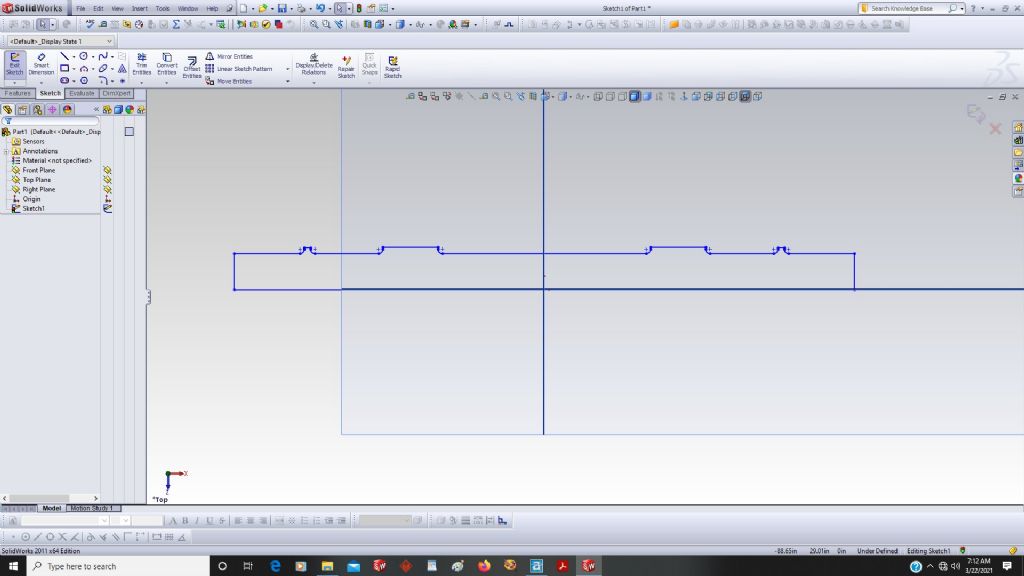
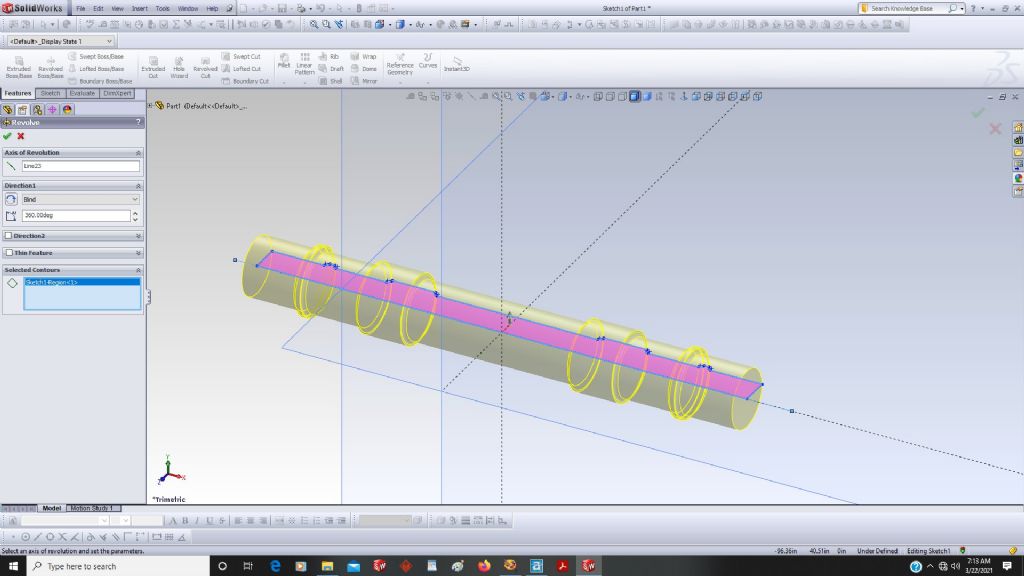
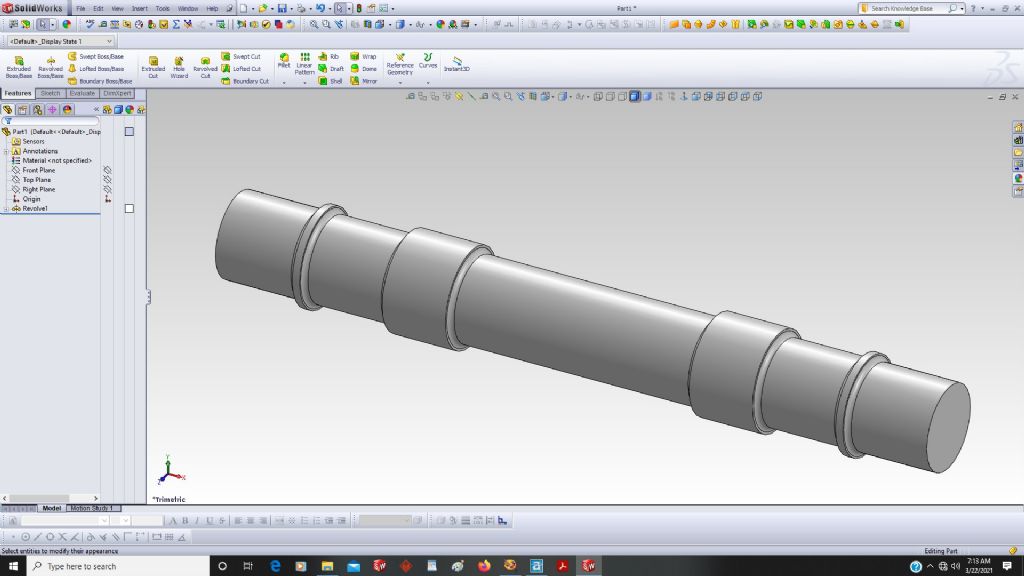
                                Method #2 is to include many or all of the details of an object in the initial sketch, and then revolve that sketch around a axis, which results in a finished part.

                                .

                                #597231
                                PatJ
                                Participant
                                  @patj87806

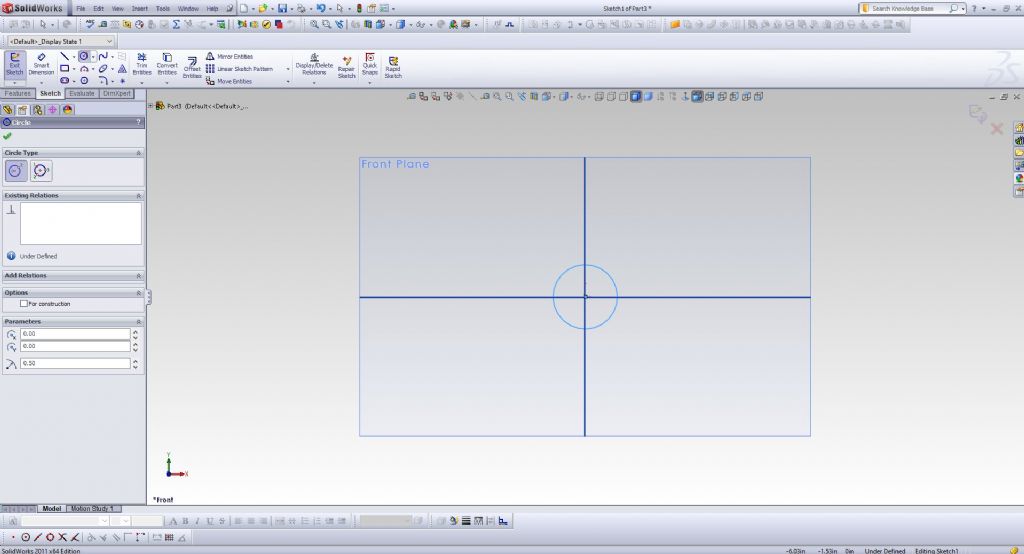
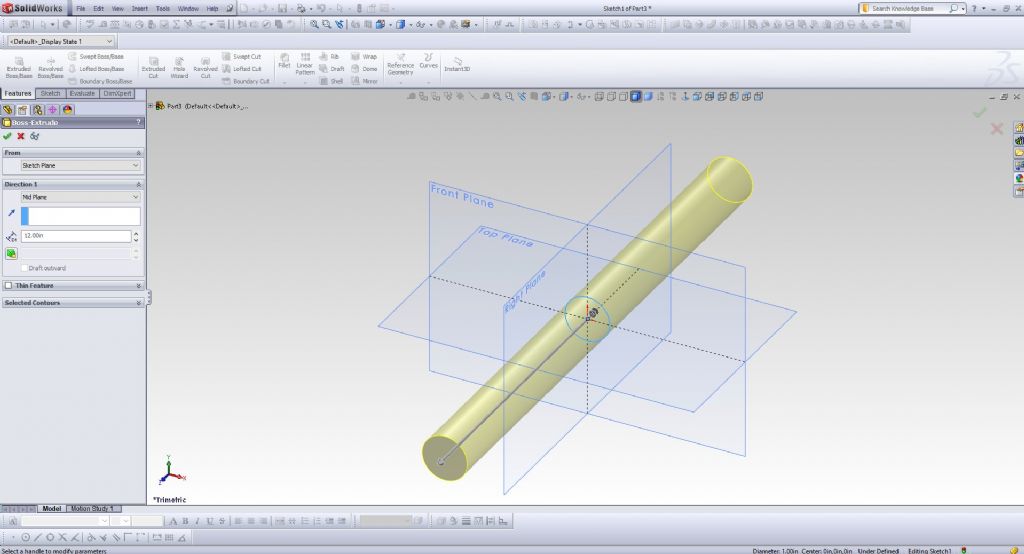
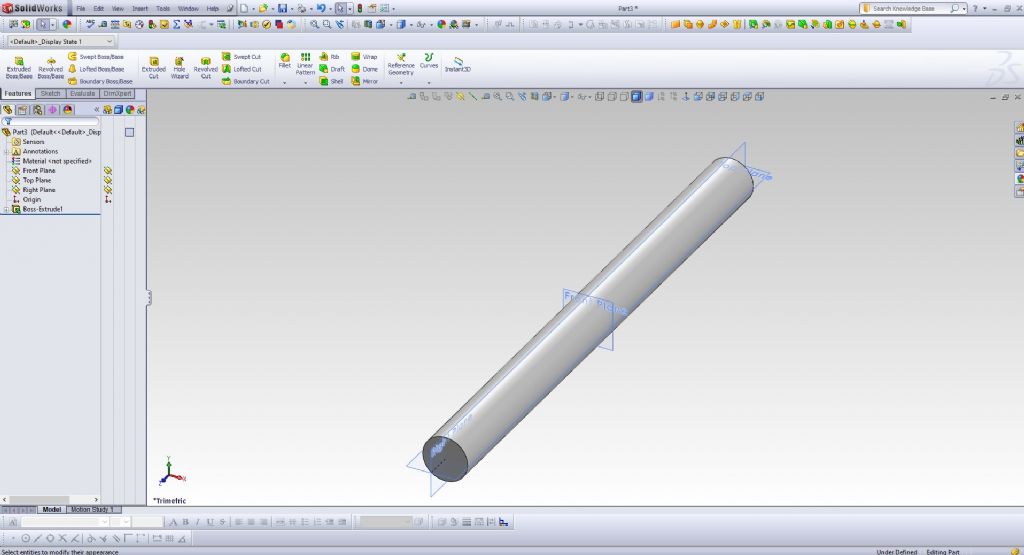
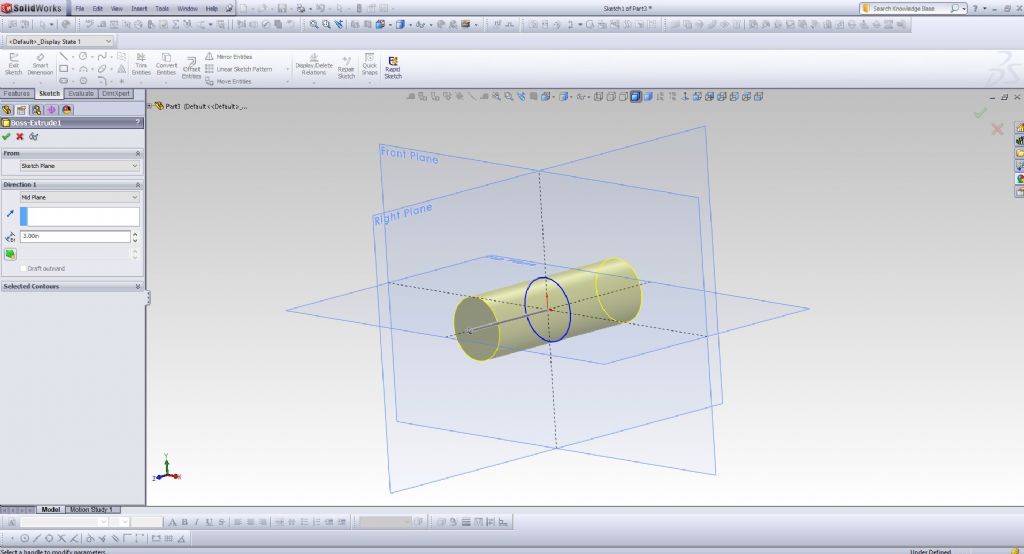
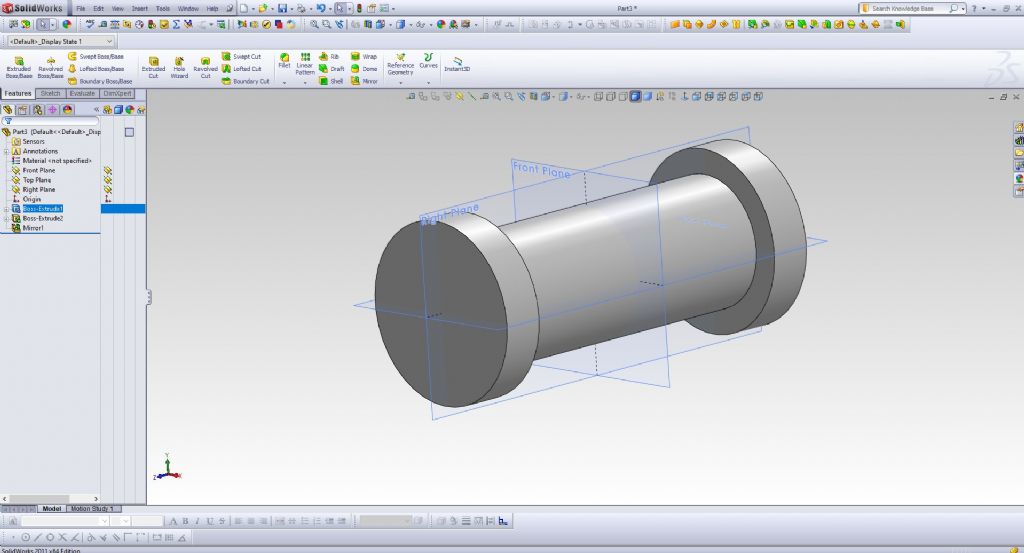
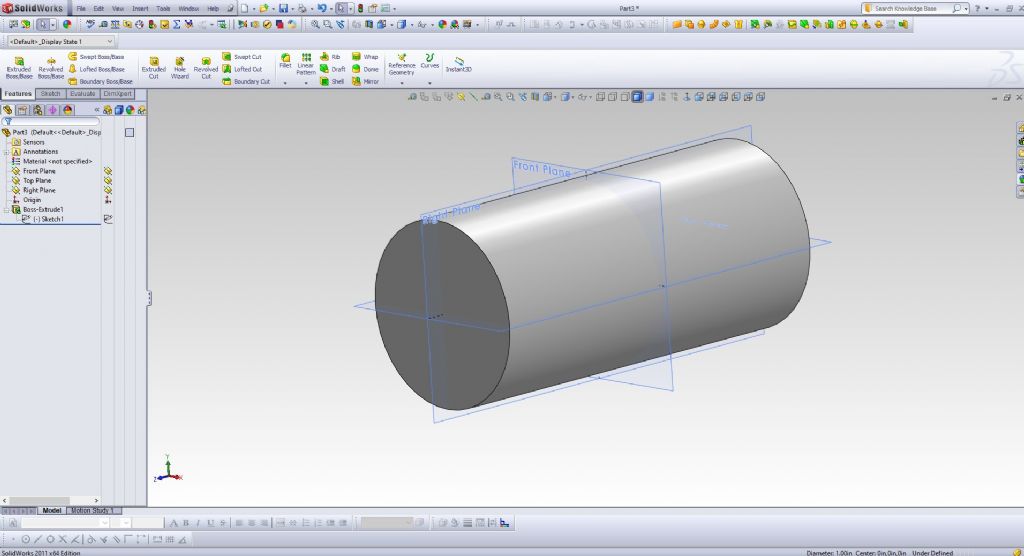
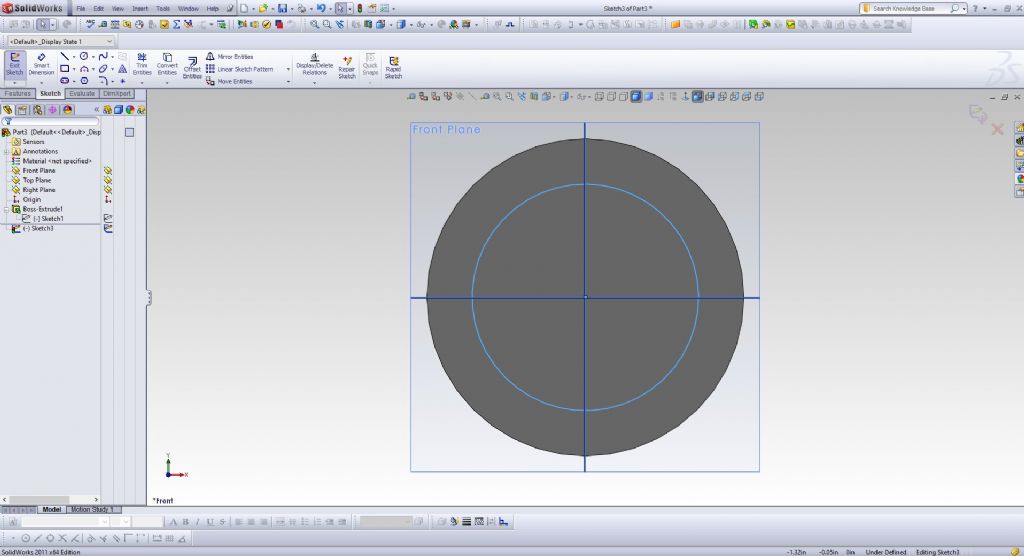
                                  Using method one, we can draw a circle on the front plane, extrude it FROM THE CENTER outward in both directions, and create a shaft.

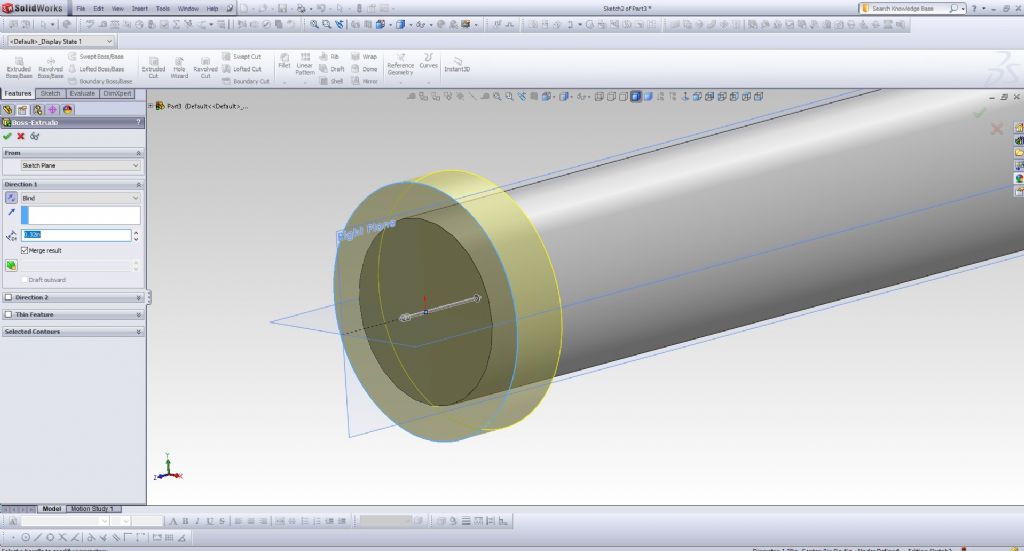
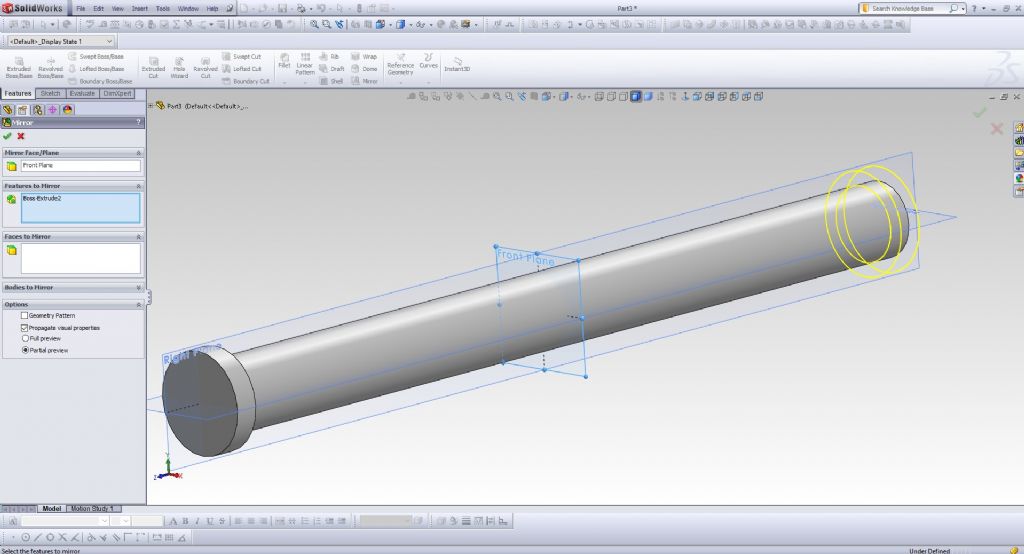
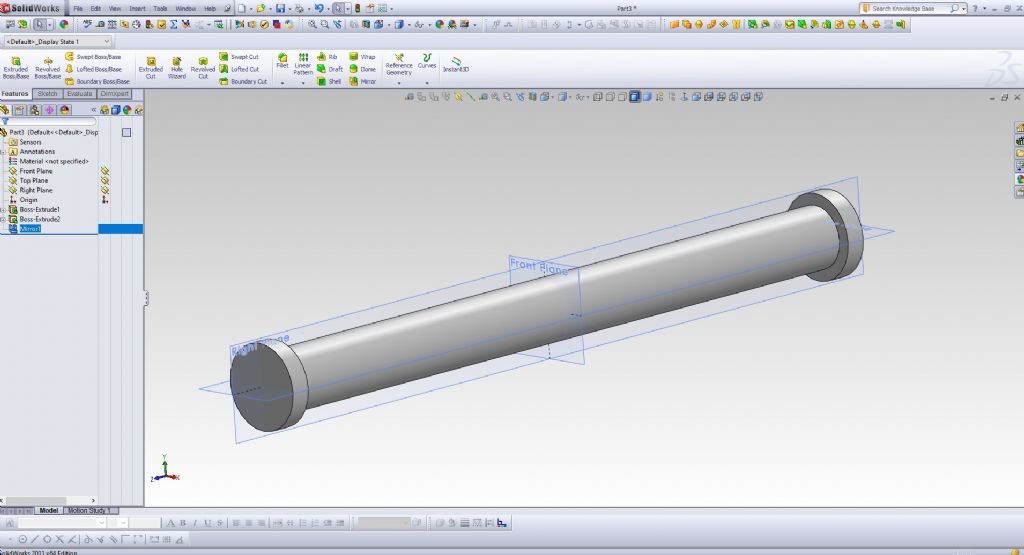
                                  If we pick one end of the shaft, we can sketch another circle, and extrude it inwards, to create a flange (if that is the correct term), and then mirror that flange to the other end of the shaft.

                                  image167.jpg

                                  image168.jpg

                                  image169.jpg

                                  image170.jpg

                                  image171.jpg

                                  image172.jpg

                                  #597235
                                  PatJ
                                  Participant
                                    @patj87806

                                    The significance of extruding the shaft from the plane in the center, and then extruding the flanges from the ends of the shaft back towards the center of the shaft, is that the length of the shaft can now be modified, and the flanges will follow the shaft without changing size.

                                    The shaft length is modified by right clicking on the original extrudion name on the left side of the screen, and editing the extrusion length from 12 inches to 4 inches.

                                    This is one approach I use for creating steam engine cylinders.

                                    image175.jpg

                                    image176.jpg

                                    #597236
                                    PatJ
                                    Participant
                                      @patj87806

                                      For round objects, the second method is to draw the shaft and flanges in section, and rotate that section around a central axis.

                                      image1.jpg

                                      image2.jpg

                                      image3.jpg

                                      #597238
                                      PatJ
                                      Participant
                                        @patj87806

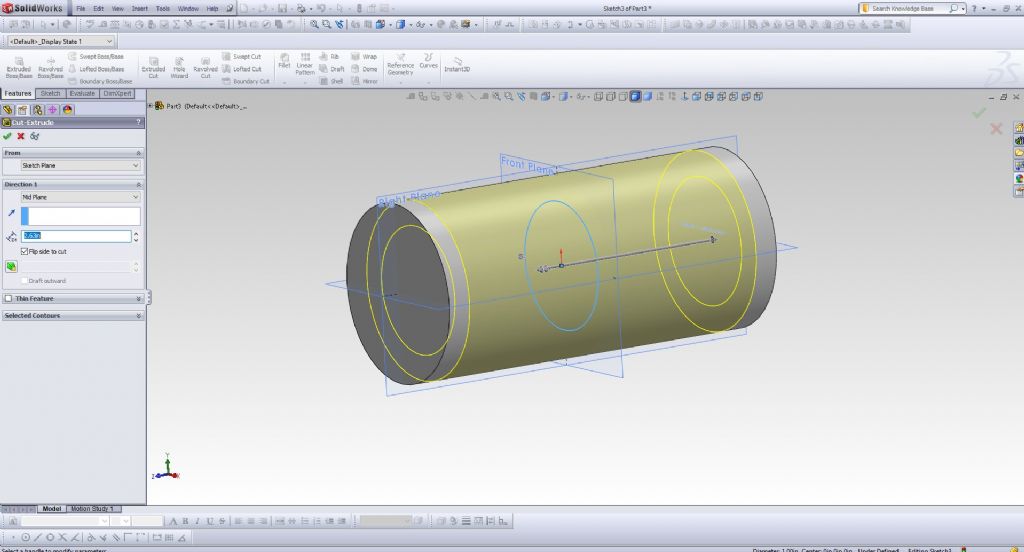
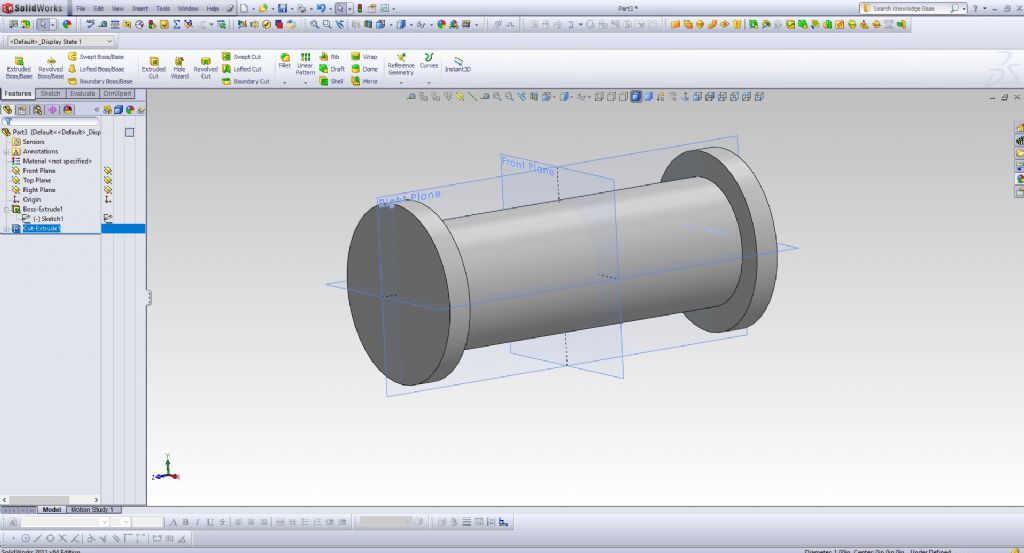
                                        A third method is a subtractive method, and it is exactly like machining (the first method was an additive method).

                                        We can create a larger diameter shaft, and then cut off (cutting from the center outwards) the material we don't want.

                                        We result looks the same as the first method, but the difference is that when we change the length of this model, the flanges do not follow, and so we get what I call the dreaded "model explosion", where things stop working correctly.

                                        One wants to avoid model explosion at all cost.

                                        There is nothing worse than spending hours on a 3D model, only to have it all crash.

                                        image177.jpg

                                        image178.jpg

                                        image179.jpg

                                        image180.jpg

                                        #597239
                                        PatJ
                                        Participant
                                          @patj87806

                                          How to recover if you model expolodes;

                                          1. Hit the "Edit-Undo" button (on my program, it is in the pulldown menu) repeatedly until you undo the problem.

                                          2. In the beginning of my learning 3D, I would use a "Save-As" after every step, and if my model crashed, I could open the last good file.

                                          These days, I never use the Save-As, and I only have one file for each part.

                                          There are parts that are complicated enough that sometimes I cannot forsee which exact method I should use.

                                          3D models are often created using the rotated sketch, additive method, and subtractive method.

                                          On rare occasions I have to start a model over again, and map out a new strategy, but for me, starting over again on a model is very rare.

                                          .

                                          #597240
                                          Nick Wheeler
                                          Participant
                                            @nickwheeler

                                            I would make the flanges back from the ends for the reasons mentioned, but would include their diameter(s) in the original, central sketch. A central bore could also be included, but that's enough concentric features to justify sketching the profile and revolving to create the solid.

                                            #597241
                                            PatJ
                                            Participant
                                              @patj87806

                                              One technique I have learned, which is very useful for complex parts, is to take a screen capture after each step, and paste that image into a photoshop program.

                                              This leaves a quick visual paper trail, and should things go wrong, you can glance at your method, and generally figure out a new approach (if needed) quickly.

                                              This paper trail is also very useful if you put a model away for a year or so, and then come back and start working on it again. I can quickly refresh on the approach that I took on any given part.

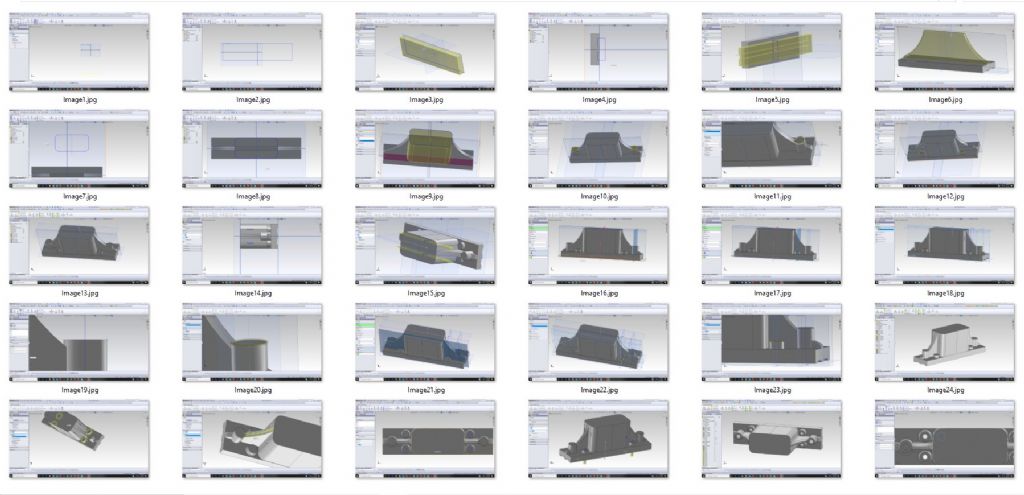
                                              Here is a paper trail on a part that I modeled (a bearing support block).

                                              Complex models may be intimidating at first glance, but the trick is to break their creation down into one simple step at a time.

                                              Like climbing Everest; you don't jump to the top in one big leap, but rather take one small step at a time, and rest often for recovery.


                                              image181.jpg


                                              image182.jpg


                                              Edited By PatJ on 06/05/2022 20:42:30

                                              #597242
                                              PatJ
                                              Participant
                                                @patj87806

                                                I showed my brother one of my 3D models, and he said "That looks very complicated".

                                                I told him that despite the multitude of menus and toolbar buttons, in the end, 95% of the time, you use a few fundamental commands, such as draw a sketch, extruding, cutting or rotatw that sketch, and then repeat.

                                                Once I learned 3D modeling, I was shocked at just how few commands I generally used to create models.

                                                .

                                                Edited By PatJ on 06/05/2022 20:35:20

                                                #597243
                                                PatJ
                                                Participant
                                                  @patj87806
                                                  Posted by Nicholas Wheeler 1 on 06/05/2022 20:19:33:

                                                  I would make the flanges back from the ends for the reasons mentioned, but would include their diameter(s) in the original, central sketch. A central bore could also be included, but that's enough concentric features to justify sketching the profile and revolving to create the solid.

                                                  Everyone seems to eventually settle in on their favorite methods/techniques as they learn 3D modeling.

                                                  My techniques generally get refined with each model I create, as I discover better/more efficient methods.

                                                  The trick is to remember what you did, and how you did it, and thus the reason I use the paper trail for most of my models these days, since my memory is not very good.

                                                  There are many many ways to model any given part.

                                                  The only way to learn 3D modeling is to use the program, start with very simple models, learn one step at a time, and then keep using the program.

                                                  If you get frustrated with the program, put it away and try again another day.

                                                  This is how I learned machining.

                                                  I would chuck up a piece of metal, machine on it for an hour, ruin the piece, curse profusely, swear that I would never machine again, leave the shop, come back the next day, do the same thing, and by day 4 or 5, I would finally master machining that part.

                                                  Persistence is the key.

                                                  Few if any people learn machining or 3D modeling overnight.

                                                  .

                                                  Edited By PatJ on 06/05/2022 20:43:48

                                                  #597250
                                                  PatJ
                                                  Participant
                                                    @patj87806

                                                    I should mention what the benefits of 3D modeling are, and why it can be worth the trouble to learn 3D modeling, and use it instead of 2D CAD or manual drafting.

                                                    There are those who will be better served by using either manual drafting or 2D CAD, but for those who have the time, take the deep dive into the world of 3D modeling.

                                                    As with building model engines, 3D modeling can be addictive, and one seems to have to want to build those ever more challenging models/engines.

                                                    Some of the benefits of 3D modeling are:

                                                    1. You can create an assembly, and assemble the parts together, and verify if the parts actually fit, verify that things such as the holes in the cylinder head and the studs on the cylinder actually align, etc.

                                                    2. When you create an assembly, you run a motion study, and actually run your engine virtually (not all programs have this option).

                                                    If the parts do not fit, the engine will not run.

                                                    It is best to test each part for rotation as they are added, in case there is a misalignment.

                                                    Otherwise if you assemble all the parts before attempting a motion study, and you have a problem, you will not know which part is causing the problem.

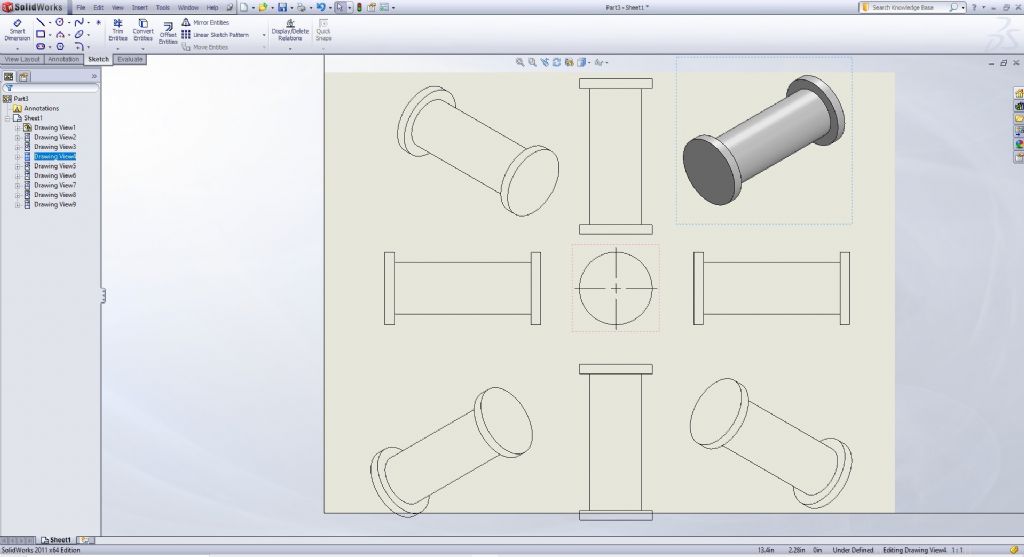
                                                    3. Once you have created a 3D model, you can derive the 2D drawing from that model by creating a drawing file, and dragging and dropping the model onto a virtual sheet of paper.

                                                    You can drag the model left, right, up, down, and at angles, to automatically create, front, top, side, bottom, isometric, etc. views.

                                                    The views can be line drawings, or solids.

                                                    You can dimension the views, and if you change your models, the dimensions automatically update to reflect the new dimensions of the part.

                                                    image183.jpg

                                                    Edited By PatJ on 06/05/2022 21:05:16

                                                    #597251
                                                    Nick Wheeler
                                                    Participant
                                                      @nickwheeler

                                                      Pat, the other thing to do when that happens is to ask somebody competent for advice and actually listen to it. How many threads have we seen recently that have ended with the OP flouncing off after being told that his design/parts/approach is never going to work and starting over will save throwing more good resources after bad?

                                                    Viewing 25 posts - 1 through 25 (of 66 total)
                                                    • Please log in to reply to this topic. Registering is free and easy using the links on the menu at the top of this page.

                                                    Advert

                                                    Latest Replies

                                                    Viewing 25 topics - 1 through 25 (of 25 total)
                                                    Viewing 25 topics - 1 through 25 (of 25 total)

                                                    View full reply list.

                                                    Advert

                                                    Newsletter Sign-up