How to use this internal dial caliper gauge?

Advert

How to use this internal dial caliper gauge?

Home Forums Beginners questions How to use this internal dial caliper gauge?

Viewing 7 posts - 1 through 7 (of 7 total)
  • Author
    Posts
  • #699382
    felis concolor
    Participant
      @felisconcolor37847

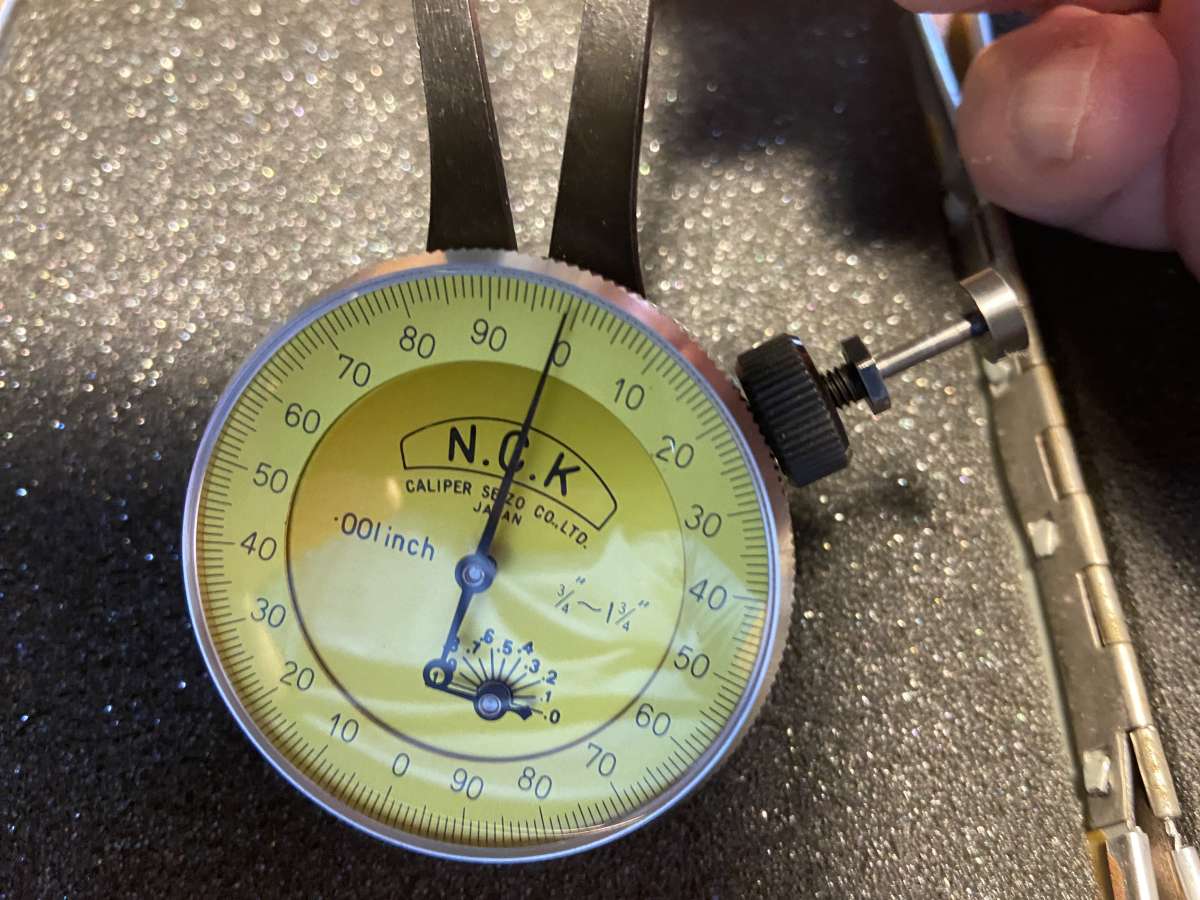
      I have recently bought this NCK-branded, internal bore, dial caliper tool, but it is proving to be a challenging measuring tool to learn to use.

      It has two “legs”, with the left leg being stationary and the right leg being spring-loaded and fully extended while at rest.

      The measurement range is from 1.750″ down to .750″.

      How does one use this this for measuring and reading an actual bore diameter?

      Does it need to be “calibrated”, and if so, how does one calibrate it?

      I did take a measurement between the tips of the “feet” on the legs, with the right leg fully extended at rest, with a digital caliper.
      It is supposed to be 1.750″, but measured at 1.763″.

      My intent is to use this for measuring bore diameters, for determining major and minor diameters for various internal threading pitches.

      Does anyone have a link to the instructions for use, for this instrument?

      Thank you for your insight, with using this instrument

      IMG_1037IMG_1035


      Advert
      #699383
      Michael Gilligan
      Participant
        @michaelgilligan61133

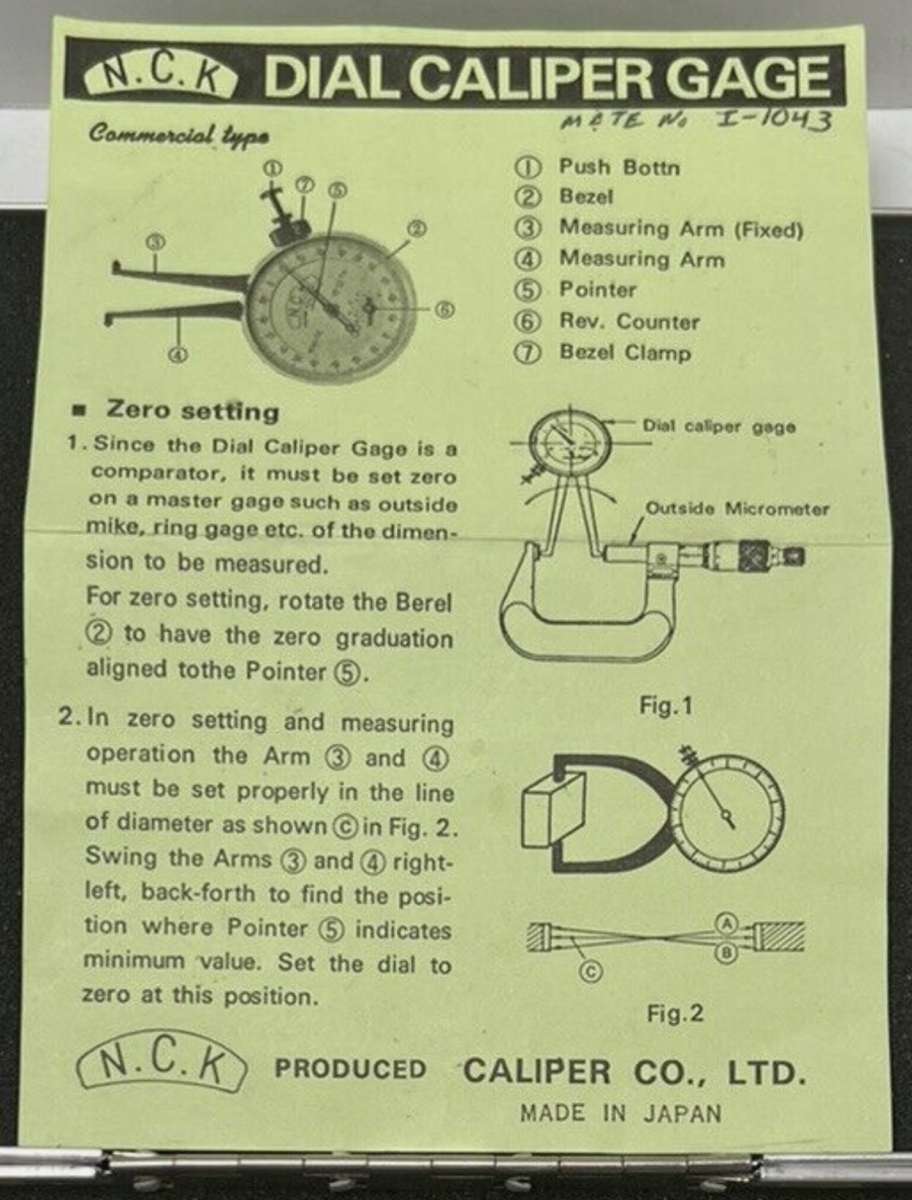
        Image grabbed from ebay listing

        https://www.ebay.com/itm/255543767754

        .

        IMG_9136

        #699392
        DC31k
        Participant
          @dc31k
          On felis concolor Said:

          How does one use this this for measuring and reading an actual bore diameter?

          The first thing to do would be to read the instructions.

          In short, you don’t use it for direct measurement.

          It is a comparative instrument only.

          You zero it out at your chosen size using a ring gauge (or gage – I think one is metric, the other imperial). Make sure Berel is in a good mood before you attempt to rotate her.

          Poking it up your chosen hole then tells you the difference from your ring.

          #699414
          Mike Hurley
          Participant
            @mikehurley60381

            As DC31k says its a comparative instrument, not direct sizing

            Simply set your final desired internal diameter on a Mic, as shown in the instruction sheet, set bezel to Zero and then continue boring out your work and testing with the calipers as you go, indicting your progress to zero.

            Mike


            #699438
            SillyOldDuffer
            Moderator
              @sillyoldduffer

              I always wonder what instruments like this are for exactly.   The set-up procedure and limited range suggest repetition work to me – a need to measure many bores with good but not exceptional accuracy.   The accuracy is better than needed for threading, unless something special is being done.

              For my purposes taper gauges are ‘good enough’ to identify nominal diameters.  Cheap, quick, and not very accurate:


              http://image.made-in-china.com/2f0j00rSqQuvGBgacn/Bore-Diameter-Gauge.jpg

              I don’t sneer at spring calipers either – applied carefully they work surprisingly well, though plenty of practice is needed:


              https://5.imimg.com/data5/SELLER/Default/2022/2/CF/VJ/PB/2785425/spring-caliper-1000x1000.jpg


              On the lathe, I mostly bore to match an existing part, which is offered up as it’s own gauge – not measured accurately.  I occasionally use the lathe dials, checked with a digital caliper.  Similar on the mill – fitting is preferred to accurate measuring.

              When measured accuracy is needed I switch to a set of telescopic gauges.  They’re more costly, take longer to use, require care and a digital caliper to take off the actual measurement, but are OK in the range I work too – rarely better than ±0.02mm.   The sets cover large and small bores.


              https://ae01.alicdn.com/kf/HTB1t.tWazzuK1Rjy0Fpq6yEpFXa1/6Pcs-Telescoping-Gauge-8-150mm-5-16-6-Adjustable-Inner-Diameter-Gauge-carbon-steel-Measuring-Tools.jpg

              I often make simple plug gauges on my lathe, for example to make sure by fit that a hole bored on my milling machine matches that on another part.

              No doubt Fells’ dial instrument would get measurements faster than my T-gauges, and I think it could also detect ovality, but for pro accuracy it’s not in the same league as a 3-point internal micrometer, or production GO/NO-GO gauges.   Gut feel is they’d be ideal in a shop refurbishing engines or hydraulic machinery.  Fells’ example is too small for most engine cylinders, and better instruments are available for that, but it would do valve ports, injectors, & spark plugs etc.   Hydraulic and pump repairs too.   Can anyone confirm what sort of work a dial on legs would be first choice?   (Don’t think I need one myself, but I’m often wrong!)

              Dave


              #699493
              felis concolor
              Participant
                @felisconcolor37847

                For whatever reason, the “reply box” at the end of my thread does not show up…..even after logging-in and out, and in again multiple times.

                So, to that end, I wanted to say thank you to the helpful guys that replied to my internal dial gauge questions, and that I am posting it here, vs not being able to reply at all. Thank you guys, for your help.

                So it is a “comparator” measuring tool, and not an instrument to take direct readings.

                Now it makes sense, and I will be able to use it, in this manner.

                Is it the “best” measuring instrument for my purposes? Probably not.  But since it’s already in my kit, and as a beginner, I am going to be able to put it to use.


                MOD EDIT moved to right thread. J.


                #699525
                Howard Lewis
                Participant
                  @howardlewis46836

                  It will indicate the difference in size from the gauge (Ring, Micrometer, etc) to which it was set to Zero.

                  Hence, it compares the bore being measured with that usewd to set the Zero.

                  In used it will need to be be gently rocked to and fro in both planes to show the minimum reading, oe. when perpendicular to npth both axes, (diameter and longitudinal)

                  It might take a while to become used to this procedure, but practice makes perfect!

                  Howard

                Viewing 7 posts - 1 through 7 (of 7 total)
                • Please log in to reply to this topic. Registering is free and easy using the links on the menu at the top of this page.

                Advert

                Latest Replies

                Home Forums Beginners questions Topics

                Viewing 25 topics - 1 through 25 (of 25 total)
                Viewing 25 topics - 1 through 25 (of 25 total)

                View full reply list.

                Advert

                Newsletter Sign-up