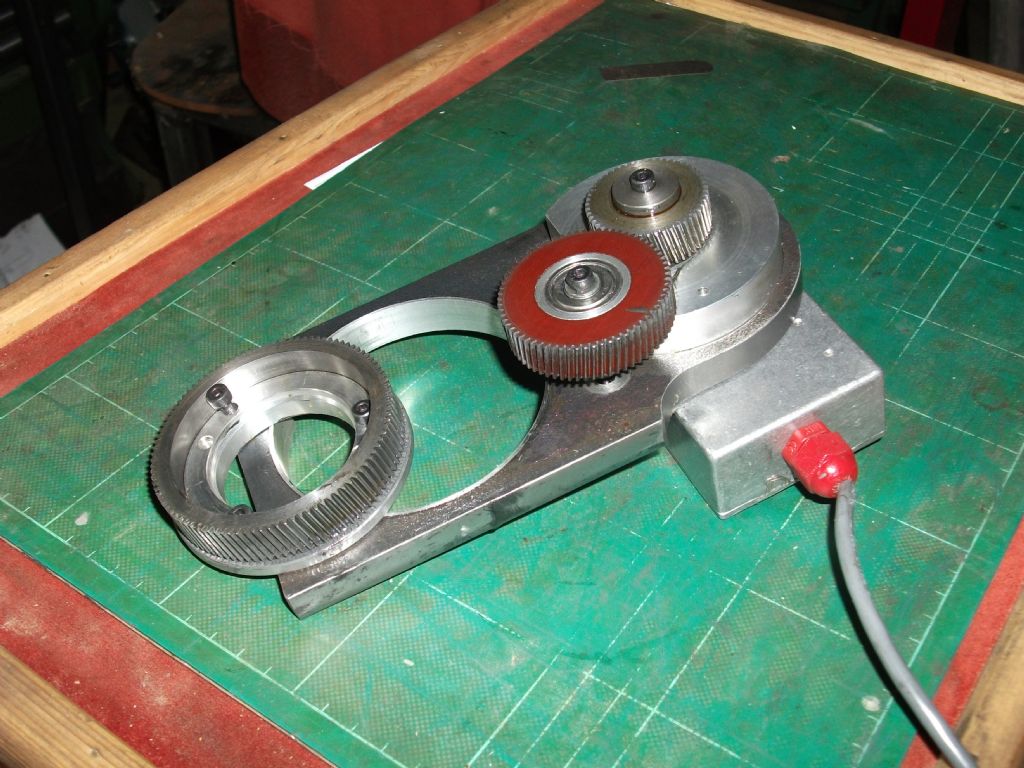
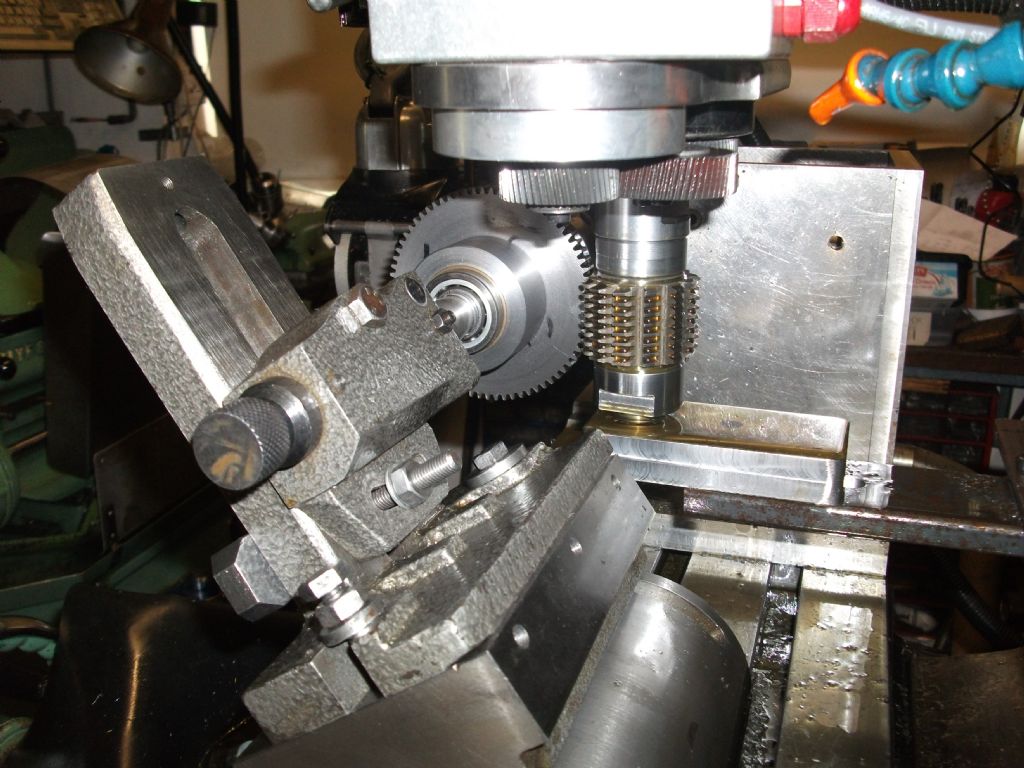
Issues 303 stepper driven rotary table with hobbing capability

Advert

Issues 303 stepper driven rotary table with hobbing capability

Home Forums Model Engineers’ Workshop. Issues 303 stepper driven rotary table with hobbing capability

Viewing 18 posts - 1 through 18 (of 18 total)
  • Author
    Posts
  • #542442
    Baldric
    Participant
      @baldric

      I found the article on using a stepper motor with a rotary table to hob gears interesting, I will need to make some gears for my 3" Foden and had been wondering about doing this. I have already driven my rotary table using a previously published article with an Arduino and I am generally happy with that, but don't think it has the speed to cope with hobbing. What seems missing is any link to the code used in the article, is that available anywhere? I did try using the search on this site, but it only titles that did not seem to match.

      Has anyone done this using a Bridgeport, if so any tips on where to mount the sensor? I have an older step-pulley head, that I expect to run at it's lowest speed.

      My rotary table has a 90:1 gearing, I appreciate this means the stepper will have to work harder, but I guess I can reduce the micro-stepping to compensate for that.

      Thanks in advance,

      Baldric.

      Advert
      #38612
      Baldric
      Participant
        @baldric
        #542447
        Douglas Johnston
        Participant
          @douglasjohnston98463

          This is often the problem with articles which only demonstrate a device. Such articles are not meant to be used to make the device but merely show what is possible. They can be very interesting and inspiring but can also be frustrating if you want to build the item in question. I too read the hobbing article and would love to build something similar but would need a lot more information to make that feasible.

          Doug

          #542451
          Andy Carruthers
          Participant
            @andycarruthers33275

            Have a look here:

            https://www.worldofward.com/rotarycontroller/overview/

            Have just purchased one, simply don't have time to figure everything out myself…

            #542452
            JasonB
            Moderator
              @jasonb

              Joe will hopefully see this thread and respond, he also did a thread about it here

              #542471
              Joseph Noci 1
              Participant
                @josephnoci1
                Posted by JasonB on 30/04/2021 18:54:00:

                Joe will hopefully see this thread and respond, he also did a thread about it here

                He saw and here he is…

                Always a trade off with articles like that – to make it a DIY construction article would probably occupy two or three magazine editions and would perhaps tend to bore most folk. It's not really fair on subscribers to pay for the magazine and have heavy, possible uninteresting content, occupy many issue perhaps? I would not know..

                Anyway, I don't really see the need for frustration – as Jason indicated I did do some posts which show in some detail what you would be letting yourself in for if you wished to build something like this, and I generally am around these forums and happy to assist any wishing to give it a try! Paul White, another UK forum member was actually the motivator for this – to build an electronic hobber, and so this was born and Paul did build and use it.

                I can provide circuits, C source code if you wish to modify/roll your own, or binary code to you requirements ( within practical reason!) etc. My Wife is the software boffin behind all this. We do not use the Arduino development / compile, etc environment – it's to tacky for our way of working – so we use open source tools on a PC. The code runs on an STM32 microprocessor, on a NUCLEO module – very similar to the arduino type modules, but 32bit and much faster. So all interested let me know how you wish to go! All/most of the bits should be available from RS, Digikey and Mouser, and other favourites you may have.

                The unit is not complex, but you need to be able to read a circuit, solder some electronics, deal with LCD character displays, etc, albeit at basic levels.

                Can be via email, or on the forum, whatever works and very happy to help.

                Joe

                #542558
                Baldric
                Participant
                  @baldric
                  Posted by Andy Carruthers on 30/04/2021 18:46:51:

                  Have a look here:

                  https://www.worldofward.com/rotarycontroller/overview/

                  Have just purchased one, simply don't have time to figure everything out myself…

                  I don't think that does gear hobbing, and I made an equivalent of that from MEW 249, here.

                  #542559
                  Baldric
                  Participant
                    @baldric
                    Posted by JasonB on 30/04/2021 18:54:00:

                    Joe will hopefully see this thread and respond, he also did a thread about it here

                    Thanks, I will read through that.

                    #542561
                    Baldric
                    Participant
                      @baldric
                      Posted by Joseph Noci 1 on 30/04/2021 20:48:55:

                      Posted by JasonB on 30/04/2021 18:54:00:

                      Joe will hopefully see this thread and respond, he also did a thread about it here

                      He saw and here he is…

                      Always a trade off with articles like that – to make it a DIY construction article would probably occupy two or three magazine editions and would perhaps tend to bore most folk. It's not really fair on subscribers to pay for the magazine and have heavy, possible uninteresting content, occupy many issue perhaps? I would not know..

                      Anyway, I don't really see the need for frustration – as Jason indicated I did do some posts which show in some detail what you would be letting yourself in for if you wished to build something like this, and I generally am around these forums and happy to assist any wishing to give it a try! Paul White, another UK forum member was actually the motivator for this – to build an electronic hobber, and so this was born and Paul did build and use it.

                      I can provide circuits, C source code if you wish to modify/roll your own, or binary code to you requirements ( within practical reason!) etc. My Wife is the software boffin behind all this. We do not use the Arduino development / compile, etc environment – it's to tacky for our way of working – so we use open source tools on a PC. The code runs on an STM32 microprocessor, on a NUCLEO module – very similar to the arduino type modules, but 32bit and much faster. So all interested let me know how you wish to go! All/most of the bits should be available from RS, Digikey and Mouser, and other favourites you may have.

                      The unit is not complex, but you need to be able to read a circuit, solder some electronics, deal with LCD character displays, etc, albeit at basic levels.

                      Can be via email, or on the forum, whatever works and very happy to help.

                      Joe

                      Joe,

                      Thanks for replying.

                      At the moment I am considering how I will make the gears I require, buying a single hob does appeal rather than having to buy several gear cutters and cut all the teeth one at a time, either-way also adding a power-feed to the X-axis would sound sensible to me as well.

                      I spent 12 years working in TV studios, maintaining. repairing & modifying the electronic kit, so can do the electronics, I now write software in C++, just I use Visual Studio, so that should also not be a problem in making any changes that suit my needs, so anything I can get from you will be a great starting point for me. The bit I am not so familiar with is some of the issues associated with interfacing the hardware to the software

                      Baldric.

                      #542562
                      Baldric
                      Participant
                        @baldric

                        I would also like to thank Joe for highlighting the Bresenham algorithm, I was just working out how to resolve the issue I had with my existing steeper driven rotary table where I could end up with an error. I have come up with something similar, in that for each division, I will take the number of steps required for a full revolution, then work out the difference between the n and n+1 divisions, and use that to advance the table, rather than just using the number of steps divided by the number of divisions. Using this method does mean that after 1 full revolution the table should be exactly where it started rather than a few steps out for some numbers, with the "extra" steps added regularly.

                        Baldric,

                        #542577
                        Joseph Noci 1
                        Participant
                          @josephnoci1

                          What I can try is post some detail here – some circuits if they appear legible, wiring diagrams, etc, and some details on mechanical concepts.

                          I will also try to provide more detail on how it works, and maybe post the user manual in some form.

                          Interested folk can then maybe see if they wish to attempt this and then I can mail PDF's and source/binary code as needed.

                          Unless there are better ways of doing this, I will try do post some info in the coming day or two..

                          Joe

                          #542648
                          Joseph Noci 1
                          Participant
                            @josephnoci1

                            This will take a few posts as I will be limited by number of characters/images per post at some point…

                            My previous postings on this subject relate to a 7 segment LED display array version of the front panel – this changed to the present version using an LCD ( as in the MEW article)

                            There are two versions of this setup – one is for rotary table controller type applications , including a hobbing function, and the second ( as done for Paul White) is more for a hobbing 'machine' in that it provides control of a stepper for the blank feed into the hob. This could be used for example on a mill, with the hob encoder fitted to the spindle, hob in the spindle, a stepper fitted to say the X axis for feed, and the rotary table placed on the mill bed feeding into the hob – ( see my photos and video in the previous posting to see the basic setup)

                            previous posting on this subject

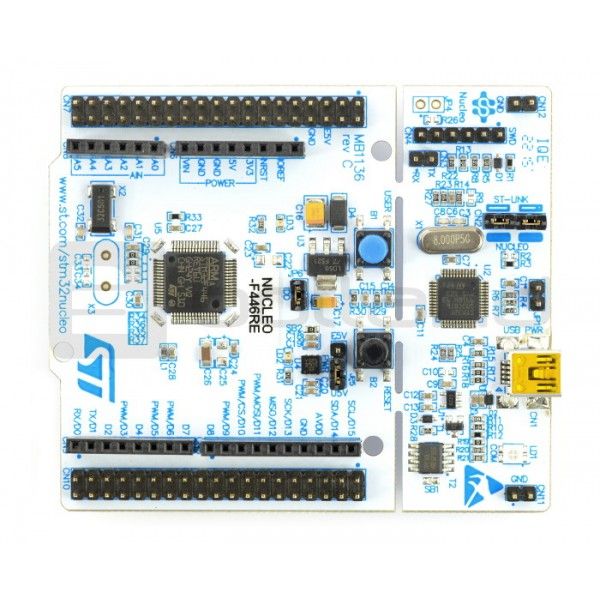
                            To re-iterate, the unit is based on an STM 32bit uP, using a NUCLEO module, similar to the Arduino type modules.

                            nucleo-f446re--arm-cortex-m4.jpg

                            The right hand section is a USB based programmer for the main CPU, center/left. Open source ST-LINK programmer software from the STM site is used to program the module, on a windows PC.

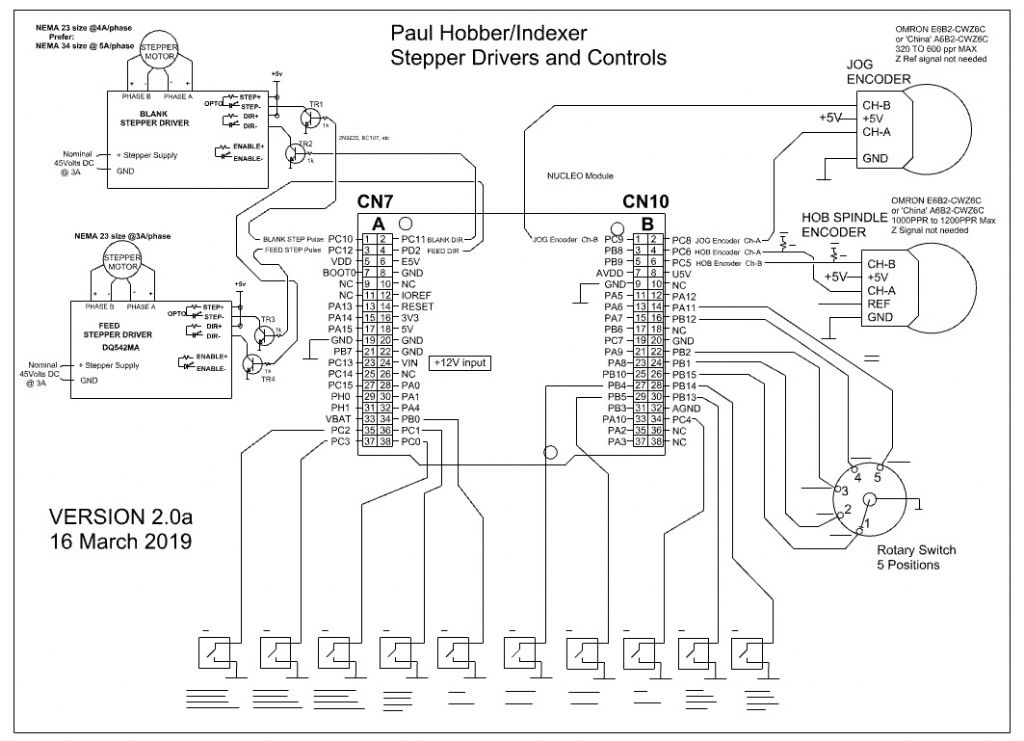
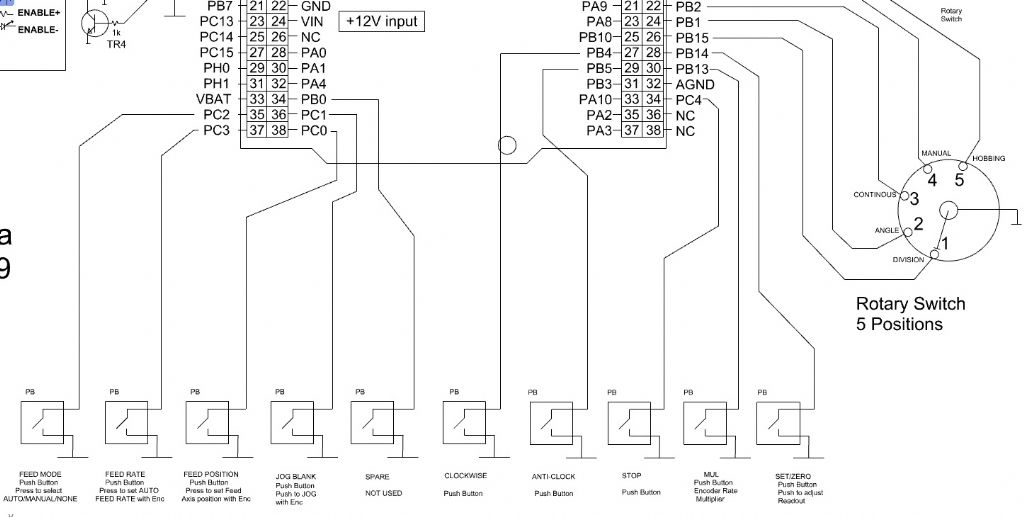
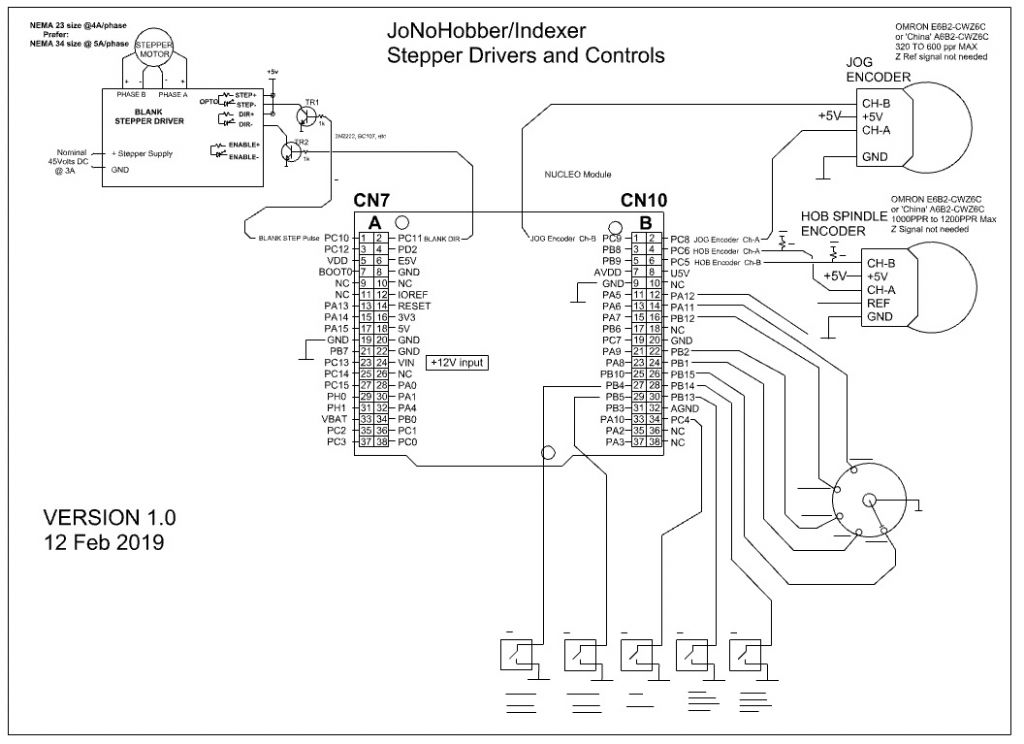
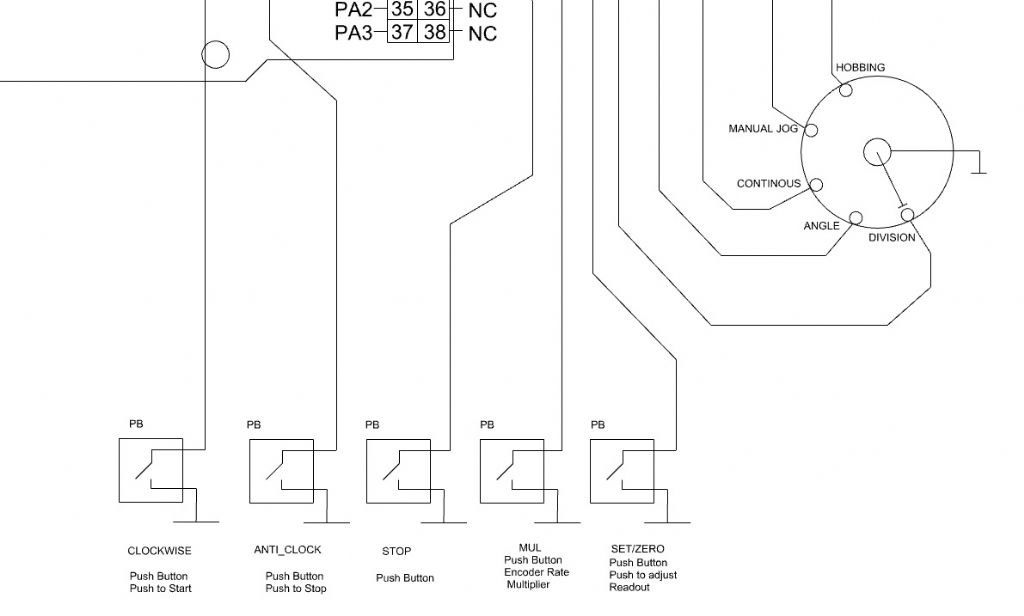
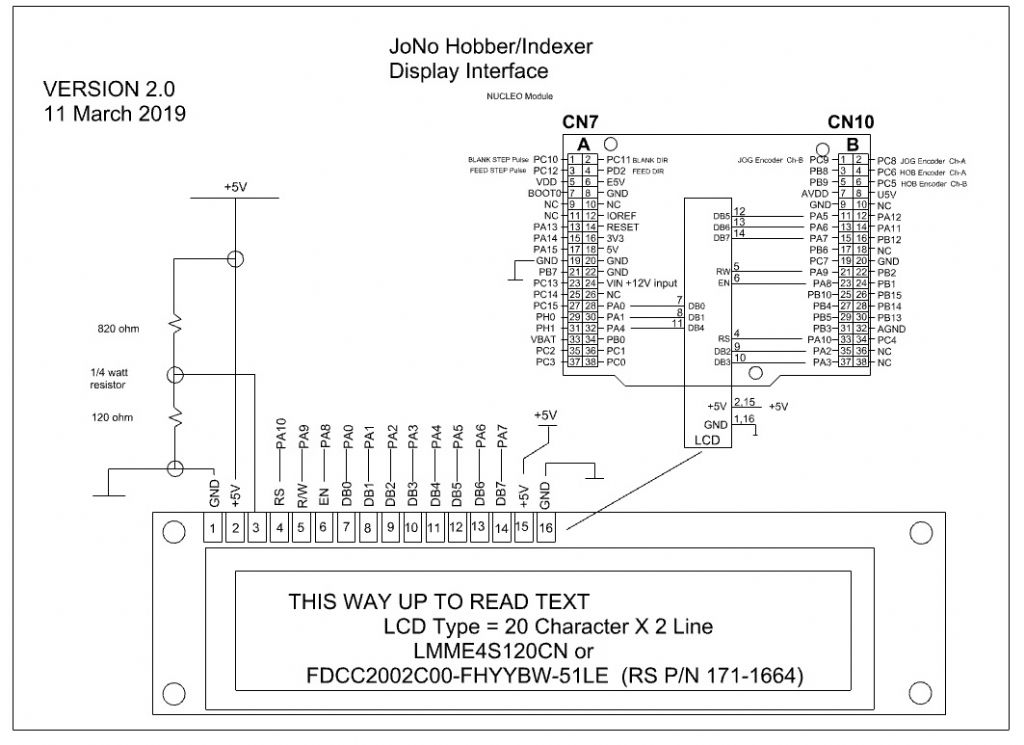
                            The circuits follow – note that resolution is limited in the size image I can paste, so some areas are repeated , zoomed in, for better viewing.

                            Circuits for the Hobber WITH FEED controls:

                            The pushbuttons with blanked text at the bottom are repeated next , zoomed in.

                            hobber_with_feed.jpg

                            hobber_with_feed_detail.jpg

                            Circuits for the Hobber WITHOUT FEED controls:

                            hobber_no_feed.jpg

                            Zoomed detail:

                            hobber_no_feed_detail.jpg

                            This is the Display Interface, common to both Hobber types:

                            hobber_lcd.jpg

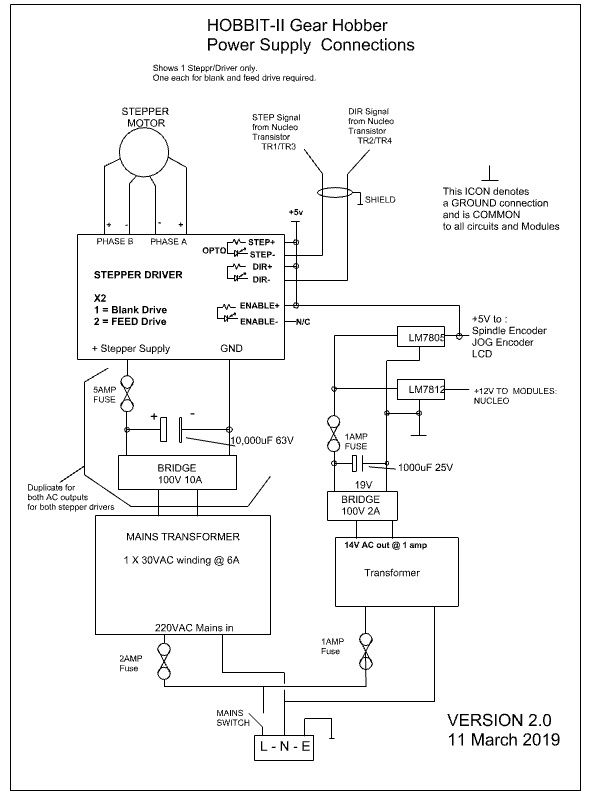
                            This is a typical Power supply for the unit – no part numbers since you can easily make do with what may be available to you:

                            hobber_psu.jpg

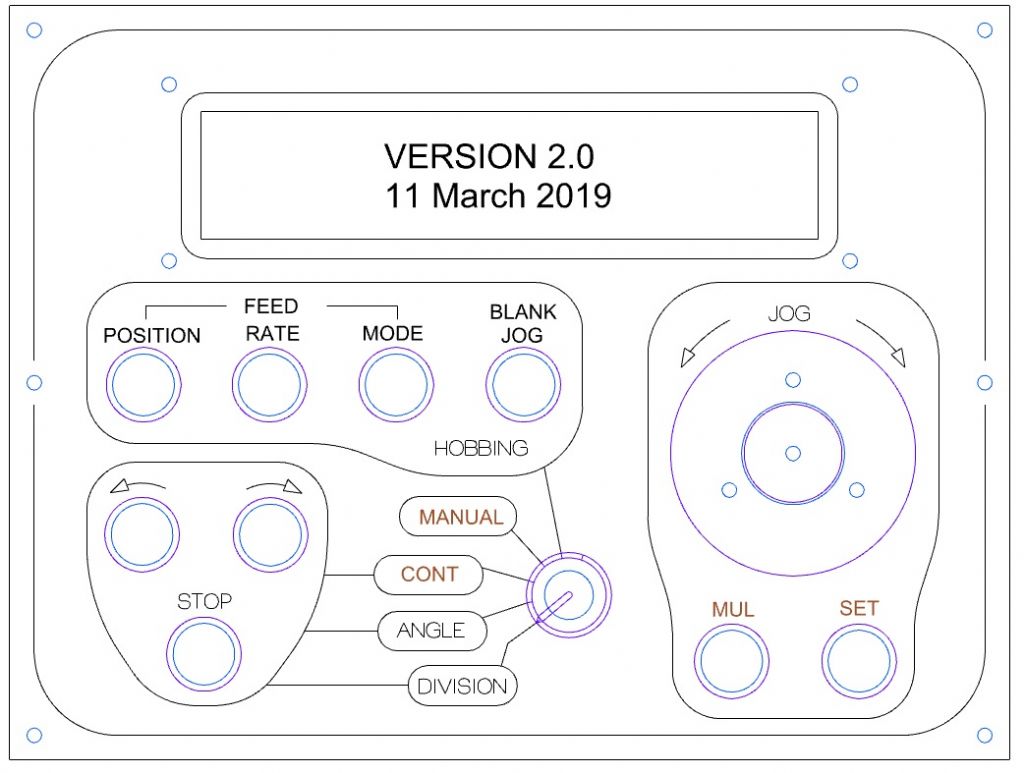
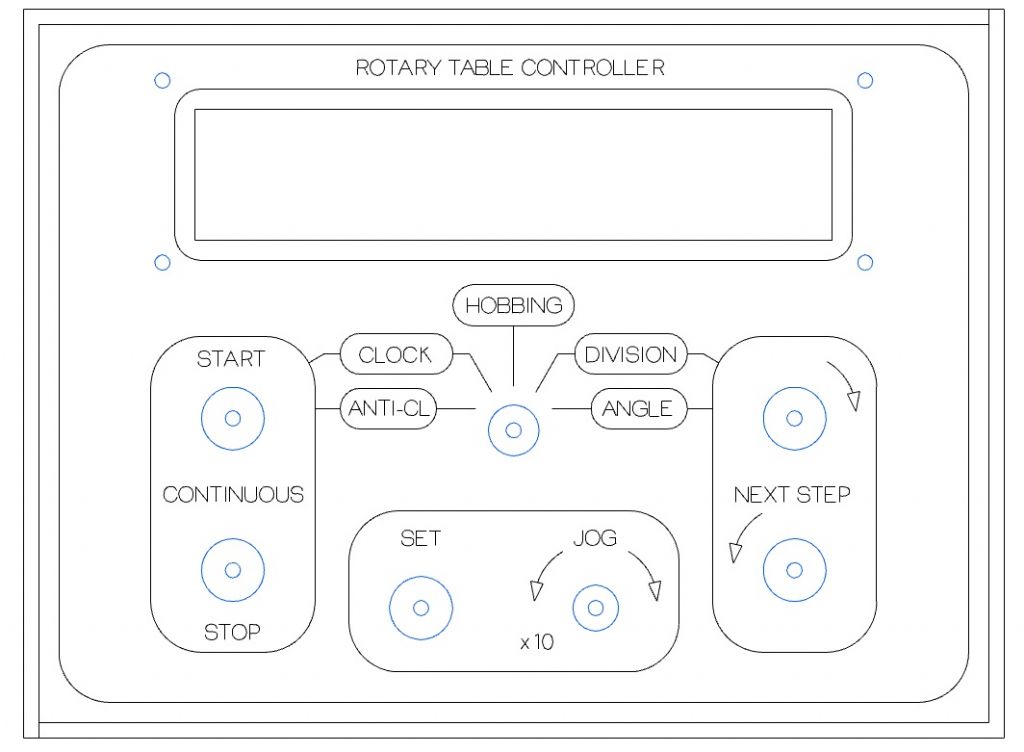
                            This is a sample front panel for a unit with Hobber AUTOFEED function

                            hobber_feed sample panel.jpg

                            And this for a Hobber with MANUAL FEED function.

                            hobber_no_feed sample panel.jpg

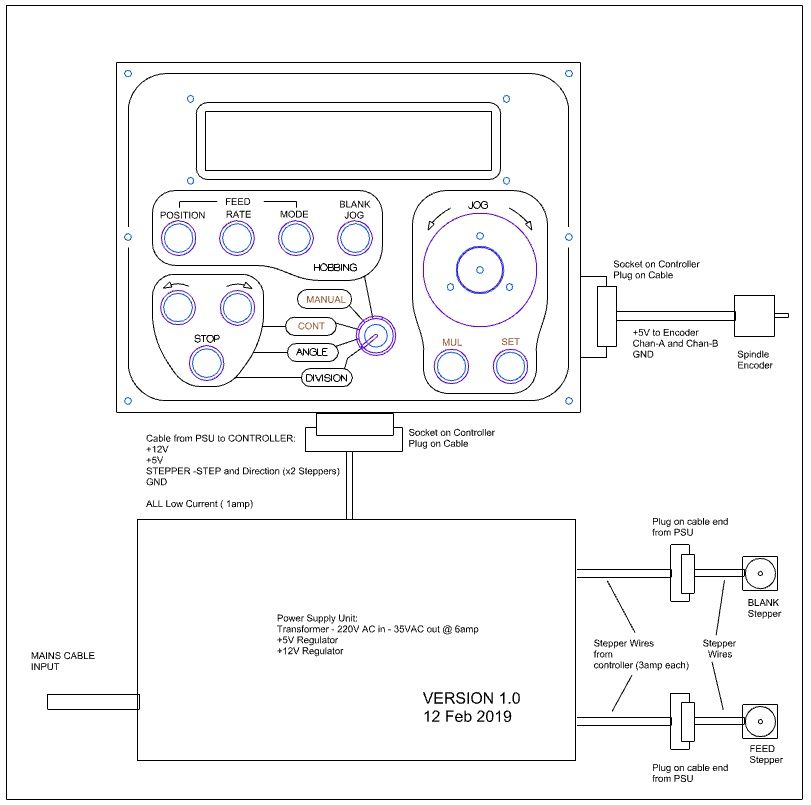
                            This shows the basic interconnection between items in the system: PSU, Hobber/Nucleo controller, Steppers, Spindle rotary encoder, etc

                            hobber_basic-interconnect.jpg

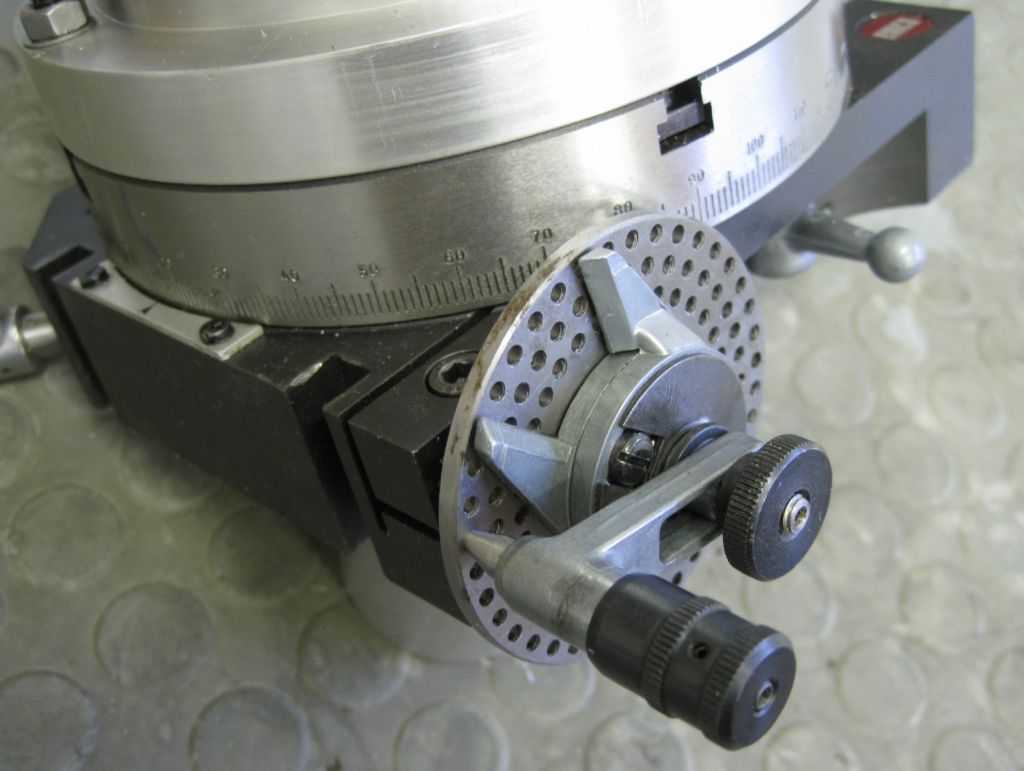
                            The un-modified rotary table at the start:

                            stock emco rotary table.jpg

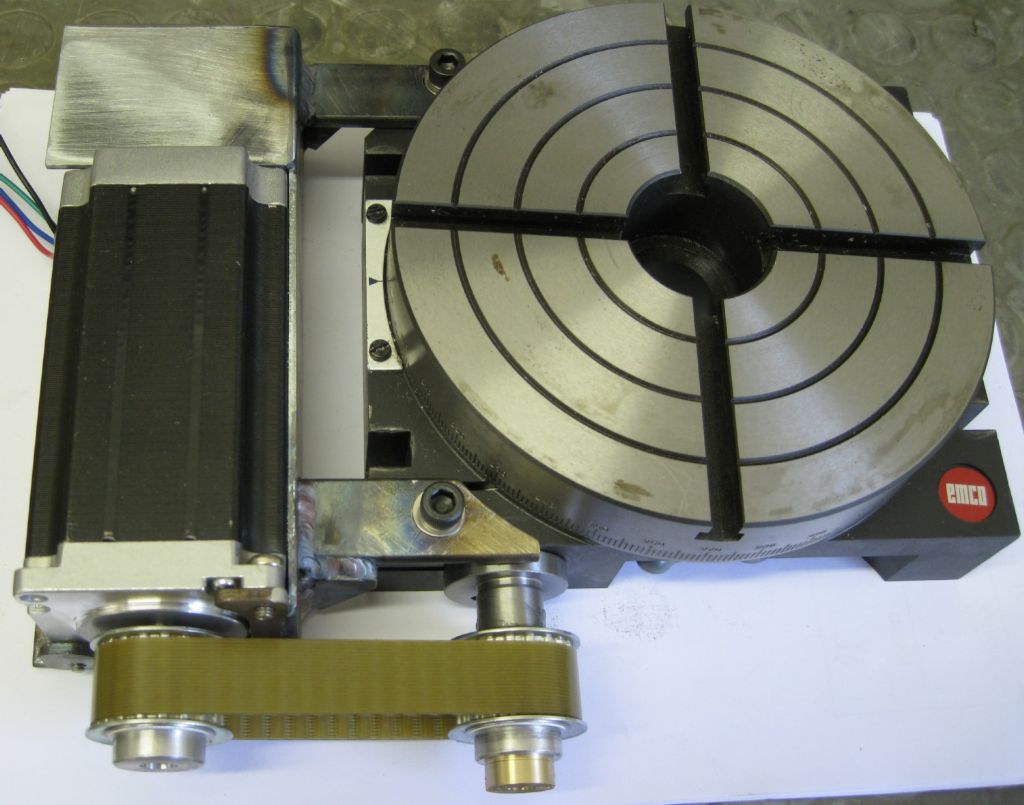
                            And the stepper fitted.

                            stepper fittings.jpg

                            It is simple to change parameters in the software to cater for stepper pulse/rev, stepper to table gear ratios, table worm ratio, etc.

                            Next post, the basic operation…

                            Joe

                            #542652
                            Joseph Noci 1
                            Participant
                              @josephnoci1

                              This describes basic operation of a hobber WITH AUTOFEED capability. It is easily understood from this which modes are not applicable to the non-AutoFeed mode type…

                              The Rotary Switch selects the various modes.

                              Each Mode may require the setup of some parameters, such as continuous rotation RPM, angular step size, No of divisions in the circle, No of teeth on the blank gear, etc.

                              When a mode is selected, the JOG encoder is active and used to set the required parameter. The SET/ZERO switch enters the parameter as the active such as number of teeth in hobbing, angular step size, number of divisions to step, rotary table rotational RPM, etc

                              The JOG wheel increment size on the display can be increased by xN (N depends on your encoder PPM..) by pressing the MUL pushbutton and rotating the jog wheel. Useful when big increments are needed.

                              Your Hobber, rotary table, may have different gear ratios – these can be adjusted.

                              Rotary Switch selections:

                              DIVISION
                              The JOG wheel is used to set a division increment, eg, say 360deg divided into 20 segments, ie each segment = 18degrees. Press SET/ZERO while using the JOG wheel to set the division value. Release SET/ZERO when done. When the ‘>’ or ‘<’ PB is pressed ( either clock or anticlock), the table will turn in that direction by the set division, for each press. The table can be set to a specific start point by first using MANUAL mode, below. Then selecting DIVISION again and using the ‘<’, ‘>’ buttons , the process will step on from that point each time. The number of division steps selected is displayed, as is the current cumulative division step number.

                              ANGLE.
                              The JOG wheel is used to set an angular increment, eg, say 5deg. Press SET/ZERO while using the JOG wheel to set the angle value. Release SET/ZERO when done. When the ‘>’ or ‘<’ PB is pressed ( either clock or anticlock), the table will turn in that direction by the set angle, for each press. The table can be set to a specific start point by first using MANUAL mode, below. Then selecting ANGLE again and using the ‘<’, ‘>’ buttons , the process will step on from that point each time. The selected step angle is displayed, as is the current cumulative angle value.

                              CONTINOUS.
                              The JOG wheel is used to set an RPM at which the table will rotate. Press SET/ZERO while using the JOG wheel to set the angle value. When the ‘>’ or ‘<’ PB is pressed ( either clock or anticlock), the table will turn continuously in that direction at the set RPM. Press STOP to stop rotation.

                              MANUAL.
                              This will rotate the table as the JOG wheel is rotated – useful when milling a radius, setting the table to a specific mechanical reference point, etc. Pressing SET/ZERO at any point in this mode will reset the angle display to 0 degrees as the reference start point.

                              HOBBING.
                              When selected, first use the JOG wheel to select the number of teeth to be cut, by pressing SET/ZERO and rotating the jog wheel. Release SET/ZERO when done.

                              5.1 BLANK JOG

                              The BLANK can be positioned as required by pressing and holding BLANK JOG, while jogging the blank with the JOG wheel.

                              5.2 FEED MODES

                              Since there is the option of Auto-feed of the cutter advance, the feed mode also needs to be set up ( Position, rates, auto/manual)

                              5.2.1 POSITION:

                              To position the cutter in relation to the blank, ie, almost touching, ready to cut, press FEED POSITION and use the JOG wheel to move the blank and cutter into the correct relationship.

                              5.2.2 FEED RATE

                              To set the feed rates ( in mm per blank rotation) press FEED RATE and use the jog wheel to set the value.

                              5.2.3 FEED MODE

                              The feed mode can be AUTO or MANUAL or NONE. This is selected by repeated presses of the FEED MODE button and will show on the display.

                              5.2.3.1 AUTO MODE

                              The feed will proceed in the selected mm per blank rotation and starts when the hob spindle starts running.

                              Pressing ANY other HOBBING mode button, eg, BLANK JOG, FEED POSITION or FEED RATE will immediately CLEAR the feed rate to NONE and if in AUTO-FEED, FEED will STOP – no AUTO feed will take place and the JOG encoder will not cause manual feed. Use FEED MODE to re-select the desired feed mode.

                              The FEED Mode can be changed on the fly, with the machine running or not. This allows manual take-over of feed, or AUTO from manual, or change of feed rate, and then back into auto, etc.

                              5.2.3.2 MANUAL MODE

                              In this mode the JOG encoder will drive the FEED axis Stepper. The JOG wheel is disconnected from ALL other functions and only generates FEED increments. Pressing ANY other HOBBING mode button, eg, BLANK JOG, FEED POSITION or FEED RATE will immediately CLEAR the feed rate to NONE, and the JOG encoder will not cause manual feed.

                              The FEED Mode can be changed on the fly, with the machine running or not. This allows manual take-over of feed, or AUTO from manual, or change of feed rate, and then back into auto, etc.

                              Gear Ratio Selection.
                              This is effected by selecting MANUAL MODE and then pressing and holding the ‘<’ button. Each press of the ‘>’ button will then cycle through the gear ratio options for rotary table use. Selectable ratios are 40:1 and 72:1. The HOBBING mode defaults to 40:1 ratio. This can be changed in software to any ratio you wish..

                              For those still awake, and interested, let me know what else you may need – greater detail etc is probably best by PM or emails.
                              Joe

                              #542722
                              Baldric
                              Participant
                                @baldric

                                Thanks for that Joe, I will start to look in to all of that.

                                Baldric.

                                #542726
                                John P
                                Participant
                                  @johnp77052

                                  Posted by Baldric 30/04/2021 17:51:39
                                  Has anyone done this using a Bridgeport, if so any tips on where to mount the sensor? I have an older step-pulley head, that I expect to run at it's lowest speed.

                                  My rotary table has a 90:1 gearing, I appreciate this means the stepper will have to work harder, but I guess I can reduce the micro-stepping to compensate for that.

                                  Thanks in advance,

                                  Baldric.
                                  —————
                                  Hi Baldric

                                  You have not indicated what size DP or Mod gears you are intending to
                                  cut ,the Bridgeport machine that is in your photo album seems to
                                  show that the lower part of the spindle protrudes by about an inch
                                  below the quill.
                                  In my hobbing set up on a Warco A2f machine i use this part of the
                                  spindle to attach a split collar turned in situ to mount a drive gear for an
                                  optical encoder ,the encoder bracket clamps around the quill and is
                                  seen here in the photo.
                                  Above 18 dp the hobs are around 55mm dia and you may need a
                                  substantial rotary table to cope with the cutting loads.
                                  I only cut up to 1,25 mod or 20 dp as seen in the photo here ,the
                                  set up here is much more rigid than any rotary table.
                                  More photo's in the the album gears.

                                  John

                                  hob encoder.jpg

                                  myford change wheel .jpg

                                  #542733
                                  Baldric
                                  Participant
                                    @baldric

                                    John,

                                    I like that idea for the sensor, I can probably do something similar.

                                    I have a 6" rotary table, I think it is a Vertex one, I also do have an Elliot 5" universal dividing head I could use, but I would then need to consider the work to add a stepper motor to this.

                                    Regarding the gears, they are 14DP, with 111, 95, 82, 44, 31 & 15 teeth, if this is not practical using the rotary table for hobbing I may have to do one tooth at a time. I would be interested in your thoughts on the suitability of the equipment I have available.

                                    Before starting work on any of this I will need to also look at the cost & availability of such a hob.

                                    Baldric.

                                    #542759
                                    John P
                                    Participant
                                      @johnp77052

                                      Hi Baldric.

                                      The Bridgeport is a substantial machine well suited to hobbing of these
                                      gears ,the weak point will most probably be the rotary table side of things.
                                      If you look at proper hobbing machines they are massive in comparison
                                      to the items they produce ,at 14 Dp and 111 tooth count the minimum centre height
                                      needed would be about 4.100 inches,the Vertex rotary and clones are 4.000 inches
                                      from the centre to the vertical mounting base so would need to be on
                                      a raised support ,the vertical mounting face is only 3.000x 6.000 inches by
                                      comparison the fabricated hobbing unit that i have the base is 3/4 thick steel
                                      9.000 x 8.000 inches in size.
                                      The other end of your gear size range at 15 tooth ,with a 2.500 inch diameter cutter
                                      you would be at about 150 rpm , with the Vertex table at 90 to 1 the stepper
                                      motor input to the table at 1:1 would have to run at 900 rpm,i don't know
                                      if that is possible ,my own hobbing unit has only a 5:1 reduction between
                                      the stepper motor and the work shaft but i mainly cut small gears and have
                                      hobs from 0.3 mod to 1.25 mod and 20 DP and sometimes cut as few as
                                      5 teeth ,so at times the cutter speed could be around 400 rpm.
                                      There is some more information on my own hobbing setup in
                                      MEW 193.

                                      Aliexpress have 14 DP hobs in 20 deg PA and 14.5 deg PA around
                                      the £40 to £45 mark , both are 22 mm bore 50 mm long 55mm
                                      diameter, Arc euro used to sell these but no more.

                                      I think that it is fair to say that the hobbing unit you require would need to be
                                      tailored very much to suit the type of gears that you would wish to make.
                                      With cutters of about 2.500 inches in diameter the gear blank must stand
                                      far enough forward to clear any rotating part of the rotary table and for the
                                      cutter to cut past the face of the gear blank.From that point of view the
                                      Vertex table would be a poor choice as the body depth is 2.000 inches
                                      and the bearing surfaces are contained within this, a 4 inch chuck mounted
                                      on the table would be a total of 4.000 inches away from the table body
                                      add on the extra 1.250 to the gear blank for cutter clearance you have
                                      5.250 inches overhang on a total supporting bearing contained
                                      within 2.000 inches.
                                      As for the Elliot 5" universal dividing head i have no knowledge of this
                                      unit but you will be able to make your own decisions on this.

                                      John

                                      #544644
                                      Gary Glenn
                                      Participant
                                        @garyglenn52543

                                        Thanks for all the information Joe,

                                        Got interested in this from model engineers workshop 303,this is exactly what I could do with at home !

                                        The hobbing version , I just need the code to program to the nucleo board …the mechanics and electronics I can do and understand , Just the program code, I wouldn't know where to start !!

                                        If I could please get some assistance with that , I could get ordering the needed parts .

                                        Gary

                                      Viewing 18 posts - 1 through 18 (of 18 total)
                                      • Please log in to reply to this topic. Registering is free and easy using the links on the menu at the top of this page.

                                      Advert

                                      Latest Replies

                                      Viewing 25 topics - 1 through 25 (of 25 total)
                                      Viewing 25 topics - 1 through 25 (of 25 total)

                                      View full reply list.

                                      Advert

                                      Newsletter Sign-up