Making a Carriage stop for a lathe

Advert

Making a Carriage stop for a lathe

Home Forums The Tea Room Making a Carriage stop for a lathe

Viewing 25 posts - 1 through 25 (of 65 total)
  • Author
    Posts
  • #586321
    Steviegtr
    Participant
      @steviegtr

      I have just made a adjustable carriage stop for the Myford Super 7 lathe.. I am sure it could be adapted to fit any lathe. Please any forum members that think this is rubbish or not suitable for purpose. Please comment & tell me why , or what would be better.

      I love criticism.

      Steve.

      Advert
      #36760
      Steviegtr
      Participant
        @steviegtr

        This is mainly for a Myford but could be adapted to any lathe.

        #586323
        MikeK
        Participant
          @mikek40713
          Posted by Steviegtr on 20/02/2022 00:48:15:

          I love criticism.

          Steve.

          Get a haircut.

          #586324
          MikeK
          Participant
            @mikek40713

            Sorry, I posted that before I saw the video. I was making a joke, Steve.

            Mike

            #586325
            Steviegtr
            Participant
              @steviegtr
              Posted by MikeK on 20/02/2022 01:23:31:

              Posted by Steviegtr on 20/02/2022 00:48:15:

              I love criticism.

              Steve.

              Get a haircut.

              Well the barber said what will it be today. I said just a trim. He said what about the one hair left. I said leave it alone & let it grow wild.

              He replied ,,, anything for the weekend Sir.

              I said no thanks I have a bottle of Smirnoff.

              Steve.

              #586326
              Steviegtr
              Participant
                @steviegtr
                Posted by MikeK on 20/02/2022 01:44:37:

                Sorry, I posted that before I saw the video. I was making a joke, Steve.

                Mike

                No problem. I love the criticism so it went over my head.

                Steve.

                #586327
                Steviegtr
                Participant
                  @steviegtr

                  In fact you would not believe how many Forum members have contacted me privately By P.M & email to say they never post on this forum , because of the flack they get from the Professional's. You know the one's that never post a picture of anything they have actually made. The ones that google every answer that is asked. Never mind there are a few of us that actually are pretty clever but always get dis'd.

                  Steve.

                  #586328
                  Hopper
                  Participant
                    @hopper

                    Wow. Attitude much? It's a wonder you keep posting when things are that bad!

                    Criticism? Well, like such videos in general, 25 minutes of talking head waffling and tedious video of basic turning and drilling in the lathe and we get to the end and …. it's not finished yet! And we still don't know what the finished product looks like, and thus whether or not we might like to make one. "Wait for part two." You have got to be kidding. All this time invested — 25 minutes so far — to find out how you made a carriage stop, when the very simple concept could be grasped in 2.5 seconds via a photo or drawing of the finished item.

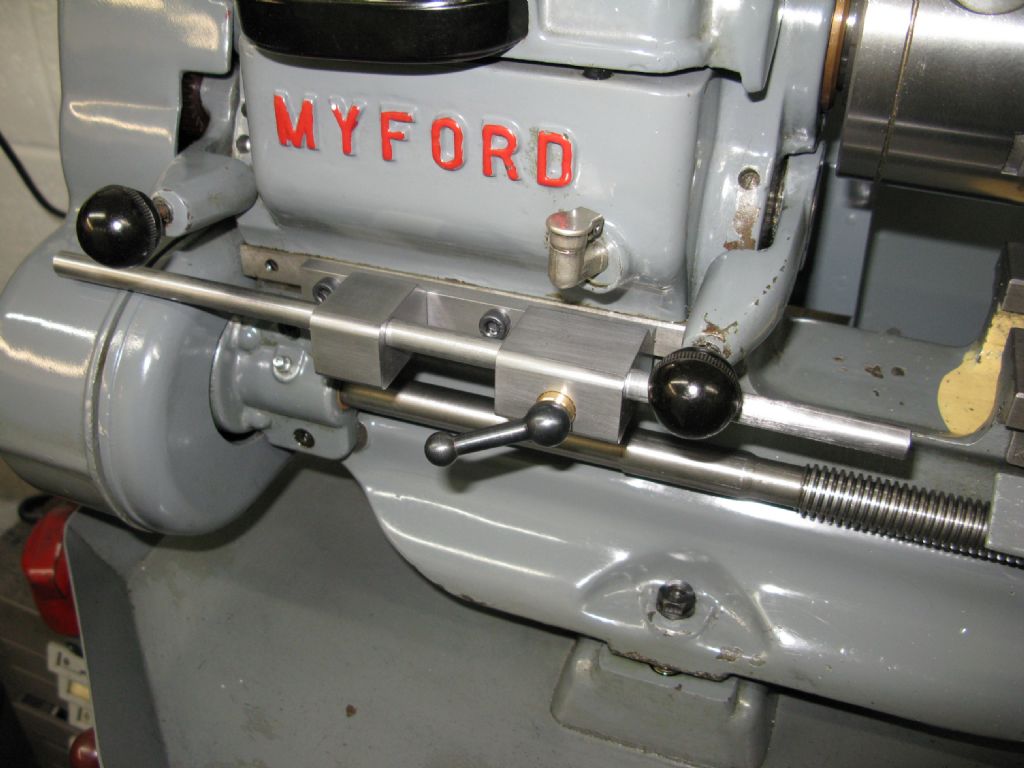
                    Here is the Myford carriage stop I made a few weeks ago, used for putting the calibration marks on a resettable cross slide dial I was making. The first pic of the basic "makings" showing the basic principle. Second photo showing the finished item after "tarting up". 2.5 seconds to grasp the basic principles and see how to make your own very simple version.

                    20211214_120616(1).jpg

                    20211216_173411.jpg

                    Technical details:

                    • Made from a bit of 20mm x 50mm flat bar about 75mm long. A 5/16" hole drilled lengthways for the piece of 5/16" threaded rod to pass through. Three nuts used to set position as shown.
                    • Two holes drilled and counterbored crossways to fit 1/4" BSF socket head cap screws. Screwed into one existing gearbox mount hole in the bed. Second hole spot drilled through the stop body and tapped 1/4 BSF to suit.
                    • Bit of brass hex bar turned and threaded to fit on the end so it's a bit kinder to the carriage where it hits.
                    • Shaped body on belt sander to make it look like an original casting.
                    • Painted with Bunning's cheapest Machinery Grey rattle can.
                    • Further extensions can be screwed on by replacing the brass hex with a builider's 5/16 joining nut, used to join two lenghts of threaded rod together when hanging suspended ceilings etc. Stop can be set all way to the left out of the way when not in use.
                    • End of.

                    Some basic story telling tips from a media professional that apply to making videos:

                    Start with a pic or video of the finished project so people know what we are talking about and where we are heading. A video of the piece in action is better than one of it just sitting there.

                    Keep talking head footage to an absolute minimum. Boring. Very, very briefly introduce yourself, then get the hell out of the way!

                    Stay on task. Have a prepared script and stick to it. No waffling on about stickers on the wall or side issues. Look at the way TV news reporters do their voice-overs, modulating their voice as they go and combining the voice with footage of the actual event/job going on.

                    Limit footage of mundane machining operations. We all know what it looks like to take a cut all the way along a 6" long piece of half inch bar, or to drill a hole all the way down the middle of it. It's the machining equivalent of watching paint dry. Instead, use editing software to show the start and basic set up of the machining and either show fast motion machining or cut straight to the end of the cut and show the finished result.

                    Do show details of any particularly unusual, special or tricky set ups and procedures, but again not going on and on in real time. Show the set up, the basic process, then cut to the end result.

                    Then at the end show it all being assembled and finally being used. Back to where you started in the opening scene of the finished item in use. In the trade, that is known as a "closer". Watch TV current affairs shows etc for this commonly used technique. It's ubiquitous.

                    We live in a fast paced world, and the net is even faster. Viewers want a quick take, not War and Peace.


                    Well, you did say you like criticism! And videos that take hours to convey minutes' worth of information are a pet peeve of mine. Apart from the fact that so many of them on machining are laughably wrong, made by relative beginners blissfully unaware of the clangers they are dropping. Here's a favourite of mine from the usually very good BlondieHacks. Have a look at the 6:30 minute mark involving a fixed steady and dial indicator, and you tell me what's wrong with that.


                    Edited By Hopper on 20/02/2022 04:15:13

                    Edited By Hopper on 20/02/2022 04:25:23

                    Edited By Hopper on 20/02/2022 04:30:42

                    Edited By Hopper on 20/02/2022 04:38:05

                    #586329
                    Chris Mate
                    Participant
                      @chrismate31303

                      What are your rules from experience with using a carriage stop-?
                      Spacial awareness:
                      I would like to make a "Carriage" stop that could sense pressure(Adjustable but accurate) to switch off the lathe, or disconnect the feed to prevent a crash if the topslide or crosslide were moved in such a way during the operation to cause a crash,.. to prevent a crash.

                      #586336
                      JasonB
                      Moderator
                        @jasonb

                        Well that is one advantage of Steve's over Hoppers. If you were to run the carriage into Steve's stop too hard the bristol lever would likely allow the stop to slip rather than hitting Hoppers solid stop.smiley

                        Edited By JasonB on 20/02/2022 07:15:54

                        #586340
                        Dave Wootton
                        Participant
                          @davewootton

                          Hi Chris

                          I haven't got any clever ideas for turning the machine off to prevent a crash, although I have used lathes that had a microswitch arranged to cut the power if the carriage reached the headstock ( Smallpiece Cromwell S800).

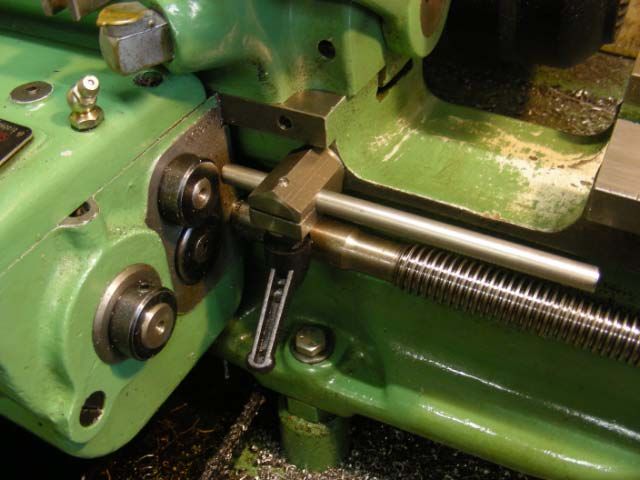
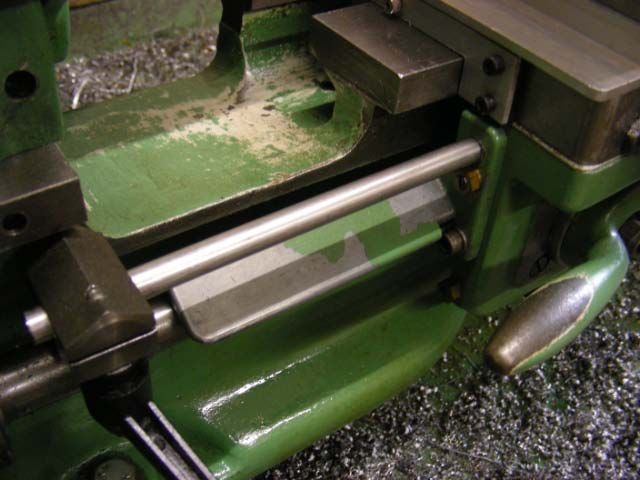
                          But I do use carriage stops all the time, and so far have not had any disasters, I attach a picture of a simple adjustable carriage stop I made when I had an ML7-R , the stop rod is locked by GHT Thomas's pet split clamp arrangement which will slip if it all goes wrong. I made two of these, one for a friends S7 who being quite new to the hobby was worried about a jam up and damaging the fibre feed gears. The stop rod in the one shown is 5/16" diameter , but for my friends the rod was made 3/8" diameter and drilled to take a smaller rod ( 9/32" from memory) so that this rod could telescope into the larger rod, It was cross pinned with a brass shear pin, again from memory 3/32", so in case of a disaster the shear pin would break allowing the stop to telescope and prevent damage. The size of sacrificial shear pin was entirely empirical, we started with 1/16" which sheared too easily and 3/32" seemed about right. My friend tells me it has been tested twiceand has worked!

                          I have not got a photo of the shear pin one, but attach one of the version on my machine, it required careful positioning to avoid the back gear lever. Obviously this is for a non gearbox machine, but the shear pin principle can be adapted to many other stop designs. Hope this gives a few ideas.001.jpg

                          Dave

                          #586360
                          Allen Norris
                          Participant
                            @allennorris97892

                            An interesting thread and I endorse Hoppers outline of helpful video production…….but he is also guilty of one of the greatest failings so for as I as a relative beginner am concerned. I refer to the Blondihacks example given. Now Quinn is way more experienced than I but Hopper says spot the mistake, fine but don’t leave beginners like me in ignorance, what in his opinion is the mistake? We all make mistakes, but unless someone kindly explains we will rarely learn from them!

                            #586366
                            Hopper
                            Participant
                              @hopper
                              Posted by Allen Norris on 20/02/2022 09:17:35:

                              An interesting thread and I endorse Hoppers outline of helpful video production…….but he is also guilty of one of the greatest failings so for as I as a relative beginner am concerned. I refer to the Blondihacks example given. Now Quinn is way more experienced than I but Hopper says spot the mistake, fine but don’t leave beginners like me in ignorance, what in his opinion is the mistake? We all make mistakes, but unless someone kindly explains we will rarely learn from them!

                              I left it so you can observe what is being done, think about it and maybe learn something, rather than just being told something. As nobody seems to have picked it up, look carefully at the 6.30 minute mark. She has a long slender job in the chuck, then puts a fixed steady on the far end of the job and adjusts the steady jaws up to a nice neat fit on the job. Then she puts a dial indicator on the half inch of bar sticking out past the steady and rotates the job. "Look at that — no runout".

                              Think about it. What is she measuring with that dial indicator? Right next to the end of the job held in place by the jaws of the fixed steady.

                              Answer: Absolutely nothing. The fixed steady is holding the job in one position. It is impossible for the job to do anything except show zero runout. That's what the fixed steady is for.

                              She should have checked the end of the job for runout BEFORE she put the steady on it. If the end of the job was running out of true, she should have got it running true and THEN put the steady on it. In fact, with a flimsy job like that, she should have set the fixed steady jaws in postition on the job right up next to the chuck, then slid the steady along to the far end and used it to set the far end running as true as the chuck end.

                              The way she did it, that end of the long thin job could be 10 thou or even 100 thou out of true, if the bar was say bent like a banana, or held crooked in the chuck. Then you put the fixed steady on the stationary far end of the job and that end is still 100 thou out of alignment with the axis of the lathe. But when you put a dial indicator on it like she did, it will read zero runout, as the long slender job flexes with each rotation and but the steady holds the end in one position.

                              A surprising slip up for a good operator like Blondie. But a common, common mistake on American videos. YouTube is full of Harley Davidson "mechanics" making the same error when truing a set of flywheels. They place the dial indicator right up next to the bearings the crankshaft is running on and pat themselves on the back for finding "no runout". But if they were to move the dial indicator three inches along to the far end of the cranks mainshaft, they would get a correct reading, and probably find many thousandths of runout.

                              Rule No 1 on using a dial indicator: Think very carefully about exactly what you are measuring. Blondie did not do that at minute 6.30.

                              And here's a YoutTube Harley guru making the same mistake. putting the dial indcator right next to the locating bearing. See the 10.02 minute mark.

                              #586372
                              Allen Norris
                              Participant
                                @allennorris97892

                                Fair point Hopper and now I understand thank you. I also took a look at the threads on this website covering the use and setting up of fixed steadies. The method you describe does seem to be that most favoured and I take the point about thinking about what one is actually measuring.

                                #586375
                                Hopper
                                Participant
                                  @hopper
                                  Posted by JasonB on 20/02/2022 07:15:29:

                                  Well that is one advantage of Steve's over Hoppers. If you were to run the carriage into Steve's stop too hard the bristol lever would likely allow the stop to slip rather than hitting Hoppers solid stop.smiley

                                  Edited By JasonB on 20/02/2022 07:15:54

                                  As I said in my post, my stop was made specifically for the purpose of putting the graduation lines on a set of resettable dials I was making for the Myford. It is designed NOT to move under impact so that the 100 small impacts as I put the 100 marks on each of the four dials I made will not result in the lines gradually getting longer as the stop moves.

                                  If you want a less solid stop, its just a matter of replacing the threaded rod and nuts wilth a piece of plain bar and putting a grub screw or clamp handle like Stevie's or Dave Wooton's examples.

                                  But my point was not how to make a stop. It was how the information could be grasped in 2.5 seconds in a couple pics and a paragraph of text, vs 25 minutes of video, to cover HALF the job.

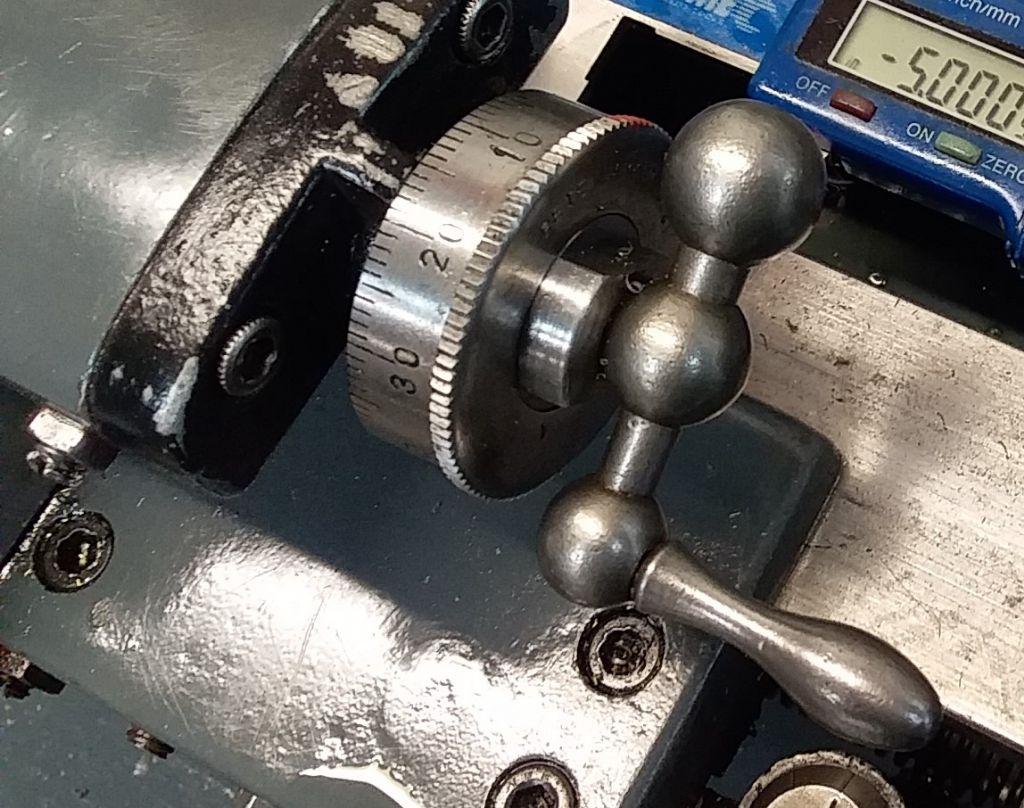
                                  FWIW here are the gradaution lines, below, on one of my dials the stop was used to cut. I went around the circumfrence once with the stop set for the short marks, missing out every fifth mark. Then advanced the top slide by the 30 thou to make the intermediate length marks at the un-numbered "5" points. Then advanced the topslide by another 30 thou to go around a third time and do the 10 long marks at the numbered "10" points.

                                  Much quicker and easier to keep track of than the traditional method of varying the length of lines every fifth line, then going back to the default short setting then back to the longer after another five lines and so forth. I had the job done in a matter of minutes for each dial. This method also means you are using the lathe bed and carriage to "plane" the marks on the dial, not some dicky little shopmade graduating tool that always has slack between the body and the plunger, which is exaggerated by the lenth of the toolholding bar and results in inconsistent depths of cut. This way, the cuts are as consistent as your lathe's main bed and carriage.

                                  dial.jpg


                                  As far as the safety factor of not crashing into a carriage stop under power, goes, the Drummond M Type has that beat. A leadscrew dog clutch with an actuating bar running the lenght of the bed, with an adjustable trip that can be set to disengage leadscrew at any point. Brilliant on long jobs. Set it up, set your cut going on a long job an walk away confident the feed will stop at the set point. Lovely! The ML7 was a step backwards.

                                  My next job is to make one for the ML7 because I got so used to it with the Drummond I consider it essential. Handy too for disengaging the change gears quickly so you can use the leadscrew handwheel, which if you don't have a QC gearbox is a right PITA. I will do this by making an  ML10-style dog clutch consisting of a sliding sleeve over the existing leadscrew. with a couple of driving pins and slots. Then add the bed-length "knock bar" and actuating trip that gets knocked by the advancing apron at the set point.


                                  Edited By Hopper on 20/02/2022 10:28:20

                                  #586384
                                  SillyOldDuffer
                                  Moderator
                                    @sillyoldduffer
                                    Posted by Allen Norris on 20/02/2022 09:17:35:

                                    An interesting thread and I endorse Hoppers outline of helpful video production…….but he is also guilty of one of the greatest failings so for as I as a relative beginner am concerned. I refer to the Blondihacks example given. Now Quinn is way more experienced than I but Hopper says spot the mistake, fine but don’t leave beginners like me in ignorance, what in his opinion is the mistake? We all make mistakes, but unless someone kindly explains we will rarely learn from them!

                                    This is the problem with Videos in a nutshell. When an internet video contain mistakes or bad practice there isn't a good way of pointing them out. Watched uncritically in hope of learning how stuff should be done, the inexperienced are liable to pick up bad habits and misconceptions. The reliability of internet videos is highly variable.

                                    The forum is better because it's interactive. Glad Allen asked Hopper to explain because I hadn't spotted Blondihack's mistake either! If I or anyone else gets something wrong in a post it's possible for other members to question and correct it. Peer review is a powerful way of improving quality and it's rarely applied to videos.

                                    Steve mentions forum members being unwilling to post in case they get flack from the 'professionals'. Sorry to hear that, because my feeling is this forum is friendlier than most: I've certainly found it extremely helpful. Being able to get expert answers to a wide range technical questions is incredibly valuable. In return I'm happy to share my imperfect skills and understanding. Fortunately I'm not interested in having my ego polished and don't take robust comment personally! I'm of the opinion Engineers should fix stuff when it's broke, not send for a good lawyer. We shouldn't get emotional, but hey – we're all human.

                                    With my moderator hat on, I read most new posts and rarely find abuse outside the Terms and Conditions and Code of Conduct.

                                    Dave

                                    #586390
                                    Hopper
                                    Participant
                                      @hopper

                                      Posted by SillyOldDuffer on 20/02/2022 10:53:08:

                                      …I'm of the opinion Engineers should fix stuff when it's broke, not send for a good lawyer. We shouldn't get emotional, but hey – we're all human.

                                      With my moderator hat on, I read most new posts and rarely find abuse outside the Terms and Conditions and Code of Conduct.

                                      Hear hear. And I hope Stevie did not think I was having a go at him. He did say he "loves criticism" so I was merely obliging, whilst admittedly indulging a pet peeve of my own.

                                      I am sure there must be videos and other information online about "How to Make a Video Presentation" etc. It's a well established trade in TV land and like all trades there are simple tricks and techniques that can be learned to move towards professional quality work. Just like Blondie and Joe Pie etc do for machining, some TV videographer types must be sharing their tips out there somewhere. All I know about it is from being a print journalist and photographer/designer. Same principles but different medium. But it's obvious in which direction my biases lie.

                                      #586391
                                      ega
                                      Participant
                                        @ega

                                        I haven't yet viewed the OP's video but here are photos of my own very simple and long-established carriage stop for the gearbox Myford:

                                        dscn2018.jpg

                                        dscn2019.jpg

                                        A previous owner had put a tapped hole in the bed which provided a mounting point and I have stop rods in varying lengths to suit the job. A split collet would be more elegant than the clamp; I don't recall testing its yield point in a jam-up.

                                        #586402
                                        Nick Wheeler
                                        Participant
                                          @nickwheeler

                                          And here's mine for a WM250:

                                          flutedknob.jpg

                                          I made that a couple of days after getting the machine. It's 1" aluminium bar, with a notch to fit over the bed, a pinned clamp plate operated by the lever, and a sliding rod clamped by the brass knob. 7 years use suggests that steel would be better as the aluminium has spread. The rod adjustment was a waste of time, because there's no sensible way of adjusting accurately, and adding/removing shims is not going to happen. It was intended to be easy to make from stock I had, and to never need a tool in use which is always a requirement for me. It means I use it most times I turn on the lathe.

                                          I might modify some of the micrometer adjustment designs for my machine later.

                                          #586415
                                          John Hinkley
                                          Participant
                                            @johnhinkley26699

                                            When I started putting up videos on YouTube at the beginning of lockdown to keep me from going "stir crazy", I was transported back thirty years to a presentation skills course I had to attend ( luckily only one day long, so you can imagine the range of skills they were able to impart ). The one thing I did remember though was the following mantra regarding giving a short lecture:

                                            First, tell them what you're going to tell them.

                                            Then, tell them.

                                            Followed by tell them what you just told them.

                                            It's a formula followed by, amongst others, broadcast media news outlets. I tried to follow that code with, I think, limited success. I also tried to cut out the boring bits as suggested by Hopper.

                                            John

                                            #586423
                                            MikeK
                                            Participant
                                              @mikek40713

                                              Posted by SillyOldDuffer on 20/02/2022 10:53:08:

                                              When an internet video contain mistakes or bad practice there isn't a good way of pointing them out. Watched uncritically in hope of learning how stuff should be done, the inexperienced are liable to pick up bad habits and misconceptions. The reliability of internet videos is highly variable.

                                              The forum is better because it's interactive. Glad Allen asked Hopper to explain because I hadn't spotted Blondihack's mistake either! If I or anyone else gets something wrong in a post it's possible for other members to question and correct it. Peer review is a powerful way of improving quality and it's rarely applied to videos.

                                              I agree. Although I would argue that Internet videos are consistently bad with a few good ones tossed in.

                                              I'm American and I have to say that this forum is very good. Forums dominated by my fellow Americans can be brutal. Also – and I'm guilty of this at times – they too often don't read everything…Not reading previous posts and even not fully reading the original post. It's aggravating. It seems obvious to me that people who reply *here* have thoroughly read previous posts, the original post, and make well informed replies instead of a quick "well that's dumb, just do X!"

                                              I hope the members who shy away from posting here would develop a little thicker skin and reconsider. Although I did spot the error in the Blondihacks video I appreciate everything Hopper has said….I hope Steve does too.

                                              Sorry for the distraction.

                                              Mike

                                              #586428
                                              Emgee
                                              Participant
                                                @emgee

                                                If viewing videos on Youtube it is very simple to use the Settings box to view at 1/4 speed or 2x speed, also with the cursor over the Time line you can view ahead for the next operation if a machining video, you only have to use the left mouse button to jump to the cursor position.

                                                The video owner is able to check amount of viewing time, and other data per visit to the video, it is surprising the number of viewers who will watch an entire video even though some machining operations are quite long and repetitive.

                                                Some months ago I did ask what people wanted from a video, response was very useful and the advice taken on board.
                                                I have quite a few videos on my Youtube channel but only appear in some shots where a reflected image is seen on the chip screen, or on a few occasions when inspecting the job or tool changing when the back of my head appears in shot.

                                                Emgee

                                                Edited By Emgee on 20/02/2022 14:34:23

                                                Edited By Emgee on 20/02/2022 14:35:11

                                                #586430
                                                Nicholas Farr
                                                Participant
                                                  @nicholasfarr14254

                                                  Hi, I did notice he was measuring the run out while it was being held by the steady, but I see this has been explained already and yes you need to have the end running true before you set the steady onto the work.

                                                  Regards Nick.

                                                  #586431
                                                  John Hinkley
                                                  Participant
                                                    @johnhinkley26699

                                                    Emgee,

                                                    You're right about the skipping through facility in YouTube of course and looking at the analytics on my channel, viewers are taking great advantage of it – on average I guess only about 40% of my efforts are actually seen. I wonder if it's worth doing!

                                                    Oh, and don't you just hate it when people drag the thread off-topic!!! Sorry, Steviegtr!

                                                    John

                                                    #586441
                                                    SillyOldDuffer
                                                    Moderator
                                                      @sillyoldduffer
                                                      Posted by Steviegtr on 20/02/2022 00:48:15:

                                                      Please any forum members that think this is rubbish or not suitable for purpose. Please comment & tell me why , or what would be better.

                                                      I love criticism.

                                                      Steve.

                                                      Good news, there's much to like in Steve's video, and I didn't see anything unsafe! I particularly like his slow Yorkshire presentation and the absence of camera wobble and other common production faults.

                                                      Many improvements possible though and Hopper's list of basic story telling tips from a media professional are spot on. By applying them, I think the whole Carriage Stop story and design could be done and dusted comprehensively in under 20 minutes.

                                                      I did wonder which audience Steve is aiming at? The title 'Myford Adjustable Carriage Stop' strongly suggests a practical project for Myford owners advanced enough to know what a carriage stop is. However, the video's content often veers into 'explore the workshop' and 'basic introduction' territory. All interesting, but not mixed together! An improvement would be to edit out irrelevant stuff like the stickers and unfocussed comments like 'lot of letters printed on it', and 'we're not in a hurry, well I'm not…' A script would tighten up the commentary. I prefer to talk to a bullet list: they keep me on topic and allow ad-libbing. Scripts make me sound wooden.

                                                      There are a few mildly unfriendly items that might confuse beginners:

                                                      • Using random scrap is generally a bad idea because not all metals machine well. In fact many alloys are horrible. Giving newbies the idea that scrap will cut OK on a lathe is unhelpful. I'd make the Carriage Stop out of free-cutting mild-steel. Instead, Steve goes for a work-hardening Stainless that becomes "red hot" and mentions two other difficult metals – Titanium and Phosphor Bronze. The project is based on metal he happens to have rather than metal selected to do the job. Working with awkward materials is a video in it's own right.
                                                      • When turning stainless (with an interrupted cut!), Steve says he doesn't know what the correct speed should be. The video would be better if details like that, and the unfinished plan, were sorted out before filming started.
                                                      • The implication that a DRO Tailstock is necessary is misleading. Nice to have maybe though I've never felt the need.
                                                      • Flipping the hex bar in the 3-jaw chuck at about 12:45 causes an avoidable mismatch where the cuts meet. Not the end of the world, but misses the chance to discuss whether or not it matters, and what to do if it does! Being lazy, I'd have dodged the interrupted cut and chuck flipping error by not rounding the hex bar off at all.

                                                      Certainly not rubbish!

                                                      Dave

                                                    Viewing 25 posts - 1 through 25 (of 65 total)
                                                    • Please log in to reply to this topic. Registering is free and easy using the links on the menu at the top of this page.

                                                    Advert

                                                    Latest Replies

                                                    Home Forums The Tea Room Topics

                                                    Viewing 25 topics - 1 through 25 (of 25 total)
                                                    Viewing 25 topics - 1 through 25 (of 25 total)

                                                    View full reply list.

                                                    Advert

                                                    Newsletter Sign-up