Adding coloured infill to embossed graphics?

Advert

Adding coloured infill to embossed graphics?

Home Forums 3D Printers and 3D Printing Adding coloured infill to embossed graphics?

Viewing 21 posts - 1 through 21 (of 21 total)
  • Author
    Posts
  • #646984
    John Doe 2
    Participant
      @johndoe2

      I have 3D printed some items in PLA into which I have embossed numbers, by extruding them into the item by 1mm to leave a 'trench' in the surface in the shape of each number.

      Now I want to fill each number with a contrasting colour to make them contrast visually, and am wondering about the best way to do this.

      I originally thought I would drip paint or ink in to fill up each number, but the 'trenches are very thin – maybe 0.7mm, and I just know that I will get paint outside the number and not be able to clean it off neatly, leaving an untidy ragged finish.

      Any suggestions? I have also wondered about coloured wax, but again, am not sure if it would easily clean off the surrounding surface neatly – especially since the printed surface is not perfectly smooth but full of minute 'furrows' where the filament was laid down on successive passes.


      Edited By John Doe 2 on 30/05/2023 15:28:46

      Advert
      #31730
      John Doe 2
      Participant
        @johndoe2
        #646988
        lee webster
        Participant
          @leewebster72680

          I recently bought some mettalic ink pens to see if I could colour small 3D printed resin parts. It worked surprisingly well. I don't know if it would work on PLA.

          #647001
          DC31k
          Participant
            @dc31k
            Posted by John Doe 2 on 30/05/2023 15:24:21:

            I originally thought I would drip paint or ink in to fill up each number

            Hypodeemic nerdle and syringe.

            Coat a flat surface with water-soluble paint. Press the item onto it like a stamp. That will cover the non-filled bits with paint. Splash non-water soluble stuff around until the trenches are full. Wash off original paint and any overspill. Test on non-critical item first. The 'real deal' stuff is called 'masking fluid'

            #647024
            John Hinkley
            Participant
              @johnhinkley26699

              Well, I suppose the expensive solution is to buy a printer with two nozzles! However, more cheaply, is it possible to print the "base" article with the text, say 2mm deep and then extract the text only from your original design from Fusion, Alibre or whatever as a separate STEP file? Print the text to a thickness of 2mm in the contrasting colour and glue the resulting text into the cut-outs in the base material. Can you tell that I don't have a 3D printer (yet)?

              Google "two-colour 3D printing" and it throws up several YT videos to watch.

              John


              Edited By John Hinkley on 30/05/2023 17:19:49

              #647025
              John Doe 2
              Participant
                @johndoe2

                Good ideas so far, many thanks. I will try the last one, as it will have the least chance of me messing it up and getting paint where it shouldn't be.

                Me and paint don't get on very well……..

                #647037
                Keith Pink
                Participant
                  @keithpink61173

                  I've used Edding paint pens for some of my infills – they do a very fine nib version too

                  #647049
                  pgk pgk
                  Participant
                    @pgkpgk17461

                    Masking fluid then clean up any number edges before filling with paint
                    Then use acrylic paint for sharp edges.?

                    pgk

                    #647055
                    Peter Cook 6
                    Participant
                      @petercook6

                      I made a switch panel in the same way. After printing I filled the trenches with enamel paint. After the paint dried hard (48 hours) I used fine wet and dry to sand the top surface smooth. That removed the fine lines of the printing, and any paint that had spread.

                      Enamel paints go harder than acrylics, so give a better edge.

                      Edited By Peter Cook 6 on 30/05/2023 20:26:59

                      #647076
                      John Doe 2
                      Participant
                        @johndoe2

                        Ah, OK, what grit wet & dry? And did it give a nice crisp edge to your graphics?

                        #647092
                        JasonB
                        Moderator
                          @jasonb

                          When doing it to metal I just rub the part on a sheet of 1000g wet & dry to clean any paint off the raised areas,


                          Edited By JasonB on 31/05/2023 08:48:45

                          #647113
                          John Doe 2
                          Participant
                            @johndoe2

                            Am just thinking that any paint or ink might run along the tiny furrows between the filament ridges around the number 'troughs' in my 3D printed items and prevent a crisp edge?


                            Edited By John Doe 2 on 31/05/2023 12:06:04

                            #647116
                            Gerard O’Toole
                            Participant
                              @gerardotoole60348

                              I have done the reverse, printed raised lettering in a different colour. Cura will allow you to stop the print at a certain level and change the filament.

                              Could you try printing a layer in a contrasting colour at the depth of the embossing? I haven't tried this but it might work

                              #647127
                              Shugs
                              Participant
                                @shugs

                                I have used the old style tri. laminated plastic label principle. Set to print 6 top layers, colour change for layers 3 & 4, change back for layers 5 & 6. This does mean that the colour of 3 & 4 will show around the edge of print, which can be painted, inked or felt tip penned over.
                                The number of layers are just an example and can be adjusted to suit.

                                #647136
                                John Doe 2
                                Participant
                                  @johndoe2

                                  Now those last two ideas are very good – I had not thought of that.

                                  Too late for this particular print, (which took 19 hours), but I will certainly remember it for next time.

                                  #647139
                                  Journeyman
                                  Participant
                                    @journeyman

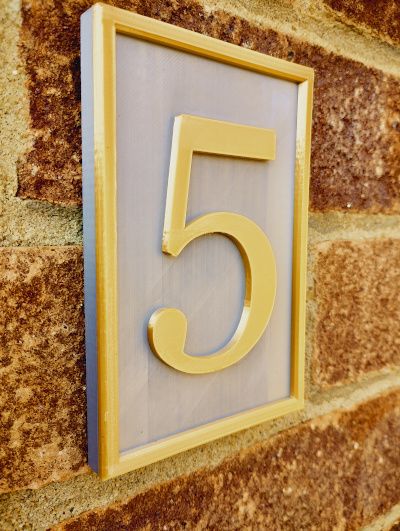
                                    I have had some success with multi colour printing for numbers, probably a bit larger than you require but this house number was printed in grey and gold PLA simply stopping the printer at the required height to change the filament.

                                    numfive.jpg

                                    The printer software allows for the stop and you set it it at the required height (number of layers) this was done using the Prusa Slicer software. Fading a bit now will need re-doing.

                                    John

                                    #647171
                                    John Doe 2
                                    Participant
                                      @johndoe2

                                      Nice print !

                                      My graphics are sunk in rather than being proud of the surface – I can't think of the word to describe that, inverse embossed, I suppose.

                                      I originally intended to drip ink or paint in, to fill the numbers, but I now worry that I will mess it up.

                                      #647191
                                      Peter Cook 6
                                      Participant
                                        @petercook6
                                        Posted by John Doe 2 on 31/05/2023 00:30:34:

                                        Ah, OK, what grit wet & dry? And did it give a nice crisp edge to your graphics?

                                        I think I used 600 grit to start, then finished with 1200. I think I smoothed of the surface to get rid of the print lines before filling with paint, then after the paint went hard repeated the smoothing.

                                        Graphics were more than adequate for my purposes, but nothing like exhibition standard.

                                        panel.jpg


                                        Edited By Peter Cook 6 on 01/06/2023 12:13:21

                                        #647211
                                        Journeyman
                                        Participant
                                          @journeyman

                                          If you have the original drawing would it be possible to extract just the text and then print just that in the required colour and then insert into the depression with a suitable adhesive. Print at half the height of the text depression and then you will still have an engraved and filled look. Depends a bit on the size but printing at 0.5mm or thereabouts is doable. Just depends whether the text is wider than the nozzle width.

                                          John

                                          #647212
                                          Clive Hartland
                                          Participant
                                            @clivehartland94829

                                            Old style,coloured wax fillings were applied hot allowed to harden and then the wax rubbed off with a slightly oily cloth. That was back in 1952.

                                            #647234
                                            Jon Lawes
                                            Participant
                                              @jonlawes51698

                                              I'm about to use exactly that technique on a Fairey Swordfish instrument panel Clive. Engravers Wax.

                                            Viewing 21 posts - 1 through 21 (of 21 total)
                                            • Please log in to reply to this topic. Registering is free and easy using the links on the menu at the top of this page.

                                            Advert

                                            Latest Replies

                                            Viewing 25 topics - 1 through 25 (of 25 total)
                                            Viewing 25 topics - 1 through 25 (of 25 total)

                                            View full reply list.

                                            Advert

                                            Newsletter Sign-up