Scrap yard steam engine

Advert

Scrap yard steam engine

Home Forums Work In Progress and completed items Scrap yard steam engine

Viewing 15 posts - 1 through 15 (of 15 total)
  • Author
    Posts
  • #315976
    Jon Cameron
    Participant
      @joncameron26580

      20170906_115208.jpg20170906_115014.jpgOk I'm cheating a little as I already have a boiler, and firebox. Collected lots of steam related bits and chunks of metal.

      <);" />
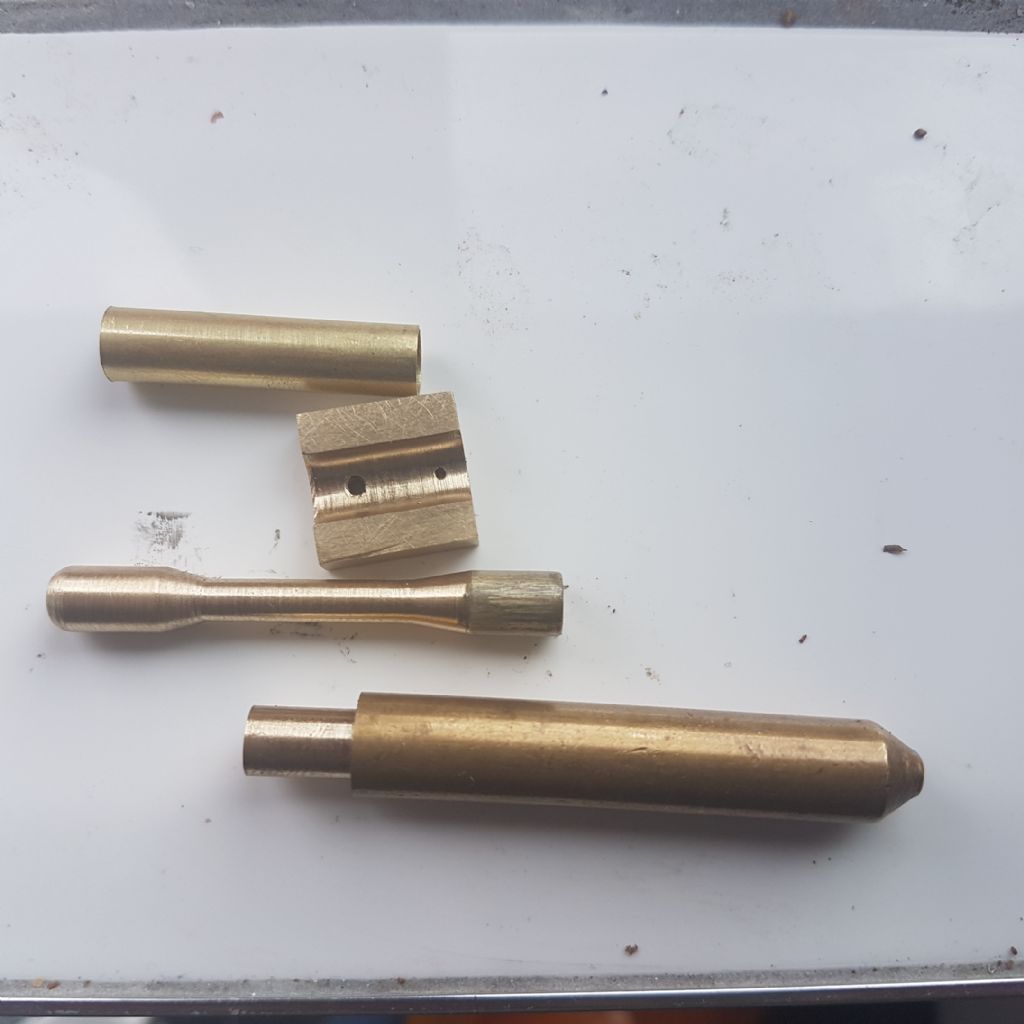
      <);">I've been looking at what may be possible with the bits I have. I have lots of drills and reamers but not many pairs if you get what I mean. I've got a 5/16" MT1 drill and reamer. Also a 19/64" MT1 drill. So I can drill undersized and ream the bore out. A small 4mm dia steel rod for the connecting rod. And a 3/8" piece of brass which should be enough to make the piston, end cap, cylinder. Which will be soldered to a 2mm piece of flat brass as picture. I need to buy a 6BA die, as I have a tap but no die, to make the connecting rod, failing that a press fit.


      The fittings for the boiler may have to be remade if I can't identify the threads. So these may end up been more common sized thread 40 or 32TPI. I'll have enough brass to make a simple spring safety valve, and I have a few pieces of 1/8" copper pipe to allow the steam where it needs to go. I haven't decided how to do the burner yet. I have a choice of different ways. So I'll get to that once I've finished the rest.


      The lot will be mounted on a hard brass sheet, then plywood, again these materials were all got for nothing. So it really is the junk yard steam engine.


      First job will be to clean up the boiler, and get rid of the excess solder where a chimney once mounted.

      Edited By Jon Cameron on 08/09/2017 19:57:35

      Edited By JasonB on 08/09/2017 20:12:33

      Advert
      #31184
      Jon Cameron
      Participant
        @joncameron26580

        First project a simple oscillator

        #315977
        Jon Cameron
        Participant
          @joncameron26580

          Well progress. Started out by cutting a lump of brass to form the face for the cylinder. Chucked it in the 4 jaw so I could centre it and turned two of the jaws around to give me a flat surface for the piece to mount against. Then faced off the ragged edge. Once both sides were done, turned it around and food the other side, then the jaws were put back right. And the piece turned 90 degrees to do the bore. I realised at that time I had too smaller piece to make two as planned, so off set it in the jaws. With a packing piece at one side. Once finished I faced off and then centre drilled before drilling out. As it stands now but got called away.

          Edited By Jon Cameron on 08/09/2017 20:53:02

          #315982
          Roger Clark
          Participant
            @rogerclark

            Hi Jon,

            Link doesn't work

            #315993
            Jon Cameron
            Participant
              @joncameron26580

              20170906_145947.jpg20170906_141903.jpg

              Photos for above post

              #315994
              Jon Cameron
              Participant
                @joncameron26580

                20170906_134458.jpg

                #315999
                Jon Cameron
                Participant
                  @joncameron26580

                  20170906_162219.jpgscrapped that one off, the bore isn't straight. My own fault as the drill wandered to path of least resistance. I tried to do the relief in the face on the lathe which was a good idea and looked good but left very little meat in the brass for drilling and boring. The drill broke through and then decided to wander off course. *Will buy some 5/8" Brass bar tomorrow from M machine and do it again. With 5/8" they'll be more meat left over for the bore, then it's just a job of cut and bore as I did today-badly. At least its not cost me yet. I had some hard brass tube if I can find this it will be better? As it'll save me messing around boring and reaming. Just need to turn a piston to fit.


                  Edited By Jon Cameron on 08/09/2017 21:20:00

                  #316003
                  Jon Cameron
                  Participant
                    @joncameron26580
                    Here's a talk through the pieces of brass and steel I have and what I'm planning
                    #316004
                    Jon Cameron
                    Participant
                      @joncameron26580

                      Since I had problems first time I started again with the port face. All six sides turned square. Old Carling cans cut up and been used as packing to protect the finish of the sides against the jaws of the chuck. If anyone wants to donate me some cans feel free, preferably unopened lol


                      I also turned some steel bar down to fit the bore of the tailstock as it had become a nuisance already when they got stuck in there. Upto two hours of work on the lathe today, including maintanance taking one of the links out the belt to tighten it up, it wad too slack and when drilling the bore yesterday nearly came to a full stop. So i was loosing a lot of power from the motor, not to mention probably wearing my new belt already.


                      Just got to face off a bit more, removing that drill hole, then will be offset in the jaws and drilled for 6BA on two opposing sides, then turned 90 degrees to centre and drill for the bore, then cut in half and file the cut edges flat

                      20170907_142409.jpg

                      #316005
                      Jon Cameron
                      Participant
                        @joncameron26580

                        20170908_101303.jpg20170908_101259.jpgTake 2.


                        Well continued with the port face today for the cylinder, this is how it looks at present, the holes been drilled through for the steam inlet and outlet, (this is a wobbler remember) the trunioun bolt hole been drilled to 2mm then tapped 6BA, (yes i know it should have been 2.3mm but didn't have it, been brass I was cross fingered I'd get away with it and almost did.


                        As per pictures first attempt, tap got jammed because I hadn't unlocked the tail stock, and it stripped the thread. Turned the piece around been mindful to only adjust two of the four jaws. Then started again, this time unlocking the tailstock when the tap had bit, and turning the flywheel of the lathe to let it travel up and down doing it's job. Doing this now, saves me having to worry about drilling depth, since I don't have any reference on the tailstock just yet. The steam hole is drilled 1mm and will be transfered to the cylinder tube onceassembled.The bore is next.20170908_101253.jpg

                        #316006
                        Jon Cameron
                        Participant
                          @joncameron26580

                          20170908_141757.jpg

                          Well thats me done for the day in the shed eyes are getting tired. Off for a cuppa and some food.*


                          Have a nicely fitting piston that just needs drilling for the crank pin. A port face and cylinder. The 3/8" Brass is now a nice fit on the end of the cylinder so will be faced off to size and then the end cap for the cylinder is done too. Then it's solder it together and I have a piston made


                          20170908_112234.jpg

                          Edited By Neil Wyatt on 12/09/2017 09:38:58

                          #316007
                          Jon Cameron
                          Participant
                            @joncameron26580

                            Ah go on then may as well finish the parts off20170908_153816.jpg

                            #316575
                            Jon Cameron
                            Participant
                              @joncameron26580

                              20170911_154839.jpg20170911_154833.jpgWell somewhat fed up today, everything's gone wrong.


                              Went into the shed, and went to turn my "soft" centres down to a point, they had been a bit rounded, broke my sharpest cutting bit. Dug around and found another rounded end One, no good for the job at hand so.abandoned that idea, for a couple of quid and less hassle I'll just buy two new ones.


                              Anyhow. With the rounded end cutter the brass machined beautifully and turned a plummers end plug down to start on a crank, this didn't go so well either, having got the brass to the required diameter I drilled the hole. After i had got a wonderfully fitting shaft into the hole, realised that id actually made a bearing instead of a crank, as the hole was to be offset. Oh well put that to one side. Start again.


                              Machined to diameter again then off set the round in the four jaw. Drilled the hole, drill wobbling! Sigh, carry on regardless taking it slow to see what happens. Got it drilled and turned to drill the other side at 2mm for the crank pin. When I finished tried the hole and it was tight fit, then i realised the spotting drill mustn't have been aligned correctly in the chuck, basically second attempt knackard. Results as shown and now can't get my shaft out.


                              Given up today, but not before getting the tailstock aligned. It was out slightly out of alignment.20170911_145853.jpg

                              Edited By Neil Wyatt on 12/09/2017 09:36:15

                              Edited By Neil Wyatt on 12/09/2017 09:36:45

                              #316625
                              Neil Wyatt
                              Moderator
                                @neilwyatt

                                Hang on in their Jon, it will all come right!

                                Glad you seem to have got the font size back to (nearly) normal. If composing your comments in another program, try using the 'paste from word' or 'paste as plain text' buttons above the edit window.

                                Neil

                                #316627
                                Jon Cameron
                                Participant
                                  @joncameron26580

                                  Sorry about that, I’m posting this build on a couple of forums, it’s the copy and paste that’s all messing it up. I’ll figure it out eventually, just be patient with me

                                  I’ll be coming back to the crank later, I have another idea on how to do it, which should hopefully keep everything aligned much better. Got a flywheel to do next, just got to sharpen some cutting tools.

                                Viewing 15 posts - 1 through 15 (of 15 total)
                                • Please log in to reply to this topic. Registering is free and easy using the links on the menu at the top of this page.

                                Advert

                                Latest Replies

                                Viewing 25 topics - 1 through 25 (of 25 total)
                                Viewing 25 topics - 1 through 25 (of 25 total)

                                View full reply list.

                                Advert

                                Newsletter Sign-up