Play in new arbour for mill

Advert

Play in new arbour for mill

Home Forums General Questions Play in new arbour for mill

Viewing 25 posts - 1 through 25 (of 31 total)
  • Author
    Posts
  • #660294
    Antony Harding
    Participant
      @antonyharding74298

      Hi,

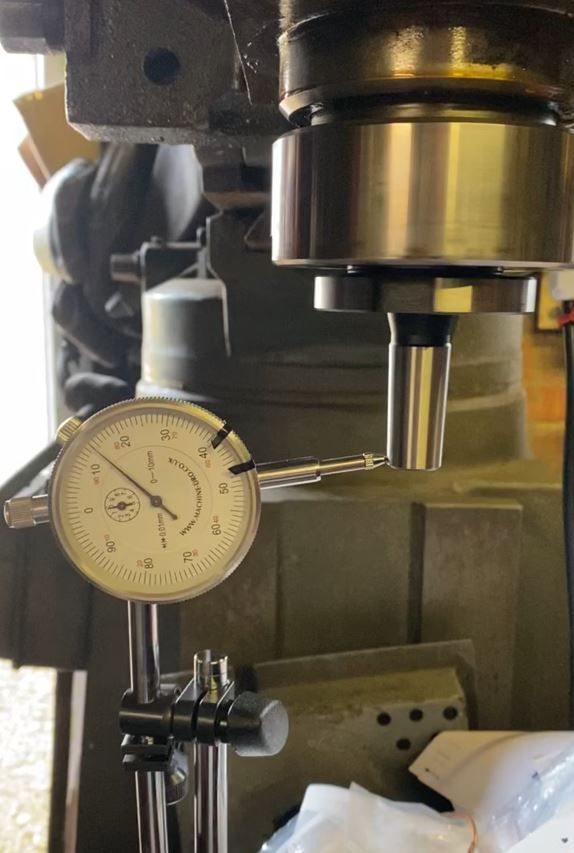
      Have a question, I am new to milling but got myself a 2nd hand mill and just bought a new Arbour and Drill Chuck for it. Before joining the two together I put an indicator dial on outgoing shaft of the arbour while in the mill rotating. The "play" in the shaft was about 1.5mm. I tried to reseat the arbour a couple of times but 1.5mm play was the best of all three times.

      Would you say this is not bad "play" for a £50 arbour ??? or should I return it and ask for another one?

      Advert
      #29379
      Antony Harding
      Participant
        @antonyharding74298
        #660296
        Diogenes
        Participant
          @diogenes

          What size and fitting is it?

          ..that sounds rather a lot of money for a drill chuck arbor..?

          #660298
          John Haine
          Participant
            @johnhaine32865

            Totally unacceptable. Return it and get a refund. 0.15mm would be just about ok.

            #660299
            JasonB
            Moderator
              @jasonb

              I'd say it is a masive error for a £10 arbor let alone a £50.00 one. Should be looking for about 0,015mm or less.

              Have you checked the spindle and/or something else in the taper to see if the 2nd hand machine is the problem?

              How many divisions on your gauge was the needle actully moving, sounds like you may be reading it wrong unles steh needle was making about three ful revolutions.

              Edited By JasonB on 16/09/2023 19:31:48

              #660300
              Pete
              Participant
                @pete41194

                Exact and more details are important, terminology is as well. Since you mentioned checking with an indicator I suspect you mean run out and not play as each has completely different meanings. But if you mean play as in the arbor is still loose? As Diogenes asked, what spindle taper is the machine? And 1.5 mm / .060" shows something is very wrong. Unusable in fact. At most it should be around .025 mm / .001" or less for a decently ground arbor. Either you have bought the incorrect arbor taper for it, or on something like a R8 taper machine, possibly the spindles internal key isn't engaged with the side slot in the arbor. If it is R8? The arbors front taper should be pulled up fully within the spindle taper and almost flush with the end of the spindle. About all you should then see is the bottom taper that accepts the drill chuck taper below the spindle nose. That can only be done if the side slot is indexed properly to engage with that internal key.

                #660301
                SillyOldDuffer
                Moderator
                  @sillyoldduffer
                  Posted by Diogenes on 16/09/2023 19:06:30:

                  What size and fitting is it?

                  +1

                  A photo would help.

                  I'm wondering what the word 'play' means. My first thought was run-out, that is the arbour axis is misaligned with the mill's spindle axis. If so 1.5mm is huge! Second thought is 'play' means the socket goes part way in, and there's an all round gap in which it rocks. If so that suggests the tapers are mismatched – the arbour's male taper doesn't match the taper in the mill's socket. Several different tapers are available, and identifying them often causes bother.

                  Dave

                  Edited By SillyOldDuffer on 16/09/2023 19:54:46

                  #660303
                  JasonB
                  Moderator
                    @jasonb

                    Earlier posts seem to suggest INT40 in a Beaver Mill

                    #660304
                    Antony Harding
                    Participant
                      @antonyharding74298

                      Hi guys – sorry yep its a INT40 in a Beaver Mill. Give me 2mins will try and post a photo of the dial.

                      #660305
                      Antony Harding
                      Participant
                        @antonyharding74298

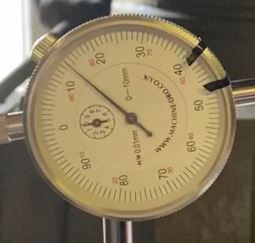
                        dial 01.jpg

                        Hi, so hopfully i am readying the dial correct… the movement is from 0 to 15. I take that as 1.5mm.

                        Will see if i can get a screenshot of the "set-up" i done.

                        #660306
                        Antony Harding
                        Participant
                          @antonyharding74298

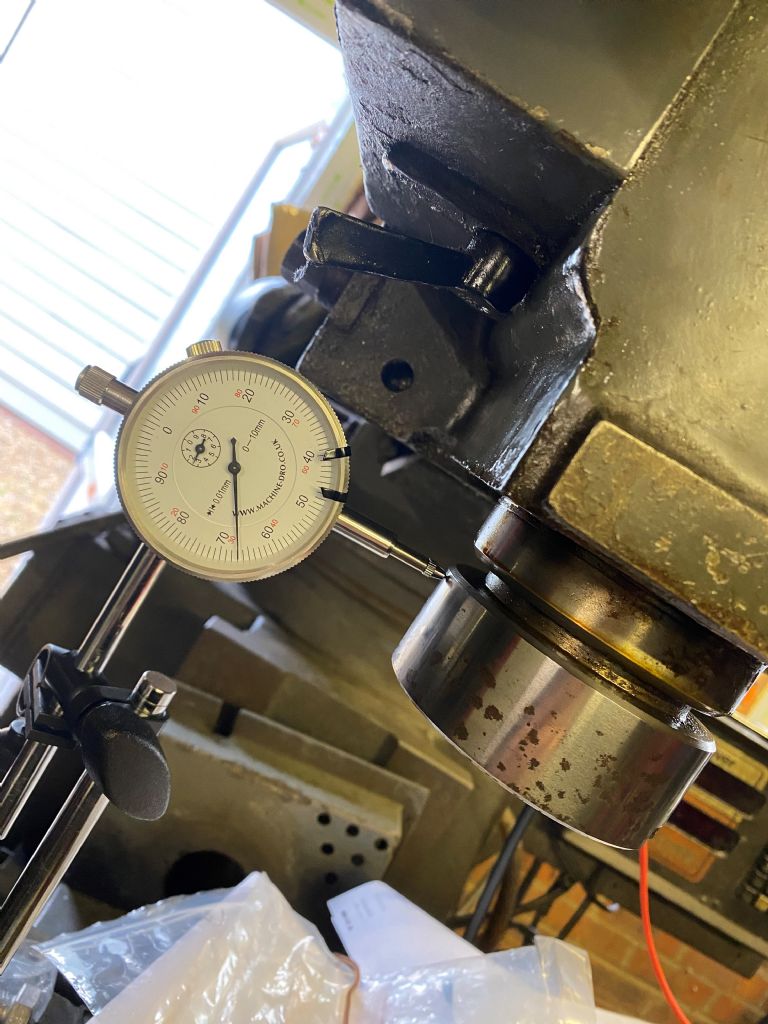
                          dial 02.jpg

                          #660307
                          John Haine
                          Participant
                            @johnhaine32865

                            Each small division round the large scale is 0.01 mm as is printed across the dial. So that's 0.15mm TIR which isn't bad though not wonderful.

                            #660308
                            JasonB
                            Moderator
                              @jasonb

                              Yep 0.15mm whch is still not that good,

                              Put the indicator into the spindle taper and see what that reads.

                              #660310
                              Antony Harding
                              Participant
                                @antonyharding74298

                                Hi guys,

                                I throught as the dial noted 0 – 10mm each "10" was 1mm. I take it I was completely reading this incorrectly.

                                The internal face of the INT40 and the arbour face look fine, I cleaned them and wiped them down with cleaner to get rid of any oils.

                                Would you agree its best to send this back and ask for another arbour ?

                                #660311
                                Michael Gilligan
                                Participant
                                  @michaelgilligan61133
                                  Posted by Antony Harding on 16/09/2023 20:44:21:

                                  Hi guys,

                                  I throught as the dial noted 0 – 10mm each "10" was 1mm. I take it I was completely reading this incorrectly.

                                  […]

                                  .

                                  I think you have probably ‘got it’ now, Antony … but the 0 – 10mm reference means the total travel is 10mm

                                  … The little dial counts rotations of the big one.

                                  MichaelG.

                                  #660312
                                  DC31k
                                  Participant
                                    @dc31k
                                    Posted by Antony Harding on 16/09/2023 20:44:21:

                                    I thought as the dial noted 0 – 10mm each "10" was 1mm.

                                    The internal face of the INT40 and the arbour face look fine

                                    That is the trouble with thought, it can mislead you. Best not to think but to test the indicator with something of a known dimension (thickness) and see how much the indicator moves. For instance, a search could tell you the thickness of every coin that is legal tender in the UK. Passing one of each of those under the indicator would teach you a lot.

                                    Given how badly thought can divert you from truth, 'look', as you have done with the arbor face, is at least an order of magnitude worse. Now you know what each of the little lines on the indicator mean, poke it up inside the spindle, even if it is at an angle, and actually measure if there is any run out in the spindle itself.

                                    You have paid money for the tool. Why 'look' when you can recoup some of that money?

                                    All you can say for sure is that there is run out on the arbor. You have not yet identified or isolated the source of that runout. You will soon become bored, as will your supplier, if you return a few arbors as faulty and then subsequently discover there is an issue with the milling machine spindle.

                                    #660326
                                    JasonB
                                    Moderator
                                      @jasonb

                                      On the left is "mm 0.01" that is what each division measures.

                                      The "0-10" is total travel. Each complete turn of the needle will be 1.0mm and for each of those rotations the small "clock" upper centre will count upto 10.

                                      Was there any tooling with teh machine a sthat would be something else you could clock and compare results with.

                                      #660332
                                      Martin Connelly
                                      Participant
                                        @martinconnelly55370

                                        The new arbour has probably got centre holes at each end. Is there any way for you to set it up between centres, such as in a lathe, and check if it is bent? I ask this as the usual reason for changing arbors when I was at work is because someone swung a large radial drill around and clouted a vice with a drill chuck. The neck of the arbor was the weak spot that bent as a result. I would assume a new arbor without any obvious bruising is not going to be bent and that the spindle is likely the source of your runout, especially since you have tried different positions and got the same result.

                                        The other thing to do is when you measure the runout on the end of the arbor mark the high spot on the arbor and the spindle Then see if it moves with the arbor when the arbor is tried in a different position or stays in the same place on the spindle.

                                        Martin C

                                        #660355
                                        Baz
                                        Participant
                                          @baz89810

                                          You must have other holders that fit your machine, put one of those in and see how far out that is, also have a good look at the taper in your spindle, all it needs is a bit of swarf embedded there and surprisingly in industry where your machine most probably came from the operators don’t always look after machinery as men in sheds do, also if you have them remove any spindle drive dogs, the arbor slots can be undersize and catch on the dogs causing a runout.

                                          #660359
                                          Pete Rimmer
                                          Participant
                                            @peterimmer30576
                                            Posted by Martin Connelly on 17/09/2023 08:16:57:

                                            The new arbour has probably got centre holes at each end. Is there any way for you to set it up between centres, such as in a lathe, and check if it is bent? I ask this as the usual reason for changing arbors when I was at work is because someone swung a large radial drill around and clouted a vice with a drill chuck. The neck of the arbor was the weak spot that bent as a result. I would assume a new arbor without any obvious bruising is not going to be bent and that the spindle is likely the source of your runout, especially since you have tried different positions and got the same result.

                                            The other thing to do is when you measure the runout on the end of the arbor mark the high spot on the arbor and the spindle Then see if it moves with the arbor when the arbor is tried in a different position or stays in the same place on the spindle.

                                            Martin C

                                            This is what I would do first. Turn a centre in your lathe chuck and then put the new arbor between that and the tailstock centre. Put a dial gauge on the wide part of the taper and turn it by hand between the centres. If there is runout the part is bad, if none then the spindle needs looking at.

                                            #660364
                                            Mark Rand
                                            Participant
                                              @markrand96270

                                              By the way, to original poster Antony:- You've definitely earned a 'You Suck' for getting your hands on a 40 taper Beaver, even if it should turn out to need a rebuild at this point in its life.smiley

                                              Edited By Mark Rand on 17/09/2023 12:20:21

                                              #660406
                                              Antony Harding
                                              Participant
                                                @antonyharding74298

                                                sp.jpg

                                                Hi,

                                                Ok thanks for the help and info on my issue… this afternoon I check the following and can report back.

                                                So, when measuring the arbour at speed I got 0.15mm runout under speed, turning the spindle by hand the runout was only 0.09mm.

                                                Following the advice, I removed the arbour and measured the spindle, I couldn’t get to the inside but found a clean section outside. At speed I got a runout of 0.05mm but manual turning the spindle got 0.02mm runout.

                                                Regarding the above difference in readings could this be down to a cheap dial gauge? I have had this for many years now…. Would imagine it was about £15 to £20.

                                                The other observation I note, can feel a very slight movement in the spindle when trying to move it side by side. Not too sure if it’s the motor belt I am moving or play in the spindle. But following the reading taken about is this bad or good?

                                                So……. Note sure where this leaves me…!!!!

                                                Q1 = due to the different measurements I am getting, this could be due to a cheap dial gauge bouncing under speed of the rotating item, or due to play in the spindle.

                                                Q2 = if the runout of the arbour was only 0.09mm, generally would this be acceptable?

                                                Q3 = not looking forward to the answers on this one…!!!! If I have the runout in the spindle what options do I have to solve this? Would this hopefully be just changing out bearings and collars? On a scale of 1 to 5 is this very hard to do ?

                                                #660409
                                                JasonB
                                                Moderator
                                                  @jasonb

                                                  The plunge type are not ideal for measuring small amounts of run out, a lever DTI rather than your dial gauge would be better. Not good to run at too fast a speed but not sure what your lowest is.

                                                  I'd like to see less than 0.09mm

                                                  The spindle bearings may just need some adjustment if you think you can feel movement, I assume they are taper roller type.

                                                  This is almost a bit fast but the problem with turning by hand if there is bearing play is you can be moving the spindle with uneven hand pressure. This is the type of runout you should be looking for, one of those divisions is the same as one of yours so about 0.003mm on the arbor or spindle, drill in the chuck won't be as good

                                                  Edited By JasonB on 17/09/2023 18:29:52

                                                  #660415
                                                  SillyOldDuffer
                                                  Moderator
                                                    @sillyoldduffer

                                                    I advise against starting with high accuracy measuring. Trouble is it's skilled work that's easy to get wrong. Dozens of booby traps. One is not making sure the instruments are OK before starting, check that dial and learn how to use it!

                                                    As unpractised measuring applied randomly with dodgy kit is dangerously misleading, I suggest better to start simply by cutting metal with the machine. If it cuts OK, stop worrying. Measure the work it produces, not the machine. Distinctly ratty tools can still produce good results. Takes longer because the operator has to compensate and double-check, but quite severe backlash and bearing wear can be tolerated.

                                                    Only take measurements if the machine doesn't perform adequately, and remember measurement is only one of several ways of pinning down problems.

                                                    Best engineering advice ever: if it ain't bust don't fix it.

                                                    Dave

                                                    #660416
                                                    Pete Rimmer
                                                    Participant
                                                      @peterimmer30576

                                                      0.09mm TIR is miles more than you should see in any mill spindle. Don't measure it on the outside, do it on the taper and do it at low speed.

                                                      Have you inspected the taper for embedded debris or burrs on the edge? Try roatating the head so that you can get a good view of it.

                                                    Viewing 25 posts - 1 through 25 (of 31 total)
                                                    • Please log in to reply to this topic. Registering is free and easy using the links on the menu at the top of this page.

                                                    Advert

                                                    Latest Replies

                                                    Home Forums General Questions Topics

                                                    Viewing 25 topics - 1 through 25 (of 25 total)
                                                    Viewing 25 topics - 1 through 25 (of 25 total)

                                                    View full reply list.

                                                    Advert

                                                    Newsletter Sign-up