As I need to keep the tooth count low I want to use 30 degree PA.
Originally I was going to use the "hob forming" method. I posted about it a few weeks ago and a few of you responded having used it successfully. Others were dubious.
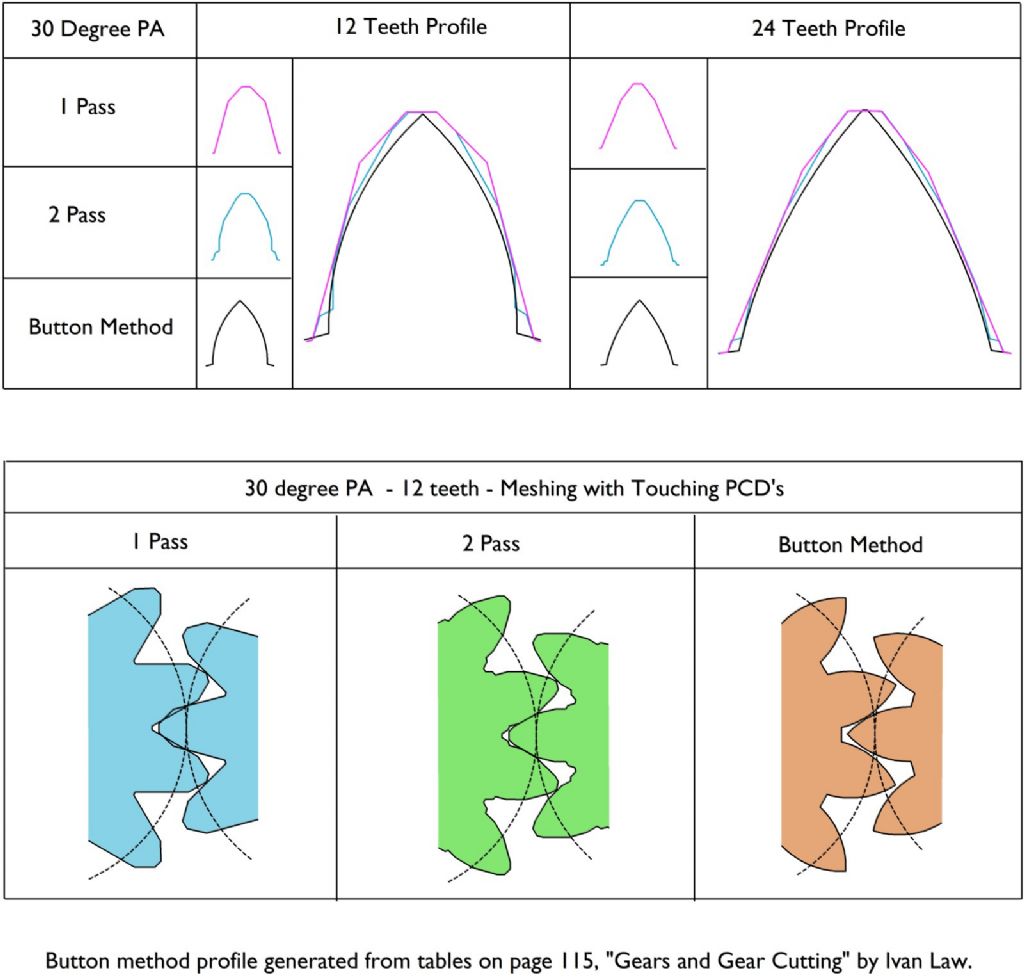
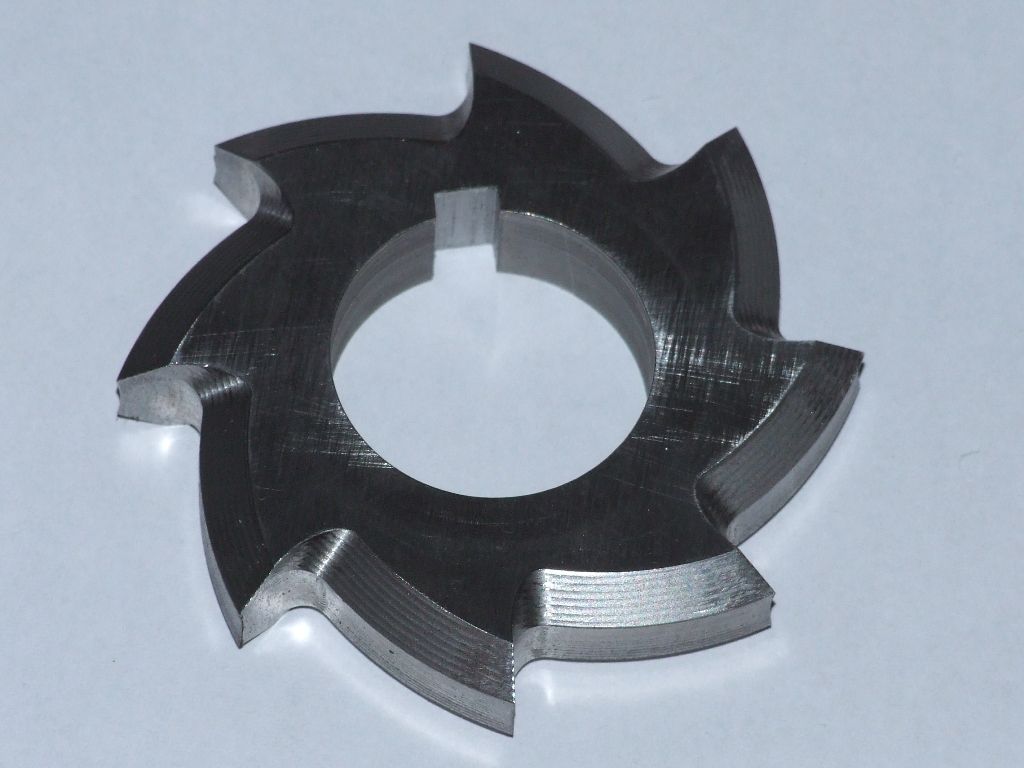
I've done some drawing to find out what tooth profiles I'd get with a single pass and 2 passes with the work rotated 1/2 a tooth and the cutter moved by 1/2 a pitch. I then compared it to a tooth generated using Ivan Law's info. Here are the results…..
As you can see, the single pass will only work with extra depthing and it's got a crude profile. A second pass improve things a lot but still looks tight. I'm sure a couple more passes would help a lot but the accuracy of the tool movement would have to be very good.
For my application the distance between centres is fixed so I'm going to have a go at making single point cutters milled from carbon steel using Ivan Law's button dimensions. It seems to be a popular method for making horological cutter in the USA.
The trouble with milling single point cutters is you need the right size end mill for the correct radius on the tool.
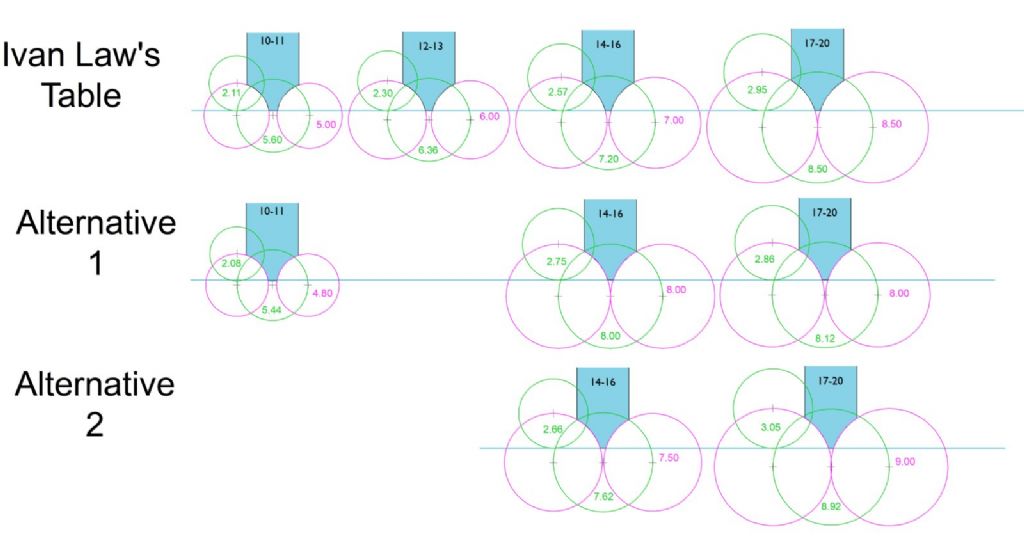
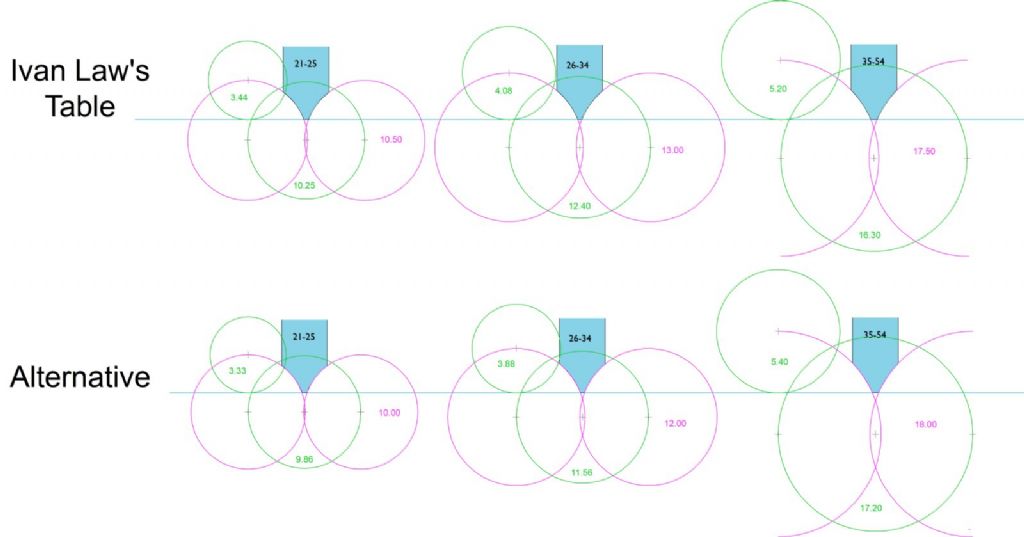
The button diameters in Ivan Law's tables are all integers or halves for Mod 1 but are not all easily divisible for smaller mods.
I decided to draw up alternative dimensions for each tooth count. Using the alternatives, I can now cut Mods 0.25, 0.33 and 0.5 all using easily available end mill sizes.
This is what I came up with.
Can anyone see any flaws with this plan? Has anyone milled small single point gear cutters before? Any comments or question welcomed.
I made some cutters for the clock I'm currently making this way, but haven't used them as they disappeared in the house move. Then I thought Id try the 'not a Hob method'.
By cutting 'updside down' you get additional clearance behind the edge, and you can set any diameter you want to the accuracy of your measuring.
I post this as a useful thing that should not get lost, unlike so much when people die and take knowledge with them
With the appropriate machinery and skills [*], it is possible to machine the relevant profile of a “button” directly onto the end of a piece of HSS … it is then a simple matter to make the cutter.
MichaelG.
.
[*] __ which I don’t have … but I know a man who does; and he works to small sizes.
Or you could turn the concave radius directly on the edge of the cutter blank, using either CNC (which I have done) or a radius turning attachment (they might as well do something useful). Then you are not limited to stock end mill sizes.
The gentleman in question [see my earlier post] does horological work, and showed me a beautiful example of a very small cutter-making form tool that he had made.
Having the smallest of the Hauser jig borers, with rotary table, is a great start … but he is very skilled.
Incidentally: He mostly uses single tooth cutters now [even for pinions] … because it’s only [sic] a matter of getting speed and feed properly matched.
That is interesting, There is quite a wide variety of small size solid carbide end mills available, although a bit more expensive.
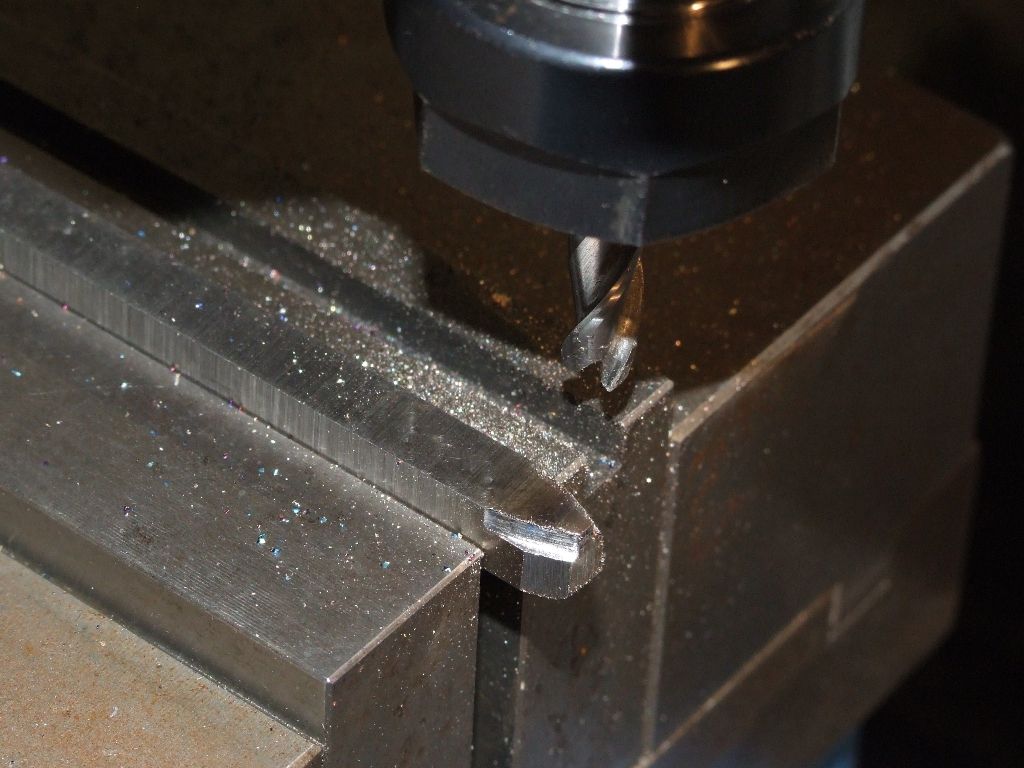
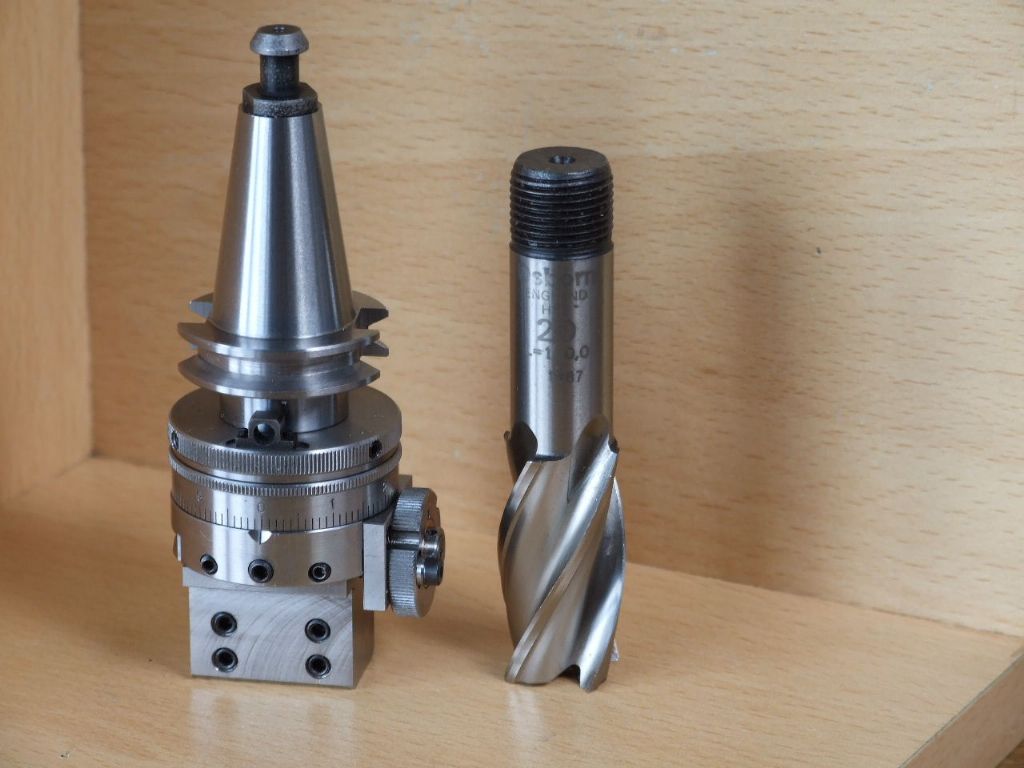
How many flutes would you recommend for HSS? It looks like 3 in the photo. And cutting speeds? Doesn't carbide like a high speed. But with HSS?
Any hints or tips welcome.
it isn't so much that carbide likes high speed it is more that it can work at the higher speeds because it doesn't lose its temper at the higher temperature. The number of flutes matters more with softer material as you can take deeper cuts and that can fill the space between the flutes. You need a way to evacuate the chips faster with the softer material so a single flute or 2 flute mills work better on aluminum than a 4 or 6 flute mill would.
Please, someone with more experience correct me if I am giving grossly wrong info.
How many flutes would you recommend for HSS? It looks like 3 in the photo. And cutting speeds? Doesn't carbide like a high speed. But with HSS
Indeed it is a 3-flute cutter, because that's what I had. As stated above fewer flutes are good for soft materials, not so much due to depth of cut but to higher chip loads so more metal removed per revolution. I use mostly 3 and 4 flute cutters as a compromise. For HSS it doesn't matter how many flutes, just adjust the feedrate to suit.
Carbide inserts for lathes often perform better at high surface speeds. The same is not true of carbide milling cutters. Professional grade carbide cutters are much sharper than the old HSS cutters. There are some coatings that require high temperatures, and hence high speeds, to work properly. But I suspect most of us don't have mills capable of making full use of some of the more estoteric coatings.
I was running the cutter at 3000rpm and 200mm/min and a stepdown of 0.5mm. The key to milling and turning hardened steel is to get the shear zone red hot and soft. So than means shallow depth of cut but high feedrates and reasonably fast speeds.
You could make your own for free and have the money for other things!
Regards
Gray,
That's nice! Does the dial work an eccentric cam for adjustment?
Would love to see plans for this.
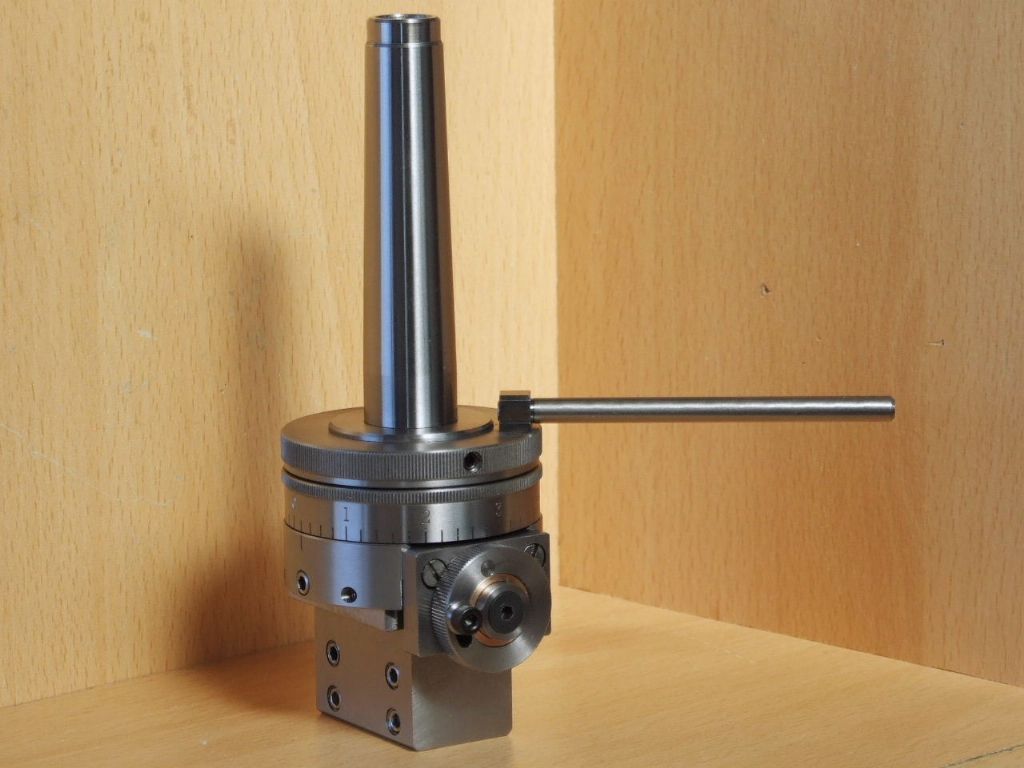
Just by coincidence Neil has an article waiting a publication slot on this 36 mm diameter Boring & Facing head. The above boring head was made for a friend who has a Mannix MM 250S3 Milling machine, the taper is a BT 20, hence the 20 mm cutter.
The feed of this concentric dial Boring Head to the feedscrew is by a single start worm and gearing to a conventional feedscrew. To keep the worm profile simple the Pressure Angle was chosen at 30 degrees. Thus the 10 tooth input gear has an Involute form with 30 degree PA. The feed works in two directions to meet the requirements of the two boring tool positions. There is a neutral provision in the gearing for manually setting the boring tool, so the operator does not have to wind the dial for this purpose. The dial can be set to zero, one full turn of the dial removes 0.1 mm from the bore, and two stops can be set to limit the travel when spotfacing. The feed is 0.05 mm per rev. A built in clutch in the feed ring allows the feed to stop once the limit stops are made.
With regards to forming the flanks of the single tooth cutters that I use. A series of photographs recently appeared in the thread on my design for the Myford Tailstock dial. Or you can find them in my album.
As regards the flank radius this is always going to be a compromise. B&S cutters cover a range of teeth per cutter. For obvious reasons the cutter will have to be made to cut the smallest number of gear teeth in that particular range. Thus those at the top of that gear cutters range are going to be a compromise.
I design my cutters to suit each gear used, that way the teeth are as close to a hobbed profile as I can get with a form cutter. These gears run extremely smoothly together because of this. While I draw and work exclusively in Metric very often an Imperial cutter is so close that it is not worth worrying about, so I use that.
I am currently working on the 66 mm diameter bodied version of this B&F Head following numerous requests for a larger version of the 36 mm baby of the family. (I built the 50 mm version some time back, see below).
Regards
Gray,
Edited By Graham Meek on 02/05/2020 11:40:19
Author
Posts
Viewing 20 posts - 1 through 20 (of 20 total)
Please log in to reply to this topic. Registering is free and easy using the links on the menu at the top of this page.