Another CAD challenge

Advert

Another CAD challenge

Home Forums CAD – Technical drawing & design Another CAD challenge

Viewing 15 posts - 1 through 15 (of 15 total)
  • Author
    Posts
  • #597178
    Versaboss
    Participant
      @versaboss

      Hi all,
      as there are several CAD threads running at the moment, I dare to add another one.

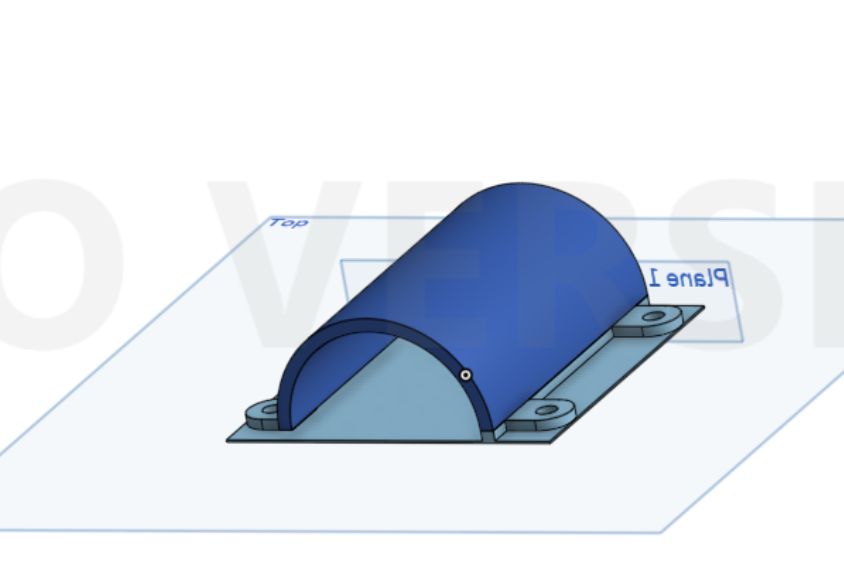
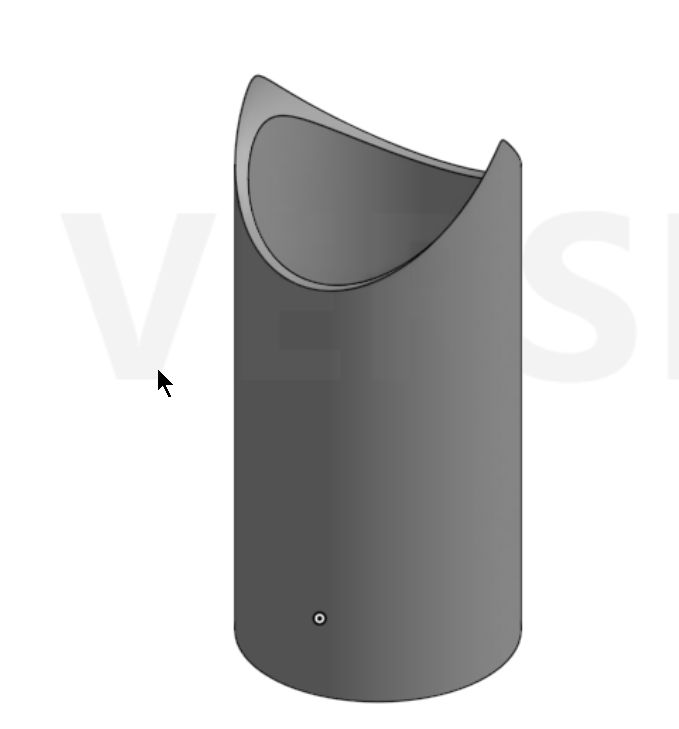
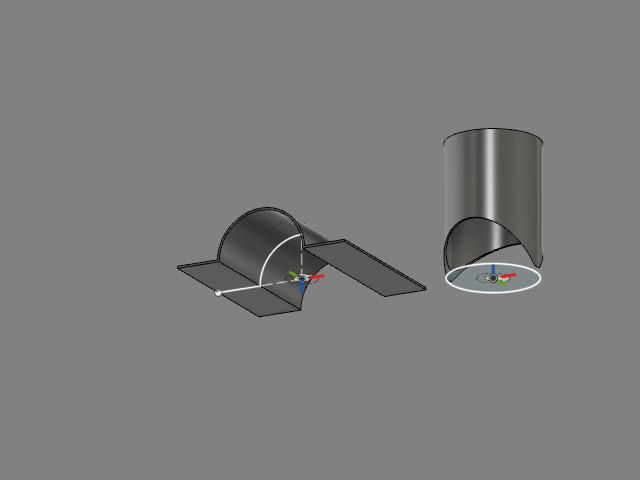
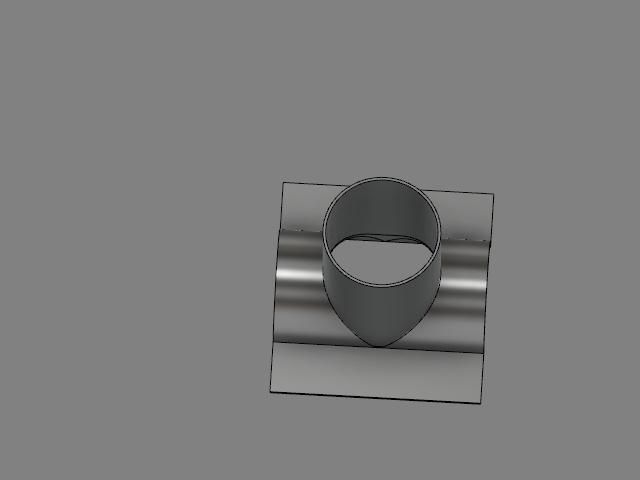
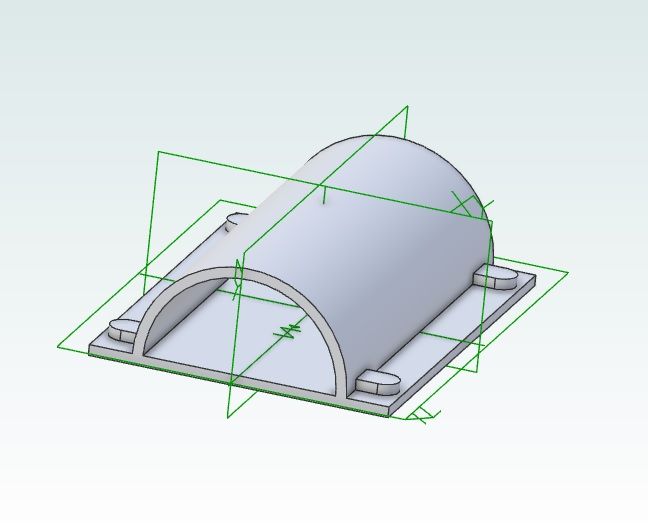
      I was drawing two parts, as follows:
      (tried to do my best to hide all traces about the program I used, as it is not favourably regarded here…)

      Part 1:

      screen shot 1.jpg

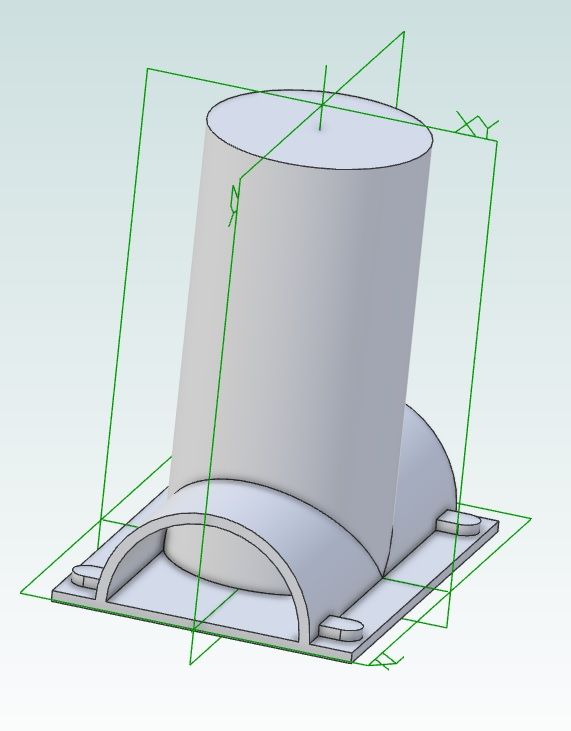
      Part 2:

      screen shot 2.jpg

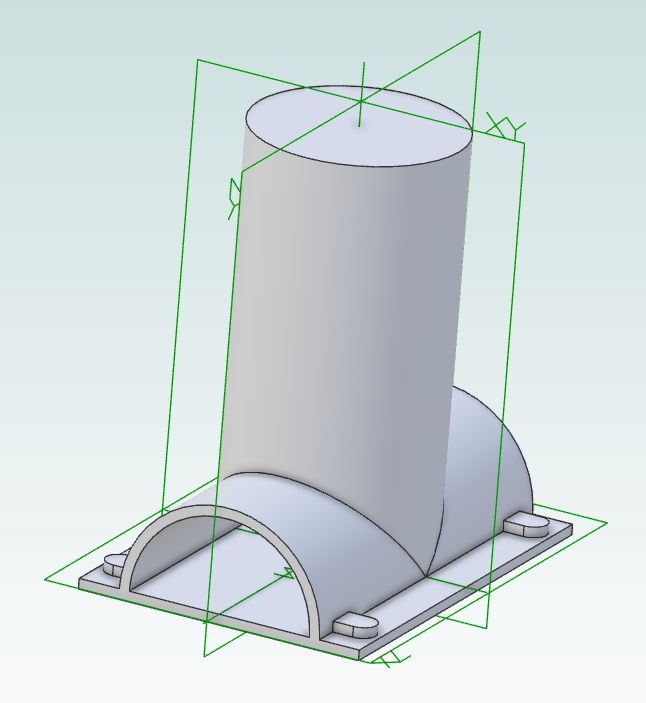
      The problem is the following: assemble part 2 on the surface of part 1, centrally, forming a Tee (hope I explain that good enough). Like a steam dome on a locomotive should make it clear.

      With my program I found not out how to do that, so I printed both parts separately and used epoxy glue to join them.

      The diameters of the two parts are the same.

      How can it be done in Freecad, Solid Edge or Fusion?

      Kind regards,
      Hans

      Advert
      #21381
      Versaboss
      Participant
        @versaboss

        Assembly problem

        #597190
        Nigel Bennett
        Participant
          @nigelbennett69913

          In SolidWorks, I would simply add a concentric mate of the curved surface on the Part 2 grey tube to the curved surface of part 1. I would then align a plane on both parts to ensure it was vertical and then create a distance mate between a plane on Part 2 and some feature – perhaps the face with a dot on it – to another plane on Part 2.

          #597193
          SillyOldDuffer
          Moderator
            @sillyoldduffer

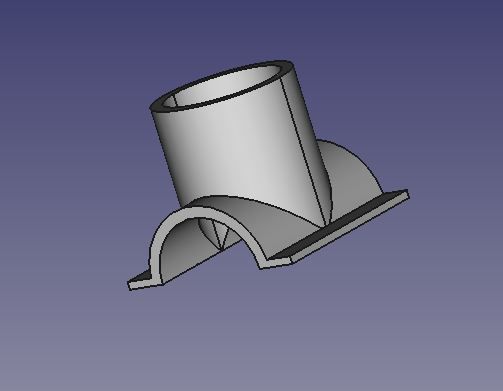
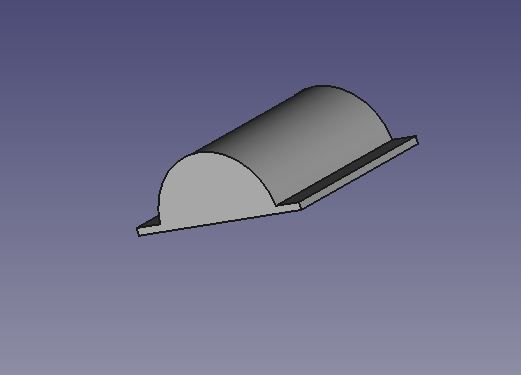
            Apologies for not following the instructions exactly, but this is FreeCAD:

            twopfinished.jpg

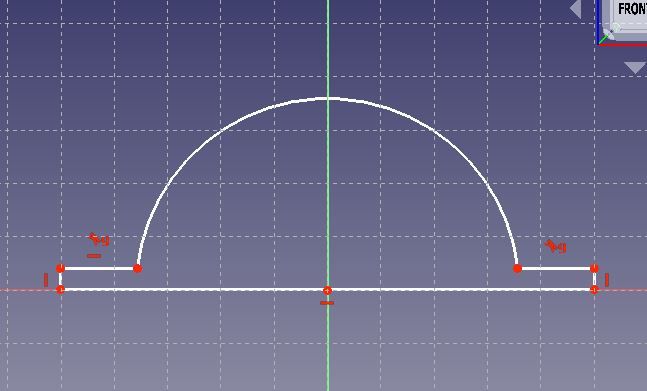
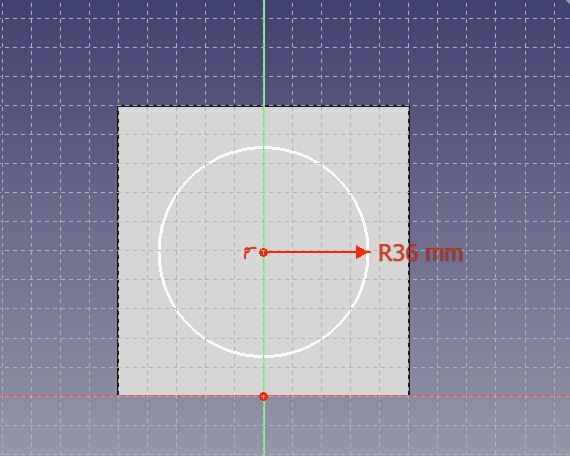
            Done this way. First sketch the base section.

            twopbase.jpg

            And pad (extrude) it:

            twopubase.jpg

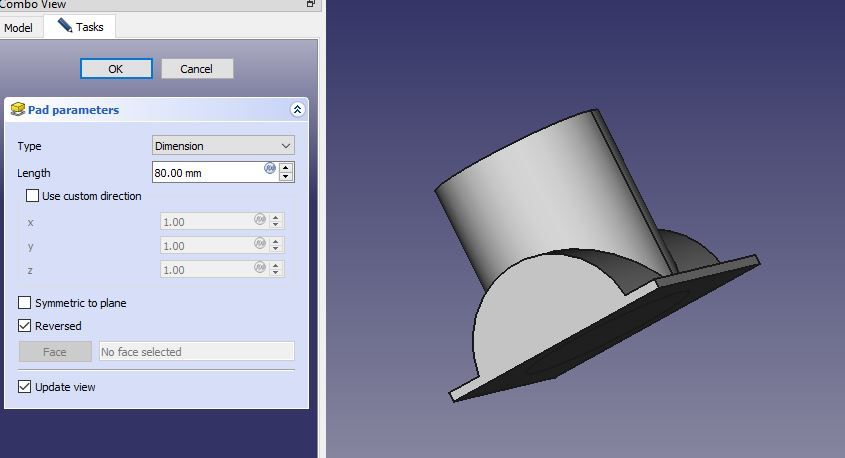
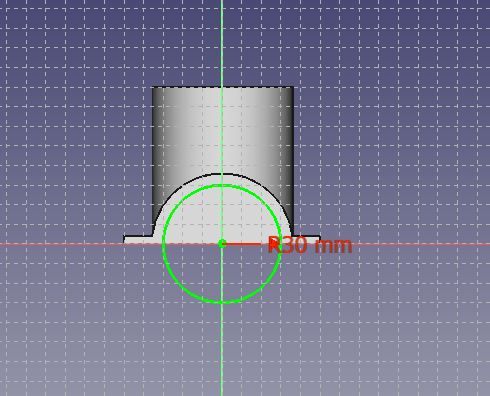
            Then flip the object over, and sketch a circle representing the riser pipe one the base.

            twopcirconbase.jpg

            Pad this circle in Reverse so it comes out the top giving:

            twopsolid.jpg

            Lastly, draw circles on the top face, and the lower semi-circle and pocket both to create the hollow pipes:

            twopbasebore.jpg

            There's also a thickness tool which can do the last two steps without sketching.

            Solid Edge and Fusion can make the part in much the same way: sketch on plane or face, then pad (extrude) or pocket( cut).

            Dave

            #597196
            JasonB
            Moderator
              @jasonb

              I'd do the same as Nigel in Alibre to assemble the two

              Though if it was going to be 3D printed as a single part I would have drawn it as one to start with

              #597202
              HOWARDT
              Participant
                @howardt

                With Autodesk Fusion or Inventor it is simply a case of aligning and offsetting planes created in the individual parts. It is really a case of how you want to create the thing as other one part or two. Probably one part of you are 3D printing it and two if machining from solid, although you could machine in one on a CNC mill.

                #597205
                JasonB
                Moderator
                  @jasonb

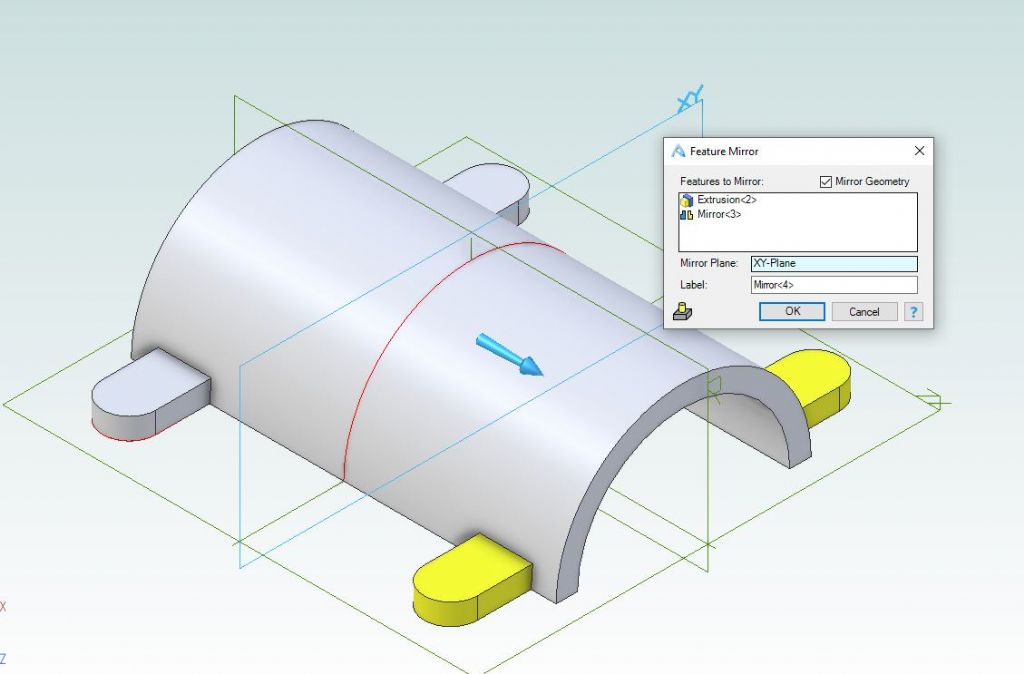
                  Looking again at your firs part, the half round. If that had been extruded equally about plane 1 rather than all to one side you should then have been able to use that plane to line up the two parts provided the circular part was central to two axis.

                  The added bonus would be that you could also have mirrored the tabs about the central axis too.


                  Extruded centrally and tabs mirrored

                  challenge 1.jpg

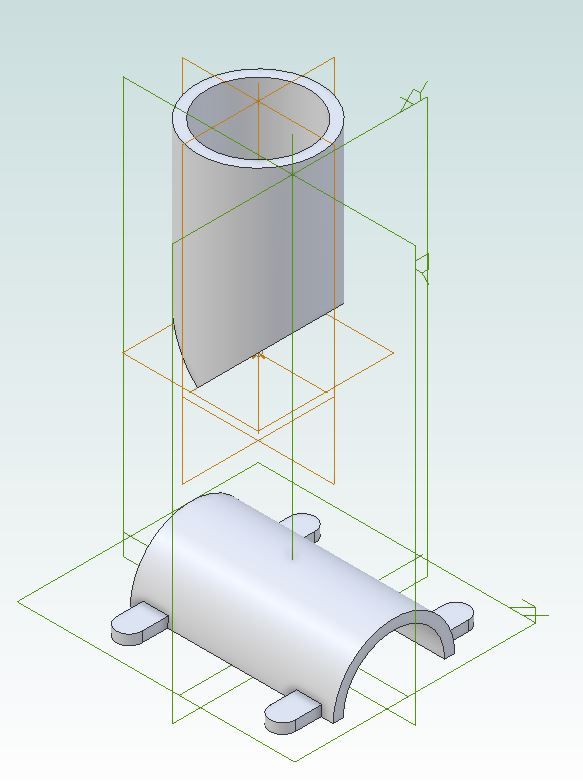
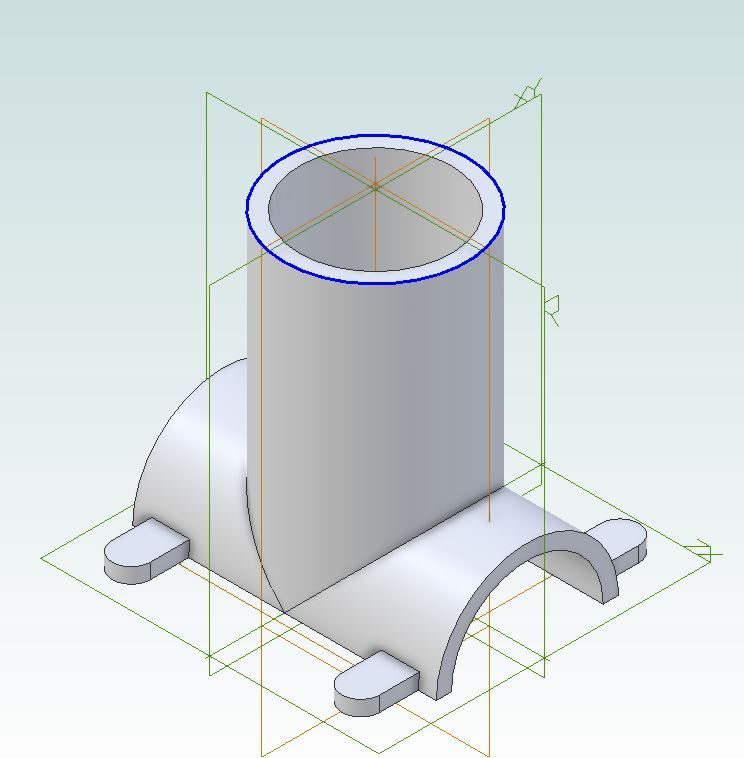
                  Then align the two vertical axis and then the horizontal planes and they all sit in the correct position but it does need some thought at the sketching stage to make assembly this easy.

                  challenge 2.jpg


                  Assembly screen showing half round lined up in XY&Z (green) and the geometry of the tube in brown

                  challlenge3.jpg

                  Edited By JasonB on 06/05/2022 18:13:52

                  #597214
                  Bazyle
                  Participant
                    @bazyle

                    Why don't these tools just let you 'pick up' item one, twiddle it round to be upside down, and push it down onto roughly the right place on item two. Then press a special button "use your megadoodles of computing power that cost me and arm and a leg and join these bits". Like a drag and drop editing in Word manages to put the words into the sentence with spaces not splodge them on top of each other.

                    #597224
                    SillyOldDuffer
                    Moderator
                      @sillyoldduffer
                      Posted by Bazyle on 06/05/2022 17:34:28:

                      Why don't these tools just let you 'pick up' item one, twiddle it round to be upside down, and push it down onto roughly the right place on item two. Then press a special button "use your megadoodles of computing power that cost me and arm and a leg and join these bits". Like a drag and drop …

                      Fusion360 and SE both work like that. FreeCAD is still primitive in this department, but getting better.

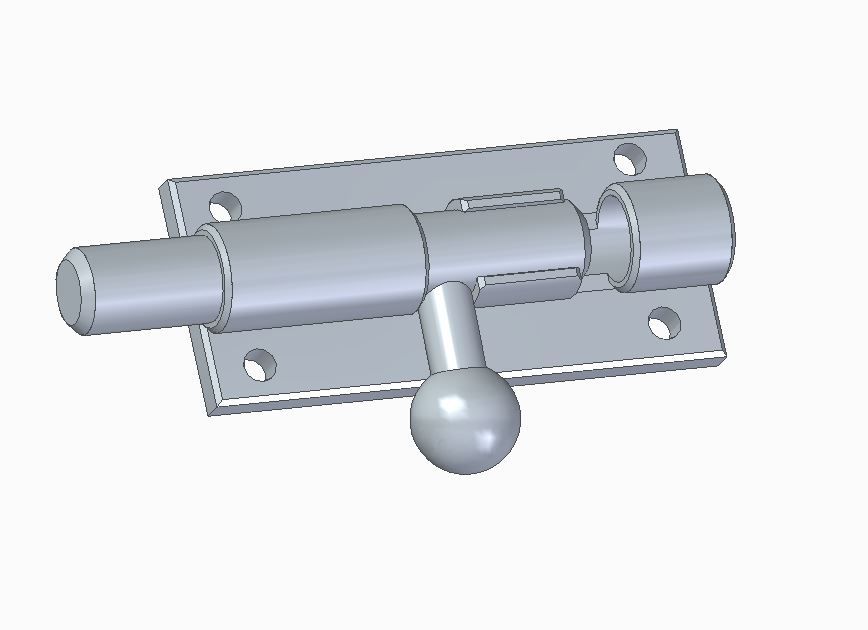
                      This example is Solid Edge. I designed a door bolt, which although based on the domestic item, is original : my dimensions, not a copy.

                      First part is the bolt body:

                      sedoorboltbody.jpg

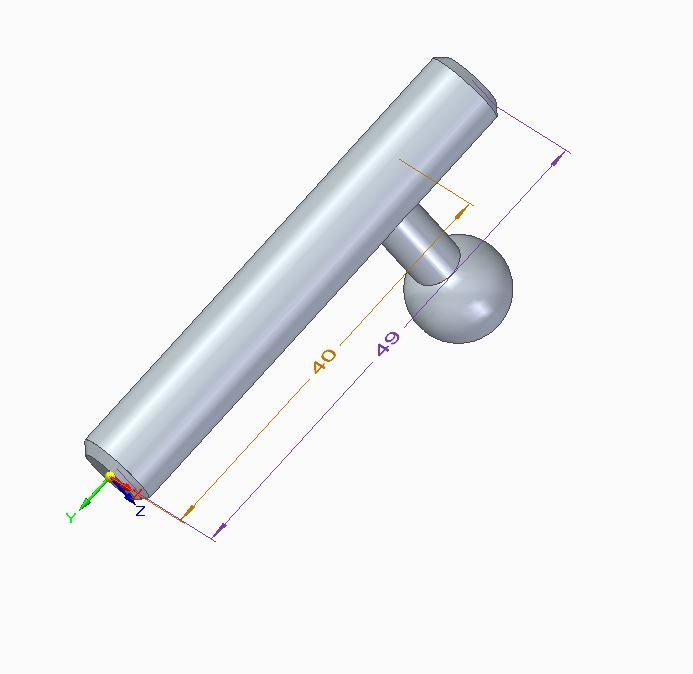
                      Created separately is the bolt. It has to fit into the body, correct diameter, length, handle to fit the slots etc.

                      sedoorbolt.jpg

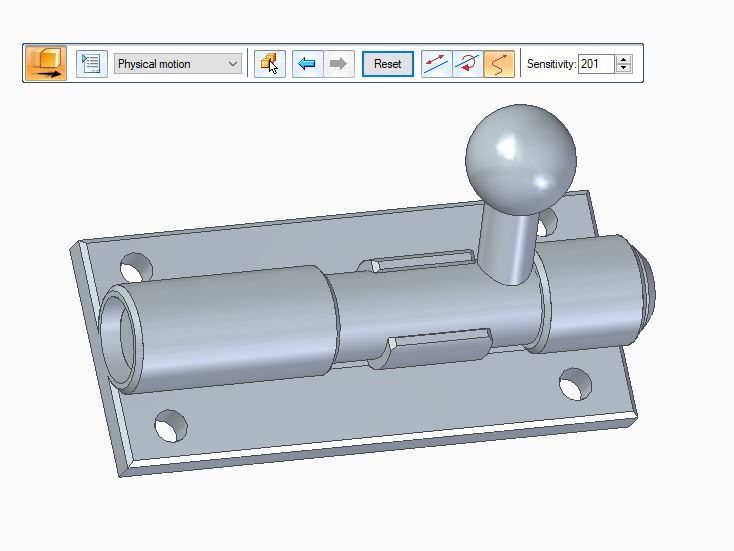
                      SE (and similar CAD packages) allow two or more parts to be combined as an Assembly, which achieved by drag and drop plus intents – axial, rotation allowed or not etc. The result is two parts working together.

                      sedoorboltopen.jpg

                      The software understands the bolt slides in the body, and detects collisions and interferences. When the design is correct, the bolt can be moved realistically on screen to prove all is well:

                      sedoorboltclosed.jpg

                      Mildly useful for designing a simple door bolt, but highly valuable when developing a multi-part object like an engine, where pistons must fit into cylinders without smacking into the head or valves, whilst the conrods turn the crankshaft without jambing. At the same time, the valve gear is driven from the crankshaft by a chain, and valve events delivered with cams. Saves an enormous amount of time when fits of all these different parts can be confirmed in a model, rather than painfully made for real, only to find they crunch expensively together inside the prototype!

                      Challenging enough to build an engine from someone else's plan, but much harder to reverse engineer an old engine from pictures or to develop a working engine from scratch. These tools are primarily for creating original work, not copying what went before.

                      Dave

                      #597230
                      Nick Wheeler
                      Participant
                        @nickwheeler

                        Fusion allows you to pick where you join parts, or to place Joint Origins at known places. It then gives you the option to offset and/or rotate the parts when you actually join them:

                        Parts, the multi coloured features are the Joint Origins:

                        origins.jpg

                        Rigidly joined together using those origins:

                        joined.jpg

                        And you didn't ask for this, but cut the centre of the joint using the tube's inner profile:

                        notched.jpg

                        The original sketches show in some of those pics, and you'll see they aren't closed profiles. Instead I used the Thin Extrude command which saves a lot of time. Also, only half the clamp body was drawn and extruded, then it was mirrored about its central face which also saves time and simplifies the sketch

                        #597232
                        Versaboss
                        Participant
                          @versaboss

                          Many thanks for some eye-opening comments. I think (now) that the way to do it is drawing the parts massive (as SOD did) and then hollowing it out.

                          To be honest, once in my trials I could arrange the two parts correctly, but during the printout my 3D printer died a silent death. Later I could not repeat that. The program has the so-called mates, which are shown as small coordinate systems with colored axes. Unfortunately, I could nor arrange them in the correct relationship. There are only two operations possible: flip the primary axis (but which is that?), and reorient the secondary axis. IF they would be oriented correctly, then the "megadoodles of computing power" would mate the two parts as intended.

                          It might be that later I will find that the parts are not strong enough, So I will then use SOD's method to construct them more massively.

                          Btw, I use a program called languagetool, which shows me a lot of my errors when writing this text. Even missing commas…

                          Kind regards,
                          Hans

                          #597233
                          Nick Wheeler
                          Participant
                            @nickwheeler

                            As for Dave's door bolt, I would have modelled the bolt inside the body, using projections of its axis, diameters and notch positions. That removes the need to figure out where the new features need to be, and makes creating the joint and its limits much simpler. As a design approach, the notches in the body could be left until last and placed by sliding the bolt to and fro in its bore.

                            #597248
                            John Hinkley
                            Participant
                              @johnhinkley26699

                              Did I mention that I don't watch "Coronation Street" No? Well it's on TV now, so while my wife gets her Friday fix, I thought I'd do it my way.

                              I sort of combined some of the previous ideas but latched onto Jason's idea to do it all in one drawing. So, I thought, how about treating it as if it were a solid casting and "machining away the unwanted bits?

                              First, sketch the basic profile and extrude from a mid-plane, With lugs drawn once in a separate sketch and mirrored around two planes:

                              doohdaah base.jpg

                              Then add the side extension as a solid :

                              doohdaah base with side piece.jpg

                              Followed by removing the semi-circular section :

                              doohdaah base hollowed out.jpg

                              Then "hollow out" the side pipe section:

                              doohdaah base with side pipe formed.jpg

                              Just one 3D drawing in Alibre and for export to a STEP or STL file for printing.

                              John

                              #597318
                              Gary Wooding
                              Participant
                                @garywooding25363

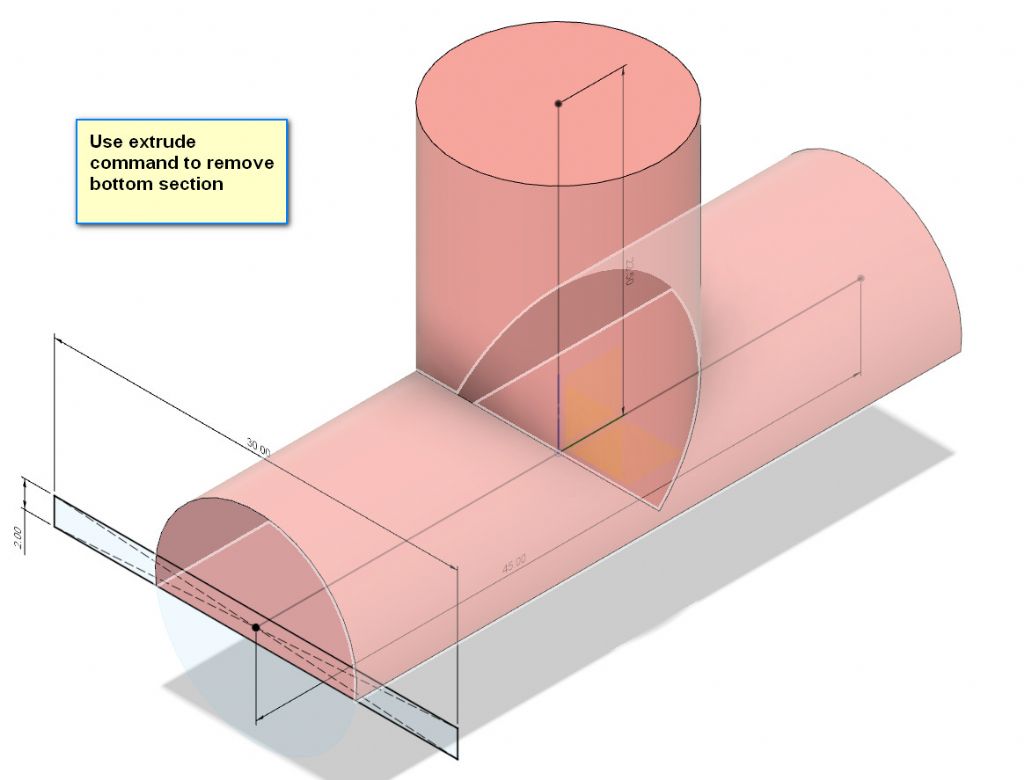
                                In case anyone is interested in using Fusion for it…

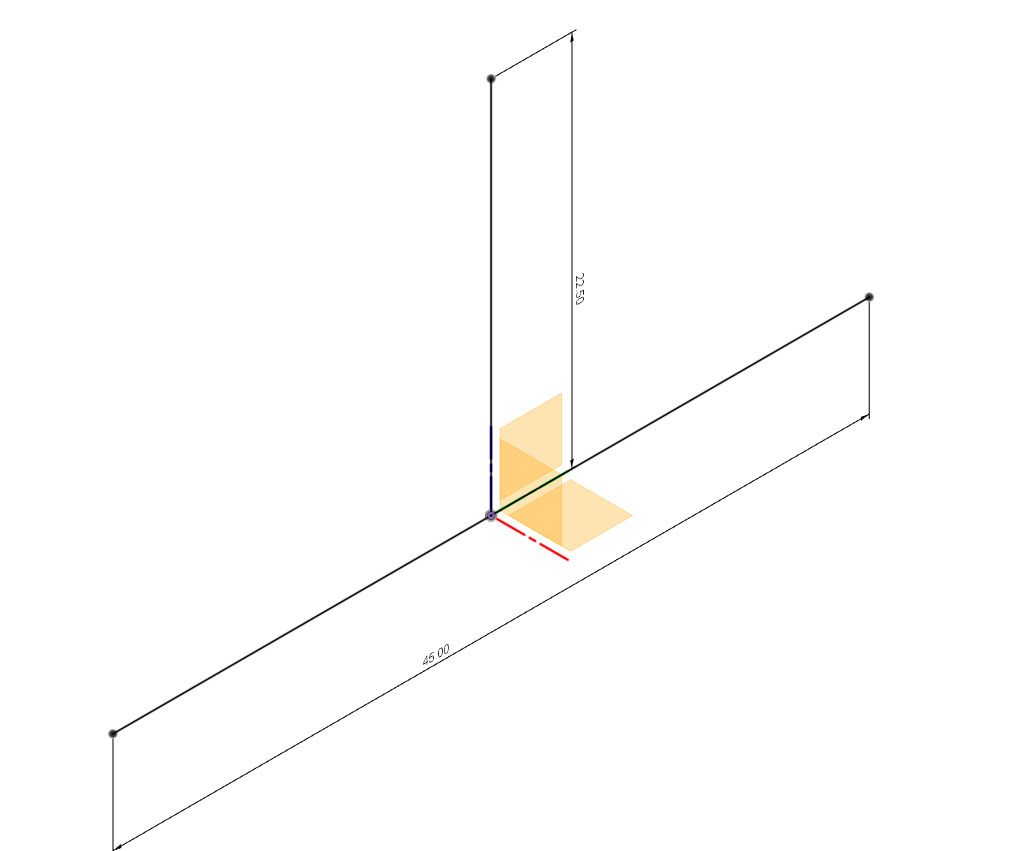
                                First draw a sketch of the centrelines of the intersecting pipes.

                                sketch1.jpg

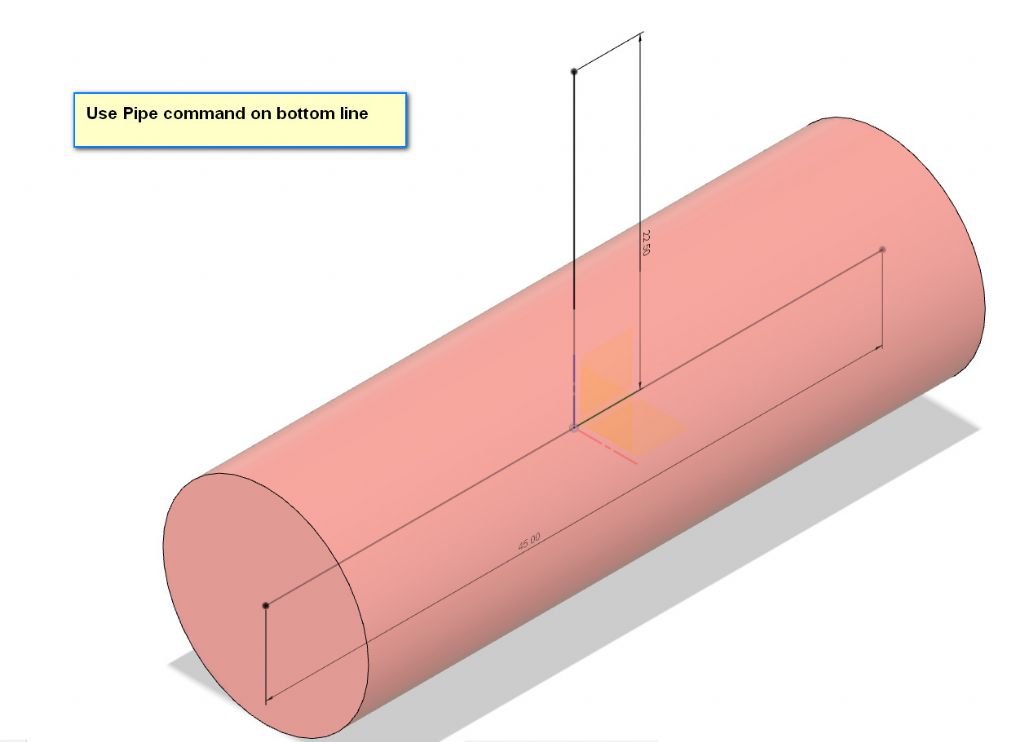
                                Next, use the Pipe command to create a solid cylinder along the horizontal line.

                                pipe1.jpg

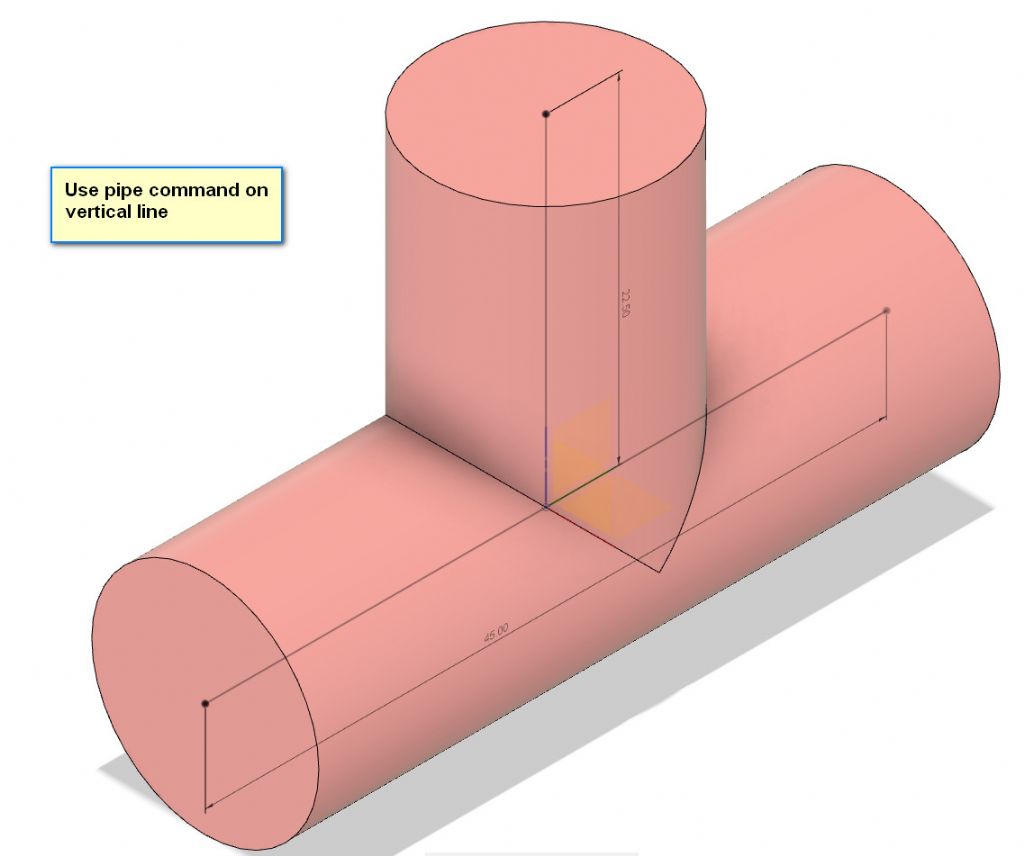
                                Then use the same command to create the vertical cylinder joined to the first one.

                                pipe2.jpg

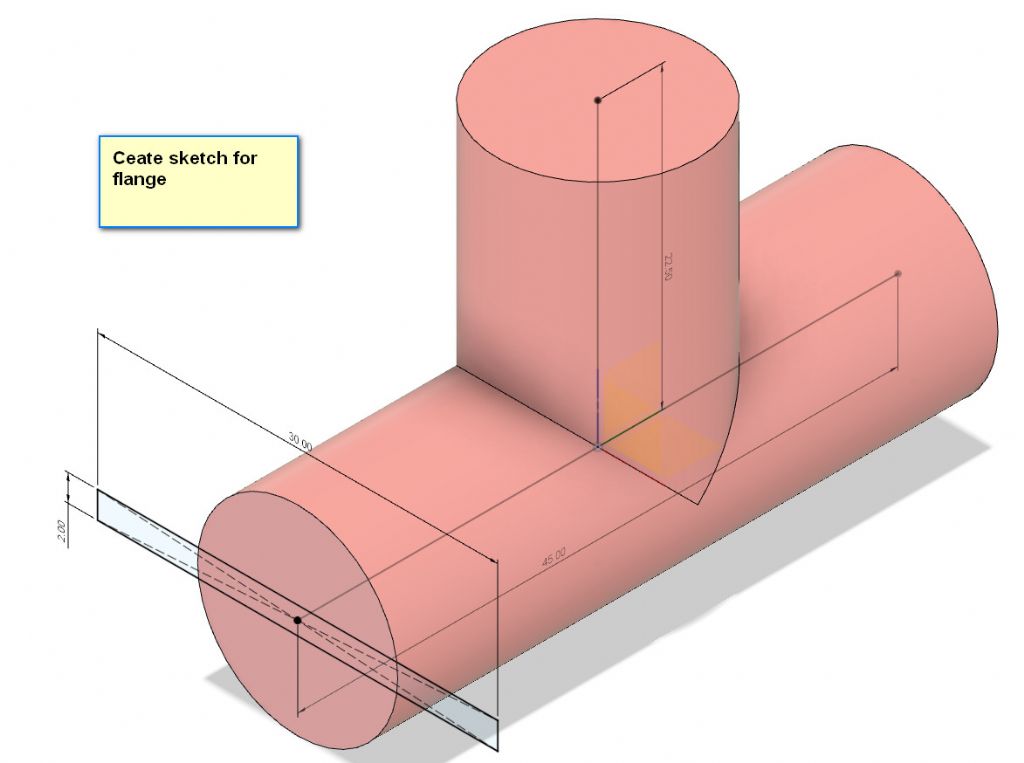
                                Now draw a sketch of the flange X-section on the end of the horizontal cylinder.

                                flange1.jpg

                                Now extrude lower section be low the flange profile to remove the bottom part of the horizontal cylinder.

                                flange2.jpg

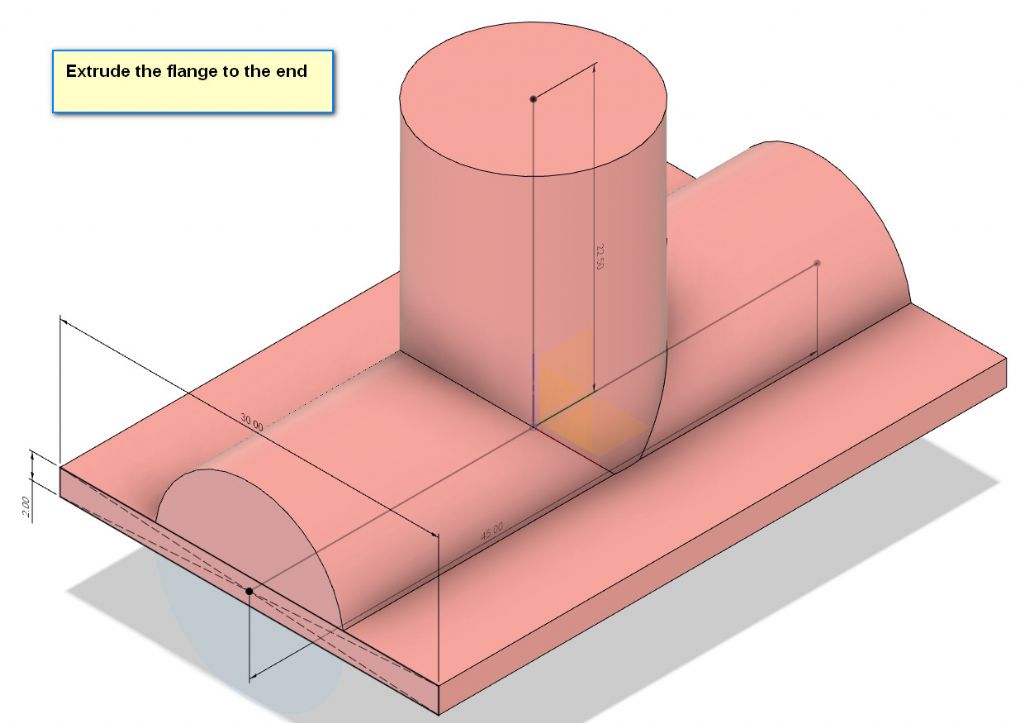
                                Then extrude the flange profile.

                                flange3.jpg

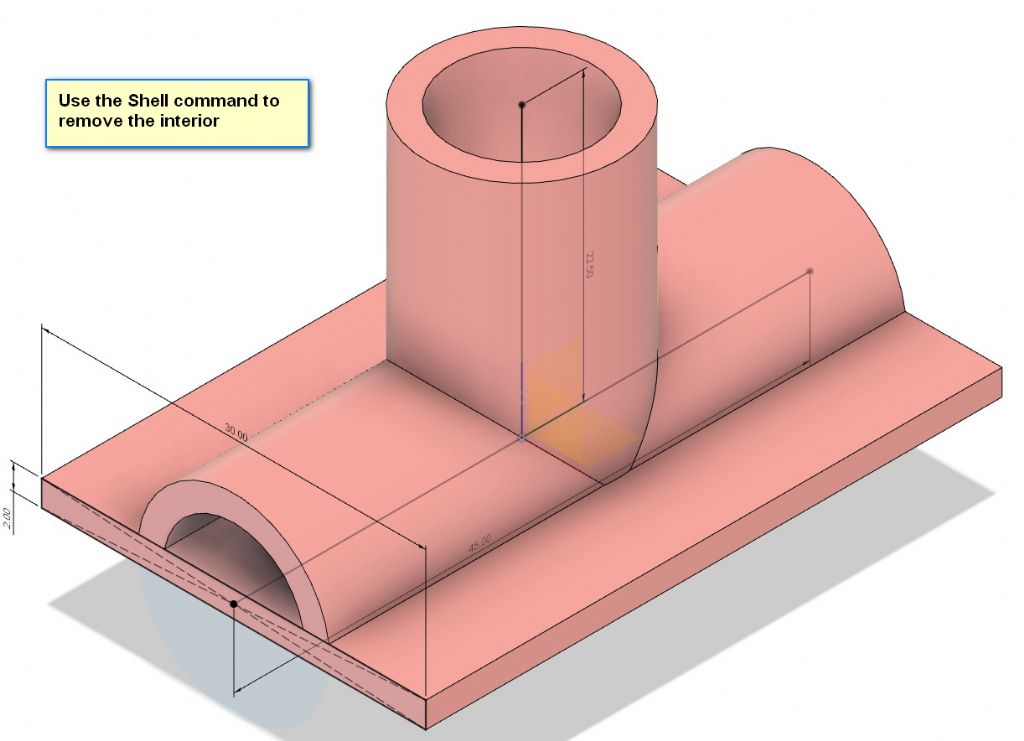
                                The last step is to use the Shell command to remove the unwanted interior to leave a wall thickness equal to the thickness of the flange.

                                shell.jpg

                                #597319
                                Gary Wooding
                                Participant
                                  @garywooding25363

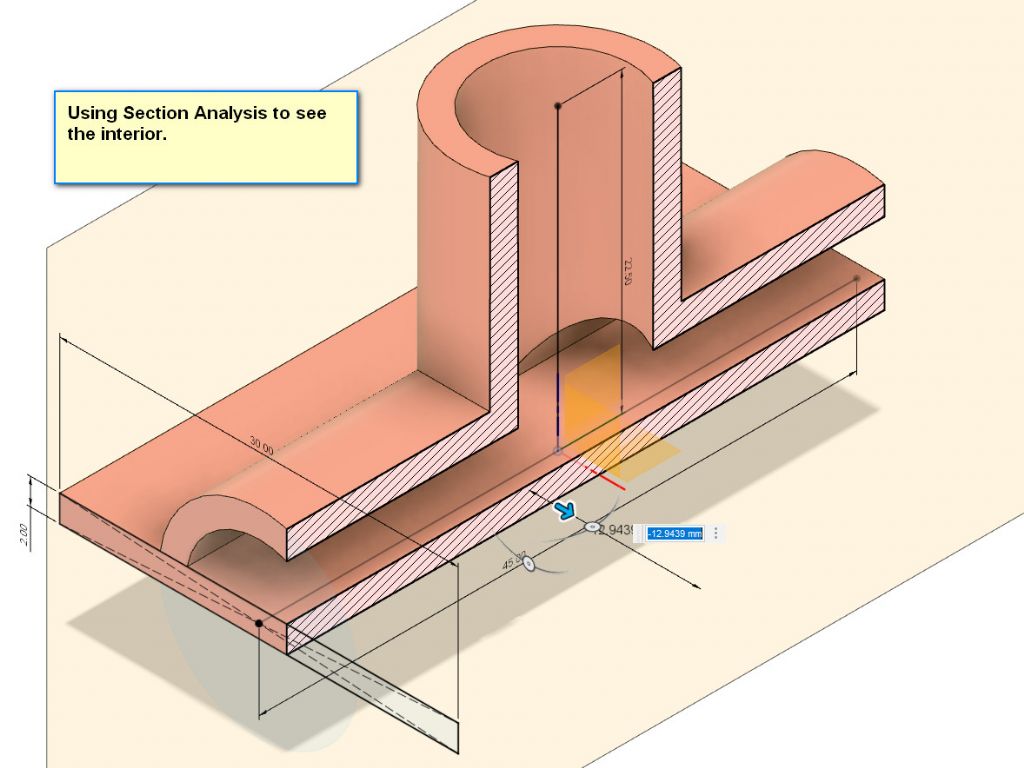
                                  You can then use the Section Analysis tool to show the interior.

                                  section.jpg

                                Viewing 15 posts - 1 through 15 (of 15 total)
                                • Please log in to reply to this topic. Registering is free and easy using the links on the menu at the top of this page.

                                Advert

                                Latest Replies

                                Viewing 25 topics - 1 through 25 (of 25 total)
                                Viewing 25 topics - 1 through 25 (of 25 total)

                                View full reply list.

                                Advert

                                Newsletter Sign-up