Advice on Cluttered Dimensions in Drawings

Advert

Advice on Cluttered Dimensions in Drawings

Home Forums CAD – Technical drawing & design Advice on Cluttered Dimensions in Drawings

Viewing 25 posts - 1 through 25 (of 49 total)
  • Author
    Posts
  • #590782
    SillyOldDuffer
    Moderator
      @sillyoldduffer

      I've modelled a coupler in FreeCAD and am experimenting with the TechDraw workbench. TechDraw renders a 3D model into 2D drawings to various standards and projections, as chosen by the user. I chose Third Angle ISO.

      TechDraw doesn't add dimensions automatically. Instead the designer clicks on what he wants dimensioned, and dimension leaders arrows and whatnot are added.

      My problem isn't specifically FreeCAD: it's what's the best way of dimensioning a 2D drawing when lots of dimensions cluster together? My example:

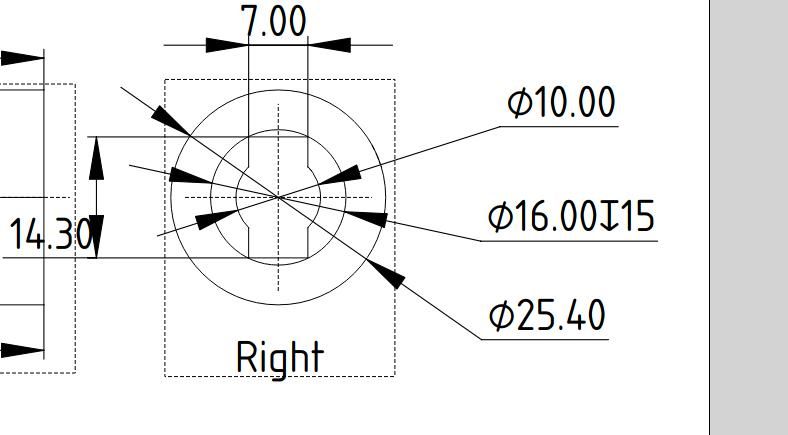
      dimscoupler.jpg

      The drawing is quite cluttered and there's not much room to manoeuvrer. The three diameters on the right are perilously close to edge of the paper. The Right View of the coupler is full of arrows and it's vertical dimension overlaps the clipped off drawing of the Front View on the left.

      Messier than I like, and it would be worse if I turned on the hidden lines showing the threaded holes. Is there a better way of organising dimensions? I have several Technical Drawing Books but their examples are all too simple.

      Dave

      Advert
      #21367
      SillyOldDuffer
      Moderator
        @sillyoldduffer
        #590783
        Nigel Bennett
        Participant
          @nigelbennett69913

          I'd create a cross-section and dimension the diameters on that. If they're external turned dimensions, then a side view would be used to put them on. The 7,00 dim you have would be best in the right view as you have it.

          #590785
          HOWARDT
          Participant
            @howardt

            Having completed all my working life draughting in one way or another I understand where you are coming from.

            One way is to create more views, adding diameter dimensions to a section view can be clearer to the reader. Looking at your view one thing I would do is reduce the arrow head size slightly, they look about 5mm, reduce down to 4 or 3, and maybe the test size. Whist standards may dictate the size in a working environment if it is just for hobby use you can reduce things so long as you can read it. Standards were mainly created so drawings could be digitised in one way or another, microfilm needed a good original drawing to be readable.

            #590793
            blowlamp
            Participant
              @blowlamp

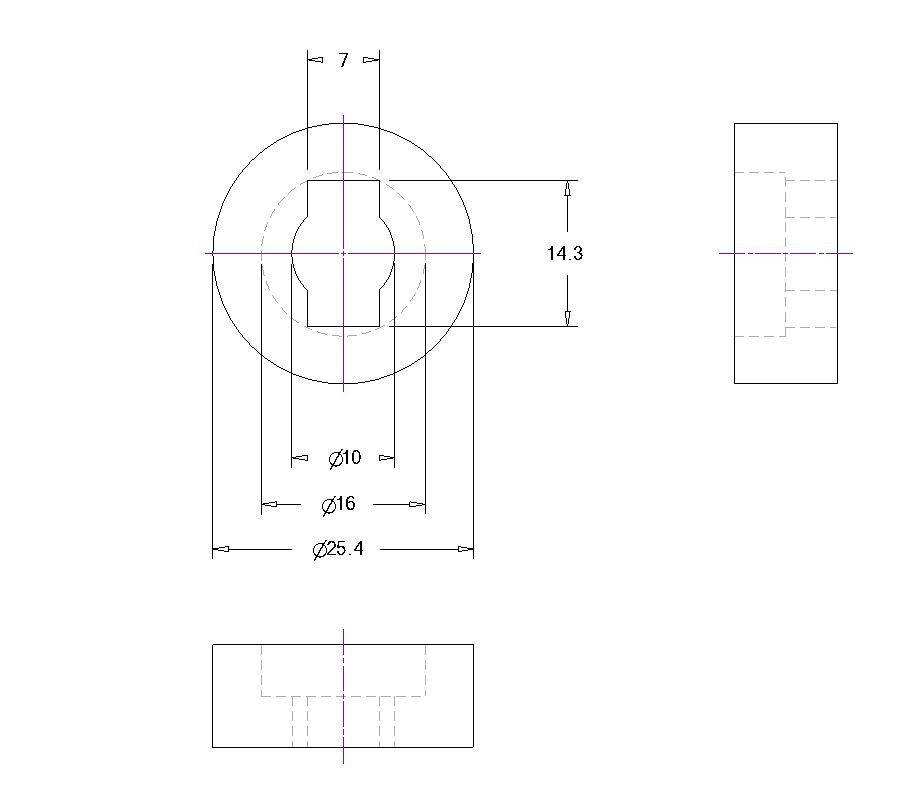
              Reduce text & arrow size. See if your CAD will dispense with the arrows on the other side of circles.

              Martin.

              dims.jpg

              #590802
              Anonymous
                Posted by SillyOldDuffer on 20/03/2022 14:44:02:

                The drawing is quite cluttered and there's not much room to manoeuvrer. The three diameters on the right are perilously close to edge of the paper.

                Not familiar with the programs you used but the obvious thing in general terms with CAD drawings (**) is to not locate views close to the edge of the sheet. Then you can pull the dimensions away from the view and give them a bit of space.

                (or manual drawings if it comes to that).

                #590804
                JasonB
                Moderator
                  @jasonb

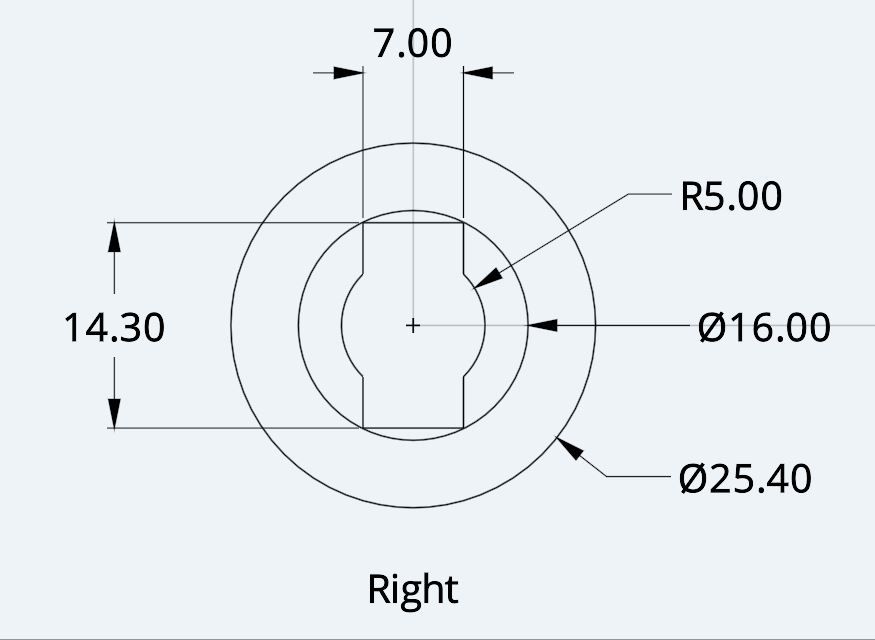
                  I'm not keen on showing diameters with the diagonal lines at all sorts of angles, I prefer to select "linear" dimensions for diameters which puts them as shown.

                  Does the program not allow you to space the elevations further apart? Alibre does and I can also alter text and arrow size and style.

                  neat dims.jpg

                  Edited By JasonB on 20/03/2022 16:31:47

                  #590810
                  JA
                  Participant
                    @ja

                    Agreed. I hate cluttered drawings. Where I worked you never had more than one part on a detail (working) drawing. Easy, use a larger sheet of paper. However most of us have only got A4 printers. One can always crop a large drawing into bits that can then be printed or have an old computer in the workshop.

                    JA

                    #590824
                    duncan webster 1
                    Participant
                      @duncanwebster1

                      Does your system allow viewports? If so you can have dimension parameters to suit the paper size, but scale up the item. It's easier to put dimensions on something drawn twice full size. Once you've got the dimension parameters as you want them, save it as a template, or even as a blank drawing so you don't have to do it again.

                      #590826
                      PatJ
                      Participant
                        @patj87806
                        Posted by JasonB on 20/03/2022 16:29:52:

                        I'm not keen on showing diameters with the diagonal lines at all sorts of angles, I prefer to select "linear" dimensions for diameters which puts them as shown.

                        Does the program not allow you to space the elevations further apart? Alibre does and I can also alter text and arrow size and style.

                        neat dims.jpg

                        Edited By JasonB on 20/03/2022 16:31:47

                        I am glad someone else prefers this method.

                        I have always used diameter rather than radius.

                        Using a radius causes you to have to have a calculator during a build, and is prone to error.

                        Using a diameter also gives you am immediate reference, for comparison with other parts/dimensison.

                        Diameter is the only way to fly in my opinion.

                        #590835
                        blowlamp
                        Participant
                          @blowlamp
                          Posted by PatJ on 20/03/2022 18:23:11:

                          Posted by JasonB on 20/03/2022 16:29:52:

                          I'm not keen on showing diameters with the diagonal lines at all sorts of angles, I prefer to select "linear" dimensions for diameters which puts them as shown.

                          Does the program not allow you to space the elevations further apart? Alibre does and I can also alter text and arrow size and style.

                          neat dims.jpg

                          Edited By JasonB on 20/03/2022 16:31:47

                          I am glad someone else prefers this method.

                          I have always used diameter rather than radius.

                          Using a radius causes you to have to have a calculator during a build, and is prone to error.

                          Using a diameter also gives you am immediate reference, for comparison with other parts/dimensison.

                          Diameter is the only way to fly in my opinion.

                          I think a radius is used to dimension arcs, rather than circles.

                          #590836
                          JasonB
                          Moderator
                            @jasonb

                            Yes I was not saying I don't likethings dimensioned by radius when it's a full circle (which I don't), its the way the diameter is dimension, I don't like that angled lines with the dimension at the end

                            #590838
                            JA
                            Participant
                              @ja

                              You should be able to measure the dimensions shown on a drawing. If you can measure the diameter it should be shown as a diameter. If not, it is a radius. If you cannot measure it, it should not be dimensioned.

                              Dimensions SHOULD NOT BE CHAINED, an almost universal fault on model engineering drawings. They should be taken from a single datum.

                              JA

                              #590850
                              Anonymous

                                Is it just me or has this thread totally lost sight of the original question?

                                #590867
                                DMB
                                Participant
                                  @dmb

                                  I think that the various posters above are just trying to be as helpful as possible with advice on drawing layouts, being basically what the OP asked for.

                                  #590868
                                  JasonB
                                  Moderator
                                    @jasonb

                                    Yes, still quite close to topic for a thread on here.

                                    But now there are three posts that aren't about the original question!

                                    #590870
                                    Nigel Bennett
                                    Participant
                                      @nigelbennett69913
                                      Posted by JA on 20/03/2022 20:17:15:

                                      Dimensions SHOULD NOT BE CHAINED, an almost universal fault on model engineering drawings. They should be taken from a single datum.

                                      JA

                                      I disagree; you cannot make a bald statement that you "should not chain dimensions". If you have an important centre-to-centre dimension that must be held to within a tolerance, then using a common datum would double the permissible variation between your important centres.

                                      What is wanted is a copy of the good old BS308, (now sadly obsolete). That tells you all about dimensioning!

                                      #590871
                                      Circlip
                                      Participant
                                        @circlip

                                        Strangely enough, layout was one of the skills taught when I was "Promoted" into the D/O fifty odd years ago. Unfortunately thanks to the advent of cheap drawing programmes, everyone can become an instant draughtsman which is fine for drawing straight and parallel lines and true circles but not basic principles. With a sheet of paper, the O/Ps problem never occurred and for large items, a scale rule came into operation. Important when items are constrained by A4,3.2.1 and 0 sized sheets to put them on. Only got an A4 printer? Go to a print shop.

                                        Regards Ian.

                                        #590873
                                        JA
                                        Participant
                                          @ja
                                          Posted by Nigel Bennett on 21/03/2022 08:36:26:

                                          Posted by JA on 20/03/2022 20:17:15:

                                          Dimensions SHOULD NOT BE CHAINED, an almost universal fault on model engineering drawings. They should be taken from a single datum.

                                          JA

                                          I disagree; you cannot make a bald statement that you "should not chain dimensions". If you have an important centre-to-centre dimension that must be held to within a tolerance, then using a common datum would double the permissible variation between your important centres.

                                          What is wanted is a copy of the good old BS308, (now sadly obsolete). That tells you all about dimensioning!

                                          Nigel

                                          I stand by what I wrote. In your case one of the centres becomes a datum.

                                          For those who think this is outside the topic chained dimensions take up less room on the paper so, seemingly, produce a less cluttered drawing. Which comes back to use a larger sheet or more sheets of paper.

                                          JA

                                          Edited By JA on 21/03/2022 08:49:26

                                          #590874
                                          Circlip
                                          Participant
                                            @circlip

                                            Just read the garbage about NOT chaining dimensions. RUBBISH. Even our lowly toys refute that. Try using a common datum when trying to locate a cylinder with eight mounting holes and forget all your fancy measuring systems. One hole is datum and the rest are chained from it. Straight line dimensions would work but what about an angled cylinder?

                                            Try the one datum rule on tooling to produce more than a thousand holes in a printed circuit board with metric AND imperial pitched components.


                                            Regards Ian.

                                            Edited By Circlip on 21/03/2022 08:52:32

                                            #590905
                                            JasonB
                                            Moderator
                                              @jasonb

                                              Unchained dimensions are far more useful these days with the vast majority having a DRO on their mill which makes it easy to work from a datum be that a corner or ctr of a part.

                                              Centred pairs or hole son a PCD are easily handles with the absolute and incremental settings by using absolute to get the ctr of the pair or group and then incremental from there.

                                              Those still marking out by hand and using handwheels are better off dimensioning from a corner datum so all positions are positive so less faffing about allowing for backlash if a ctr datum is used.

                                              I'd happily do the 1000 holes from one datum with the DRO on the manual mill or better still the CNC which only needs the one datum. This is probably about the most I have done from one point, a lot easier than all the chained fractional inches that were on the drawing.

                                              Edited By JasonB on 21/03/2022 13:01:47

                                              #590907
                                              JA
                                              Participant
                                                @ja
                                                Posted by Circlip on 21/03/2022 08:49:29:

                                                Just read the garbage about NOT chaining dimensions. RUBBISH. Even our lowly toys refute that. Try using a common datum when trying to locate a cylinder with eight mounting holes and forget all your fancy measuring systems. One hole is datum and the rest are chained from it. Straight line dimensions would work but what about an angled cylinder?

                                                Try the one datum rule on tooling to produce more than a thousand holes in a printed circuit board with metric AND imperial pitched components.

                                                Regards Ian.

                                                Edited By Circlip on 21/03/2022 08:52:32

                                                Ian

                                                I will take notice of you when you publish your personnal profile.

                                                JA

                                                #590925
                                                duncan webster 1
                                                Participant
                                                  @duncanwebster1

                                                  So taking circlips 8 holes, say a 4 * 2 array. With daisy chained dimensions the diagonal could be out by somewhere around 4 times the general tolerance. Of course if your marking out is perfect it doesn't matter, mine isn't. There might be places where one datum isn't appropriate, but this would be the exception. Ordinate dimensions make the drawing less cluttered.


                                                  And I'll echo the plea, can someone find a copy of bs308, send it to whoever does the drawings for ME and MEW

                                                  Edited By duncan webster on 21/03/2022 14:57:12

                                                  #590928
                                                  SillyOldDuffer
                                                  Moderator
                                                    @sillyoldduffer

                                                    My dimension question came up during an excursion into 3D printing, and I've been distracted by a USB cabling problem, still unsolved.

                                                    Many thanks for the help and observations, all much appreciated. It's been underlined to me that producing good drawings is a mixture of art and science. Science does an excellent job of the geometry and correct drawings, but making clear to a human needs intelligence!

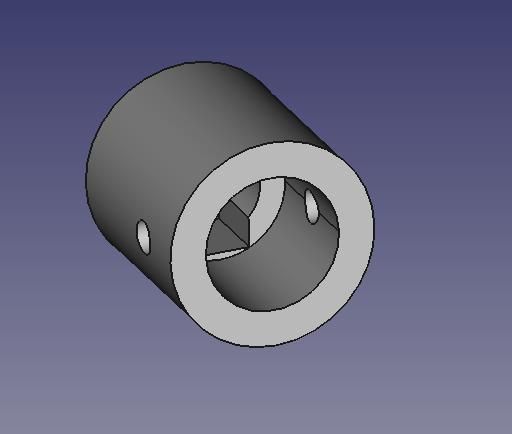
                                                    The Coupler is modelled in 3D with a Pad and 3 pockets, 4 simple sketches total. The sketches make perfect sense to the CAD package, but not in a workshop. Though the rendered object gives a good idea of the shape and how it might be machined, it's not dimensioned.

                                                    coupler3d.jpg

                                                    3D printing is easy enough because the CAD model contains all the information needed to create the shape. Ditto CNC. For strength I need to make the coupler in Aluminium or Mild-steel, and I only have manual machines. Proper 2D Technical Drawings are needed.

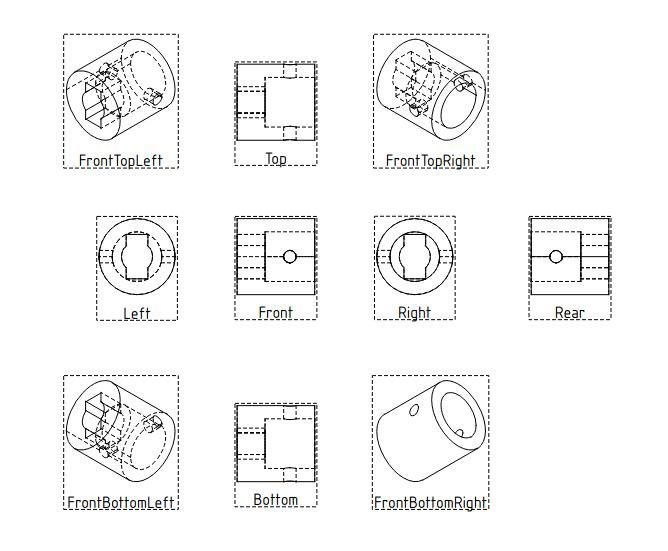
                                                    Here's the range of 2D plans and projections FreeCAD (and most other modellers can generate):

                                                    coupletechdraw.jpg Unwise to print all of them with internal detail, centre-lines, dimensions, tolerances, labels, sections and balloons etc. In this case, I think the coupler can be completely described by the Front, Top, and Right Views, and it's helpful to add the Front Top Left and Front Top Right isomeric projections. A simple text description bottom right is needed: Title, Date, Name, dims in mm, material=Aluminium, Third Angle etc

                                                    I'm taken by JA's "More Paper" suggestion. I can only print A4 at home, so one page for the general arrangement plus a page each for the individual views, as necessary to remove clutter.

                                                    Otherwise, I'm going to experiment with the other suggestions, like Jason getting rid of angled arrows by using linear dimensions instead. Watch this space!

                                                    On the great chain vs don't chain debate, my First Year draughtsmanship books all advise against it because it can cause errors to accumulate. As there are examples of short chains in the same books, I guess it's not always wrong! When milling, I prefer to work from a small number of reference points, which is easier when dimensions aren't chained. Again, the idea is to avoid small errors adding up into a big problem at the end.

                                                    Back to my 3D printing problem now, then another go at dimensioning.

                                                    Many thanks,

                                                    Dave

                                                    #590930
                                                    Anonymous

                                                      Time to settle down with beer, nibbles and a dictionary, pausing only to don appropriate PPE against flying toys. smile

                                                      Andrew

                                                    Viewing 25 posts - 1 through 25 (of 49 total)
                                                    • Please log in to reply to this topic. Registering is free and easy using the links on the menu at the top of this page.

                                                    Advert

                                                    Latest Replies

                                                    Viewing 25 topics - 1 through 25 (of 25 total)
                                                    Viewing 25 topics - 1 through 25 (of 25 total)

                                                    View full reply list.

                                                    Advert

                                                    Newsletter Sign-up