Myford S7B Cross Slide Stop

Advert

Myford S7B Cross Slide Stop

Home Forums Workshop Tools and Tooling Myford S7B Cross Slide Stop

Viewing 13 posts - 1 through 13 (of 13 total)
  • Author
    Posts
  • #642460
    Robert Butler
    Participant
      @robertbutler92161

      Gentlemen

      A brain picking exercise. I have to make approximately 100 identical components. I have a form tool to create the external profile and have arranged the tooling for the tailstock turret to machine the internal features. Regrettably the material diameter is too large to pass through the headstock and prevents the use off my cut off slide as I will be chasing the material toward the headstock repositioning the cross slide and tailstock each time.

      I therefore need to create a positive stop for the cross slide to ensure consistent daimeter. I have a copy of the design published in MEW (a reprint from ME?) but this will not work due to the need to reposition the stop after each component with resultant lack of repeatability without resetting..

      Has anyone of the learned Forum members solved this problem and prepared to share any information please.

      Thank you all in anticipation.

      Robert Butler

      spelling


      Edited By Robert Butler on 24/04/2023 17:25:13

      Edited By Robert Butler on 24/04/2023 17:28:00

      Advert
      #20983
      Robert Butler
      Participant
        @robertbutler92161
        #642461
        Brian Wood
        Participant
          @brianwood45127

          Robert,

          If you are not using the set of threaded holes on the rear side of the lathe bed [for mounting the Myford taper attachment] would there be scope there to build up your stop from those mounting points?

          Regards Brian

          #642463
          Robert Butler
          Participant
            @robertbutler92161

            Thank you Brian.

            I have DRO mounted and the cross slide has the scale fitted on the underside so very crowded. I know I can count down on the DRO but would prefer a posative stop in order that I can observe the machining process.

            The great pity of it is the small diameter of the headstock mandrel, the cut off slide would solve all the problems and reduce waste.

            Robert

            #642475
            Baz
            Participant
              @baz89810

              Don’t really understand why you need a solid stop when you have readouts on cross slide but if you must have one there is a hole for clamping travelling steady down to and a couple of tee slots on the cross slide, surely you can cobble up a stop to suit.

              #642478
              Nick Wheeler
              Participant
                @nickwheeler
                Posted by Brian Wood on 24/04/2023 17:33:56:

                Robert,

                If you are not using the set of threaded holes on the rear side of the lathe bed [for mounting the Myford taper attachment] would there be scope there to build up your stop from those mounting points?

                For 100 parts, I'd be adding a folding contraption to position the stock in the spindle too. A few bit of angle welded together, with M6 bolts for fine adjustment would be my starting point.

                #642479
                Clive Foster
                Participant
                  @clivefoster55965

                  Robert

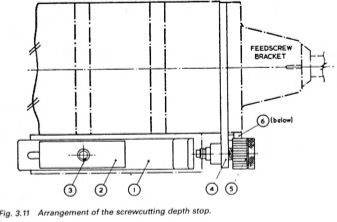
                  Tubal Cain described a screw cutting depth stop that might adaptable to your needs.

                  Basically it comprises a slide bar fitted to the top of the saddle using a hole provided for the travelling steady and a a fine adjustment screw carried in a suitably stiff plate trapped between the cross slide and the feed screw bracket.

                  screwcutting stop.jpg

                  As described the slide bar is about 6 3/4" inches long with a near 2" slot for adjustment. The bar is 3/4" x 3/16" material with a piece 1/2" equal angle brazed to the outside end for the adjustment screw to contact. A second piece of 3/16" sheet 15/16" wide is used for the plate that is trapped between the cross slide and feed screw bracket to carry the fine setting screw. The fine setting screw is 1/4" x 40 TPI (ME thread) running in a boss almost 3/4" long brazed to the carrier plate. Tubal Cain uses a grooved head on the adjusting screw with a flat spring steel "click" device fixed to a 4 BA screw.

                  My reference is Simple Workshop device published by Argus, also available as No 28 in Workshop Practice series, but no doubt it can also be found in Model Engineer and elsewhere.

                  Clive

                  Edited By Clive Foster on 24/04/2023 19:00:04

                  #642483
                  Brian Wood
                  Participant
                    @brianwood45127

                    Hello again Robert,

                    There is another mounting point where a collet closure can be attached just to the rear of the spindle that you may be able to utilize in some way to add a further choice to the mix. And finally from me, needing some ingenuity, a bar mounted off the X slide itself that can include a drop/swing down tab to butt up to the inner edge of the rear shear at the critical time

                    End of ideas now!

                    Brian

                    #642498
                    Robert Butler
                    Participant
                      @robertbutler92161
                      Posted by Baz on 24/04/2023 18:48:17:

                      Don’t really understand why you need a solid stop when you have readouts on cross slide but if you must have one there is a hole for clamping travelling steady down to and a couple of tee slots on the cross slide, surely you can cobble up a stop to suit.

                      Thank you Baz, I wan't to set everything up using stops for ease and speed as I have with Tailstock Turret. Other posts build on your suggestion to use the travel steady mounting point.

                      Thank you again.

                      Robert

                      #642501
                      Robert Butler
                      Participant
                        @robertbutler92161
                        Posted by Nick Wheeler on 24/04/2023 18:56:47:

                        For 100 parts, I'd be adding a folding contraption to position the stock in the spindle too. A few bit of angle welded together, with M6 bolts for fine adjustment would be my starting point.

                        Nick, the form tool is positioned agaist the material left after parting off so no issues with positioning. I am chasing material towards the headstock as the material will not pass through otherwise the cut off slide I have would be ideal.

                        Thank you

                        Robert

                        Edited By Robert Butler on 24/04/2023 22:23:15

                        #642503
                        Robert Butler
                        Participant
                          @robertbutler92161
                          Posted by Clive Foster on 24/04/2023 18:59:42:

                          Robert

                          Tubal Cain described a screw cutting depth stop that might adaptable to your needs.

                          Basically it comprises a slide bar fitted to the top of the saddle using a hole provided for the travelling steady and a a fine adjustment screw carried in a suitably stiff plate trapped between the cross slide and the feed screw bracket.

                          As described the slide bar is about 6 3/4" inches long with a near 2" slot for adjustment. The bar is 3/4" x 3/16" material with a piece 1/2" equal angle brazed to the outside end for the adjustment screw to contact. A second piece of 3/16" sheet 15/16" wide is used for the plate that is trapped between the cross slide and feed screw bracket to carry the fine setting screw. The fine setting screw is 1/4" x 40 TPI (ME thread) running in a boss almost 3/4" long brazed to the carrier plate. Tubal Cain uses a grooved head on the adjusting screw with a flat spring steel "click" device fixed to a 4 BA screw.

                          My reference is Simple Workshop device published by Argus, also available as No 28 in Workshop Practice series, but no doubt it can also be found in Model Engineer and elsewhere.

                          Clive

                          Edited By Clive Foster on 24/04/2023 19:00:04

                          Clive thank you. I must be losing the plot, I have WP 28, looked it out and found a page marker showing TC's device which of course I had promptly forgotten all about!! This looks promising.

                          Any other suggestions however gratefully received.

                          Robert Butler


                          Edited By Robert Butler on 24/04/2023 22:29:51

                          #642504
                          Robert Butler
                          Participant
                            @robertbutler92161
                            Posted by Brian Wood on 24/04/2023 19:41:38:

                            Hello again Robert,

                            There is another mounting point where a collet closure can be attached just to the rear of the spindle that you may be able to utilize in some way to add a further choice to the mix. And finally from me, needing some ingenuity, a bar mounted off the X slide itself that can include a drop/swing down tab to butt up to the inner edge of the rear shear at the critical time

                            End of ideas now!

                            Brian

                            Thank you once again

                            Robert

                            #642507
                            Neil Lickfold
                            Participant
                              @neillickfold44316

                              I have found that the stops are only any good if you are gentle in winding to them, especially on the cross slide. When I made 1000's of parts a way back in 1996 on my Myford, I created a fine cross slide lead screw. I modified an imperial set, so used the dial, with 100 divisions, and removed the original feed screw from the adapter. Then made a new 0.5mm pitch screw, M8X0.5P and made a new nut. The adapter had the thread for the assembly to go together.

                              It meant that I could turn the dial 1 rev and it was 1 mm in diameter. It was very repeatable, so you could easily achieve 0.01mm sizing less tool wear and temp of the part of course. Yes it was more winding, but that was allowing me to hold a 0.01mm diameter sizing on these simple parts.

                              I had little pen marks on the side of the cross slide, that corresponded to different sizes. I carefully set all the tools from the boring bar being zero. ie every whole mm diameter is Zero on the dial. Then the outer tools are set by cutting a reference, then adjusting the tools' psoition in the holder, so that each tool was nominally on the zero for any whole mm size, like 25mm for example. I used different coloured pens for the different tools.

                              It worked very well, and was often asked how I got the sizing correct, and the real secret was keeping the tool holders clean of any swarf when changing, and keeping a constant torque on the locking of the tool post cam on the Myford quick change tool holder.

                              I did initially have a muti index tool holder on the tail sock, but taht was only any good for drilling holes really. When it came to form tools or D bit's , it was not accurate enough , being so far from the tailstock. It may be my tailstock is too worn for that to have been effective, or the total extension from the tailstock was just too far.

                            Viewing 13 posts - 1 through 13 (of 13 total)
                            • Please log in to reply to this topic. Registering is free and easy using the links on the menu at the top of this page.

                            Advert

                            Latest Replies

                            Viewing 25 topics - 1 through 25 (of 25 total)
                            Viewing 25 topics - 1 through 25 (of 25 total)

                            View full reply list.

                            Advert

                            Newsletter Sign-up