Rose Blocks

Advert

Rose Blocks

Home Forums Workshop Tools and Tooling Rose Blocks

Viewing 12 posts - 1 through 12 (of 12 total)
  • Author
    Posts
  • #526050
    IanT
    Participant
      @iant

      I was interested to see Rob Renshaw's note about Simple Tool Holders in 'Scribe a Line' (MEW 301).

      I made a set of Rose Blocks a few years back for my EW 2.5" lathe, having first tried a small QCTH. The QCTH had a lot of overhang and also restricted the cross-slide travel. Additional toolholders were also fairly pricey. I'd read the article by Dr Rose and decided they might solve the problem.

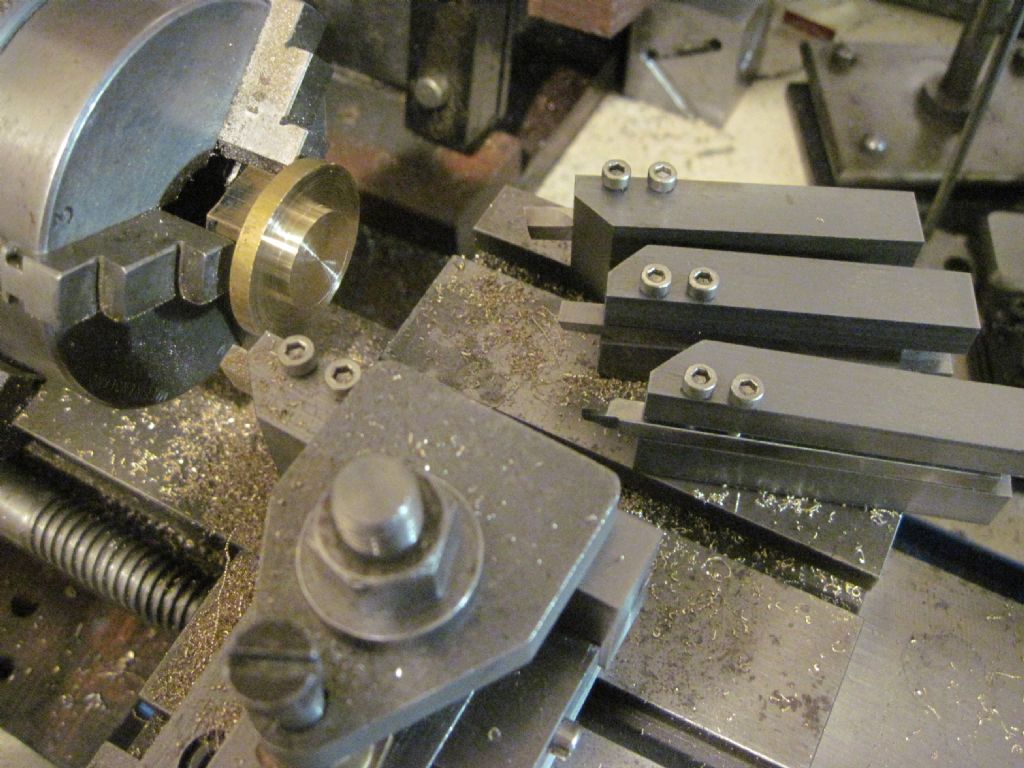
      I made half a dozen (I did mine on a shaper) all to the same dimensions and to take 3/16th HSS tools. I then made a clamp block to get the tools on centre height. For brass tooling (with no top rake) I don't need to pack the tools, they are at the correct height. Even where a shim may be necessary on other ground tools, once set that's it, they can be moved in and out as required without further setting – no different from a QCTH really and much easier to make.

      Although not the original reason I made them, they do hold the tools very rigidly too as Rod mentions. Obviously they won't suit all uses (or users) but they certainly work well enough on my EW.

      Regards,

      IanT

      Rose Block Rose Blocks

      Advert
      #20154
      IanT
      Participant
        @iant

        Simple Tool Holders for the small lathe

        #526458
        Nigel Graham 2
        Participant
          @nigelgraham2

          I like that design.

          Years ago I made something like it for my EW, by drilling holes at appropriate angles in short pieces of rectangular-section steel bar, to take tools ground from old milling-cutter 1/4" shanks and the like. They are not a cohesive set like yours though.

          One extension to my idea may be to put small locating fences on the blocks to engage the top-slide corner, giving a simple quick-change function. Does that clamp-block have a rebate to the same effect?

          My own EW is feeling a bit lonely at the moment because the headstock bores and spindle are worn unevenly, so a Myford ML7 takes all of the smaller work while I try to decide the best way to restore them. I can't strictly to original, only to original accuracy, as there is precious little metal available to remove safely from the castings.

          #526466
          IanT
          Participant
            @iant

            Well, it seems no one's interested in simple tool holders Nigel. sad

            I'm not allowed down the 'big' shed at the moment, as my wife is firmly of the belief that even a short visit in these temperatures will (at best) result in a bad cough that will keep us both awake for two or three nights. I'm afraid her views have some foundation in past experience. So I just have access to a few small machines in my warm (e.g. inside) workshop at the moment but I still like to keep a few things moving along.

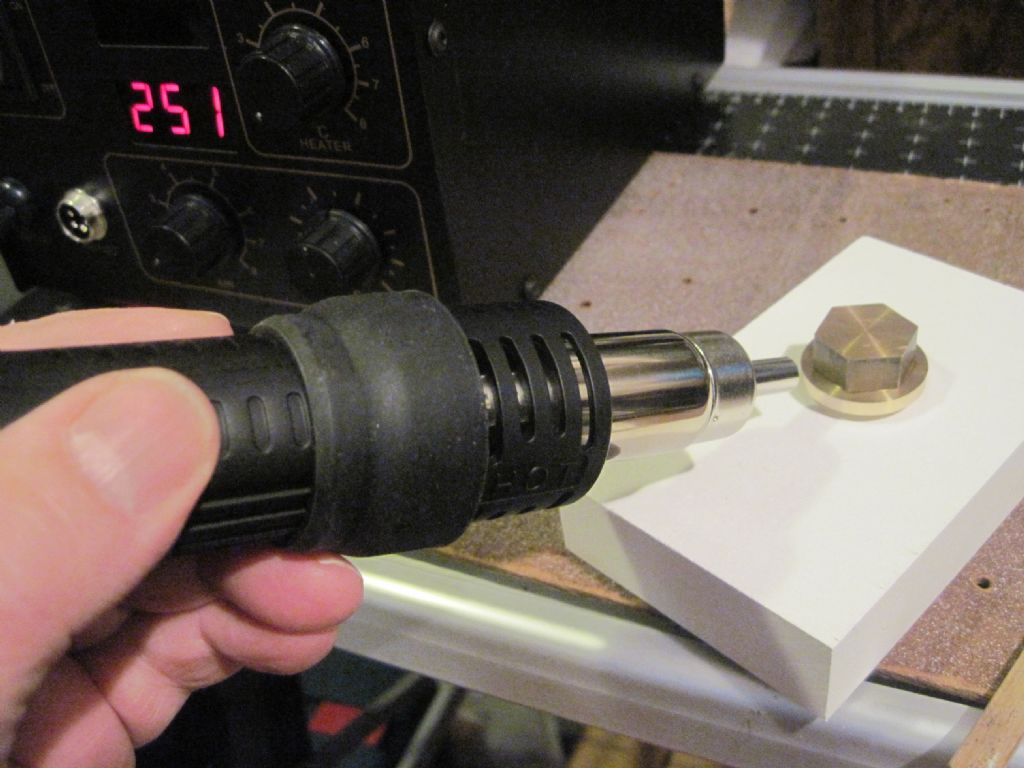
            I need a large blanking plug for one of my boilers (for testing) and found a suitable piece of brass in stock. As there wasn't anything 'spare' to hold on to – I used a shellac 'wax' chuck to hold it and turned the outside edge and inside face on my EW (you can see the partially turned part in the toolholder photos above. I find my soldering 'station' hot-air gun very convenient for this operation (it was really acquired to solder SMD components). It gives very controllable temperature and doesn't overheat things – albeit it's slower than using a gas torch. The photo shows the part being "un-attached".

            Heating a Shellac Chuck

            I then needed to index the part and drill six mounting holes. I normally use my rotary table for this (but it was down the Shed). I'd gripped the part in an ER32 chuck to face off the other side, so decided to use my Hex collet block to drill the holes. First problem was (with the vice mounted) there was insufficient clearance to set the block vertically. A simple solution was to bolt two 20-40-60 blocks directly to the table (via 8mm bolts and the table slots) with a front stop. These held the block very firmly. This then allowed the holes to be part-drilled – I couldn't go right through as I didn't want to damage the collet.

            Vertical HEX collet Block

            I should mention that whilst still chucked in the EW, I'd run a spotting drill into the centre. Dividers were used to then mark the hole radius. A sticky pin in the drill chuck was trued and set to this radius mark (easy to see with my Optivisior). My Cowells drill has a very useful design feature in that the table's 'arm' can be swung, as well as having a table that rotates. So a part can be fixed to the table and then simply aligned by moving the part through the two arcs possible. I've fitted a collar/clamp (which sits under the arm) to the drill's main column so that when the arm itself is unclamped – the table doesn't just drop but can be swung to either side.

            Finger Plate on drill table

            To finish through drilling the holes, the part was clamped in my finger plate. Something that may not be obvious is that the long (8mm) central bolt can be screwed right through the base plate and in this instance there is a wing-nut holding the plate in place on the table. The finger itself is then tightened using the finger 'knob' & cap-screw.

            Anyway – that's the blanking plug finished hopefully. I will try a test fit this evening and all being well make a gasket for it. I hope this wasn't too basic for the experts here and that maybe there is something here of use to others.

            smiley

            Regards,

            IanT


            Edited By IanT on 11/02/2021 17:59:37

            #526485
            Nigel Graham 2
            Participant
              @nigelgraham2

              Some of us ARE interested…

              After all the essence of good engineering is to solve the problem in the simplest and most efficient way without compromising quality, accuracy and safety.

              …. Maybe the stumbling block was the word "simple" – in these days of knocking off before breakfast a set of 5"g Bulleid Pacific 'Boxpok' driving-wheels on one's 5-axis machining-centre and own-created CAD/CAM file!

              '

              I've not been in the workshop for the last 2 or 3 days either, as even if I could make the air vaguely warm I don't fancy trying to handle obstinately cold machinery. There's no pleasure in that, and it's hard to work properly.

              '

              I fitted a spilt circular clamp to an Elliot 'Progress' drill column for the same support, particularly as that drill's table is heavy, most easily raised and lowered with a scissor-jack from an old car.

              Neat finger-plate – I don't think I've seen a double-ended one previously.

              You could try using a T-nut for that centre clamping-screw, with a wing-nut or knurled knob up on the top.

              '

              Just a thought with circular, rotatable drilling-machine tables as on your Cowells. Assuming the table can be centred under the spindle and its centre faithfully follow an arc from it, how feasible would it be to add to it a simple indexing plate for drilling pitch-circles? A 24-hole plate would accommodate the vast majority of such tasks, including 8 holes.

              #526496
              IanT
              Participant
                @iant
                Posted by Nigel Graham 2 on 11/02/2021 17:20:49:

                One extension to my idea may be to put small locating fences on the blocks to engage the top-slide corner, giving a simple quick-change function. Does that clamp-block have a rebate to the same effect?

                I've thought about several 'improvements' over the years Nigel (including guides on the blocks) but never quite got around to them. I did fit a 'guide' piece/block that a) generally positions the blocks and b) supports the clamp adjusting screw and its foot. This guide isn't currently fixed in place and can swivel – allowing the blocks to also be angled, which can be handy for chamfering etc. I may drill it for a removable taper-pin one day. I have considered fitting an 'end' stop (to make things a bit more 'repeatable' ) but haven't found a desperate need for one yet.

                One thing I didn't mention is that when making these holders (from bright mild steel) the bottom will NOT be flat. I took a very light skim over the bottom surfaces. Otherwise they will tend to move, even if firmly clamped.

                These blocks are very simple to make and use and perhaps it's best to keep them that way. A spring lifts the clamp when changing blocks and (again) whilst I've thought about a handle (instead of the nut) but it's never quite reached the top of my TUIT list…

                I've also thought about index holes on the edge of the Cowells table but in use it would require careful set-up of any required radius (via the arm). I am happy with my new variable speed (with remote-control) DC motor though!

                egards,


                IanT

                Tool Clamp for Rose Blocks


                Edited By IanT on 11/02/2021 18:52:25

                #527037
                Nigel Graham 2
                Participant
                  @nigelgraham2

                  Thank you for that.

                  I reckon for chamfering simply for appearance and removing the sharp edges, a V-tool is the easier way than angling the tool-holder round.

                  Good idea – the foot on the clamp-screw (hexagon-headed on mine). I've tended just to use a bit of sheet-metal but that's always a faff, best avoided simply by a few minutes' turning.

                  That is a definite advantage, the spring under the clamp. I've used bigger lathes with similar tool-clamps but no spring, and it was always a bit of a battle with the thing.

                  '

                  One exercise I set myself was using a spread-sheet to prepare a change-wheel set for cutting metric threads on these lathes, with the standard change-wheel set. I have not tried it in reality but was able to find very close approximations for the smaller M-series, based on acceptable cumulative pitch-errors in 10 turns. (Certainly enough for under-cutting and die-finishing.)

                  I've nly ever used my EW with the top-slide on, though I've used the boring-table to hold the vertical slide a few times. To hold the VS' location I made two L-shaped blocks that nest the slide's back corners, and held to the table by screws and T-bars. (A happy discovery recently was that some T-bolts I think I made for the EW also fit the BCA jig-borer!)

                  '

                  The wear on my EW's spindle and headstock mean it's not reliable for very accurate work, and you can see the chuck bouncing; but if nothing else I could use it for tasks like threading studs, perhaps turning it by hand. I usually finish a cut screw with a die to profile the thread anyway.

                  My thoughts have been on making very thin-walled leaded-bronze liners working on slightly reduced diameters on the spindle, with the bores line-bored out to 19.5mm. maybe a delicate 20mm max. This may be feasible on the Harrison lathe, with the headstocks still on the bed. The tailstock would need re-boring and new spindle, or a liner, at the same setting.

                  Alternatively I could re-bore the headstocks and make a new, over-size spindle to suit. It does not seem to be anything other than mild-steel, unhardened.

                  I've only about 8 other projects to finish, the house to look after and me to feed…

                  #527043
                  DMB
                  Participant
                    @dmb

                    Nigel,

                    I'm in a similar situation, just the cat and I. I often (usually once a week) obtain a large steak pie made on the premises in a small shop, cut in 1/2does 2 days. Prep enough vegs for two days then day 2s dins quicker. Only wash up after day 2 meals. An occasional big shop @ supermarket to stock pile cupboards and my large freezer and time it to arrive at a very good chippy and sit in car to eat it out of the wrapping. Only knife and fork to wash up with other items later in the week. Waiting for things to cook is like watching paint drying so I try to find other food prepping jobs like carving up a Swede for tomorrow or peeling bramleys for an apple crumble, e.g. I find all sorts of little tricks to reduce regular jobs to get me a bit more time in workshop. I keep a shopping list handy in the kitchen so when I notice something is getting low its added to list. Saves 'firebrigade trips' for one important ingredient that may otherwise be forgotten. Round trips on foot to various nearby shops gets me my daily exercise as well. I have practised 'roundtripping' in the car for years to cut down time mileage etc. I like supermarkets that flog cheaper petrol as well, do both jobs, one trip. Need the time to finish off all the roundtuits so I can photograph and write them up for the club newsletter. TV railway progs are a time consuming prob! Still not enough hours to achieve everything.

                    John

                    #527044
                    DMB
                    Participant
                      @dmb

                      IanT,

                      Thanks for drawing attention to "roseblocks", seems a good idea for my small lathe so will refer back to the article and maybe make some. Have got a QC holder system on Myford in gently warmed workshop, pleasant to use in Winter but still the unpleasant journey to it from the house, such that not ventured forth for a couple of days. Plan to use my under used small lathe for small jobs indoors (understairs cupboard). I therefore need your suggestion to make the small lathe more convenient to use.

                      John

                      #527127
                      IanT
                      Participant
                        @iant

                        Hello Nigel & John,

                        Nigel, If you haven't already seen them, Martin Cleeve wrote quite a long series of articles about "improving" the EW – including making a new 7/8th" spindle (with nose plate) to replace the original 3/4" one. This might be a useful way to restore your headstock. I have the articles if you'd like copies.

                        I do use the top-slide occasionally for some work but generally just leave the boring table in situ, as it's slotted table makes many things more convenient. The only real drawback is that it's a good bit wider and my scroll chuck & 4Jaw will foul it I get too close to them. This is not a problem with the ER32 chuck, where it will pass underneath.

                        John, having a small lathe "indoors" is very convenient and there are lot of simple (but still useful) things that you can do with one. I am very fortunate that my 'Manager', although very firm about visiting cold workshops, does provide an excellent in-house restaurant service in exchange. My friend (who is widowed) is very organised in this area and makes a whole tray of stuffed peppers and home made soups that get stored away in the freezer as 'instant meals'. His daughter is currently delivering Sunday Lunch to his doorstep but I know he misses eating it with her family. I'd like to be able to get down the Pub with him again too.

                        The blanking plug fitted well and I've made some paper gaskets for it. Amazon use a nice thick brown 'packing' paper that looks ideal, so I've used that. In the past I've used a plastic 'circle cutter' to cut these but never been very happy with them – especially on smaller diameters. After throwing several attempts in the bin, I simply used a compass to draw the inside hole and cut it out with a scalpel. I then cut the outside diameter using the plug itself as a guide. I don't think my circle cutter will see use in this area again. Sometimes simple and obvious is best!

                        The holes I've made in the past with a (leather) hole punch but I again decided to change tack and made a simple custom punch. It's very easy. I chucked some 6 mm mild steel rod, faced it and then centre drilled it with my smallest centre drill. I then turned it down to 3mm (to fit the holes) – which gave a sharp end. Then using low-peel masking tape (to hold the gasket in place) I punched away on top of a wooden block. There was no need to harden the punch.

                        I hope this helps someone here – it was (and still is sometimes) often the simplest things that caused me the most headaches.

                        Regards,

                        IanT

                        Paper Gaskets

                        #527339
                        Nigel Graham 2
                        Participant
                          @nigelgraham2

                          JOHN –

                          I've not been in the workshop for a few days now apart from fetching a few tools this afternoon. Too cold to be pleasant in there. I like the Domestic Science tips!

                          IAN –

                          Yes – I would be very interested in that article, thank you. To be honest I'd have thought 7/8" dia rather risky because the headstock journals are so thin.

                          I found the back of the spindle flange had worn a recess about 1/32" deep in the casting, so I made a thick bronze thrust-washer for there. To stop it revolving I screwed a 6BA brass screw tightly into the back, cut it to a short stub and filed that flat to slip into the clamping-slit in the headstock.

                          I've worked out how to hold the head and tails stocks for re-boring – clamp them to a short dovetailed block made with an appropriate tenon to fit the boring table, probably on the Myford as it's nearer EW centre-height than the Harrison. The tailstock as well not just to overhaul that, but also to make any slight vertical or horizontal error from original axis equal on all three parts.

                          I spent this afternoon dismantling my A0 drawing-board, to gain space for the EW on its trolley in what I call the 'middle room' (at the back of my house). At the moment it's under the kitchen work-top, but the 'South Wing' holding the kitchen and bathroom are like an ice-box in cold weather!

                          #527365
                          IanT
                          Participant
                            @iant

                            Nigel – if you PM me with your email – I'll send you the MC EW articles.

                            Regards,

                            IanT

                          Viewing 12 posts - 1 through 12 (of 12 total)
                          • Please log in to reply to this topic. Registering is free and easy using the links on the menu at the top of this page.

                          Advert

                          Latest Replies

                          Viewing 25 topics - 1 through 25 (of 25 total)
                          Viewing 25 topics - 1 through 25 (of 25 total)

                          View full reply list.

                          Advert

                          Newsletter Sign-up