How to strip a Centec 2A Vertical Milling Head

Advert

How to strip a Centec 2A Vertical Milling Head

Home Forums Workshop Tools and Tooling How to strip a Centec 2A Vertical Milling Head

Viewing 25 posts - 1 through 25 (of 40 total)
  • Author
    Posts
  • #19750
    Avon
    Participant
      @avon
      Advert
      #472467
      Avon
      Participant
        @avon

        vertical head - top.jpgHi,

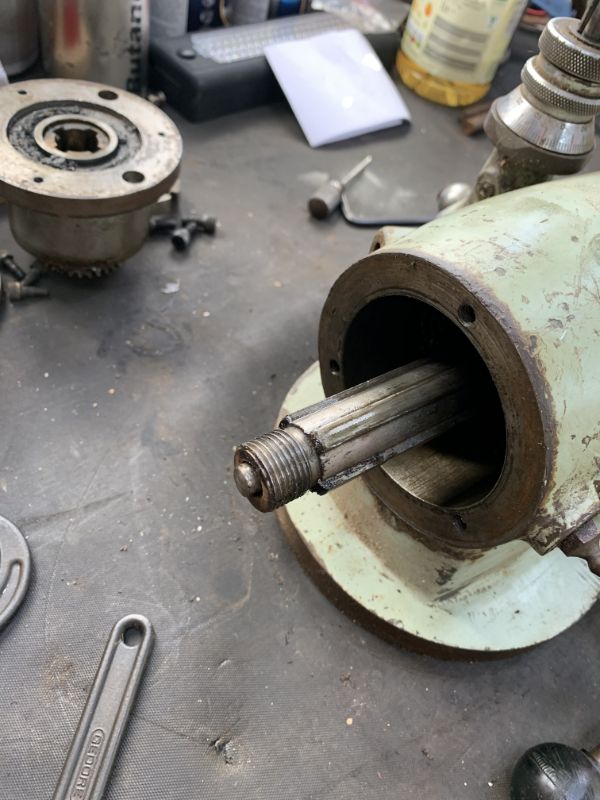
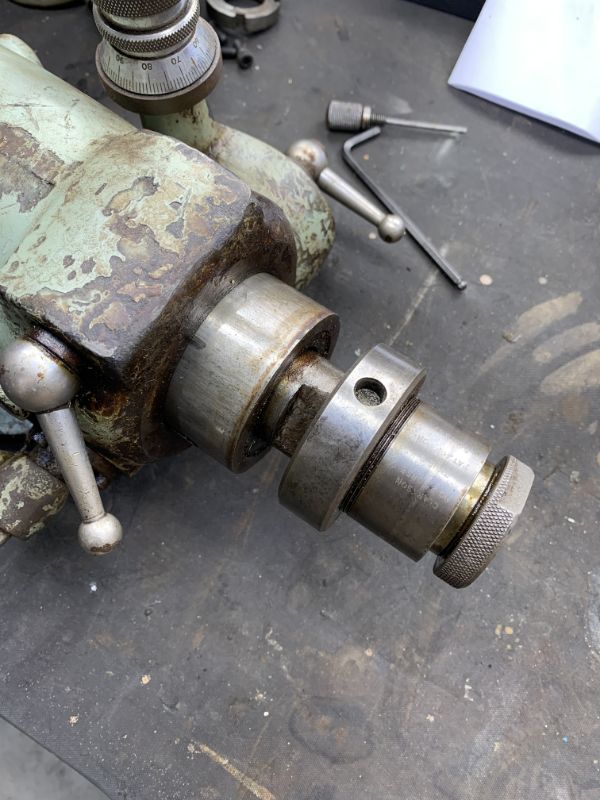
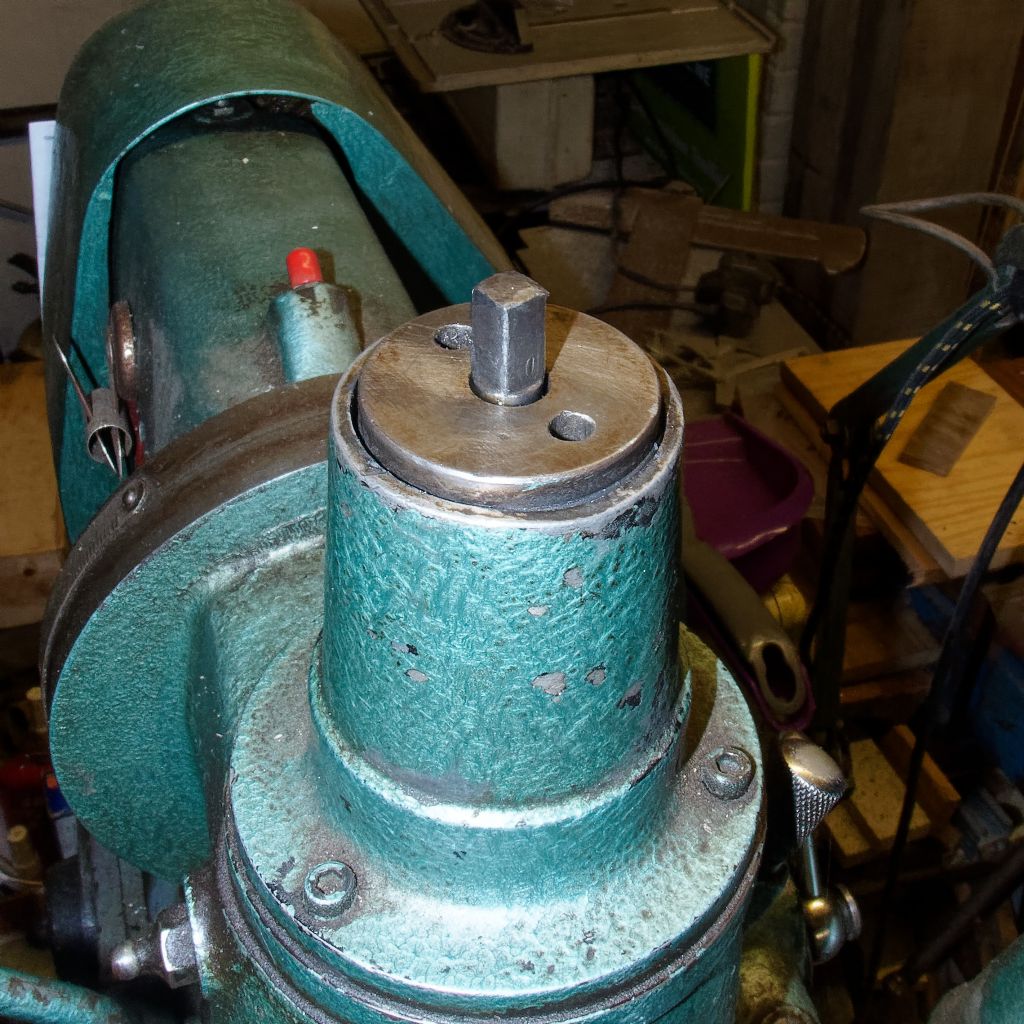
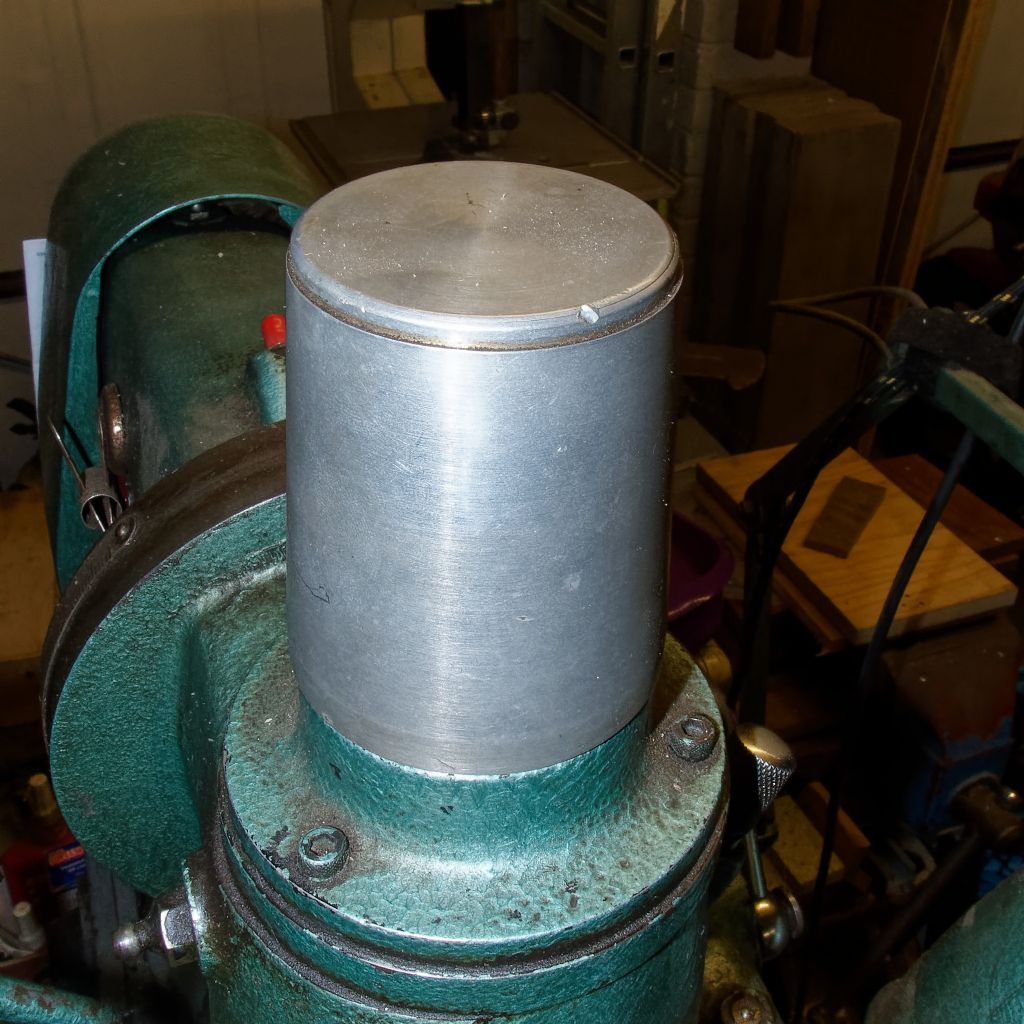
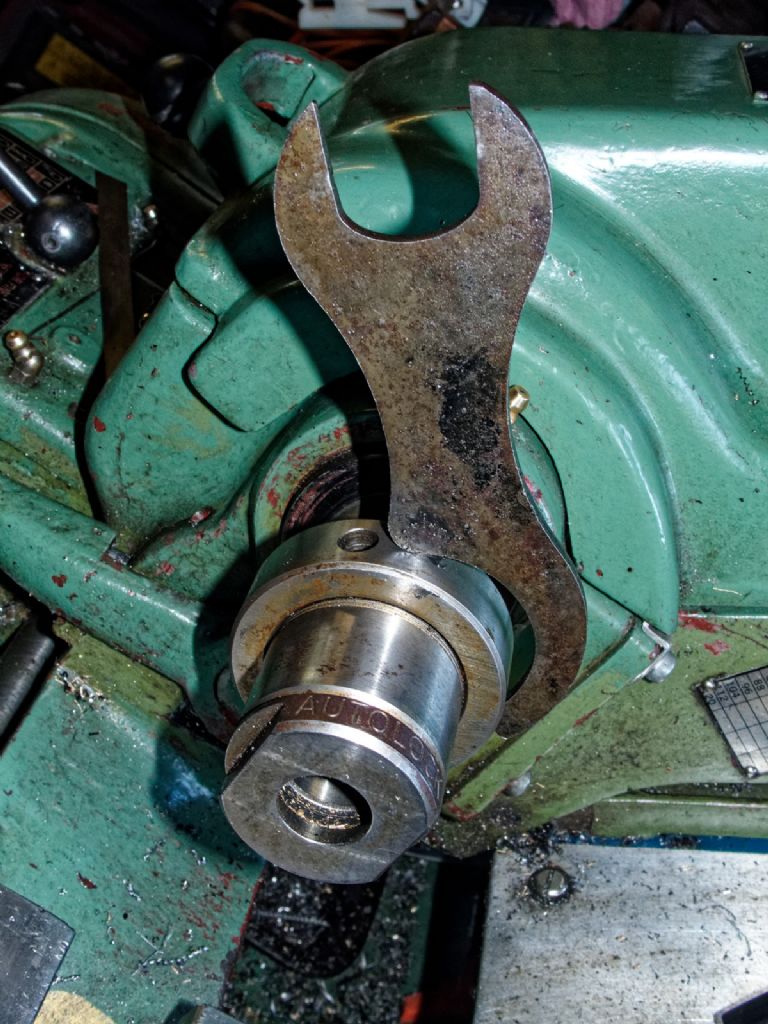
        I've just started to refurbish my father's old Centec 2A milling machine. I've started with the vertical milling head, which I believe is the MkIII. However, I can't remember seeing it being used so have little first hand knowledge of this machine. Attached (I hope) are two pictures, one shows the bottom of the head and the other the top. The device at the bottom of the quill which has the knurled nut fitted I believe is a cutter holder. However, I can't remove it from the quill, I've tried clamping the body of that part and using a proper spanner in the holes of the larger diameter piece. Nothing moved. I suspect that it has all got siezed with old oil and lack of love. I can't even remove it from the quill, which I presume it fits into via the MT2 taper. The other picture shows the top end of the head (sans gear carrier etc). What appears to be a pin in the top of the shaft wobbles about and I've presumed it might act to disengage anything in the taper, but a few reasonably heavy taps with a hammer didn't appear to achieve anything. I'm loath to give it a good whack unless I'm sure that that is the right thing to do.

        I'd be grateful for any advice or guidance on stripping this down. I want to clean out the many years of old grease and gunk, repaint and reinstall.vertical head - bottom.jpg

        #472476
        duncan webster 1
        Participant
          @duncanwebster1

          The thing with the holes in is part of the collet chuck. It has a left hand thread (from memory) and is used to increase the stiffness of the whole setup after the morse taper is nipped up. The drawbar (about 3/8" diameter poking out the top of the splined bit) doesn't look right it should be self ejecting. I wouldn't go beating the drawbar with a hammer to get the morse taper apart until you have exhausted other means, you don't want to damage the bearings. There is a useful link at **LINK**

          #472494
          Avon
          Participant
            @avon

            Thanks Duncan, I did wonder whether it the drawbar as you've described it had a better function than simply being there to be whacked! Fully agree with you about not wanting to damage bearings etc as the whole setup currently feels sufficiently tight. Thing I'll continue to strip it down and then probably soak it all in diesel or something similar.

            Do you know how the drawbar should be tightened? I can't see any obvious way of doing so – I'll investigate further, but I wonder whether its sheared off as there's method for locking it off.

            I'll know much more when I've finished!!

            #472499
            mark smith 20
            Participant
              @marksmith20

              Looks to me also like the square end of the drawbar has sheared off.

              #472513
              not done it yet
              Participant
                @notdoneityet

                Avon,

                Use a couple of wedges to part the holder from the quill. I do it a lot of the time, on mine, if the taper is tighter than a tap (with a softer-than-steel) mallet to free it. I very much doubt that soaking it, with anything, is likely to loosen it.

                #472529
                T.B
                Participant
                  @t-b-2

                  If you screw a nut onto the threaded part of the spindle where the draw bar is poking out.

                  You can use this with a pulley puller to push on the draw bar and hopefully pop the chuck out of its mating taper

                  This will avoid putting any strain on the spindle bearings.

                  From memory you will need a 3/4" UNF nut

                  #472705
                  Avon
                  Participant
                    @avon

                    Gentlemen,

                    Many thanks for the replies. I've now stripped the head down and have the quill together, draw bar and Clarkson S type collet holder in one lump on the bench. Currently I have them in a bottle full of diesel in a vain hope that it'll soften some of the old gunk; even poured some down the quill shaft.

                    I've tried undoing the damper on the chuck having found a proper spanner to fit the holes – nothing moved, even when I carefully checked the thread direction.

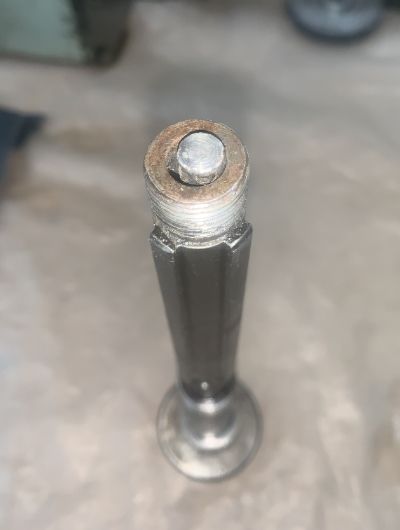
                    Neither does the draw bar move. With regard to the drawbar does it act in such a way internal to the quill that it will pull any taper fitting up tight or should it be acting on something on the top of the quill shaft? If if acts internally then to use T.B.s suggestion surely I'd have to have unscrewed the drawbar first? Since it doesn't move at all at the moment, I'm considering cutting a slot in the head to act like a screw head.

                    I'd be grateful for your thoughts. I'll post a pic of the quill head shortly.

                    #472707
                    Avon
                    Participant
                      @avon

                      draw bar head.jpg

                      #472710
                      Howard Lewis
                      Participant
                        @howardlewis46836

                        Any chance that you could clamp wedges between the collet chuck and the quill, and then apply some heat to the outside of the lower end of the quill?

                        Possibly applying heat, a short distance away, and waiting for it to sink through to the taper, might work.

                        If the wedges apply enough pressure, you should hear things come apart, quite easily.

                        Howard

                        #472716
                        Avon
                        Participant
                          @avon

                          Hi Howard, I've been thinking about the careful use of heat to free things up. My first concern though is the drawbar which I presume will prevent any effective use of wedges – unless I've completely misunderstood the drawbar's function (entirely possible).

                          To heat it up I was actually thinking of putting it in a bath of boiling water? It'll be hot, but can't get too hot.

                          Peter

                          #472733
                          old mart
                          Participant
                            @oldmart

                            I would try to unscrew the remains of the drawbar first. Then cut a 3/8" W thread on a length of silver steel an inch or two longer then the broken one, screw it into the back of the autolock and give it a substantial whack with a hammer and the MT will probably separate from the spindle. You are unlikely to do any harm to the bearings as all Morse tapers are difficult to remove by design. The original drawbar is not likely to be of captive design as there is not enough size at the small end of the taper to allow a step in the spindle bore.

                            Cutting a screwdriver slot may be the best option to get the drawbar out, although if there is about 1/4" sticking out, then hitting it in situ would probably work, but due to the proximity of the end of the spindle, a copper hammer would be safer. If the taper breaks, the broken drawbar will just fall out downwards still attached to the autolock.

                            Edited By old mart on 18/05/2020 18:11:16

                            #472734
                            not done it yet
                            Participant
                              @notdoneityet

                              Dunno what wedges you are thinking of. As I wrote earlier, I use wedges all the time, as the only necessary alternative to a tap on the drawbar with a soft mallet.

                              I have made my own but they are similar to these:

                              Wedges

                              #472760
                              duncan webster 1
                              Participant
                                @duncanwebster1

                                That drawbar is not original, it should have an extension with a square end. Once you get the nut on the collet chuck moving you should be able to use it to jack the morse taper apart. If that doesn't work I'd take advise above and make up some tapers, or use 2 bits of 10mm square bar to make a bridge arrangement so you can support the spindle and hit the end without jarring the bearings. The bearings are taper rollers and so expensive, and you need some bespoke C spanners to do the adjustment. There is an oil seal at the bottom end as well, so go careful with any heat.

                                An alternative mentioned above is to screw a nut onto the top thread and use a bearing puller to push on the end of the drawbar

                                #472773
                                Avon
                                Participant
                                  @avon

                                  Dear All,

                                  The quill is out of the bearings so I've found the taper rollers and oil seal mentioned by Duncan. I think I'm going to try using a bearing puller first (I think I have one somewhere), perhaps supported followed by making up some wedges as mentioned by 'not done it yet'..After that some heat, WD40 and possible a good whack with a mallet – Old Mart doesn't believe that the drawbar would be captive – so an enthusiasic whack might be all thats required.

                                  I'll let you know how I get on!!

                                  Many thanks

                                  #472788
                                  peak4
                                  Participant
                                    @peak4

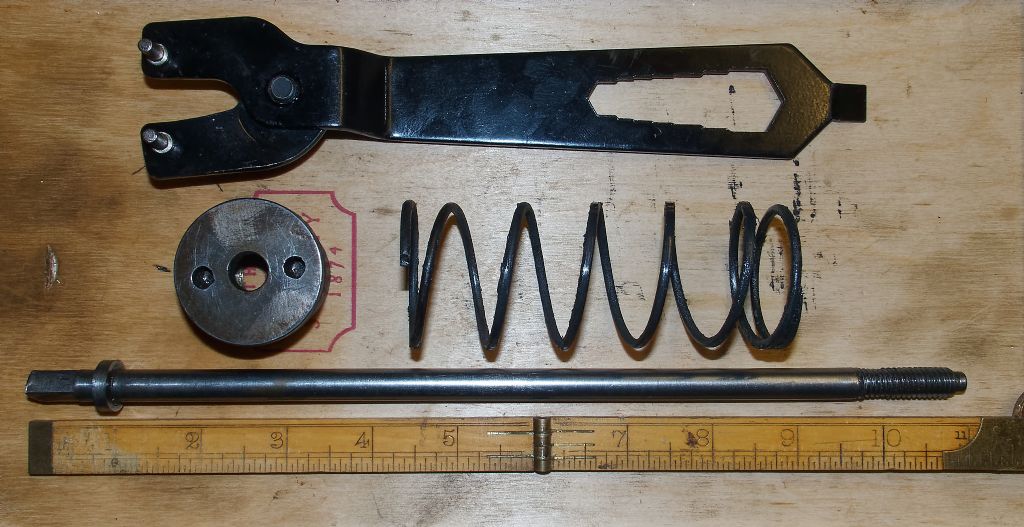
                                    Avon, the drawbar is certainly not captive in that part of the spindle, thou it is when everything is assembled correctly.
                                    The collar fits under the top cap, above the spring.
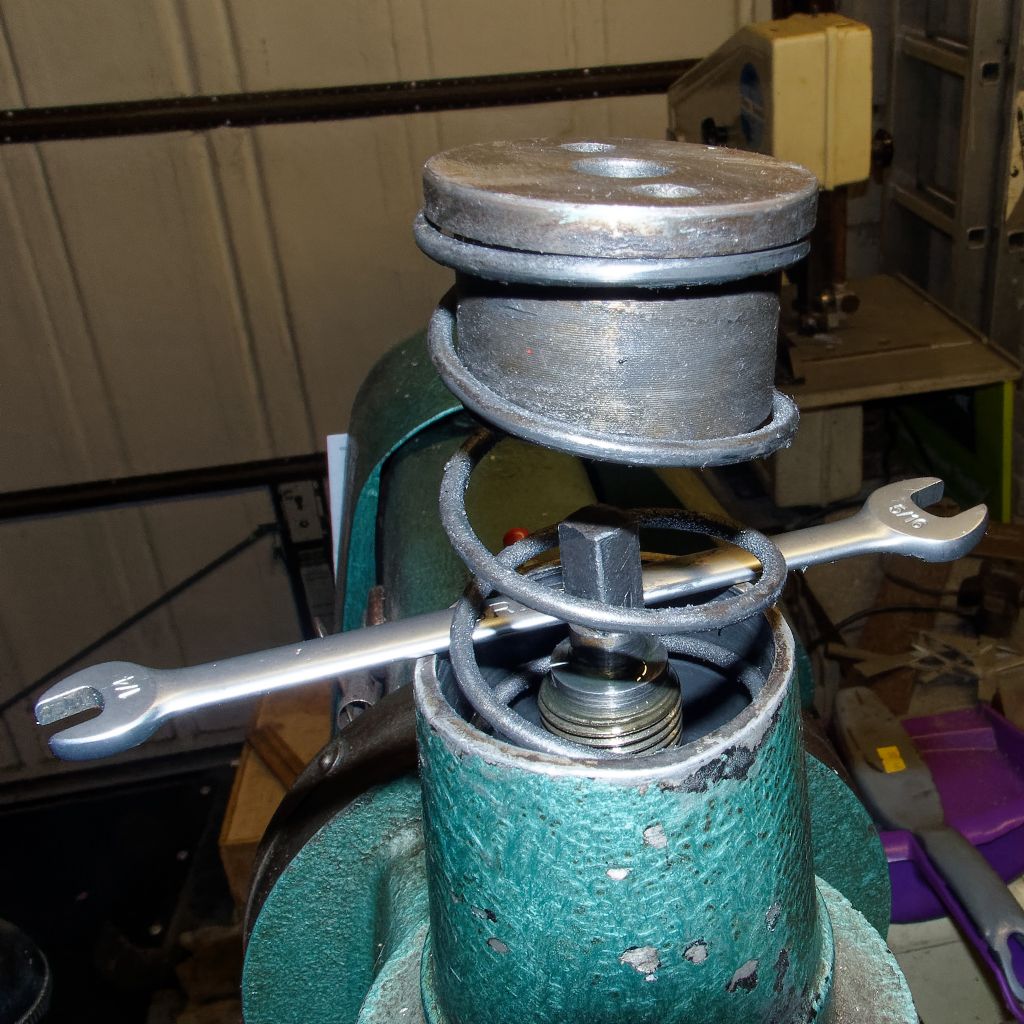
                                    When tightened, the collar clamps the morse tapered item in the spindle, and when turned anticlockwise, the collar bears on the cap nut to eject the cutter/holder.

                                    Drawbar, spring top nut and adjustable angle grinder spanner.

                                    Drawbar

                                    Part assembled

                                    Assembled

                                    Safety Cap

                                    Just had mine apart today to make a new spacer to go between the two top bearings.
                                    I had about 29 thou rise and fall on the top bevel gear, so so too much angular backlash on the spindle; I made a spacer +0.025" longer than the old one.
                                    Hopefully that will leave enough clearance between the gears for some oil.

                                    Bill

                                    #472791
                                    Simon Williams 3
                                    Participant
                                      @simonwilliams3

                                      There was a similar debate going on just a few days ago, albeit with a Tom Senior vertical head. Maybe you've already found it, but it's worth looking at

                                      Tom Senior V Head stuck MT2

                                      The secret to this problem seems to be to preload the taper as much as possible – wedges and/or puller – then give it a sharp whack with a hard hammer. I know that will cause a whole lot of sharp intakes of breath, but don't pat it with a soft hammer, give it a good shock. The weight of the hammer is important – needs to be a sharp crack from a 1 lb hammer or thereabouts. But lots of axial preload first.

                                      If that won't shift it don't beat it to death, it needs some science with hot on the outside and cold on the chuck. Put the whole thing in the freezer, then heat the outer with a paint gun. Then preload it and hit it.

                                      Looks to me that the snugging ring on the back of the chuck is already tight against the end of the spindle. It's a left hand thread, try running it down away from the spindle nose to free it up and get it away from the nose to leave some space for the wedge idea. In that other thread the taper gave way with a smack on the top wedge with the bottom one against something big and heavy as an anvil.

                                      HTH Simon

                                      Edit :  Oops that seems to be the wrong link, sorry.  I'll try to update it before the edit timer runs out, otherwise there will be a correction below.

                                      Edit 2: My apologies.  Try this one for size:  Getting a vertical head ready for use

                                      Edited By Simon Williams 3 on 18/05/2020 21:01:44

                                      Edited By Simon Williams 3 on 18/05/2020 21:04:18

                                      #472793
                                      old mart
                                      Participant
                                        @oldmart

                                        That's a clever captive drawbar design, I like it.

                                        #472794
                                        old mart
                                        Participant
                                          @oldmart

                                          That's a clever captive drawbar design, I like it.

                                          #472795
                                          Dave Halford
                                          Participant
                                            @davehalford22513

                                            Old oil can set like Loctite after 40 odd years, use some blowlamp heat for freeing off the ring nut.

                                            Use the opposing wedges squeezed tight with the vice to add some preload, then blow lamp the taper again and wack whats left of the drawbar with a steel hammer as there's nothing left to damage.

                                            I would file spanner flats in the draw bar, a screwdriver slot is too weak.

                                            #473051
                                            Avon
                                            Participant
                                              @avon

                                              Hi Dave, All, I think its well and truly set!

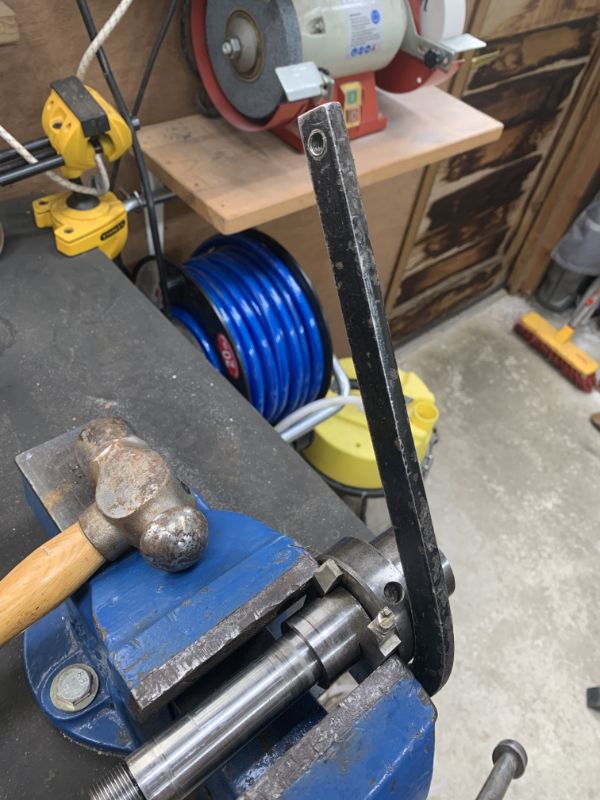
                                              I've heated it (wife didn't notice it in the oven – only 120C) then cooled the chuck in cold water. Clamped it in the vice as show and gave the well fitted spanner some enthusiastic attention. Not the slightest sign of if moving and I checked and thought through multiple times whether I was trying to turn it in the right direction – I'm certain I am!

                                              The spanner is now showing signs of cracking (maybe a bit too much enthusiasm) and tomorrow we're off to a local engineering firm that are experienced in attending to old agricultural machinery and the chap is a bit of a whizz (I'm told and hope).

                                              Maybe that's why my father never seemed to us it very much – I know I can use it setup as it is, but it'd be a shame to refurb the rest of the machine and not get this sorted out.

                                              I'll update the thread when I've made some progress.

                                              in the vice.jpg

                                              Edited By Avon on 19/05/2020 17:37:32

                                              Edited By Avon on 19/05/2020 17:38:16

                                              #473122
                                              old mart
                                              Participant
                                                @oldmart

                                                No matter how tight that Autolock is, you still need a drawbar to ensure it doesn't fall out when milling.

                                                What is that black painted bar being used for? The collar on these MT2 Autolocks is left hand thread.

                                                #473133
                                                Simon Williams 3
                                                Participant
                                                  @simonwilliams3

                                                  That snugging nut is a left hand thread – so I agree you are turning it correclty to push against the end of the quill, but is it moving? Can you turn that backing nut with your black spanner in the opposite direction at all?

                                                  That really looks like it should let go.

                                                  You need to move the snugging nut away from the end of the quill to create a space into which you can get a couple of slotted taper wedges between the back of the chuck and the end of the quill.

                                                  One of the problems you are fighting is that the drawbar is quite elastic – so you hit the top end but the shockwave dissipates as it travels along the drawbar and is just a bump when it reaches the taper. Introducing wedges as an additional axial urge puts the force exactly where it is needed.

                                                  I've made these wedges out of gauge plate, cutting the angle with a sanding disc in the angle grinder then hardening and tempering them afterwards. You only need a very slight angle. You need two opposing each other to get the best effect.- they're not as good as the real thing but needs must.

                                                  Keep is posted!

                                                  Rgds Simon

                                                  #473181
                                                  Dave Halford
                                                  Participant
                                                    @davehalford22513

                                                    I'm beginning to think someone has actually used Loctite on the taper due to the trashed drawbar.

                                                    Gummed oil will give up at 100C, epoxy and some Loctite's cease to hold at the melting point of solder.

                                                    MORE HEAT

                                                    #473206
                                                    peak4
                                                    Participant
                                                      @peak4
                                                      Posted by Simon Williams 3 on 19/05/2020 22:43:02:

                                                      That snugging nut is a left hand thread – so I agree you are turning it correclty to push against the end of the quill, but is it moving? Can you turn that backing nut with your black spanner in the opposite direction at all?

                                                      That really looks like it should let go.

                                                      You need to move the snugging nut away from the end of the quill to create a space into which you can get a couple of slotted taper wedges between the back of the chuck and the end of the quill.

                                                      ………………………………….

                                                      Rgds Simon

                                                      Gents, I'm struggling to get a handle on this, so to speak.
                                                      As several people have mentioned, that ring with the C spanner holes is on a Left Hand thread.

                                                      As such, in order to make it bear against the end of the spindle, the nut must be rotated Anticlockwise, as viewed from the cutter end of the chuck.

                                                      Please see the photo below for the correct placement, and turning direction, of the C spanner ( though a better spanner would clearly be advisable ).
                                                      I know this is the correct orientation, as I've just used it to release the chuck from the lathe spindle, as per the photo below.

                                                      clarkson autolock c spanner.jpg

                                                      Yes I know it's the wrong C spanner and everything needs a clean, but this was a quick setup on the Warco 720 for illustration purposes.
                                                      I set it in the lathe rather than the mill so the spanner stayed in place whilst I took the photo.

                                                      I'd suggest that there is only a very small gap between the collar and the spindle end in Avon's case, so there might not be enough space for wedges.

                                                      Assuming the nut isn't now jammed on the chuck, through turning in the wrong direction, pre-load the nut hard (with a small hammer) against the spindle end and then try clouting the remaining end of the drawbar with a decent sized hammer.
                                                      Perhaps protecting the drawbar's end with a lump of copper or brass might be a good idea (and it would also protect the screw thread on the spindle's end if anything moves.

                                                      N.B. even just fitting the chuck to the lathe spindle with just a reasonable rap, it took quite a bit of force on the spanner to remove the chuck in the photo shown above, as the morse taper locked quite well.
                                                      I'd suggest that using the nut alone won't be enough axial force to eject the chuck, but the preload might be enough when used with a hammer on the drawbar.

                                                      Bill

                                                      Edited By peak4 on 20/05/2020 11:47:28

                                                    Viewing 25 posts - 1 through 25 (of 40 total)
                                                    • Please log in to reply to this topic. Registering is free and easy using the links on the menu at the top of this page.

                                                    Advert

                                                    Latest Replies

                                                    Viewing 25 topics - 1 through 25 (of 25 total)
                                                    Viewing 25 topics - 1 through 25 (of 25 total)

                                                    View full reply list.

                                                    Advert

                                                    Newsletter Sign-up