Myford ML4 restoration, setup, upgrades………improvements???

Advert

Myford ML4 restoration, setup, upgrades………improvements???

Home Forums Workshop Tools and Tooling Myford ML4 restoration, setup, upgrades………improvements???

Viewing 25 posts - 1 through 25 (of 50 total)
  • Author
    Posts
  • #318171
    Jon Cameron
    Participant
      @joncameron26580

      Hello there since I seem to be hi jacking other peoples threads in the quest for info on my lathe I thought an update and an introduction were probably necessary. wink

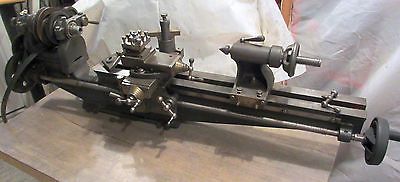
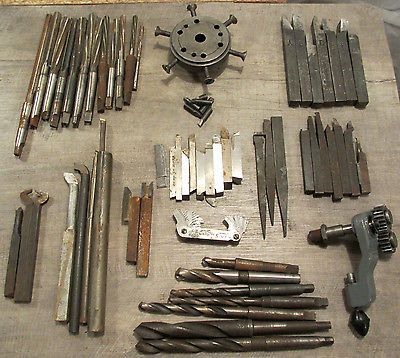
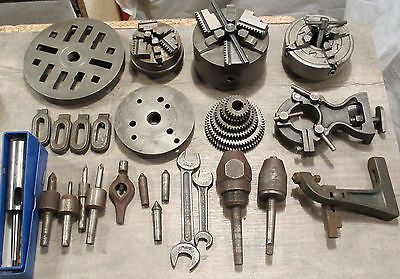
      I bought this lathe from e-bay for the princely sum of £350, it came with a range of tooling some of it knackard, some still usable. Also 3 jaw, and a four jaw self centering, and a 3 jaw quick tightened  chuck. It also has a myford fixed and traveling steady and a couple of tapered drill chucks for the tailstock which are to be honest a little past it but may be useful at some point so have been put to one side.

      Firstly some photos of the lathe as advertised

      s-l400-2.jpg

      s-l400-1.jpg

      s-l400.jpg

      Edited By Jon Cameron on 22/09/2017 23:08:31

      Edited By Jon Cameron on 22/09/2017 23:13:24

      Edited By Jon Cameron on 22/09/2017 23:14:43

      Advert
      #18664
      Jon Cameron
      Participant
        @joncameron26580
        #318172
        Jon Cameron
        Participant
          @joncameron26580

          This useful info posted by another member shows some very useful identification for the 4 different variations of the ML series.

          Posted by Georgineer on 22/09/2017 21:20:29:

          Some simple measurements and observations can identify which of the different models ML1 to ML4 one is faced with.

          ML1 & 2: 3 1/8" centre height, 15" between centres, 3 1/2" cross slide travel.

          ML3 & 4: 3 1/2" centre height, 24" between centres, 4 1/2" cross slide travel.

          ML1 & 3 ('Standard' models): Spindle bearings direct in headstock.

          ML2 & 4 ('Superior' models): Bronze spindle bearings, shrouded ball thrust race.

          My understanding from lathes.co.uk is that the cast-in headstock was abandoned in 1937, so from then until the ML1 and ML3 went out of production in 1941, all models had the removable headstock.

          George

          #318174
          Jon Cameron
          Participant
            @joncameron26580

            20170824_150224.jpg20170824_150334.jpgGiven the above advice I can now say with certainty that my lathe is an ML4, though one with an ML1 or 3 type nose thread, possibly turned down to fit some cheap accessories or was because they had knackard the thread on the spindle nose.

            Edited By Jon Cameron on 22/09/2017 23:30:05

            #318175
            Hopper
            Participant
              @hopper

              Or someone machined the spindle down to fit a set of chucks etc they already had from a previous machine etc.

              Looks like a good useable machine with a good selection of tooling you got there. There is a good Yahoo group for Myford lathes that could be useful source of info.

              I have an old Drummond M type of similar style and vintage and it has proved to be a good and useful machine once set up and sorted out a bit. Happy turning!

              #318177
              Jon Cameron
              Participant
                @joncameron26580

                20170826_191519.jpg20170826_191402.jpg20170826_191342.jpgThere is as with any old machine a fair bit of wear, on mine the bed is worn, chipped, and in a couple of localized areas even pitted. As well as wear on the cross slide, top slide, and the dovetails and gibs.

                20170826_191249.jpg

                #318182
                Jon Cameron
                Participant
                  @joncameron26580

                  20170906_134458.jpg20170904_130924.jpg20170904_140952.jpg20170904_140946.jpg20170904_140937.jpg20170904_140932.jpg20170904_140912.jpg20170904_131051.jpg20170904_131009.jpg20170904_130956.jpgIt came time to set the lathe up and mount the motor and lathe on the 38mm chipboard worktop, and kitchen cabinet I got from freegal. Great place freegal for odd bits of money saving.

                  I first started with the motor using M8 threaded rod cut to length, and a nut backed onto another nut to form a good lock nut. The position of the motor was selected, with the lathe in situe. So I could gauge what room I'd need to be able to work around the lathe. Once finalised I marked the bolt openings from the motor frame onto the worktop with black market pen. These were then drilled using the cordless, and to the front edge of the markings enabling the motor bracket to move back and forth to allow tension to be set on the lathes belt.

                  Then once the bolts were passed through and bolted tight, I turned my attention to the position of the lathe, making sure with a long enough straight edge the pulleys were in line. Then again marked the position on the bench and drilled. What I should have done is put some silicone down the holes when putting the bolts through as this would stop oil ingress, and potentially expansion of the chipboard as it takes on oil. (Will come back to that).

                  The lathe was mounted on the studs (cut slightly longer than the studs for the motor mounting). To allow the lathe to be levelled, or more accurately trimmed for cutting concentric bars, drilling holes ect. Firstly a builders level was used length ways and at 90 ° to the bed, then diagonal from corner to corner of the bed. All the time watching the bubble and making small adjustments to the nuts. To get as close as I could with the level.

                  20170904_121101.jpg

                  20170904_124226.jpg

                  #318183
                  Jon Cameron
                  Participant
                    @joncameron26580

                    I hope you van appreciate that I'm a compete novice to this so I may make some errors in terminology along the way but please ignore that. I'll get there eventually.

                    I started painting some bits up too but you'll have to wait for that………TBC

                    #318199
                    Neil Wyatt
                    Moderator
                      @neilwyatt

                      Keep it coming John, the lathe looks to be in good condition for its age given the photo of the bed.

                      Neil

                      #318240
                      Jon Cameron
                      Participant
                        @joncameron26580
                        Posted by Neil Wyatt on 23/09/2017 07:57:00:

                        Keep it coming John, the lathe looks to be in good condition for its age given the photo of the bed.

                        Neil

                        Looks can be deceiving Niel, the bed isn't as great as I thought from the sale pics, and may well be improved with scraping the bed, but im still reading up on that at the moment. And I haven't even bought the tools for the job yet. Comparing my lathe with some photos on Google, there is a lot more wear in mine than other, and will need to be addressed when I've the confidence to do it.

                        #318244
                        Jon Cameron
                        Participant
                          @joncameron26580

                          I have got sick of seeing rust on my lathe and bad paint, so I stripped the tailstock down and cleaned it up, I degreased the parts and then polished some of the metal parts to get rid of the rust. I cleaned up the bore and the spindle whilst I was at it, it's amazing how much bits of metal were back there.

                          With a fresh coat of paint the parts were left to dry over night and baked in the oven for an hour at 50°C this evaporated the solvents and hardened the enamel paint. I was careful not to get any paint on surfaces that were machined or would be in contact with other parts, these got a wipe over with oil after painting, whilst I was at it I also decided to do the change gears and bracket.

                          20170921_154951.jpg

                          #318254
                          Georgineer
                          Participant
                            @georgineer
                            Posted by Jon Cameron on 22/09/2017 23:23:54:

                            20170824_150224.jpgGiven the above advice I can now say with certainty that my lathe is an ML4, though one with an ML1 or 3 type nose thread, possibly turned down to fit some cheap accessories or was because they had knackard the thread on the spindle nose.

                            Edited By Jon Cameron on 22/09/2017 23:30:05

                            There were three spindle nose threads used as original by Myfords.

                            7/8" x 9 tpi Whitform (which is what you have), with MT1 internal taper;

                            7/8" x 12 tpi Whitform, also with MT1 internal taper;

                            1 1/8" x 12 tpi Whitform with MT2 internal taper (though the tailstock remained at MT1).

                            I have never discovered if the two 7/8" threads were used at different times, or on different models, or according to the customer's choice. The 1 1/8" thread seems to have been introduced later, and is the same thread as used on the ML7. The thread should be slightly undersize, location of the chuck/faceplate being effected by the parallel register behind the thread. All three threads used on the ML1/2/3/4 had a register the same diameter as the nominal thread diameter. When the ML7 was introduced it had a larger 1 1/4" diameter register. This means that an ML7 accessory will fit onto an ML4 thread but without the accurate location given by a register. An ML4 accessory will not fit the ML7 spindle.

                            It should be quite possible to make a register ring for the 1 1/8" ML4 nose, or a thread adaptor with register for the 7/8" nose, to give you a 'bolt-on' ML7 spindle nose, which opens up a whole world of accessories off the shelf or the internet.

                            Just to confuse the picture, my ML4 came with a 7/8" BSF (11 tpi) spindle nose and no internal taper – somebody had obviously fitted a non-standard mandrel for some reason.

                            George


                            Edited By Georgineer on 23/09/2017 14:47:22

                            #319041
                            Jon Cameron
                            Participant
                              @joncameron26580

                              Hi all, some interesting reference material here on ML4 lathes from last year, and a more recent thread about half nuts, which also contains some useful references and information here

                              Edited By Jon Cameron on 28/09/2017 00:40:41

                              #319107
                              Jon Cameron
                              Participant
                                @joncameron26580

                                An explaination of setting up the tailstock by Brian Wood.

                                Setting the tailstock alignment on an ML 4 lathe

                                Ideally the method needs a 1MT test bar, the actual diameter of the plain parallel section is not important other than being a minimum of 3/8 inches. Also needed is a decent three jaw chuck with self aligning jaws, one that can be really trusted for true centreing. And finally, a sensitive DTI mounted on a magnetic stand.
                                Fit the chuck to the spindle nose and fit the test bar to the tailstock barrel. Slacken all the soleplate screws on the tailstock and the clamp used for gripping the bed
                                Slide the tailstock so that the test bar enters the chuck as close to the section just beyond the M/T taper that can be reached over the saddle and gently close the chuck jaws to grip the bar. A decent bar is hard enough to resist any marking from the jaws, but neither do they want closing up hard.
                                The tailstock barrel and headstock spindle should now be correctly aligned with each other. Set the DTI up off the cross slide, offer it up to the exposed section of the bar and zero it.
                                It is now a question of tightening the tailstock sole plate screws to avoid straining the alignment just achieved and testing that by easing the chuck jaws to watch for bar flexure on the DTI. Repeat the alignment procedure if necessary until satisfied with the result. Finally, test the effect of the tailstock clamp to check for DTI movement when that is clamped.
                                Some notional movement may be inevitable with this final test, in which case it might be helpful to note by how much.
                                For putting on a taper turning offset to the tailstock in future, a short dead centre turned to fit a tool hole in a boring head fitted into the tailstock barrel is probably a lot easier to work with than upsetting the alignment achieved above.
                                In the absence of a test bar, a fair substitute can be made with either a long Morse taper drill or machine reamer. They should not be slender in cross section; at least 3/8 inch diameter is suggested.
                                i. Myford themselves would have used a production line aid to simplify setting up these lathes; it was very probably a hardened bar, perhaps 12 inches or so in length, with Morse tapers on both ends so that socket to socket alignment was made. In use, the headstock would have been aligned to the bed first and then bolted down, followed by the tail stock soleplate setting. Any over height tailstock would have had the top surface of the soleplate scraped to fit; low versions would have been shimmed.

                                Brian Wood 2016

                                #319130
                                Jon Cameron
                                Participant
                                  @joncameron26580

                                  I have gone about it another way, and I've a video which demonstrated the frustration in setting it up. In that there are three items that can all influence the angle of the tailstock. 

                                  So I put a piece of rust in the three jaw and mounted up a R/H cutting tool, I set the compound over as far as I could and turned a point onto the bar, this makes a reference point for center hieght, and eliminates if there is wear in the taper of the spindle. 

                                  Once a point was turned the tailstock received a MT1 dead centre. Since all tools will have a taper connection to this part then it seems logical that if there is wear in the tailstock then this must be taken into account. A reamer in the chuck would be a better idea but im not that brave yet, or confident about it's alignment.

                                  The tailstock is brought upto the chuck, as far as it'll go, then the quill extended to meet the other point on the turned bar. 

                                  Horizontally I look good so proceed to make adjustments to the gun slide, making sure everything else is locked up, (be sure if your tightening the gibs the the clamp has opposite force applied. Ie screwing in the adjuster, will mean you have to loosen the clamp, and visa versa.

                                  With a 6inch ruler between centers, the ruler tells you which direction the tailstock gibs need to go. To adjust the gibs make sure the bolt on top is slackened slightly to allow movement, and tightened back up after before proceeding to make adjustment to the other screw. Once you are happy that the tailstock is centred, move the tailstock up the bed, and extend the quill as far as you can, low and behold a different reading, and frustration en sues, what I did was adjust half of the difference of the duller with one screw, then the other half with the second screw. If your lucky when you move it back to the first position you'll be darn close to level, I was using the dovetail on my saddle to determine where I needed to be, and the whole thing was done by eye.

                                  Video will be uploaded to YouTube and posted later today, just to give some insight to the daft design.

                                  20170928_160023.jpg20170928_160618.jpg

                                  20170928_160517.jpg20170928_160447.jpgEdited By Jon Cameron on 28/09/2017 17:28:11

                                  Edited By Jon Cameron on 28/09/2017 17:29:08

                                  #319152
                                  Brian Wood
                                  Participant
                                    @brianwood45127

                                    You do like to do things the hard way don't you!

                                    I've wasted precious hours doing the job in much the sane way as you describe, only to find that the tailstock barrel is skewed on the bed and deep drilling into a job in the chuck is inaccurate.

                                    Thinking again about it since writing those notes last year, I think there is an even easier way of proceeding; it needs no drills, reamers or test bars either.

                                    Wind out about 1.5 inches of tailstock barrel and grip that in the 3J chuck, being careful not to grip in the anti rotation groove. Now bolt up the tailstock soleplate, the barrel is stiff enough to resist flexing.

                                    You might have hit lucky Jon, but this would give a confirmatory test on what you achieved today.

                                    Regards Brian

                                    #319157
                                    Jon Cameron
                                    Participant
                                      @joncameron26580

                                      Double post

                                      Edited By Jon Cameron on 28/09/2017 20:47:54

                                      #319158
                                      Jon Cameron
                                      Participant
                                        @joncameron26580

                                        Brian I thought of that already tried it even, but there was too much flex in the tail stock so wasn't what I thought was accurate enough, at least the centers provide a single reference point, when I've checked the extended length then back again I'm getting closer, for those that don't know here's how annoying it is to set up the tailstock, as you think it's spot on when oops it isn't!

                                        #319297
                                        Jon Cameron
                                        Participant
                                          @joncameron26580
                                          Done a few bits today, things that have been bugging me. Firstly the dials would not rotate, on the feed screws for the cross slide and the top slide, so instead of dialing in a dimention I was adding subtracting ECT. Which was a bit of a pain.
                                           
                                          I disassembled it and cleaned the parts before lubricating with light oil, the metal washers were firstly rubbed on some fine wet and dry with oil, then on a stone to remove any sharp edges.
                                           
                                           
                                          The parts were reassembled as above all recieving a light dose of oil to stop corrosion. A small flat blade screw driver was inserted to the rear of the dial so the nut could be done up. The tension on the dial, (or resistance for turning), is adjusted by how tight this nut is. The handle was then screwed back on and the same was done for the cross slide.
                                           
                                          #319298
                                          Jon Cameron
                                          Participant
                                            @joncameron26580
                                            change gears and the lead screw was been thrown out. Plus it looked ugly and I didn't like it.
                                             
                                            Once all was cleaned back up and the grime removed. The bracket was bolted back in place.
                                             
                                            The disadvantage of this was that now the lead screw didn't line up with the half nuts and was pulling the lead screw 80thou from centre, not good for a smooth gear train.
                                             
                                            I loosened the screws off the saddle which hold the apron in place, cleaned the underside of any muck, and remounted the apron. Just this adjustment halted the amount of deflection on the lead screw to 40thou. I began to think how I could make this better, and I thought to shim one side of the apron to tilt it into the lead screw. I started with one of the shims removed from the bracket. This was 16thou. By mounting this to the outer edge it tilted the apron at the bottom into the lathe. This removed all of the deflection on the lead screw. But the lead screw jammed and was stiff to turn.
                                             
                                            Next came good old beer can. Beer cans are made of 5thou thick metal and make for a great packing material. Two strips were cut. And mounted under the edge as before. This gave a deflection of just 15thou, but the leadscrews was free to turn when the half nuts were engaged.
                                             
                                             
                                            You can just see the two 5mm strips of beer can under that saddle. The deflection now reads 15thou, but since it's so smooth the length of the bed I'll leave it alone.
                                             
                                            It did however present another problem in that the gaurd for the lead screw no touched the rack, so that was removed and the offending edges that touched filed off.
                                             
                                            #319299
                                            Jon Cameron
                                            Participant
                                              @joncameron26580

                                              I also tried a rudemetary way of aligning the tailstock. Using one of the largest taper drills i have, (think it's 7/8&quot mounted in the tailstock. The quill was extended out as far as I could and the gib adjusters loosened off. The drill was fed as far into the chuck as I could get it, and the jaws nipped up, not locked tight just nipped up. Then the gib was brought to mate with the ways and tightened, the clamp at the rear was then loosely tightened. Just enough to give some pressure to the rear. The adjusters were then tightened up making sure the whole setup wasn't moving, and locked into place. I've yet to check it's alignment, but the quill by eye looks to be perfectly parralel to the ways. The worn gib strip is also sitting nice and flat against the ways, whereas before it was slightly tilted.

                                              Edited By Jon Cameron on 29/09/2017 21:43:38

                                              #319750
                                              Jon Cameron
                                              Participant
                                                @joncameron26580

                                                Well I made a start on some oil cups for the headstock today, that's after I'd adjusted the grubscrews on the headstock, (butt clenching after all the warnings of the headstock cracking).

                                                With the three jaw chuck mounted I started to turn brass, but the tools had too much top rake, had two dig ins, and then it flew out the chuck, so abandoned brass for now. While turning the brass I had heard clunks, and the finish wasn't brilliant, like the work was jumping. I knew the brass was in the chuck tight, and wasn't taking heavy cuts. I decided it was time to look at what was causing the knock.

                                                I held the 3 jaw with both hands firm and lifted upward, CLUNK, tried again same result. I got a flat bladed screw driver and tentatively went to screw the grub screws that adjust the tension. They were loose, so I nipped them up to just passed where they started to grip, I've now noted their position so will become part of my daily start up procedure of the lathe, when oiling the pots, checking the position of the screws.

                                                Anyhow Aluminium what a lovely material to machine, like cutting through butter. Will post some pics tomorrow when I've finished the oil pots for the headstock, nice shiny Ali.

                                                Is anyone actually reading what I'm posting on this thread, or am I posting to myself? frown

                                                #319766
                                                Neil Wyatt
                                                Moderator
                                                  @neilwyatt

                                                  No I'm reading… bit concerned about what you describe as coming loose… doesn't sound as if it's quite right?

                                                  #319768
                                                  Jon Cameron
                                                  Participant
                                                    @joncameron26580

                                                    There is two grub screws which act down and apply pressure to the headstock bearings, this is one area of the lathe I haven't looked over though, as I wasn't aware of what was involved. The screws act down on the split bearings and apply pressure to the bearings, and thus the spindle. I have read a lot of horror stories of the bearings been over tightened and Crack the casting of the headstock is wreaked. They must not have been tight when I first bought the lathe. If it goes loose again then I'll call in an expert to look at it properly. By expert I mean a friend about half hour away been at the machining game a lot of years. Also capable of machining up a new set of spindle bearings if needed.

                                                    #319772
                                                    Jon Cameron
                                                    Participant
                                                      @joncameron26580

                                                      I even got told by the person I bought the lathe off not to play with the adjustment on the headstock bearings, as they were prone to damage by been ham fisted. So until today I hadn't done anything with it. Till I'd heard a noticeable clucking noise. The clunk was the spindle hitting the top bearing that wasn't pressured against the top of the spindle.

                                                    Viewing 25 posts - 1 through 25 (of 50 total)
                                                    • Please log in to reply to this topic. Registering is free and easy using the links on the menu at the top of this page.

                                                    Advert

                                                    Latest Replies

                                                    Viewing 25 topics - 1 through 25 (of 25 total)
                                                    Viewing 25 topics - 1 through 25 (of 25 total)

                                                    View full reply list.

                                                    Advert

                                                    Newsletter Sign-up