Limp Probe

Advert

Limp Probe

Home Forums Workshop Techniques Limp Probe

Viewing 25 posts - 1 through 25 (of 30 total)
  • Author
    Posts
  • #552352
    Martyn Nutland 1
    Participant
      @martynnutland1

      Hello

      I wonder if someone could advise me on the use of a co-axial indicator on a milling machine. I've just bust my new one first time out of the box!

      Let's start from the premise that the instructions that come with it are total gibberish and that I do know basically how they work. I wanted to centre holes in aluminium plate so I could enlarge them with a boring head to make a dashboard.

      I fitted the short straight probe but was mystified why I couldn't get any resistance on it in one direction – I was expecting it to be like a dial test indicator where you push the stylus over to contact the workpiece. In this case the probe just hung limply down flopping about and no amount of tightening of the nut at the connection between the arm and beam would tension it. (Pushing it in the opposite – non-dangly direction – did produce tension against the beam and a reading on the dial).

      I then, very foolishly, put it in the mill, wound it across to get tension on the probe on the side where it wasn't dangling (the instrument was now of course about 25mm off-centre). I started up at 170 rpm, the probe hit a step block holding the work and snapped off the arm.

      I can probably make a new arm, and I would still like a co-axial indicator. I can't afford a Blake, that apparently is the Rolls-Royce, but any thoughts on a decent one in, say, the 200 Euro ball-park.

      Many thanks in advance for any guidance on both use and purchase.

      Best Martyn

      Advert
      #16293
      Martyn Nutland 1
      Participant
        @martynnutland1

        Advice on co-axial indicators please

        #552353
        Yngvar F
        Participant
          @yngvarf

          Hi

          There is a plastic ring that must be removed. Right over the probe.

          yf

          #552354
          Robin
          Participant
            @robin

            The £60 one on eBay?

            I was a bit puzzled by mine until I figured out I had to remove the blue plastic ring. It didn't want to come off, snapped in half when I insisted,

            I haven't used it yet but it seems okay, maybe you got a dud.

            #552364
            John Hinkley
            Participant
              @johnhinkley26699

              Martyn,

              It sounds to me like you were unlucky and bought a duff one. I bought my first lathe when I was living in France. I bought a bench top mill from Amadeal and picked it up in person on a trip back to the UK, along with some other goodies, including an axial centring device. As far as I recall, there was no plastic ring involved and it worked straight out of the box. I'm still using it today in my Warco VMC mill and have to admit that there is a certain amount of jiggery-pokery needed when setting up the probe – but that is to be expected. You should be able to alter the angle of dangle of the probe mounting to apply a little pressure to the device once roughly centred by eye. The securing screw and nut are pretty small, of course, so use a well-fitting spanner on the nut (Amadeal state that a spanner is included) and go carefully. No gorilla tactics required.

              I see Amadeal are still offering the centring indicator for £62.50, so no need to splash out 200 Euros.

              No connection with either Amadeal or Warco other than having been a satisfied customer of both.

              John


              Edited By John Hinkley on 03/07/2021 09:53:46

              Edited By John Hinkley on 03/07/2021 09:54:37

              #552366
              Anonymous

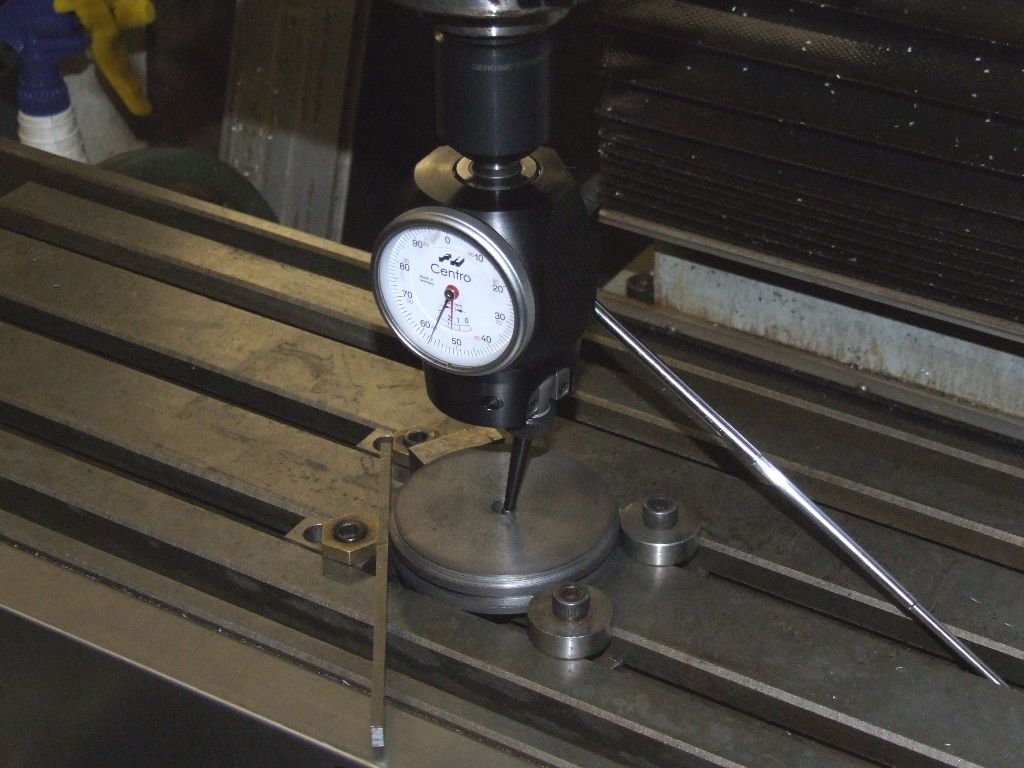
                I use a Centro from Haimer, although it's somewhat over the specified price:

                centro_using.jpg

                The probe moves easily in one direction and the dial moves in sympathy. In the other direction the probe has almost no movement. If overloaded in either direction the probe will eventually slip. On the back of the body there is a rotating disc that sets the direction of probe movement, inwards or outwards for centring on holes or spigots. I don't remember any plastic rings, the Centro just worked out of the box. The Centro instructions list a maximum speed of 150rpm. I usually run around 100rpm, 170rpm seems too fast.

                I'm not aware of any mid-price indicators. I suspect it's either hobby end or high end professional.

                Andrew

                #552383
                Martyn Nutland 1
                Participant
                  @martynnutland1

                  Thanks for that folks.

                  My plastic ring, they call it the 'guard ring' in the brochure, came off without much bother.

                  I didn't use the spanner that came with it, but good fitting BAs, but can't get any tension at all on the arm/probe, it just dangles and flops around. There's tension in the other direction but then the arm has a face that pushes on the beam and thus the main spring loaded plunger.

                  Mine doesn't have a knob on the back to set the direction of the probe – I guess that might be a Centro feature?

                  I'm a bit confused about speed. I too use a Warco mill. Tubal Cain on his instructional video, using a Bridgeport says to run at 600rpm with a 100-buck indicator like mine. Must confess I don't now fancy anything over about 100!

                  Thanks again everyone.

                  #552386
                  Anonymous

                    Posted by Martyn Nutland 1 on 03/07/2021 11:14:24:

                    ………doesn't have a knob on the back to set the direction of the probe…………….

                    ……..Tubal Cain on his instructional video, using a Bridgeport says to run at 600rpm………

                    May be the cheaper versions only work for holes? To be fair 90% plus of my usage is for holes. Hmmm, 600rpm is insane. Doesn't sound like an instructional video to me! I run at around 100rpm on the Bridgeport, horizontal and CNC mills.

                    Andrew

                    #552466
                    old mart
                    Participant
                      @oldmart

                      At 600 rpm the pointer would oscillate ten times a second and be hard to read. The slower the better. I rarely use the one I bought, but would turn the spindle by hand first to be sure the eccentricity was not out of the pointer range. A point to remember is that the figures on the dial only represent an exact distance when the probe in use is the right length and angle.

                      The plastic locking ring on mine is split and comes off easily.

                      Edited By old mart on 03/07/2021 17:56:51

                      #552473
                      Dave Halford
                      Participant
                        @davehalford22513

                        I take it these dont go big enough (50mm)

                        #552500
                        Martyn Nutland 1
                        Participant
                          @martynnutland1

                          I think it's a very good idea, as 'old mart' suggests, to turn the spindle by hand to start, and I would always do that. But to be fair to Tubal Cain, I have watched other videos where they advocate running at what I would consider too high a speed.

                          However…this does not solve the fundamental poser of what to do about a probe that just dangles vertically without any resistance in one direction! Take, for example, the situation where you were using a dial test indicator to centre the spindle, you would gently push the stylus over to an angle where it contacted the side of the bore and it would stay there while you turned the spindle by hand and manipulated the X and Y axes until the zero reading was consistent round the circumference.But with a stylus/probe that dangles, limply at the vertical it's not possible to do that.

                          By the way, in response to Dave's most helpful suggestion – I did cut the holes with hole saws, but, by sod's law, the ones for the magneto switch and oil pressure gauge need to be about 1.8mm larger than the 50mm saw!

                          Once again thank you everybody for your patience and guidance.

                          Martyn

                          #552501
                          Colin Heseltine
                          Participant
                            @colinheseltine48622

                            I never power the spindle on when using mine until I have manually got it within a maximum of 180 degrees of needle movement. I put spindle in neutral and spin by hand. When close enough I power spindle up at max of 100-150rpm and dial in the last few thou. Mine came from Machine DRO. Setting the preload can sometimes be a bit awkward. I always refit the plastic ring after use.
                            Colin

                            #552519
                            Anonymous
                              Posted by Martyn Nutland 1 on 04/07/2021 07:40:24:
                              …..does not solve the fundamental poser of what to do about a probe that just dangles vertically without any resistance in one direction!

                              That's easy, bin it and buy one that works properly. smile

                              As above I manually adjust the slides to make sure the indications are within range before powering the spindle. Although my indicator is marked on the dial that each division is 0.01mm measurement isn't mentioned in the manual. I've always treated the indication as relative rather than precise.

                              I can't imagine that a hole saw is going to leave a good surface to indicate on. When I've made panels with holes that are slightly too small I just use round and/or half round files in the hole until the instrument fits. Quick and simple, and any slight errors get hidden by the instrument bezel.

                              Andrew

                              #552524
                              JasonB
                              Moderator
                                @jasonb

                                Martin, if you pull down on the bit the probe fits into does the dial move and then spring back up when you let go?

                                Also can you post a photo of yours as most of the import ones do have a friction fitting at the end so position of probe can be adjusted, mine does and works just as well on the outside of items as it does in holes.

                                The Vee shaped part should ne in contact with the body but one side of the Vee will move away as the probe comes under pressure.. Roundhead screw adjusts tension of the friction and allows probe holder to be positioned to suit job

                                20210704_101656[1].jpg

                                #552532
                                Michael Gilligan
                                Participant
                                  @michaelgilligan61133
                                  Posted by Martyn Nutland 1 on 04/07/2021 07:40:24:

                                  […]

                                  By the way, in response to Dave's most helpful suggestion – I did cut the holes with hole saws, but, by sod's law, the ones for the magneto switch and oil pressure gauge need to be about 1.8mm larger than the 50mm saw!

                                  Martyn,

                                  Please forgive me if this is a naïve question

                                  Why not use a boring head [or its poor relation, a tank cutter] immediately after using the hole-saw ?

                                  MichaelG.

                                  #552537
                                  Clive Foster
                                  Participant
                                    @clivefoster55965

                                    As Jason says the probe carrier is supposed to be held in the spinning Vee piece that actually moves the indicator by friction alone.

                                    It may not be immediately obvious that things should be set up so the probe deflection is, with reference to Jasons picture, left and downwards so the probe is connected to the mechanism by friction alone. Any sort of hang up inside lets the probe carrier slide on the joint rather than break the innards. Setting things up to go the other way with the hard, angled, face of the carrier in contact with the Vee piece risks damage. Mine came without instructions and correct orientation of the probe was certainly not intuitively obvious to me. In particular my bent probes seemed to have the screw flat on the wrong side.

                                    I initially set up by turning the spindle by hand getting close to zero in X and Y planes simultaneously. Final set-up at about 100 – 150 rpm works fine on the Bridgeport. The scale is just numbers with no inherent meaning as the calibration varies with probe length and angle so no point in trying to read it. Just tweak the handles to minimise needle deviation. Which can be frustrating as the probe flexibility causes it to lag rotation so the error isn't quite where it seems to be.

                                    Going past where you think zero is to get same needle deviation both ways then turning handles back by what feels to be the right amount to hit the middle tends to be more productive than chasing a tiny error. Work alternately on the two axes as there is cross coupling involved. These this are sensitive so don't have unreasonable expectations. I find ± a thou or two achievable in less than geological time but anything better needs a really good surface to work off and a suitably Zen state of mind.

                                    Its most important that the body is allowed to oscillate up and down freely with no drag on the torque arm. Insensitivity to torque arm issues is one of the things you pay for when forking out 6 or 7 times as much for a Haimer. I have both but these days am just as likely to get creative with the zero set and half travel calculation functions of the DRO box. Or just say stuff it and turn up a nice fitting gauge, shove it on a stick and chuck or collet it up.

                                    Link to instructions from Blake, who originated the thing :- **LINK** , https://blakemanufacturing.com/how-to-use-coaxial-indicator-centering-device/ .

                                    Clive

                                    #552539
                                    Michael Gilligan
                                    Participant
                                      @michaelgilligan61133

                                      Very informative post, Clive

                                      Thanks yes

                                      MichaelG.

                                      .

                                      To add to the fund of knowledge … here is Blake’s patent:

                                      https://worldwide.espacenet.com/patent/search?q=pn%3DUS2814124A

                                      [download PDF available via the column of three dots] 

                                      Edited By Michael Gilligan on 04/07/2021 11:31:53

                                      #552579
                                      Martyn Nutland 1
                                      Participant
                                        @martynnutland1

                                        Michael…good ideas, but for less than 2mm enlargement of the hole, half round files are probably simpler, and let the bezel hide any discrepency.

                                        Jason…mine is exactly like yours and I understand the points you make.

                                        Clive…an excellent resumé if I may say so and I'll look up the references.

                                        Meanwhile, I've looked up all the 'internet' I can find and am left in no doubt that you must – but must – be able to initially tension the probe by way of the screw that connects its arm to the beam. This is what Jason correctly maintains. On mine you can't. So as someone said at the beginning – it's a dud!

                                        I will try, as an exercise, to make a new arm to replace the one I broke and will then introduce some frictional resistance between it and the beam. Then I'll put it all away and fork out for a Blake!

                                        Best to everyone, as ever.

                                        Martyn

                                        #552583
                                        JasonB
                                        Moderator
                                          @jasonb

                                          What part are you calling "the beam" The spring inside the unit provides the tension that holds the probe against the work

                                          #552601
                                          Martyn Nutland 1
                                          Participant
                                            @martynnutland1

                                            Jason – the cross-piece (referred to in my parts list as 'the beam&#39 and attached to the plunger in the main body of the instrument and clearly shown in your photo. The arm that holds the probes is attached to it by the set screw, also clearly visible in your picture. I can't get any tension at all on the arm, and thus the probe, so it just dangles vertically. Surely, and all the internet explanations confirm this, when centring over an internal bore, you need to set the probe over to slightly beyond the bore's diameter. Obviously it then needs to stay there, not flop limply back to vertical. Once it is set to just beyond the diameter you then gently insert the probe in the bore – the pre-load – and away to go.

                                            Martyn

                                            #552602
                                            JasonB
                                            Moderator
                                              @jasonb

                                              I'll ask again "Martin, if you pull down on the bit the probe fits into does the dial move and then spring back up when you let go?"

                                              If your beam or my "Vee" shaped part is just dangling and not being pulled up so both ends touch the body then it sounds like you have no spring tension which is what holds the probe against the job much like a lever dti does.

                                              If that is the case then talk with the supplier about a replacement.

                                              #552644
                                              Bernard Wright
                                              Participant
                                                @bernardwright25932

                                                Hi Folks,

                                                Thought I'd add a short video of using one of these indicators to centralise my rotary table. https://youtu.be/ajzC41SI1cU

                                                #552654
                                                JasonB
                                                Moderator
                                                  @jasonb

                                                  here's a rough and ready video showing how the spring within the body provides the tension to hold the probe against the work. If yours does not spring like that then its no good.


                                                  Edited By JasonB on 05/07/2021 12:17:41

                                                  #552661
                                                  Michael Gilligan
                                                  Participant
                                                    @michaelgilligan61133

                                                    Could you change the permissions on that video please, Jason ?

                                                    … it is currently showing as ‘private’

                                                    MichaelG.

                                                    #552691
                                                    JasonB
                                                    Moderator
                                                      @jasonb

                                                      Hopefully OK now, that's what comes with posting a video when you should really be going out.

                                                    Viewing 25 posts - 1 through 25 (of 30 total)
                                                    • Please log in to reply to this topic. Registering is free and easy using the links on the menu at the top of this page.

                                                    Advert

                                                    Latest Replies

                                                    Home Forums Workshop Techniques Topics

                                                    Viewing 25 topics - 1 through 25 (of 25 total)
                                                    Viewing 25 topics - 1 through 25 (of 25 total)

                                                    View full reply list.

                                                    Advert

                                                    Newsletter Sign-up