Arduino CNC

Advert

Arduino CNC

Viewing 25 posts - 1 through 25 (of 45 total)
  • Author
    Posts
  • #518595
    Ady1
    Participant
      @ady1

      Between garage sessions and dog walking I've been looking at homebrew CNC for poor people. There's quite a lot in here as well as out there so I'm going to try and bring some of it together into a single thread

      Feel free to add your own links and info

      Arduino CNC at model engineer

      4 axis arduino project (firmware is 20-40 quid before steppers)

      Arduino GRBL videos

      Advert
      #15319
      Ady1
      Participant
        @ady1
        #518600
        Michael Gilligan
        Participant
          @michaelgilligan61133

          Excellent idea, Ady yes

          MichaelG.

          #518650
          John Haine
          Participant
            @johnhaine32865

            I use GRBL on a Uno for my X axis power feed. Also has a Bluetooth interface and is controlled by GRBL Controller from my phone.

            https://www.model-engineer.co.uk/albums/member_album.asp?a=53829

            #518666
            Ady1
            Participant
              @ady1

              I've just got a cheap control system and a nema17 with a 100/1 gearbox

              Will see if it has enough grunt to move a lathe or shaper or mill table

              #518683
              mgnbuk
              Participant
                @mgnbuk

                4 axis arduino project

                This isn't "4 axis" as such – the board allows cloning of one of the axes for gantry machines and, while the "4th axis" step & direction outputs can be brought out separately, it is noted that GRBL can only control 3 axes. The GRBL developer has said that a 4 axis version of GRBL won't fit on an Arduino Uno due to lack of memory. Protoneer also has a version that fits to a Raspberry Pi, giving a "stand alone" controller where the Pi replaces the PC.

                There is a branch of GRBL for the Mega 2560 board here though this too is 3 axis.

                A true 5/6 axis capable branch that runs on the Mega is available here though I have been unable to compile this – I get something that reports as GRBL1.1P onto the 2560, but it doesn't appear to have compiled as 5/6/ axis, just 3 when I check the parameters. I think this may be due to having previously compiled the 3 axis Uno version of GRBL on the same laptop – during compiling of the %x version in "verbose" mode I get references to using "previously compiled" modules. Not investigated further yet, though.

                Grbl Gru is supposed capable of driving either the 3 or 5 axis versions of GRBL. Universal Gcode Sender will apparently send 4/5 axis commands to the Mega-5X version, though it can only display 3 axes.

                Another Arduino option would appear to be through Estlcam, which I was unaware of until it was mentioned in the thread about Joe Noci's CNC lathe. The CNC part of Estlcam is not charged for & will work without limitation independently of the chargeable CAM part.

                nema17 with a 100/1 gearbox

                Will see if it has enough grunt to move a lathe or shaper or mill table

                I would guess that speed will be your main issue. GRBL will output pulses upto 30KHz. Assuming 800 steps/rev, your motor will require 800 x 100 pulses per output shaft revolution = 80,000 pulses per rev. I make that 22.5 revs per minute at the output shaft at 30KHz – so a low feedrate when attached to a leadscrew. Going to full steps( 200 steps / rev) would up that to 90 rpm, but even with a 5mm pitch screw that is only 450 mm / min. Always assuming that your motor will provide meaningful torque at 30KHz ?

                Nigel B.

                #519541
                Ronald Morrison
                Participant
                  @ronaldmorrison29248

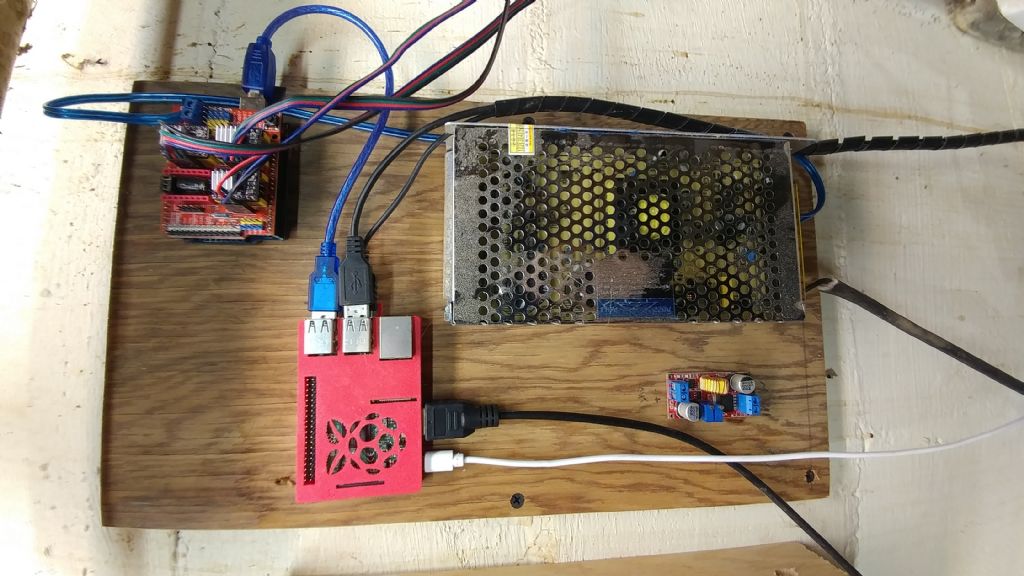
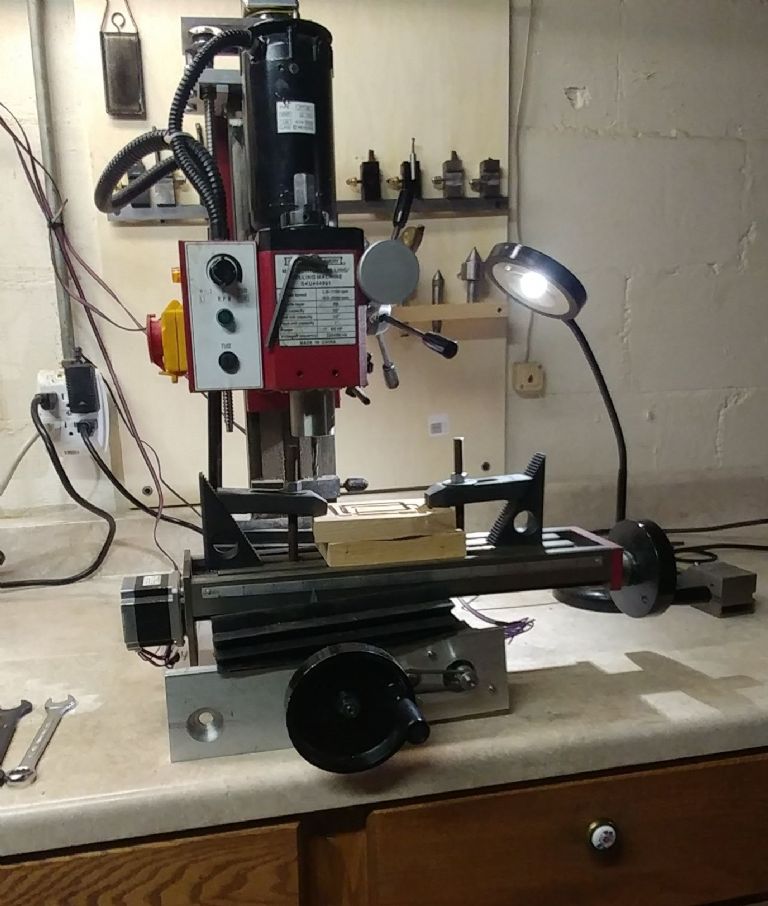
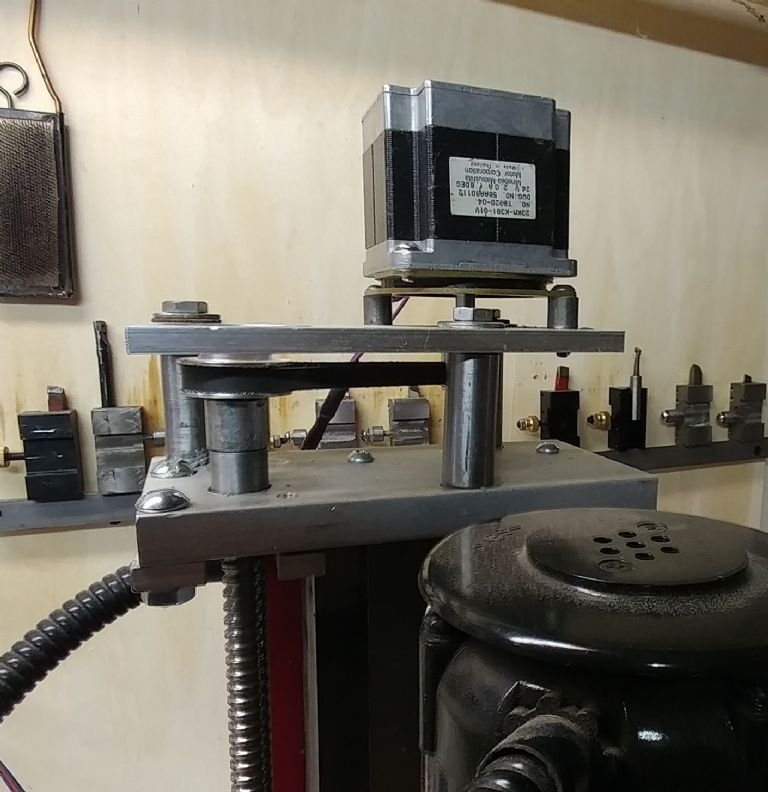
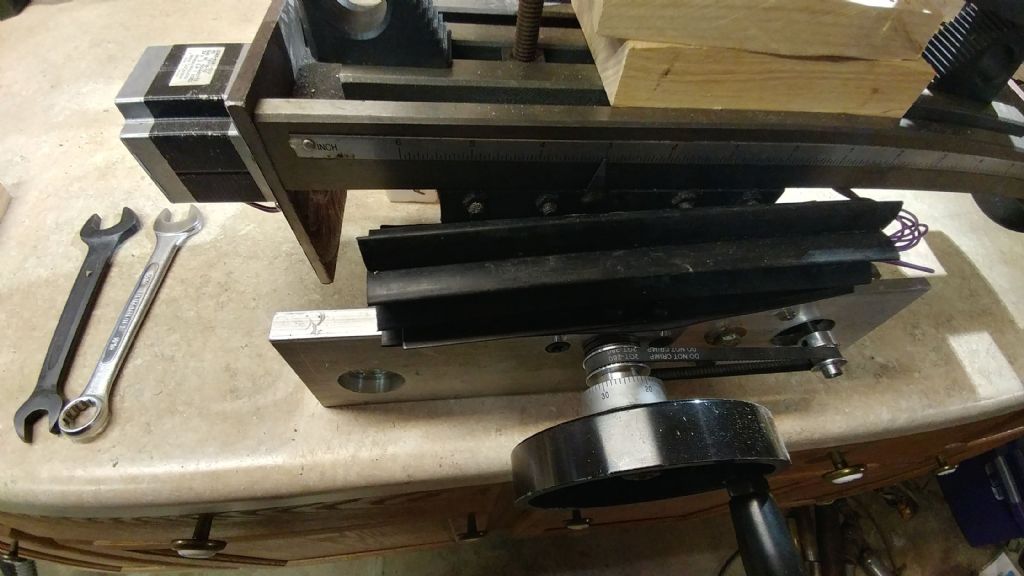
                  I wanted to try some CNC without a major cost. When I finished I had a functioning but not super accurate CNC mill with the inaccuracy mostly from keeping the acme thread lead screws for the X and Y. My X has about .007" backlash and the Y only at .003". I used timing pulleys and belts for the Y and Z while the X is connected directly to the X leadscrew. I wanted manual control for X and Y retained so the handwheels are left on. That required some compromises but as I learn I am glad to have them. The total cost was about $100 USD. I used an Arduino with a CNC shield and a cheap power supply. I drive it with a Raspberry Pi running bCNC.


                  0529200725.jpg


                  cnc minimill.jpg

                  z control.jpgsteppers x+y.jpgEdited By Ronald Morrison on 13/01/2021 12:40:39

                  Edited By Ronald Morrison on 13/01/2021 12:43:48

                  Edited By Ronald Morrison on 13/01/2021 12:46:41

                  #519563
                  Michael Gilligan
                  Participant
                    @michaelgilligan61133

                    Thanks for that, Ronald … I was not aware of bCNC, but have found several videos that look quite useful:

                    **LINK**

                    https://www.youtube.com/channel/UC6duiWL-qeoP1a7QbmSbpDw/videos

                    MichaelG.

                    #519598
                    IanT
                    Participant
                      @iant

                      Neither had Michael – but I found this summary more useful than much of the stuff on YT.

                      bCNC – Product description

                      I also noted that they are recommending going to a 32bit GRBL (not Arduino) – which I had already looked at a little – at least a version that runs on the (infamous) STM32 based "Blue Pill" – of which I already have several ( they used to be about £2 each).

                      Most of the bCNC videos on YT seem to be focused on PCB production but it seems capable of much more. Of course, I'd need a CNC machine first…

                      Regards,

                      IanT

                      Edited By IanT on 13/01/2021 17:20:50

                      #519618
                      Ronald Morrison
                      Participant
                        @ronaldmorrison29248

                        I have both Universal Gcode Sender and bCNC available to use on the Raspberry Pi but use bCNC because it will show the toolpath. UGS would show it too on a more powerful computer.

                        You may have noticed that I have not completed the power connection to the Raspberry Pi yet but that will be done soon using the buck converter mounted on the board near the power supply to drop the 24 volts to the 5 volts that the Pi needs. My connection that I use now does not supply enough current to the Pi.

                        I also have a Arduino Mega 2560 set up with Marlin instead of GRBL but I haven't taken the time to do more than verify that it will turn the stepper motors with the commands.

                        #519737
                        Robin
                        Participant
                          @robin

                          My ancient milling machines both run on Z80 assembler.

                          My new one will make the leap to 32 bits.

                          I have written the point to point 4 axis interrupt part.

                          Next comes the SDIO card as I go from 25kb memory to 16Gb.

                          Freaky teeth

                          #522161
                          Ady1
                          Participant
                            @ady1

                            I had a look at the GRBL thing today but the family braincell wasn't keen so I decided to go for a simpler approach

                            I decided to have a go at running the whole ballgame from the arduino including the NEMA17 stepper

                            Couldn't find my 12V plug thing… too much housemove stuff but found a 12V jack transformer for an airpump, which was 18V when I put it through the meter… Decided to use it anyway

                            I used this guys tutorial, which is brill and all I needed

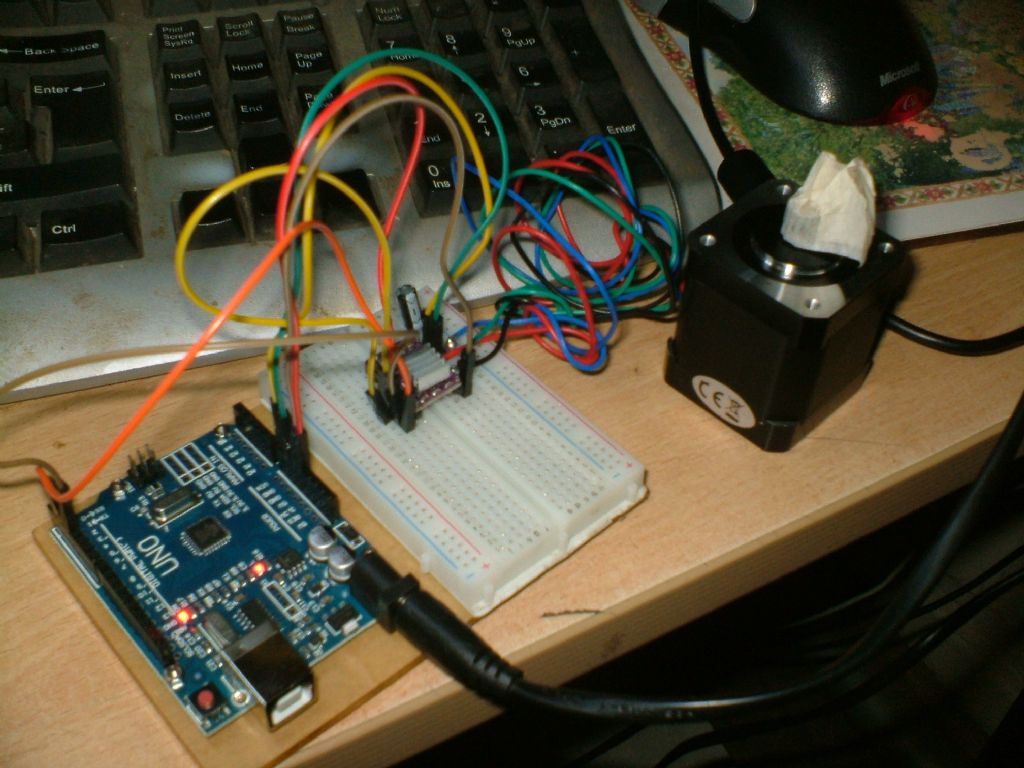
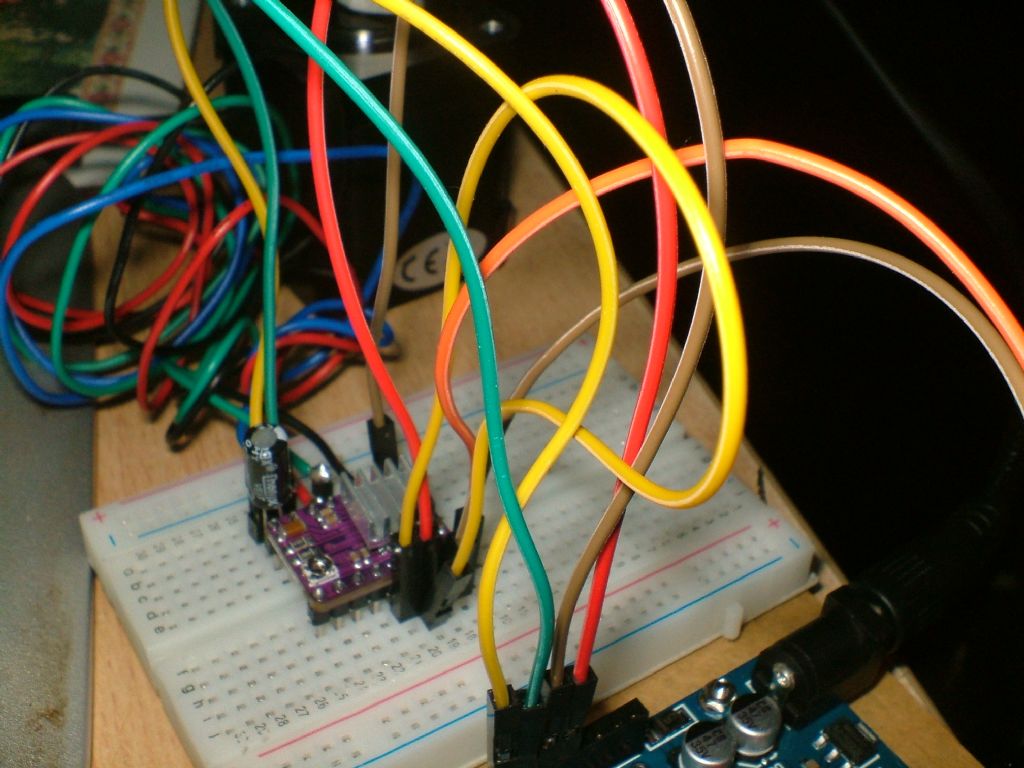
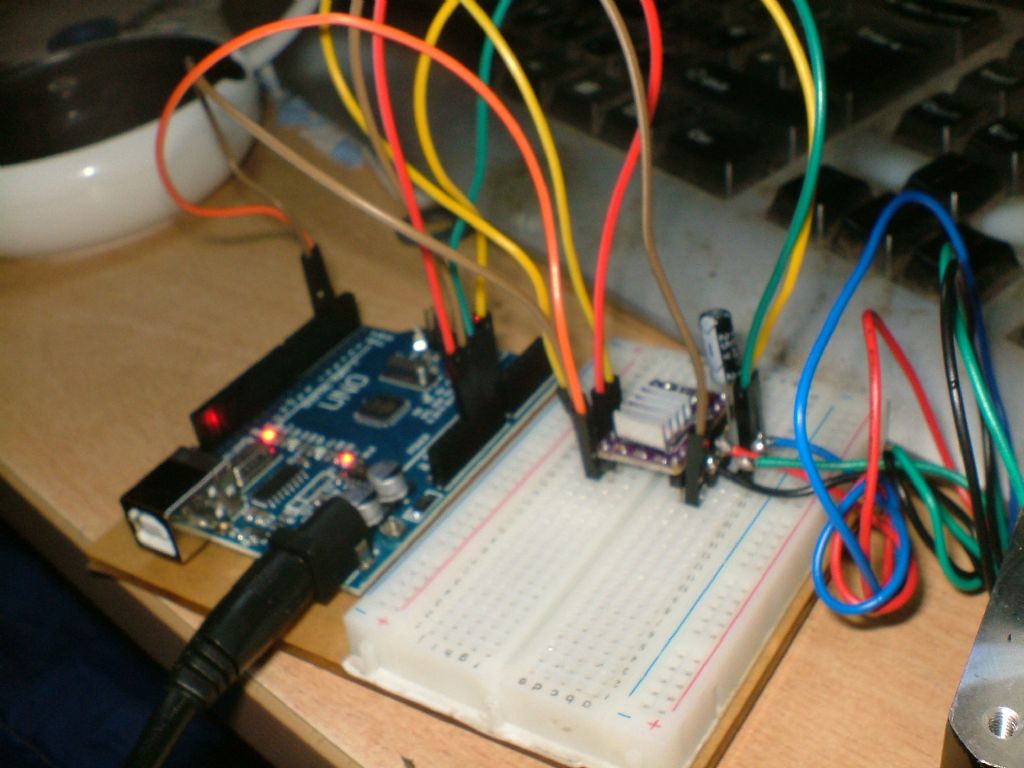
                            Then mounted the a4988 stepper driver on the breadboard and soldered pins onto the stepper motor wires

                            I have found those integrated breadboards great for projects

                            dscf3252.jpg

                            loaded up the library and uploaded his simple routine via the usb, unplugged that and plugged in the 12V jack and waited for the puff of smoke but it ran fine

                            Luckily I only let it run for 30 seconds before unplugging because I had been unable to reset the pot and it was running a lot of juice. The little heatsink on the a4988 was too hot to touch. I swapped the micro phillips screwdriver head out and used the slotted head to try and adjust it, success! and I got it down to just under 0.5V from its default of 1.5V

                            This was a huge improvement and limits the juice at 1A (I believe), in any case there were no more heatsink issues, even when I fought it with my fingers and made it work hard

                            dscf3255.jpg


                            I'm cutting out the 12V adapter on the tutorial schematic and powering it directly from the green and yellow wire on the arduino(VIN and GND) to the main VIN and ground on the a4988, the voltage was 17V (yes I know!) but it at least showed me everything worked


                            dscf3256.jpg


                            It's pretty darned kewl and has definitely boosted my interest in the subject

                            Edited By Ady1 on 24/01/2021 00:32:55

                            #522162
                            Ady1
                            Participant
                              @ady1

                              And the code for a basic 2 second rotation, 1 second pause

                              ——————————————————

                              // Include the AccelStepper Library
                              #include <AccelStepper.h>

                              // Define pin connections & motor's steps per revolution
                              const int dirPin = 2;
                              const int stepPin = 3;
                              const int stepsPerRevolution = 500;

                              void setup()
                              {
                              // Declare pins as Outputs
                              pinMode(stepPin, OUTPUT);
                              pinMode(dirPin, OUTPUT);
                              }
                              void loop()
                              {
                              // Set motor direction clockwise
                              digitalWrite(dirPin, HIGH);

                              // Spin motor quickly
                              for(int x = 0; x < stepsPerRevolution; x++)
                              {
                              digitalWrite(stepPin, HIGH);
                              delayMicroseconds(2000);
                              digitalWrite(stepPin, LOW);
                              delayMicroseconds(1000);
                              }
                              delay(1000); // Wait a second
                              }

                              #522168
                              Ady1
                              Participant
                                @ady1

                                Final note

                                When I adjusted the voltage pot I pre loaded the BLINK routine (like an arduino hello world) to over write the stepper program and disable the unit from doing any work while it was being adjusted

                                Once it was sorted I reloaded the stepper routine

                                Edited By Ady1 on 24/01/2021 02:00:34

                                #522173
                                John Haine
                                Participant
                                  @johnhaine32865

                                  Any, I'm not sure about the a4988 but on other types of driver you can adjust the pot without the motor connected.

                                  #522241
                                  Ronald Morrison
                                  Participant
                                    @ronaldmorrison29248
                                    Posted by John Haine on 24/01/2021 08:06:37:

                                    Any, I'm not sure about the a4988 but on other types of driver you can adjust the pot without the motor connected.

                                    If you connect power to the A4988 without the motor attached it instantly burns out the A4988. It took burning out 3 of them before I found the information on that. It was documented but not real well.

                                    #522245
                                    Ronald Morrison
                                    Participant
                                      @ronaldmorrison29248

                                      GRBL looks complicated because it has to be as it controls 3 motors at once, each with its own step rate. Once you have one motor set up with it, it becomes less complicated as you can adjust the other 2 motors similarly. Some of the settings can be ignored while you adjust only the ones you need at the moment.

                                      Thanks to Ady1 for posting a way for experimenting with the A4988 with one stepper motor. Could you see using that to control a rotary table or an indexer? How about just the x axis on a mill or the leadscrew on a lathe? Maybe it would work for the cross slide. Hmm… how about two of them, one on the leadscrew and one on the cross slide to work in a coordinated fashion to precisely fashion odd shapes?

                                      #522253
                                      John Haine
                                      Participant
                                        @johnhaine32865

                                        Right! Not the A4988 then. In my mill power feed I use a DRV8825 on a Pololu carrier board. This is a much more up to date driver with better performance than the 4988 and is happy for the ref voltage to be adjusted without the motor connected –

                                        **LINK**

                                        I've also used the 8834 which is useful for low power motors and low voltages – will run happily on 5V, use two in my Arduinome clock, one for the gravity arm reset and the other for the dial.

                                        If you think GRBL is complicated you should try Mach 3! I got GRBL driving a simple stepper from a UNO very quickly from the serial monitor, the main complication was interfacing to GRBL Controller on my phone via Bluetooth.

                                        GRBL would be interesting for a lathe except that it lacks threading, and a G Code sender adapted for lathe work (as far as I know). A UNO or similar running GRBL is similar in concept to a motion control board, so it ought to be possible to interface say Mach 3 to it if there was a suitable plugin.

                                        #522264
                                        Ady1
                                        Participant
                                          @ady1

                                          Sounds like I got lucky, it was just too much hassle unplugging and replugging the breadboard pins

                                          Going to be a useful thread this one

                                          On the a4988 front the stock cooling heatsink is totally inadequate if you want to maximise its output, it's only good enough up to half power IMO

                                          There must be some decent pro heatsinks out there for the a4988 , the amount of heat that tiny chip has to deal with is actually pretty ridiculous and testing it for overloading is easy, it will cook the end of your finger when you touch it

                                          edit: Will test it out on the big cross slide of my lathe milling setup before too long but got Mr Inlandi Revenuie to deal with over the next week


                                          Edited By Ady1 on 24/01/2021 13:57:03

                                          #522293
                                          Ronald Morrison
                                          Participant
                                            @ronaldmorrison29248
                                            Posted by John Haine on 24/01/2021 12:47:49:

                                            Right! Not the A4988 then. In my mill power feed I use a DRV8825 on a Pololu carrier board. This is a much more up to date driver with better performance than the 4988 and is happy for the ref voltage to be adjusted without the motor connected –

                                            **LINK**

                                            I've also used the 8834 which is useful for low power motors and low voltages – will run happily on 5V, use two in my Arduinome clock, one for the gravity arm reset and the other for the dial.

                                            If you think GRBL is complicated you should try Mach 3! I got GRBL driving a simple stepper from a UNO very quickly from the serial monitor, the main complication was interfacing to GRBL Controller on my phone via Bluetooth.

                                            GRBL would be interesting for a lathe except that it lacks threading, and a G Code sender adapted for lathe work (as far as I know). A UNO or similar running GRBL is similar in concept to a motion control board, so it ought to be possible to interface say Mach 3 to it if there was a suitable plugin.

                                            As I think more about it I may have been leading you and others astray. I had used a CNC driver board monuted atop my Arduino Uno and had the higher voltage hooked to it for that. Thinking it would be better for the stepper motor driver module I tried to adjust the reference voltage to set the maximum current without the stepper motor hooked up. That was the mistake. That was a year ago and I'm not certain which stepper motor driver I fried. I may have fried both the A4988 and the DRV8825 trying that. I wish the person who wrote the instruction that mentioned not to do that had made it in bold and bright red. One sentence in a page that mentioned not to do that.

                                            #522294
                                            Ady1
                                            Participant
                                              @ady1

                                              Interesting one here, a wire bending machine

                                              #522393
                                              John Haine
                                              Participant
                                                @johnhaine32865

                                                I can definitely say that neither the 8825 or 8834 mind having the reference voltage adjusted without the stepper connected. What is NOT a good idea is connecting or disconnecting the motor when the unit is powered up!

                                                #522422
                                                Mark Davison 1
                                                Participant
                                                  @markdavison1

                                                  Slightly off topic but as soon as you introduce the raspberry (RPI4) liuxcnc becomes an option. You can feed stepper drivers directly from the gpio. It isn't as simple as grbl but I quickly got frustrated with grbl senders on the pi (options are very limited) and swapped to linuxcnc. Its a slippery slope as I've already progressed to Mesa boards to drive the steppers faster and allow me to feed actual position from the glass scales (not sure how that is going to pan out).


                                                  **LINK**

                                                  Edited By Mark Davison 1 on 25/01/2021 07:50:28

                                                  #522432
                                                  Andy Carlson
                                                  Participant
                                                    @andycarlson18141

                                                    I'll chip in my setup…

                                                    Proxxon MF70 with home made stepper mounts and NEMA 17 motors

                                                    Arduino Mega 2560 running Marlin with Protoneer (ish) CNC shield carrying A4988 stepper drivers

                                                    Universal G Code Sender from a branch with Marlin support

                                                    G Code either done manually or using dxf2gcode

                                                    The NEMA 17s drive through flexi couplings to cups which fit over the handwheels. I think the flexi couplings are important for avoiding missed steps with NEMA 17s. Other folks have resorted to NEMA 23s.

                                                    I wanted hacklash compensation which sent me down the Mega route. GRBL on the Mega can do backlash compensation but can't be configured to drive the IO pin permutation required by the CNC shield. Marlin can. It's a bit odd for milling but it does the job.

                                                    Dxf2gcode is OK for profiling around 2d shapes but lacks sophistication beyond that. The main branch lacks pocket milling capability but there is an experimental branch for this (which I have not tried).

                                                    There is some interesting looking newer stuff around that can use for example the Teensy board instead of Arduino. I haven't got past reading about it yet because basically my setup does what I need most of the time, the occasional shortfall being mainly in the CAM department rather than the CNC controller.

                                                    Regards, Andy

                                                    #522595
                                                    Ady1
                                                    Participant
                                                      @ady1

                                                      I've just realised I'm using the 8825 and not the 4988

                                                      my head hurts

                                                    Viewing 25 posts - 1 through 25 (of 45 total)
                                                    • Please log in to reply to this topic. Registering is free and easy using the links on the menu at the top of this page.

                                                    Advert

                                                    Latest Replies

                                                    Viewing 25 topics - 1 through 25 (of 25 total)
                                                    Viewing 25 topics - 1 through 25 (of 25 total)

                                                    View full reply list.

                                                    Advert

                                                    Newsletter Sign-up