Hi All
The first casting was made today!
Image below
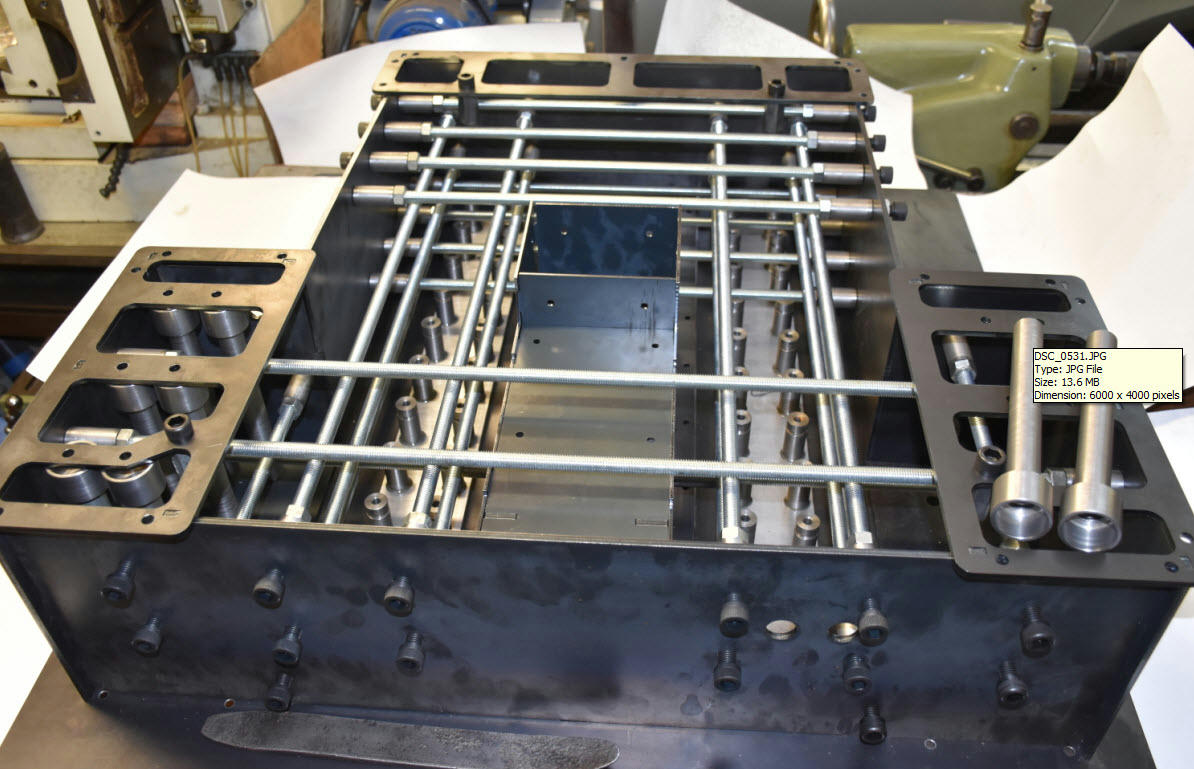
This is the last time I will see all the components I made. as you can see there are no complicated parts.
Mainly a lot of simple lathe work, tapping holes and preparing threaded rod.
A few laser cut 2.5mm sheet parts. deliberately rough ground on one side for adhesion.
Also 2 16mm x 70 rail supports. I lapped one side flat (A lot of work)

Before starting the cast all the parts have to be cleaned with solvent I used methylated spirits.
The surface plate was very carefully cleaned then checked with the palm of the (clean) hand, this will detect tiny specks that you cannot see.
The surface plate was then covered with a new sheet of 80 gsm plan paper (with 2 large slots cut out 25mm all around wider than the bearing support rails) The bearing supports rails sit on waxed baking paper not plan paper, (When I measured it I found it has very uniform thickness) This is to protect the granite surface plate. The waxed baking paper was sprayed around the edges with silicone.
The 5mm thick mold bottom plate was then placed on the surface plate.Note all the long nuts screwed in from the bottom of the plate in countersunk holes all carefully checked that no CSK bolt head sits proud of the bottom of the plate.
The top of the plate is covered with self adhesive plastic to stop the epoxy sticking.

Laser cut mold parts ready for assembly.
 These will be reused.
 Poured!
I am sorry I don't have any pictures of the molding process I was kept very busy placing and tamping the 4 mixes of about 5 litres of Epoxy aggregate This was topped of by a thin layer of sand epoxy as seen above.
I will try to get a helper to do the photographs on the next pour, There are 4 pours to go!
As you can see the finish is so so, I kept the mix ratio to 14% epoxy by volume, this makes a fairly stiff mix.
The 8mm Aggregate contained a few larger stones, For the next pour I will sieve the larger stones out. they made the tamping more difficult. I did it layer by layer. so the layer on the bottom would have been unworkable (but still very sticky) by the time I was doing the top layer.
The process took about 1.5 hours The weather was cool so there was no problem with the mix going off before it was placed
Exotherm? The mixing bucket got slightly warm only. When placed in the mold I could not detect any heat with my hand.
The mix was one part aggregate and about and 0,45 parts washed fine sand.
This was determined by filling a container with aggregate then slowly pouring the sand over the aggregate until no more sand could be poured in. I used a mechanical vibration. Note when this process was finished the volume is only one part. The sand simply filled the voids between the aggregate particles.
The final step is to sieve the aggregate to recover the sand which was then measured to determine its volume.
I used a cheap disposable bucket to mix with an 2500 Watt electric drill, and I needed those watts it was only just enough. The agitator was a low cost spiral mixing unit purchased from the local hardware for about 10 dollars.
Power mixing is essential.

This is for Neil Wyatt. Yes the Limit switch wiring is routed through the casting, they will go straight into the control box shown earlier this forum thread.
it's been a long journey, at last it will be possible to test how accurately the bearing support rails are aligned. Hopefully they will not have moved during the cure and I will not have to re-lap them.
The next step is to strip the mold, I will wait 48 hours at least to allow the material to cure.
This will be followed by attending to any small voids with body filler grinding off any rough spots, and rounding sharp edges followed by epoxy paint.
Regards
John
Jayne.


