Mill spindle runout

Advert

Mill spindle runout

Home Forums Beginners questions Mill spindle runout

Viewing 25 posts - 1 through 25 (of 55 total)
  • Author
    Posts
  • #612853
    Steve355
    Participant
      @steve355

      Hi

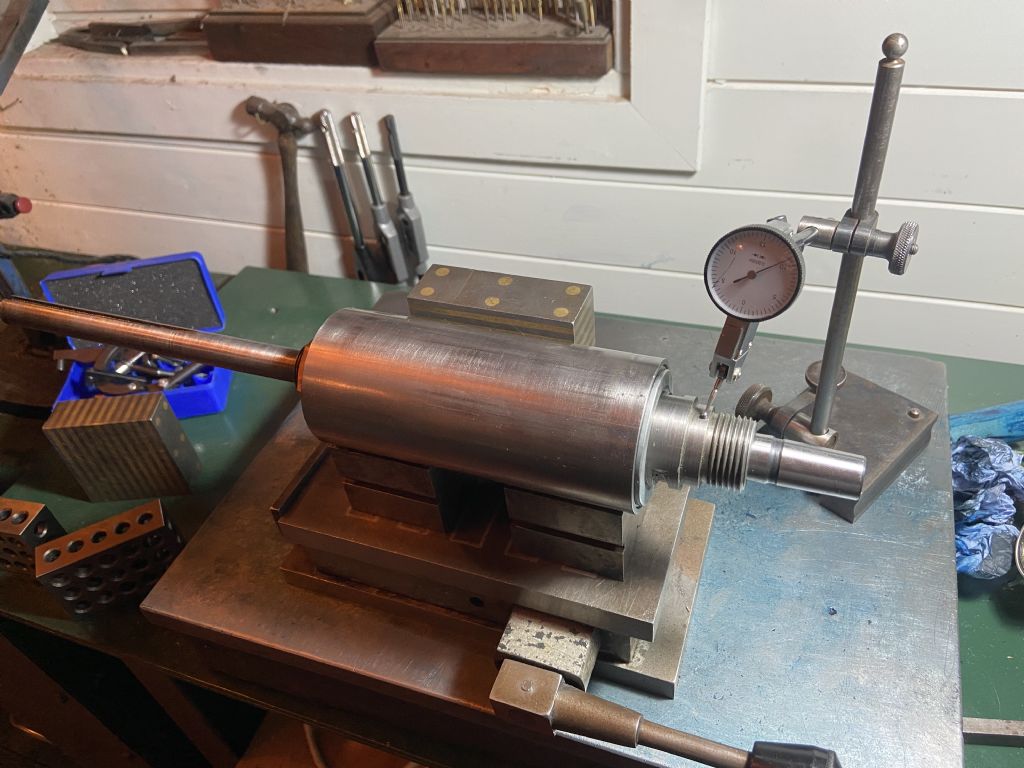
      I noticed the other day that my Dore Westbury mk 1 spindle was loose vertically, so I took it to bits to investigate and tighten it up. While doing this I thought I’d check the runout before I put it back in. I have some 0.0001 clocks these days, which I didn’t have when I got it.

      I found that it was about 0.0025 which obviously far too much. I’ve tried with various amounts of tightening of the preload (?) nuts and it doesn’t seem to make much difference. I’ve tried measuring it at the (point where the spindle exits the quill?) and also with a test bar in the mt2 socket, same results.

      The spindle doesn’t have a very good finish (home made obviously). But I’m not in a position to remake it as it’s too long for my lathe.

      The bearings look ok but there is some unevenness and roughness when turned manually! Which seems to correlate with the runout,

      How do I tell if it’s the spindle or bearings at fault? The bearings are expensive and I don’t want to get new ones if that isn’t the cause,

      im getting a nice new surface plate next week, it would be good to know what measurements to take to check out the spindle, if anyone has any ideas.

      pic below

      thanks

      Steve

      f44cfec1-80f2-40f2-931f-88d01eed35b1.jpeg

      Advert
      #11307
      Steve355
      Participant
        @steve355
        #612854
        Huub
        Participant
          @huub
          Posted by Steve355 on 09/09/2022 00:07:33:

          Hi

          The bearings look ok but there is some unevenness and roughness when turned manually! Which seems to correlate with the runout,

          How do I tell if it’s the spindle or bearings at fault? The bearings are expensive and I don’t want to get new ones if that isn’t the cause

          If "there is some unevenness and roughness when turned manually" and this is at a low preload, the bearings ar worn or damaged.

          You should measure the runout at the inside of the spindle taper. If that is not possible, then on the outside of the chuck taper.

          If you use a drill chuck (not a collet) than the runout of the drill chuck is probably more than the runout of the spindle.

          #612860
          Michael Gilligan
          Participant
            @michaelgilligan61133

            First … may we assume that you are measuring in Inches ?

            I agree with Huub’s analysis, but would also mention that if “The spindle doesn’t have a very good finish” then you may still be disappointed with the result of a bearing change.

            My ‘working hypothesis’ is that inherent runout in the spindle has abused the bearings.

            MichaelG.

            .

            P.S. ___ Have a look at the conversion illustrated on this 2016 thread:

            https://www.model-engineer.co.uk/forums/postings.asp?th=117936&p=2

            Edited By Michael Gilligan on 09/09/2022 07:44:39

            #612861
            JasonB
            Moderator
              @jasonb

              When you say "took it to bits" was that just removing the spindle or stripping the spindle and cleaning the bearings?

              If not a complete strip then that may be worth a try and at the same time inspect the bearings for damage if they look OK then regrease, adjust, run for a while and adjust again if needed and then take readings with the spindle in place.

              While apart you can also see if the builder got a better surface finish where the bearings fit.

              #612870
              Neil Lickfold
              Participant
                @neillickfold44316

                Mine had a lot of issues. The bearing end faces were not true to the run of the spindle barrel or bore. I have some pics of correcting the barrel.

                #612873
                Steve355
                Participant
                  @steve355

                  (of course it’s imperial, the Queen only died yesterday )

                  Well, eliminating the thust bearings altogether I stuck the spindle on some V blocks on a mag chuck, aligned with a parallel.

                  On the nose, I again see the 0.003 runout….

                  Runout at nose

                  On the bearing surface (which has a much better finish than other surfaces, Both bearing areas are exactly 0.999 diameter.) <0.0005 runout. Within expected tolerance.

                  Runout at bearing

                  Unfortunately I think I have to conclude that when it was made, it was turned around, either in a chuck or between centres or something and wasn’t perfectly realigned. So I’m not sure there’s anything that can be done, the Morse taper is simply not aligned with the axis of the spindle. Spindle itself is running true.

                  Any brilliant ideas very welcome.

                  Steve

                  #612876
                  Huub
                  Participant
                    @huub

                    I think the spindle is damaged during use because It is likely the bearing and spindle are machined in one fixation to avoid runout.

                    You could repair the seating of the nose and/or the taper on the lathe!


                    Edited By Huub on 09/09/2022 09:15:28

                    #612877
                    not done it yet
                    Participant
                      @notdoneityet

                      You should measure the runout at the inside of the spindle taper. If that is not possible, then on the outside of the chuck taper.

                      As per Huub, above, measure the taper runout. A commercial blank 2MT arbor would suffice, for this.

                      ONE OF THESE

                      #612878
                      Steve355
                      Participant
                        @steve355
                        Posted by not done it yet on 09/09/2022 09:27:55:

                        You should measure the runout at the inside of the spindle taper. If that is not possible, then on the outside of the chuck taper.

                        As per Huub, above, measure the taper runout. A commercial blank 2MT arbor would suffice, for this.

                        ONE OF THESE

                        That’s the first thing I did, with a MT2 test bar and also a MT2 jacobs taper adapter, and it’s the same. 0.003.

                        f44cfec1-80f2-40f2-931f-88d01eed35b1.jpeg


                        Edited By Steve355 on 09/09/2022 09:46:57

                        #612880
                        SillyOldDuffer
                        Moderator
                          @sillyoldduffer

                          Does the mill cut metal satisfactorily or has this fault been found by measuring?

                          I see measuring machines in the workshop as the second or third stage in a diagnostic process, never the first. After finding the machine doesn't cut as expected, measurement is a good way of isolating the fault, but only after trying more basic tests first. Unfortunately it's all too easy for amateurs to lead themselves up the garden path due to measurement errors. You can guess how I know! Trouble is accurate and reliable measurement is a difficult skill in itself. (Manufacturing is organised to check parts. In general they don't poke about with dials and micrometers as we have to.)

                          Huub commented: If "there is some unevenness and roughness when turned manually" and this is at a low preload, the bearings are worn or damaged. I agree.

                          Michael said: My ‘working hypothesis’ is that inherent runout in the spindle has abused the bearings. It's a good hypothesis that would account for the bearings premature demise, assuming of course that the mill wasn't worked hard during it's life.

                          Steve suggests himself: Unfortunately I think I have to conclude that when it was made, it was turned around, either in a chuck or between centres or something and wasn’t perfectly realigned. Quite likely – as we know, Model Engineers often do their best with limited equipment and skills. And some of us make mistakes, such as not using the technique needed to avoid introducing runout!

                          Hobby-end machines are what they are, so perhaps the root cause of this problem isn't worth fixing? I'm inclined to put up with minor faults until they stop me doing what I need to do. Assuming the mill was performing reasonably before runout was discovered, only because the machine is in bits, I'd fit new bearings and carry on. As a Dore-Westbury is likely to be at least 30 years old, it hasn't done too badly!

                          For most hobby purposes it's not necessary to own top-quality equipment in perfect condition. In my workshop tools are 'good enough' if they do what I need, and I don't fuss about their imperfections!

                          Dave

                          Edited By SillyOldDuffer on 09/09/2022 10:16:11

                          #612882
                          Michael Gilligan
                          Participant
                            @michaelgilligan61133
                            Posted by Steve355 on 09/09/2022 09:00:43:

                            […]

                            Runout at nose

                            […]

                            Runout at bearing

                            .

                            Nice convincing demonstrations, Steveyes

                            The ‘obvious but not trivially simple’ thing to do would be to re-finish the register and the socket in situ

                            … use the spindle assembly as the headstock.

                            MichaelG.

                            #612887
                            Steve355
                            Participant
                              @steve355
                              Posted by Michael Gilligan on 09/09/2022 10:26:05:

                              Posted by Steve355 on 09/09/2022 09:00:43:

                              […]

                              Runout at nose

                              […]

                              Runout at bearing

                              .

                              Nice convincing demonstrations, Steveyes

                              The ‘obvious but not trivially simple’ thing to do would be to re-finish the register and the socket in situ

                              … use the spindle assembly as the headstock.

                              MichaelG.

                              Michael,

                              I can see how to do that…. But it has an MT2 taper (constantly used) and a myford thread (less used). Those are the bits that look tricky to me. I have an Mt2 reamer. It could be possible that if held rigidly enough it would “centre itself” and ream the taper centrally if advanced a little further than it currently is. But it feels like a bit of a long shot.

                              #612888
                              Hopper
                              Participant
                                @hopper
                                Posted by Steve355 on 09/09/2022 00:07:33:

                                The bearings look ok but there is some unevenness and roughness when turned manually! Which seems to correlate with the runout,

                                How do I tell if it’s the spindle or bearings at fault? The bearings are expensive and I don’t want to get new ones if that isn’t the cause,

                                Regardless of runout, if clean and dry bearings have any feeling of unevenness or roughness, or noisiness, they need replacing. They must be immaculately clean and dry though. Wash in clean solvent and dry with compressed air.

                                If the bearing roughness seems to coincide with the runout, that is quite likely your problem.

                                #612891
                                Graham Meek
                                Participant
                                  @grahammeek88282

                                  To prove if it is the bearings at fault rotate the spindle in a matched pair of vee blocks. The bearing registers resting on the vee block. If you get the same run-out it as was present in the assembled spindle and then it is not the bearings.

                                  Also put a clock in the centre between the bearing registers and see if there is a high spot. Mark the high spot with a felt pen. Move either side to see if the readings are the same or less.

                                  If the readings are the same magnitude then it will be safe to assume this portion is running out from manufacture.

                                  If the readings either side are occuring at the same point but are less then the spindle may well be bent.

                                  If the high spot in the centre is opposite the low point at the Spindle nose then this would confirm it.

                                  Hope these notes help,

                                  Regards

                                  Gray,

                                  Edited By Graham Meek on 09/09/2022 11:09:57

                                  #612893
                                  old mart
                                  Participant
                                    @oldmart

                                    I did notice in the videos that the lever of the indicator didn't seem to be tangential to the spindle, that would give the best figures. Could you also mark the high spots and do a third test on the MT tool in the spindle taper.

                                    It would be possible to have the journals built up with nickel plating or metal spray and then re machined true, the surfaces would have to be reduced in diameter by about 0.01" first. It might also be possible to find bearings with a slightly smaller bore, but that would depend mostly on how lucky you are.

                                    #612894
                                    Martin Kyte
                                    Participant
                                      @martinkyte99762

                                      Point 1. I'm not sure magnetic mounting is the ideal for this test.

                                      Point 2. Do you not just need to remachine the 2 Morse internal taper with the spindle running in it's own bearings? It has got to be spot on after that.

                                      All that said, it's not terrible and I would say the machine is perfectly useable as it is.

                                      regards Martin

                                      #612896
                                      peak4
                                      Participant
                                        @peak4

                                        A couple of thoughts, on which I hope others will expand.

                                        I had a similar problem when I bought a part completed Quorn tool & cutter grinder.
                                        The main spindle ran beautifully, with a decent standard of workmanship, but the internal taper for the grinding wheel arbor was off centre.
                                        I cleaned all components, and re-assembled the spindle into its housing; the housing is essentially a bit of steam pipe bored out to suit, with bearings at each end.
                                        I then set the housing in the lathe using two fixed steadies, and clocked everything to centre height, square etc.
                                        I used the lathe chuck to drive the spindle in its own bearings, and re-machined the taper.
                                        It's only a short taper on that so a fairly simple job.
                                        Whilst the top slide was set over, I also made a load of spare arbors with a matching angle.

                                        In your case, you could do the same thing, but that would leave the external chuck register wrong, and maybe the Morse tapered hole too deep.

                                        You have a drill chuck arbor there, which is likely to be concentric and accurate, as well as being centre drilled.
                                        Is the outer chuck register off in the same direction as the MT2 internal taper?
                                        Also, using a test bar, is the taper parallel to the axis of rotation, but just off centre?

                                        If so, how about removing all of the outer components of the quill, add the arbor into the taper, and run the centre main spindle between centres.
                                        You could then re-machine the spindle's surface(s) where they touch the main bearings.
                                        A shrink fit, or loctite'd sleeve could be added and re-machined concentric.
                                        You might get lucky and find a speedy sleeve to fit to make up the difference.

                                        Another possibility might be to convert from imperial to metric bearings or vice versa, and re-machine accordingly
                                        It is possible to carefully re-machine a very small amount off the inner or outer diameter of ball/roller bearings.

                                        Bill

                                        #612899
                                        Michael Gilligan
                                        Participant
                                          @michaelgilligan61133
                                          Posted by Steve355 on 09/09/2022 10:43:54:

                                          Posted by Michael Gilligan on 09/09/2022 10:26:05:

                                          Posted by Steve355 on 09/09/2022 09:00:43:

                                          […]

                                          Runout at nose

                                          […]

                                          Runout at bearing


                                          .

                                          Nice convincing demonstrations, Steveyes

                                          The ‘obvious but not trivially simple’ thing to do would be to re-finish the register and the socket in situ

                                          … use the spindle assembly as the headstock.

                                          MichaelG.

                                          Michael,

                                          I can see how to do that…. But it has an MT2 taper (constantly used) and a myford thread (less used). Those are the bits that look tricky to me. I have an Mt2 reamer. It could be possible that if held rigidly enough it would “centre itself” and ream the taper centrally if advanced a little further than it currently is. But it feels like a bit of a long shot.

                                          .

                                          Boring or grinding would probably give a better chance of a good result.

                                          … pleased to see that others have come to the same general conclusion

                                          MichaelG.

                                          .

                                          P.S. __ You might find inspiration, encouragement, or even lust … here:

                                          http://anglo-swiss-tools.co.uk/gepy-centres-spindles/

                                          [ start by understanding how it’s done properly … you can always work backwards from there ]

                                          Edited By Michael Gilligan on 09/09/2022 12:29:13

                                          #612900
                                          JasonB
                                          Moderator
                                            @jasonb

                                            I'm with Old mart, the angle of the Dti lever does not look right, I tend to set the arm at right angles to the movement I'm trying to measure. Would be interesting to see what it measures with either the whole Dti horizontal or move the lever so it's horizontal.

                                            Edited By JasonB on 09/09/2022 12:29:49

                                            #612971
                                            Dave S
                                            Participant
                                              @daves59043

                                              Whilst it needs to end up as mt2 (probably) it doesn’t have to be mt2 whilst fixing it.

                                              I would bore the spindle to a suitable cylindrical diameter (probably large end of mt2 ish)

                                              Then loctite or shrink fit a plug in and finally bore and ream that using the spindles own bearings.

                                              Probably worth replacing the bearings whilst your doing it – modern new bearings of reasonable quality are not expensive and are sufficiently accurate for the job.

                                              Dave

                                              #612975
                                              duncan webster 1
                                              Participant
                                                @duncanwebster1
                                                Posted by JasonB on 09/09/2022 12:29:32:

                                                I'm with Old mart, the angle of the Dti lever does not look right, I tend to set the arm at right angles to the movement I'm trying to measure. Would be interesting to see what it measures with either the whole Dti horizontal or move the lever so it's horizontal.

                                                Edited By JasonB on 09/09/2022 12:29:49

                                                I think with the arm set tangential to the surface it's trying to measure the runout will be a lot less. I'd do the test again

                                                Edited By duncan webster on 10/09/2022 18:11:20

                                                #612976
                                                not done it yet
                                                Participant
                                                  @notdoneityet

                                                  A DTI is not an absolute measuring device. It is a comparator. A dial gauge actually provides a proper reading.

                                                  #612993
                                                  Bill Phinn
                                                  Participant
                                                    @billphinn90025
                                                    Posted by not done it yet on 10/09/2022 18:13:44:

                                                    A DTI… is a comparator. A dial gauge actually provides a proper reading.

                                                    This page seems to suggest something approaching the opposite of that:

                                                    "When it comes to measuring, the dial indicator excels in repetitive and comparative measurements. While the test indicator excels in a consistency measurement."

                                                    To be frank, I'm as puzzled by the distinction given on that web page as I am by yours.

                                                    As far as I understand it, both a dial indicator [or gauge] and a DTI can give actual or "proper" readings [indicated by the amount of travel of a needle (usually) round a dial] and both can function, as often as needed, as comparators.

                                                    I hope you, or someone, can clear up my confusion.

                                                    #612995
                                                    Michael Gilligan
                                                    Participant
                                                      @michaelgilligan61133

                                                      Bill,

                                                      It is my belief that the distinction is entirely artificial: Both instruments are more logically classed as Indicators; unless and until they are mounted in such a way that there is a Zero reference and the ‘system’ is calibrated.

                                                      Even then, the dial mechanism and the [likely] cosine error both serve to make them poor Gauges.

                                                      The use for which both were originally devised was that of a Comparator … a reference point is established, and the deviation from that is indicated rather than truly measured … The uncertainty can be high at any point other than a return to that reference.

                                                      Semantics make this a tricky concept to grasp, but that’s my best effort at this time in the morning !

                                                      MichaelG.

                                                      .

                                                      NPL Good Practice Guide No. 11 is a useful essay on Uncertainty of Measurement

                                                      Downloadable here:

                                                      https://www.npl.co.uk/special-pages/guides/mgpg11.aspx?ext=.

                                                      Edited By Michael Gilligan on 11/09/2022 07:11:52

                                                    Viewing 25 posts - 1 through 25 (of 55 total)
                                                    • Please log in to reply to this topic. Registering is free and easy using the links on the menu at the top of this page.

                                                    Advert

                                                    Latest Replies

                                                    Home Forums Beginners questions Topics

                                                    Viewing 25 topics - 1 through 25 (of 25 total)
                                                    Viewing 25 topics - 1 through 25 (of 25 total)

                                                    View full reply list.

                                                    Advert

                                                    Newsletter Sign-up