Cutting tools

Advert

Cutting tools

Home Forums Beginners questions Cutting tools

Viewing 18 posts - 1 through 18 (of 18 total)
  • Author
    Posts
  • #601105
    Chris Murphy
    Participant
      @chrismurphy94983

      Hi,

      I bought a set of tools from rdg.

      but being a total newbie can someone explain which way the different tools cut.

      which way do the fix in the toolpost too cut.

      also the cutters are way below the workpiece to cut, what do you do.

      thanks

      chris m….

      Advert
      #11235
      Chris Murphy
      Participant
        @chrismurphy94983
        #601108
        noel shelley
        Participant
          @noelshelley55608

          As to tool height you cut lots of short strips of material, starting with food or beer cans and increasing in thickness to may be 1.2mm ! these you use to pack up the tool to give you a cutting edge dead on the centre height of the machine. A failure to do this accuratly will result in all sorts of problems, and is one of the first things you need to learn. You do not say what type of tooling or cutters you have ? Good Luck Noel.

          #601110
          Calum
          Participant
            @calumgalleitch87969

            Which set did you buy?

            Generally speaking the principle is that most cutting tools cut at only one point (hence the name "single point cutting tool&quot. Most of the different types of tool are simply to be able to get that point where it is needed. For example, left hand and right hand tools will let you cut up to a shoulder on the left or the right (though sources differ as to which is which!). Understanding this will also help you understand how to orient it in the toolholder.

            An often recommended book is Sparey's The Amateur's Lathe, and although it is old school it is very clear and concise. If you prefer videos, I'd recommend the Blondihacks series on Youtube of basic lathe skills (though be aware it's easy to watch a video and nod along without taking much in…)

            #601114
            Adrian R2
            Participant
              @adrianr2

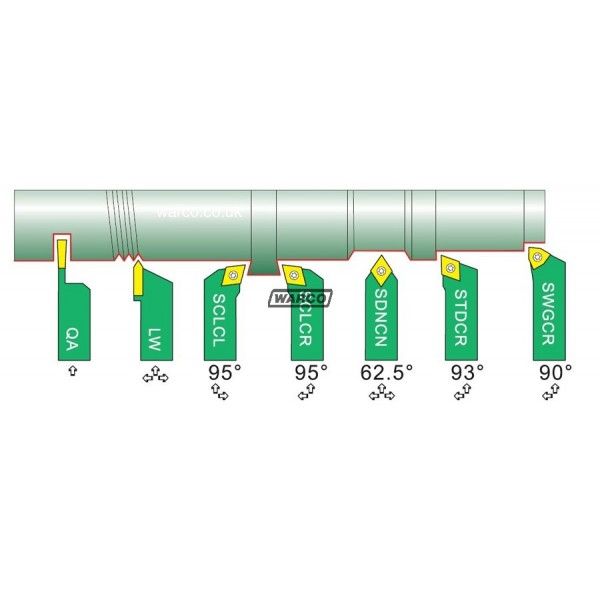
              Search around a bit and you will find pictures similar to this one showing the tools against a workpiece. One of them will hopefully match the tools you have but as noted above apart from threading you can generally just use whatever fits best to the job at had.

              **LINK**

              Do you have the most appropriate shank size for your lathe? e.g. mine will take a 10mm without packing or an 8mm with some shims underneath, a bit of experimentation might be needed to see which works best but don't go too big as negative shims are much harder to come by.

              #601116
              SillyOldDuffer
              Moderator
                @sillyoldduffer

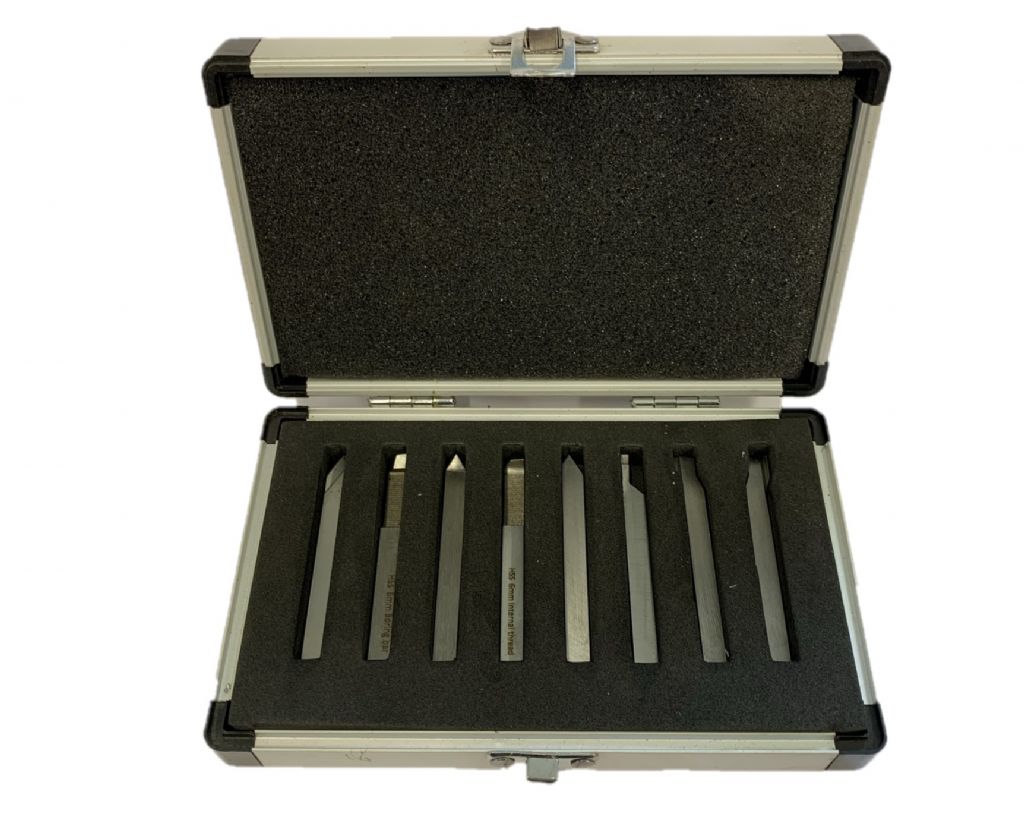
                Which set? Was it this one:

                Or maybe:

                The knives come in various sizes, such as 6mm, 8mm, 10mm and 12mm square. For a Myford, I'd go for 8 or 10mm, because I think they were designed for 3/8", roughly 10mm, and 12mm might not fit. A Myford owner will know.

                Both images above show the tools the right way up, ie top view looking down as you'd see them in the tool post.

                They are shimmed to centre height – with whatever strips of metal are handy. I'll put a picture up in a moment showing shims and how to check the height is correct.

                Dave

                #601117
                Jon Lawes
                Participant
                  @jonlawes51698

                  I hate to repeat what has been said elsewhere, but you really need someone on hand to assist with these things. It's like trying to learn to drive by post otherwise.

                  Everyone here is very happy to assist in any way they can but its quite difficult to do so via a forum. If you can speak to your local model engineering society; ours certainly has lots of keen members eager to share their experience.

                  #601118
                  Chris Murphy
                  Participant
                    @chrismurphy94983

                    Hi;

                    yes it was this set,

                    it includes…..SET OF EIGHT LATHE TURNING TOOLS, ALL HIGH SPEED STEEL. SHANK 6MM X 6MM, SET CONTAINS ONE EACH OF LEFT AND RIGHT TURNING AND FACING, STRAIGHT FINISHING, CORNER TOOL, PARTING TOOL, BORING TOOL, 60 DEGREETHREADING TOOL AND CORNER FINISHING TOOL., COMES IN A FITTED WOODEN BOX

                    ed8bb4eb-1b50-4491-b844-33c6c07ad102.jpeg

                    #601120
                    SillyOldDuffer
                    Moderator
                      @sillyoldduffer

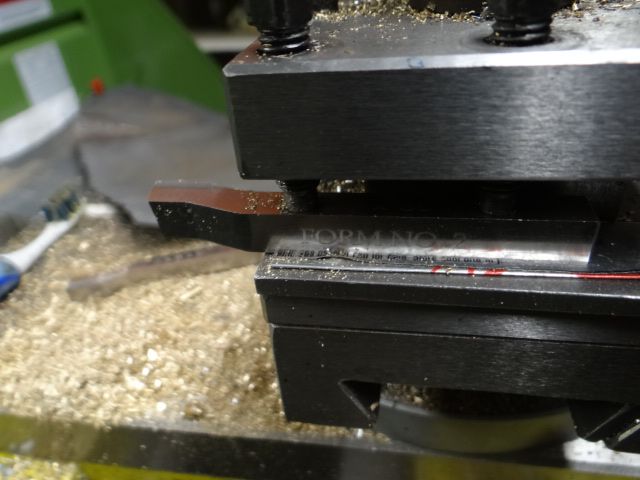
                      A left-hand knife (ie cuts away from the chuck towards the tailstock), shimmed to centre height with a strip of mild steel a few millimetres thick, plus fine adjustment with thin aluminium strips cut from a Coca Cola can. Other soft drinks work just as well!

                      dsc06598.jpg

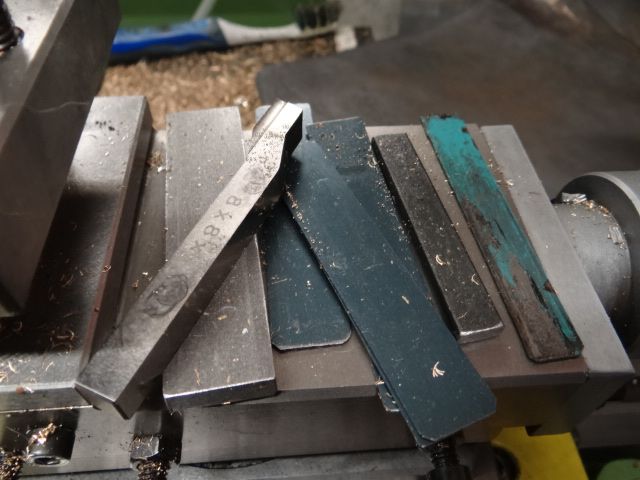
                      Next a pile of various strips used for shimming, made from soft drink cans, steel strap ribbon used in packaging, length of old hacksaw blade with the teeth ground off and a bit of DIY store metal. There's a right hand knife on the heap – a mirror image of the left-hand in the tool-post, and used to cut towards the chuck. (The usual way.)

                      dsc06599.jpg

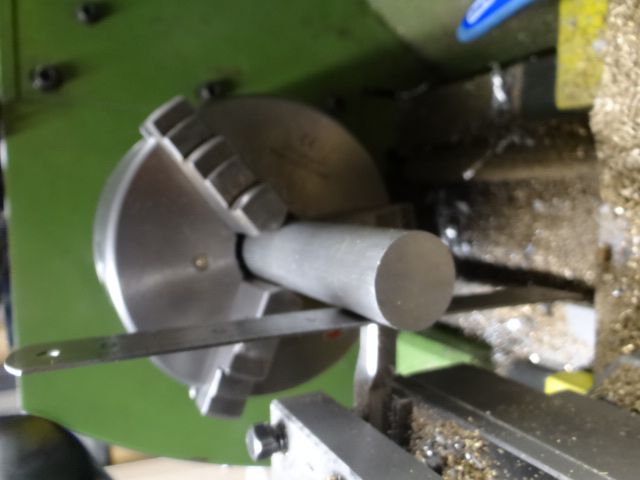
                      Next picture shows the knife is at the correct height. Done by gently nipping the middle of a 6" steel rule or similar against a rod in the chuck. If the knife is too high the top of the rule tilts away from the operator. Too low and the top of the rule tilts toward the operator. Picture shows the rule is vertical, ie the knife is correctly on centre.

                      dsc06601.jpg

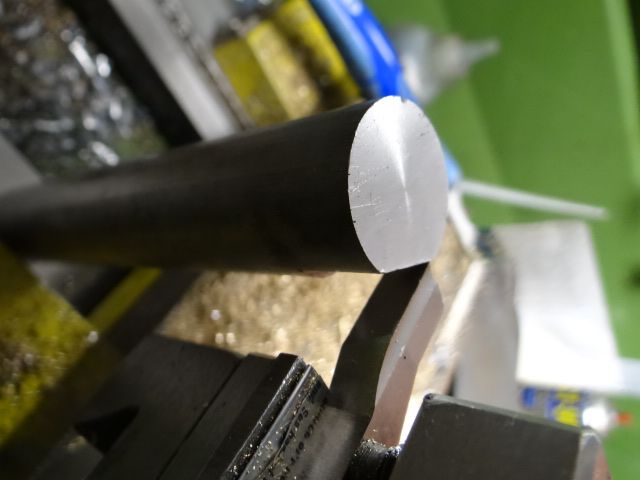
                      Another way is to face a rod accurately to centre height and use it as a gauge. Possible to get close by eye, and even better by feeling for a step between the rod and knife edge with a fingernail:

                      dsc06602.jpg

                      Facing tools can be checked by seeing if they leave a pip in the centre, too low, or break one off, too high.

                      Finally, picture below show what some of the different shapes are for.

                      7-piece-indexable-tips.jpg


                      Dave


                      Edited By SillyOldDuffer on 09/06/2022 15:10:59

                      #601122
                      SillyOldDuffer
                      Moderator
                        @sillyoldduffer

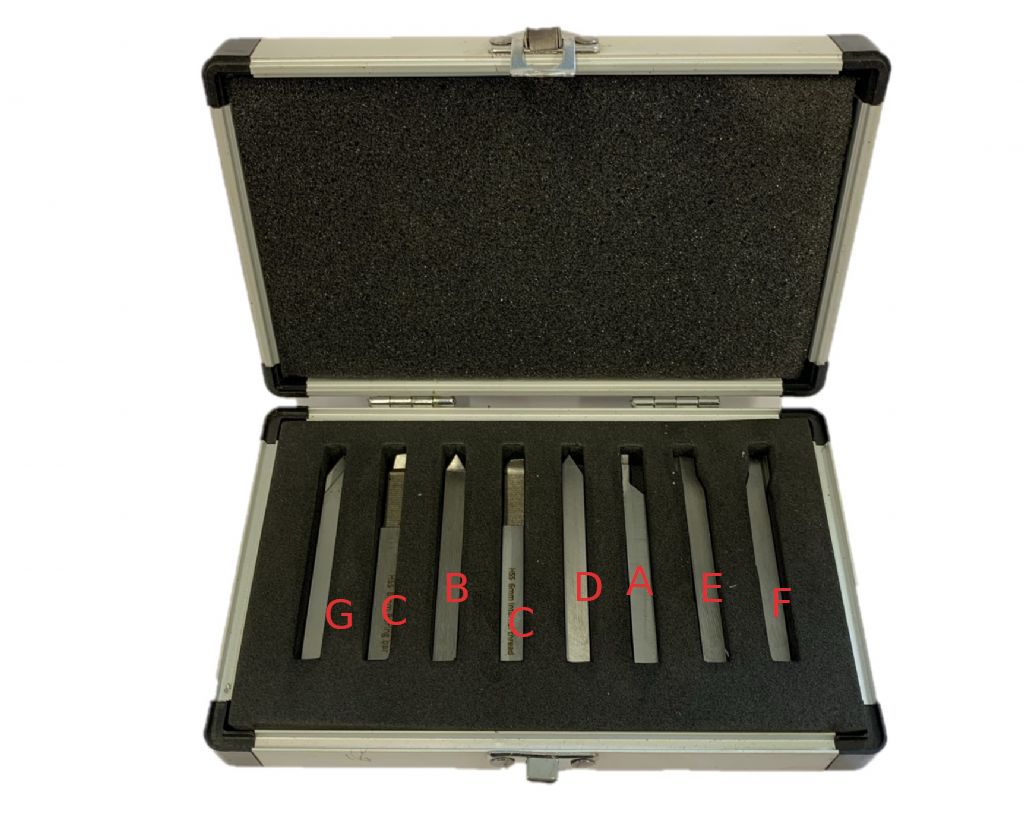
                        Little difficult to be certain from the photo:

                        labelledtools.jpg

                        A – Parting Tool (for cutting off rod or making grooves.)
                        B – Finishing Tool (for removing marks, if any, left by the LH & RH cutters
                        C – Boring Bar and Internal Thread Tool (For opening up holes and threading them.)
                        D – External Threading Tool
                        E – Right Hand Tool (For cutting towards the chuck – this one is used the most!)
                        F – Left Hand Tool (Same as RH tool except cuts towards the tailstock.)
                        G – Corner Tool

                        This document may help.

                        Recommend getting a copy of Sparey's The Amateur's Lathe, it's a goldmine.

                        Dave

                        #601127
                        Frances IoM
                        Participant
                          @francesiom58905

                          you will soon find the need for a grinder to sharpen the tools (assuming they are sold already sharpened – some, especially the brazed carbide tipped ones might not be) – this will generally require a better tool rest on the grinder than comes with a basic machine

                          #601128
                          roy entwistle
                          Participant
                            @royentwistle24699

                            With carbide you will need a Green stone on the grinder

                            #601179
                            Nigel Graham 2
                            Participant
                              @nigelgraham2

                              Note that Dave's diagram quoted from Warco shows carbide-insert tools, often called "indexable", but the principle is the same for HSS tools.

                              It also shows basically how the tool is aligned with the work: their tops are their surfaces visible in their box.

                              If the part being made is to be highly-stressed, internal corners should not be absolutely sharp as the diagram suggests, but given a little "root radius". A dead-sharp inside corner is a stress-concentrator. The hole through the component, such as a bearing, that will fit up to the shoulder has a rounded or chamfered edge partly to accommodate the root.

                              The indexable tools shown are manufactured with a tiny radius on their corners in plan; not shown on the picture. I sharpen HSS tools to angular edges then add the radius on the down-going edge by wheel or oil-stone – carefully, so as not to blunt the cutting-edge itself! That little detail also helps give a good finish to the work surface.

                              .

                              Re Roy's advice about wheel type:

                              The grey wheels on ordinary bench-grinders will cut High-Speed Steel; but not carbide. Carbide will cut the wheel instead, sort of! Hence the "green grit" wheel such tools need.

                              Traverse the tool across the wheel rim so you don't wear grooves in the stone; and use only the rim.

                              '

                              Regarding setting the tool to height, it's worth making a height-gauge for that purpose; and making it to some designs is also a useful exercise in basic turning.

                              #601263
                              Howard Lewis
                              Participant
                                @howardlewis46836

                                As you are very newbie, particularly with a lathe designed at the beginning of carbide tools, you will probably learn most by sticking with HSS.

                                You will need a bench grinder, but hopefully you will learn about grinding tools at the correct angles.

                                You have spent money buying a lathe, tooling, and hopefully measuring equipment. Now spend a little more and buy some books which will tell you how to use them properly. It will be be far better than having problems and not knowing why or how they have come about, and how to avoid them.

                                If you don't help yourself, the rest of us can't do much to help you. You are likely to ask the wrong question, and so get wrong answers to the question that you should be asking.

                                Before, it has been said, find a local Model Engineering Club and join. What you learn, first hand, from members will save a lot of wasted time and material, rather than blundering on in ignorance and bewilderment..

                                In response to your numerous posts, you have received good advice, from afar. Hopefully, you have taken the advice and learned from it.Now go and find folk who can give it, and guide you face to face,

                                You will not become a skilled machinist in a matter of weeks, it takes time and you need a lot of tuition, since you are obviously starting from near zero.

                                If in doubt, err on the side of smaller reliefs rather than large ones (Which will tend to weaken the cutting edge, and shorten tool life, because of the reduced area to conduct heat away from the cutting ares. )

                                Carbides were invented or industrial machines, rigid and powerful and depend on runnjing hard and fast so the heat produced softens the work locally..

                                The tool must be set at centre height if it is to cut properly.

                                Too low and the clearance angles are excessive.

                                Too high and the tool is likely to rub rather than cut.

                                One of your early jobs, which which will be a useful learning exercise, and make a tool that you can use for the rest of the time that you have that machine, is a Centre Height Gauge.

                                By making tools, you will learn (That is why Apprentices are taught how to make their own simple tools. It is part of their learning process, which will stand them in good stead for the rest of their lives, and equip them with tools that they can use. I still have the Tap Wrench made when in the Toolroom for a few weeks. )

                                I spent the first year of my Apprenticeship learning basic machining processes, which have been useful throughout my career, although not as a machinist.

                                Howard

                                #601278
                                Hopper
                                Participant
                                  @hopper

                                  What you really, really need is one of these: LINK You can't operate an old Myford without one. It will solve your above query and many others too.

                                  Edited By Hopper on 11/06/2022 04:13:14

                                  #601290
                                  Clive Foster
                                  Participant
                                    @clivefoster55965

                                    Grinding your own tools has been mentioned.

                                    Unfortunately descriptions of the actual techniques needed have never been well served in the Model Engineering publications. Whether books or magazines. Historically I guess it has been the assumption that most folk will be able to find someone to show them exactly how to do the job and train them in the nigh on imperceptible (to a novice) differences between getting a really sharp, durable tool and one that sort of works on a good day.

                                    The best guide I've seen is the Bulletin no 35 from SouthBend Lathe "How To Grind lathe Tool Cutter Bits". 16 pages of clear, simple, instructions along with excellent diagrams of both tool planforms and use. A bit Ameri-centric in using Armstrong type tool holders for the illustrations which hold the tool bit pointing upwards so the actual angles you need to grind on the top of the bit will be different to those on a tool held flat. Its the angle relative to the work that matters so a tool held flat needs more angle ground on the top.

                                    Can be downloaded from various places on the internet. For example :-

                                    **LINK**

                                    or, different edition of same thing in a more compact format.

                                    **LINK**

                                    Sidebar on second link shows a whole host of other potentially useful documents. Boatloads of stuff on that site. Well worth my £40 (ish) subscription for all the extras beyond basic read'n download. Very useful for sorting out whether a book is actually worth buying or not.

                                    The South Bend Lathe bulletins were primarily written to support school metal work classes and apprentice training schemes and remain highly relevant to folk like us.

                                    Clive

                                    #601292
                                    Journeyman
                                    Participant
                                      @journeyman

                                      Useful info on lathe tool grinding at *** Steve's Workshop ***

                                      John

                                      #601296
                                      Clive Foster
                                      Participant
                                        @clivefoster55965

                                        Further notes on SouthBend Lathe Bulletin 35.

                                        I just checked my copy and note that the grinder recommended by SouthBend has L shaped tool rests running round the side of the wheels. This allows the finishing touch up to be done on the side of the wheel giving a short straight surface just below the cutting edge and just above the bottom. Just a quick kiss so wear on the side of the wheel is negligible.

                                        As the main shaping grind is done on the periphery of the wheel the actual ground surface is hollow. Putting the two narrow flats at top and bottom makes it easy to accurately hone the tool using a hand held stone or hone. Either for maximum sharpness when freshly ground or to restore its edge after some use. The two flats keep the hone aligned and the hollow clearance prevents rocking during the stroke.

                                        When honing a flat sided tool the natural tendency is to rock the hone slightly as it moves across the tool rounding off the sharp edge. Which is rather the opposite of what's needed.

                                        Like free hand sharpening a twist drill honing a flat sided tool is much trickier than it sounds from a basic description. It really doesn't help that folk who have learned to do either or both can no longer do it wrong, how ever hard they try, and a simple say "It's easy. Just like this." Grrr.

                                        If you don't wan't to grind on the side of the wheel, or don't have suitable rests, its perfectly satisfactory to put the two flats at top and bottom on by hand using a stone or hone. Takes longer than on a grinder and generally the flats will be narrower so the tool won't go so long before it needs touching up. That's what I do using a set of diamond hones for puting the flats on and a fine stone for touch up.

                                        Clive

                                        Edited By Clive Foster on 11/06/2022 09:52:55

                                      Viewing 18 posts - 1 through 18 (of 18 total)
                                      • Please log in to reply to this topic. Registering is free and easy using the links on the menu at the top of this page.

                                      Advert

                                      Latest Replies

                                      Home Forums Beginners questions Topics

                                      Viewing 25 topics - 1 through 25 (of 25 total)
                                      Viewing 25 topics - 1 through 25 (of 25 total)

                                      View full reply list.

                                      Advert