What is Sterolithography?
Stereolithography uses patterns of ultra-violet light to set thin layers of a photosensitive polymer (photopolymer, commonly called UV resin or just resin) to gradually build up a three-dimensional object. It is comparable to 3D printing using fused filament deposition, a process that most readers will be aware of, even if they haven’t used it themselves, which builds up layers of an object by extruding a fine bead of heat-softened plastic.
Stereolithography or SLA printing was first patented in 1986, so it predates fused-filament deposition (FFD) printing by a couple of decades. The complex arrangements, especially the UV lasers used to set the resin and the need for large tanks of photopolymer made the early systems expensive and unsuitable for benchtop use. Around ten years ago, relatively affordable machines appeared. Since then the advent of LCD screens that project the UV image have made prices tumble and the costs associated with SLA or 3D resin printing are now comparable to FFD.
Enjoy more Model Engineer reading in the monthly magazine.
Click here to subscribe & save.
The Creality Halot One Plus
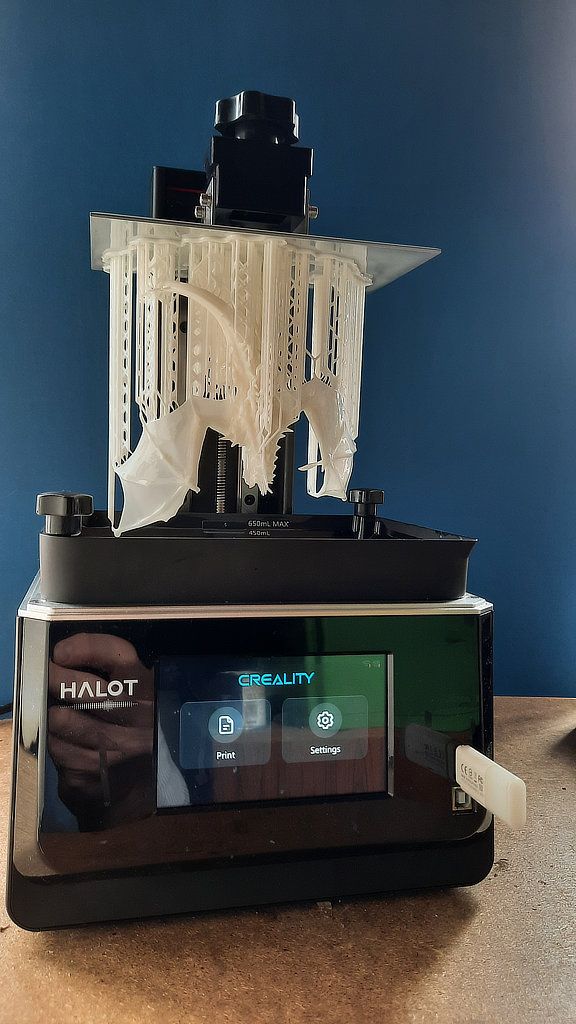
The printer, supplied for this review by Creality, is the Halot One Plus. This was their top of the range model (a more advanced machine the Halot Sky has gone on sale this week) and retails at less than £400 so it is within the reach of most people considering a 3D printer <Buy Halot-One Plus in Creality Store UK>. The machine is heavily built, mostly of steel, and mechanically simple with only one axis of motion. The base contains the power supply and controller board, it has a colour touch screen on the front for control and the UV printing screen on top. Most of the space in the base is taken up by the UV illumination system which is claimed to achieve 90% evenness helping ensure smooth accurate prints. A ‘vat’ that can contain up to 650ml of resin is secured above the screen, it has a replaceable base of thin FEP plastic, through which the UV images are projected into the resin. Fluorinated ethylene propylene is similar to PTFE but it is strong, clear and highly resistant to damage by UV light.
.jpg)
At the back of the base is a rigid upright that contains two nicely machined dovetail slides and what appears to be a ballscrew. The screw moves a very rigid cantilever arm up and down (I assume a low-geared stepper motor inside the base) to which the easily removed build plate is attached. The machine will only operate the UV source when a deep-purple coloured shield is in place on top of the machine.
As with FFD printing, object files are designed in CAD and saved as STL files (STL also stands for stereolithography, although the files are used for both SLA and FFD). The STL files have to be processed ready for printing. In brief this means arranging the object(s) on the platform, adding support (so isolated areas are connected to the platform) and ‘slicing’ the object into layers.
The printing process is remarkably simple; in summary you pour resin into the vat, load a printable file. The platform descends into the resin until it is almost touching the base of the vat. A layer is printed and set with an extended exposure to give adhesion to the platform. The platform rises to allow resin to flow underneath, then drops again, but not quite so far. The next layer of the object is printed. This continues, and over a few hours the appearance is of the object being drawn up out of the resin. Finally the platform raises the print right out of the vat and stops.
The next step is to remove the object from the platform, then wash it in a suitable solvent (usually isopropanol) then cure it in UV light or simply leave it outdoors until it is fully cured. The support material is then removed and the final object ‘tidied up’ if required.
That’s essentially the whole process, but as you might expect there is a lot of subtlety to the process, and many issues will only become apparent when you try to print more complex objects. Let’s look at this whole process in more detail, with a focus on how the Halot One Plus, its software and accessories measure up.
Unboxing the printer, I was impressed by the very high standard of packaging and the build quality of the machine. It is sturdy and well finished. Nothing was loose or sloppy. The instructions are mostly for levelling the build plate; for more detail you need to look at software on a supplied USB key, which includes a longer manual and a very useful introductory video. That said, the supplied information is rather like that supplied with a typical lathe. It tells you what the machine does, but just as a lathe manual doesn’t teach you all about turning, neither does the printer manual tell you all you need to know about 3D printing. I advise watching some online videos and visiting some tutorial websites before you try doing more than a basic test.
Remove all packaging, plug in and switch on the printer. The touch screen will come to life and try and connect to your wifi (this makes uploading prints much easier). You can skip this step and proceed to a very simple menu structure for printing or setting up the printer.
The next step is to level the print platform. This is vastly easier than with a typical FFD printer. Your raise the platform, unclamp and remove the vat and then loosen the platform. Place a ‘special’ levelling card on the screen and then the levelling button then brings the platform down onto the card. Retighten the four allen screws that secure the platform so that it secures the card. You now raise the platform again and replace the vat.
The Resin
Creality supplied two one-litre bottles of their standard white resin. The bottles are black plastic to minimise the danger of the resin setting. The shelf life is advertised as a year, but most sources say it will last far longer if kept cool and out of sunlight. The resin itself has the consistency of thin cream. Any minor spills or contaminated equipment are easily cleaned up with isopropyl alcohol.
If you have used any sorts of UV resin, you will be aware that most of them are rather smelly as they contain organic solvents (there are now water-washable resins available which have become very popular with schools). Creality recommend gloves and eye protection should be used when handling resin, and to wear ‘at least a disposable mask’. Epoxy-rich resins can also cause contact dermatitis or trigger allergies, so avoid touching uncured resin.
Most sources say it is fine to use a resin printer in a well-ventilated room, such as near an open window. I did all of my printing in my workshop, and I left it unoccupied while printing was in progress. The printer is hooded, and continually runs a fan during printing to pass any fumes through carbon filter. The Creality resin is described as ‘low odour with no irritating smell’ and although there is a smell when the printer is active, it is not as pungent as I had expected. The smell is most noticeable when lifting off the lid to remove a print. I found it a good idea to let the machine stand for a while after completing a print to allow excess resin to drip into the vat and for the odour to dissipate. My workshop is near airtight with all doors closed, so I made sure there was extra ventilation while printing was in progress. You should take care if you have asthma or are sensitive to solvents.
The vat should have between 250ml to 650ml of resin poured in – the wide mouthed bottle made a controlled pour very easy. Most prints will use less than 250ml, but if the resin gets low you can pause the process and top up the vat without affecting the print. The machine is now ready to print.
Preparing an Object
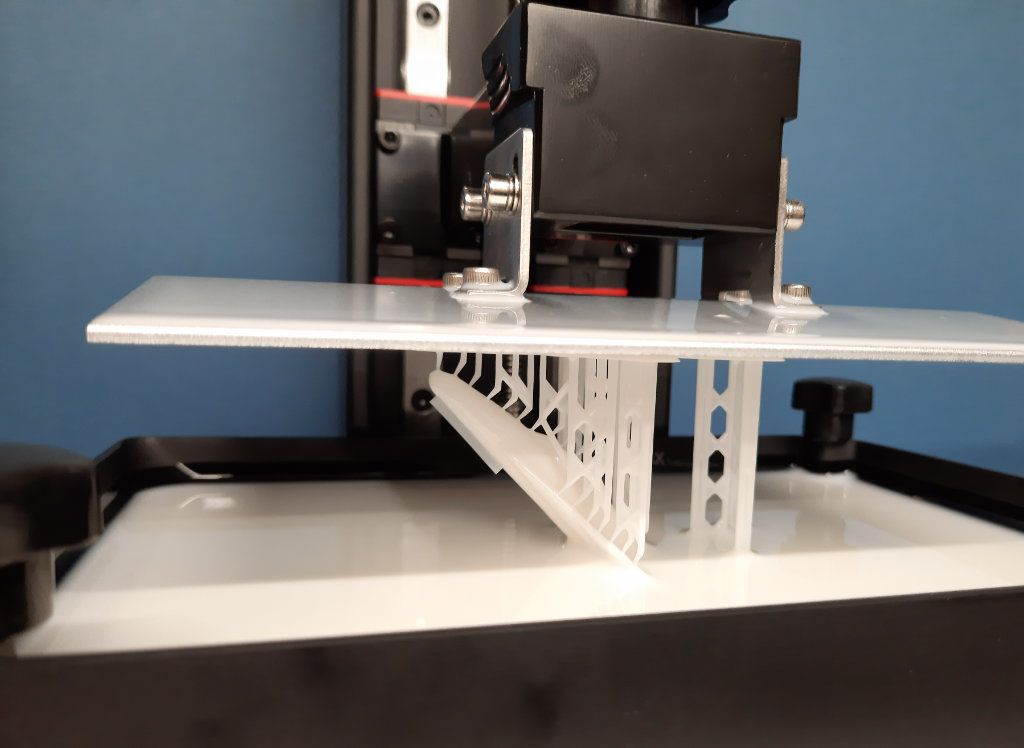
SLA can print much finer objects than FFD, the Halot One Plus has an X/Y precision of 0.04mm or 0.0016”, fixed by the resolution of the 4k LCD screen. The z-axis resolution can be selected from 0.01mm (less than half a thou) to 0.2mm. I decided to ignore the example objects supplied by Creality and print an object I designed some time ago that was too delicate to print well using my FFD printer. It is the first design I made in Alibre Atom, a small model of the 1945 Messerschmidt P1110/II jet fighter – a plane that never left the draughting office. I imported my STL file into ‘Halot Box’ software downloaded from Creality’s website (Windows and Mac versions are on the USB stick but I wanted the latest version). Halot Box proved very easy to use, being a visual system that will be familiar in style to anyone who uses Cura or similar software to prepare files for FFD printing. Having seen some advice, I set it at 45 degrees then used the default settings to add supports and slice the model. The default resolution is 0.05mm in the z-axis, roughly two thousandths of an inch. I saved my printing file onto the USB key.
.jpg)
Printing
I put the USB key into the slot next to the touch screen and selected ‘print’. The screen automatically displays all the files on the USB key (you can also print from your computer via a USB printer lead or Wi-Fi, or even from ‘Creality Cloud’. Unfortunately my Wi-Fi signal doesn’t reach the workshop). I select the P1110 and the printer then imported and verified the file. I could then select the local version of the file and choose whether to print with the settings I used in Halot Box or the printer’s standard settings (you can set these up through the printers menu interface to suit different types of resin, for example). I then selected start. The print was going to take a few hours, I left it to get on with things for a while. I came back occasionally to view progress and was able to pause the print and temporarily remove the hood to photograph the emerging model. Note that it’s important to make sure sunlight can’t fall on the vat with the hood removed. I kept a board between the printer and the window at all times. In the long term I will relocate it as far from the window as possible, but for the review I needed easy access to photograph it in action. Eventually, after a few hours the printing was complete.
I removed the print platform and used a sheet of cardboard to protect my bench from resin as I (quite easily) prised the print off the platform using the very sharp wooden-handled tool supplied with the printer,.
Washing and Curing
Creality had also supplied the UW-01 washing and curing machine, (about £110) <Buy UW-02 in Creality Store UK>. This looks like the printer’s little brother, except it has an orange hood. Again, a safety interlock requires the hood to be in place when the machine is operating. It has an external PSU, rather than a built in one, and has a control panel with touch buttons and a simple four-digit LED timer display. In washer mode a large polythene tank stands on the base, this has a magnetically driven impeller with a choice of three speeds. The tank is filled with isopropanol (500ml is enough for most models, but it will take a litre) and the model placed in a supplied basket (small models can be left attached to the platform). The hood is put in position and the machine run for two minutes for simple shapes or longer as required for bigger or complex objects. Once finished the model is drained and can be finally dried off with paper towels. The tank has a sturdy lid secured by four clips with an airtight seal so can be used to store the isopropanol. In time resin will build up in the bottom of the tank, the isopropanol can be decanted off for re-use and the resin left outdoors to set in the sun before safe disposal in household waste.
.jpg)
In curing mode, the tank is replaced by a circular mirrored platform on which the print is placed in front of the upright that houses two rows of UV LEDs (two different wavelengths). Once the hood is in place, the machine will rotate the object while bathing it in UV to complete the curing process.
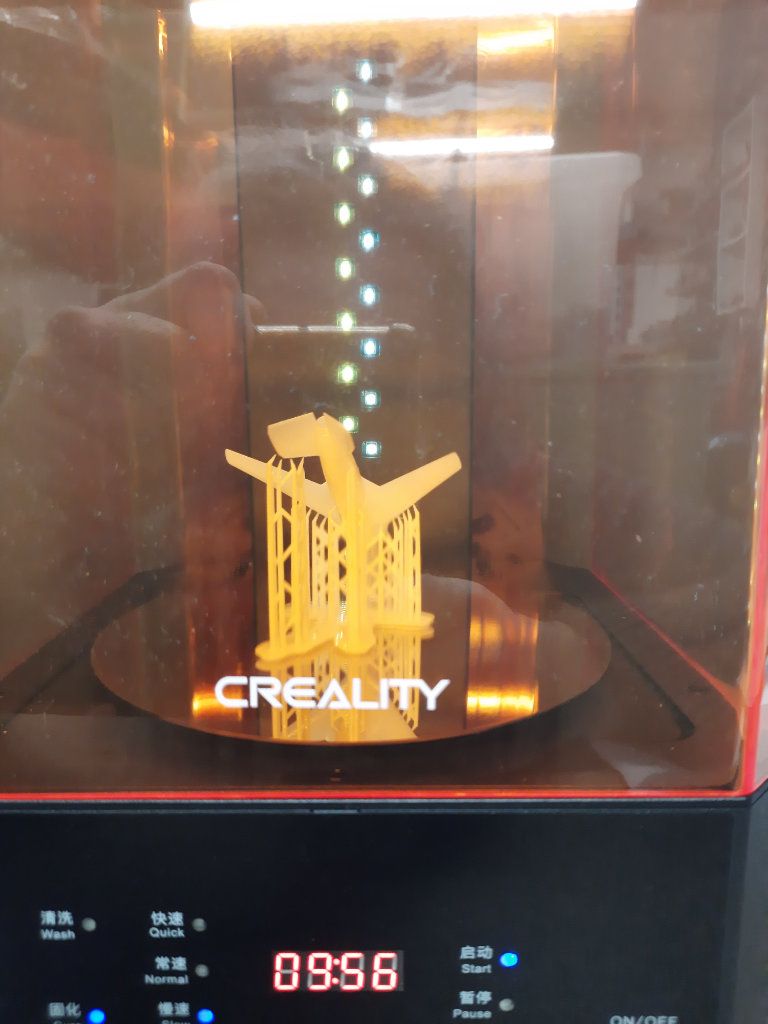
It’s important to be aware that this is a bit of a luxury item – you can wash objects in a simple isopropanol bath and curing them simply by leaving them outdoors. Even under an overcast sky there is enough UV to cure a print in a reasonable time. That said, the UW-01 does make everything very clean and simple. I have discovered one invaluable accessory that I fortunately had to hand already – a very large pair of forceps. These are ideal for handling prints before the resin is washed off, or for picking them out of the tank without having to lift out the basket.
Removing the Support
Once you have dried and cured the print can have any support removed (and you will discover that almost everything is best printed with support). Unlike with FFD support is usually in ‘tree’ form rather than a grid, also rather than stopping slightly away from the model to facilitate removal, it is fully bonded to the model. In practice the very small tip sizes used for support (typically 0.4 – 0.6mm) mean that the support is quite easy to remove, unless you choose to place it at a high density, or the object is rather complex. In these cases a sharp scalpel is the best approach. The ‘scars’ left by support are minimal – nothing like those left by FFD and easily sanded off or scraped flat with the edge of a blade.
A particular feature of the Halot One Plus is that it can print support structures down to a size of 0.1 – 0.3mm, Creality claim that even the tiniest and most delicate of prints can be supported without deformation.
The Finished Print
A good resin print will astound anyone used to 3D printing with a fused filament machine. The resin tends to smoothly transition between layers. The nominal 0.05mm/0.002” texture I have used by default leaves very faint striations, but the prints feel and look smooth. They are almost as crisp as injection moulded parts. Sometimes there are minor imperfections, I have had prints with a slight raised or sunken layer for no obvious reason, but even these marks are less obtrusive than the regular layer marks of an FFD print.
For my little model of the P1110/II, I was able to create undercarriage with legs about 1.5mm diameter and glue these in place with superglue – I now know I could have kept them integral with the print). The resin took acrylic paints beautifully.
.jpg)
Prints are dimensionally very accurate; Creality supply specialist resins for dentistry and one of their properties is very high dimensional stability. I tried printing an M6 cap head screw; an allen key neatly fitted and a standard M6 nut ran straight on to the thread. I am confident that smaller screws, such as M4 should be quite feasible.
I have already discovered some things that can go wrong. Large cross sections generate a lot of suction when pulled away from the base of the vat. They can break off, but fortunately the resulting lump in the vat can be easily released from the FEP using a built-in cleaning program that cures a layer of resin across the whole screen, this can be peeled away (wearing gloves) with any bits of failed model attached. If you have loose bits in the resin or just want to leave the machine empty, it can be filtered back into its bottle. Some mesh filter cones are supplied for this purpose and work very well. I have ordered a pack of these that should last me years. The emptied vat is cleaned with isopropanol.
Large objects are best printed hollow, to save on resin and weight and minimise the cross section of parts. Halot Box can do this with a simple function – just choose a thickness and click ‘hollow’, and it will do the job leaving a simple fill mesh of any desired density. Halot Box also has a ‘drill’ tool that you use to make air holes in the bottom of hollow object (which will be printed at the top) to stop them acting as ‘suction cups’. This approach is very effective at stopping parts from detaching.
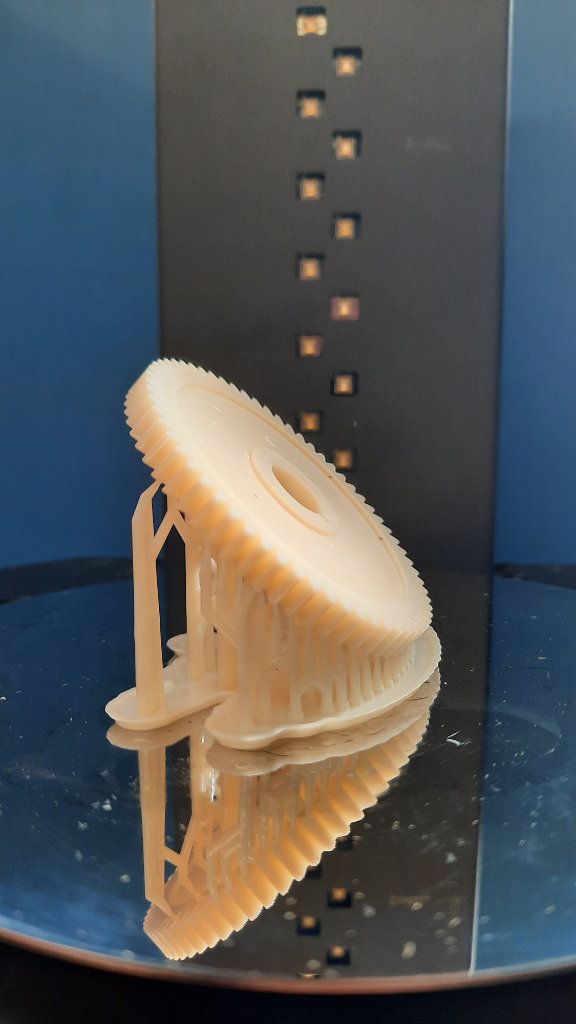
Another issue is that flat areas, particularly underneath objects, tend to curl up unless supported all around the edges. One simple cure is to angle the part, this can also help reduce cross-sectional area. Other approaches are to increase the support density or just manually add extra supports (this is very easy) around the edge of the part. With circular parts, I found that the default support placement can miss the very lower edge, very noticeable when I tried printing a mini-lathe changewheel. Manually adding a support to the tip of each tooth solved this.
For working parts, the chief drawback with standard resins is that they are hard and inflexible and therefore quite brittle under load, particularly after they have fully cured (which can take weeks). When I printed some parts directly on the build platform, the larger ones broke when subjected to the force required for removal. Using a raft and support avoids this problem, as the raft is thin enough to have some flexibility and can easily be sheared off the platform with the removal tool.
This means that parts made with these resins are best used as decorative items (e.g. model parts) or to prove designs, not as working parts such as gears or levers. Tests by others have shown that FFD printed PLA outperforms a standard resin when used for gears. Incidentally, I chipped a claw off of a decorative dragon, I found that ordinary ‘super glue’ was able to attach a bit of support material as a replacement ‘claw’ which I then blended in using plastic putty. For a test I deliberately broke a delicate part and found that superglue gave an excellent repair.
The good news is that, just as you can get many types of filament, there are almost as many types of resin – tough resins, transparent resins, flexible resins, ceramic resins, dental resins, high-burnout waxes for investment casting and even ‘PLA’ and ‘ABS-like’ resins that mimic these two popular FFD plastics. Resin prices vary widely according to the type, but standard resin is similarly priced to PLA per kilo and the tougher ones are not far from the price of PLA+ type filament. This means that the running costs should be similar to operating an FFD printer with quality filament.
While there are other consumables – isopropanol, filters and replacement FEP (for when it becomes worn and scratched), the mechanical simplicity means there is less to wear out than with an FFD printer; you don’t have to replace nozzles, heater cartridges or extruders. Even bed levelling is a ‘rare event’ as the platform can be removed and replaced without affecting the setting. The one issue is, of course, the nature of the resins. You do have to take more precautions than with filament printers (at least compared to PLA, ABS can produce unpleasant fumes). You also have to clean down the vat, particularly if it is to be left standing. Opinions on how long you can leave resin in the vat vary from a week to several weeks, I would err on the side of caution. Any spills must be cleaned up promptly using paper towels and isopropanol.
Overall Impressions
When I saw my first print emerging from the vat of resin, I was amazed at just how smooth it appeared and how crisply the sharp edges were formed. After having consumed about a litre-and a half of resin printing a wide range of objects, I’ve discovered that here are some challenges, but that these can be solved by careful use of the slicing software. It really is an eye-opening experience to be able to make objects that are so dimensionally accurate and have such a good surface finish. I was worried about the issues of odour and mess working with the resins, but in the end I found them no more difficult to use than many of the other materials I use in my workshop. The Halot One Plus was extremely easy to set up and use, as was the UW-)1 washing and curing machine. The build quality of both machines is excellent, and I found the software straightforward to understand.

The printer is comparable in speed to FFD, but as the horizontal resolution is higher than typical FFD printers the time per layer is much smaller for larger prints. As each layer is formed in one go, all layers take the same time regardless of print area. This means filling the build plate with multiple models can prove very time efficient.
Comparing the Creality SLA printer to my kit-built FFD printer, the latter has over twice the build plate area. In practice, I am confident that there is a place for both FFD and resin printing in my workshop. The FFD machine will be ideal for jigs and big parts, the SLA machine is better suited to precision work, especially making display models. I am also keen to achieve higher standards with my metal casting, and the Halot One Plus will be idea for making master patterns.
I have been inspired by the quality of the prints I have made on the Halot One Plus and plan to experiment with different approaches and resins. I am particularly keen to make some working parts, so I have ordered some tough PLA resin from Creality to experiment with. I will have a go at making working parts and report back on my experiences in a future issue of MEW, and also do some direct comparisons with my FFD printer.